Salvage Ceramic Tile

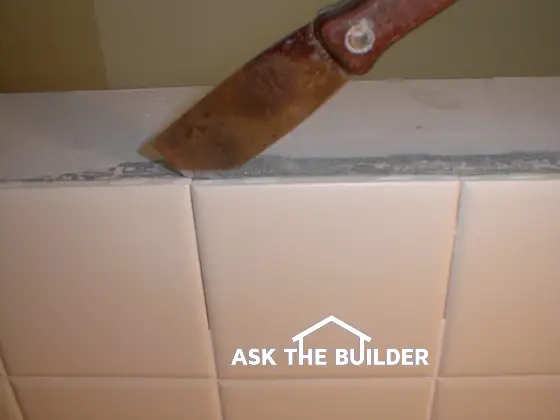
Remove the grout around the tile you are trying to save. Then tap a stiff putty knife at a low angle under the tile.
DEAR TIM: I need your help in a hurry. My mother is going to throw away a ceramic tile countertop. The top has four inch square tiles that are of great sentimental value to me. The tiles are glued to a piece of plywood . I tried to get one tile off but I cracked it. Is there a way to safely remove the tile or am I wasting my time? Ginger B., Sweetwater Oaks, FL
DEAR GINGER: Ouch! This is a job that requires a delicate touch, lots of patience and a large dose of luck. It is possible to remove ceramic tile from some surfaces, but in certain cases you can indeed waste vast amounts of time. The fact that the tile was glued directly to a wood substrate is a good sign. You must be living well!
Ceramic tile is a brittle material. In many respects it resembles concrete. Both have high compressive strength. This means you can squeeze or compress them and they will often will not break. But tile and concrete have low tensile strength, often as little as ten percent of their compressive strength. Bending or twisting a material subjects it to tension. You cracked the first tile because as you were prying it up from the wood, you bent it a little too much.
The first thing that needs to be done to even have the slightest chance of success is to remove the grout between each tile. The grout connects all of the tiles into one large sheet. If you stress one tile with the grout in place, you transfer this stress to adjacent tiles. Once the grout is removed, you can work on each tile independently without fear.
Grout removal can be done by hand with an old flathead screwdriver or with any number of rotary electrical tools. No matter which way you decide to go, you need to proceed slowly. If you select a screwdriver, use a hammer to gently tap the screwdriver into the grout. Once you have created a small void, orient the screwdriver so you are chipping grout towards this void. Take small 1/8 inch bites with the screwdriver. Watch the edges of the tile as they are very susceptible to chipping and scratching.
You have to be cautious with the rotary power tools. The rapidly spinning bit can get out of control and gouge a tile or produce a scratch across the surface. If possible, practice using this tool on some other grouted tile. Once you feel comfortable, proceed to the tiles you wish to save.
Restore the "clean" to your grout. Just go to STAIN SOLVER to see the beautiful, quick results.
With the grout out of the way, you need to remove any wood or ceramic trim that might be hiding the edges of the tile. This is a critical step because you must be able to slide a thin putty knife under a full tile at a flat or very low angle to pop it loose from the wood substrate. If the tile is held in place with an organic mastic, you should have a relatively easy time of popping the tiles from the wood. If cement based thinset was used, expect to spend more time.
Use a hammer to gently tap the handle of the thin putty knife. Orient the knife at an angle so that one corner of the knife starts to slide between the tile and the wood. Start at one corner and move along the entire edge of the tile. Do not try to drive the knife under the tile at just one spot. Keep the knife flat if possible. As you increase the angle you increase the bending forces on the tile.
Continue to tap the knife deeper and deeper under the tile. Once you are halfway, you may be able to apply gentle but firm upward pressure and the tile should pop off the wood. Take your time and go slowly. If the tile has not yet cracked, you will eventually be able to get it off.
Once the tiles are removed you can use semi-paste adhesive removers to soften and eliminate the dried organic mastic. If the adhesive was thinset, you will need to carefully grind this material off. The backs of the tile must be smooth so that they lay flat when you reinstall them.
Column 355