A Saw Horse Substitute – Tim’s Carpenter’s Bench
Years ago, a carpenter buddy of mine, Chuck Sallee, made some dandy carpenter's benches at a job we were working on. I liked them so much, I ended up making countless numbers for myself and friends. I even made a set on TV one day! You will love these strong benches.
Carpenter's Bench
DEAR TIM: I have never liked working with saw horses. I'm looking for a simple work platform or bench that I can use for various purposes around the house. My guess is that you were also frustrated with saw horses. What did you use in the on your jobs? Is it easy to find one in a store? If not, how do you build one? Melinda B., Cardwell, MT
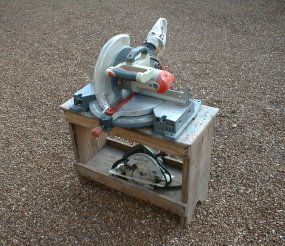
DEAR MELINDA: Saw horses are okay for certain tasks but I only use them as a last resort. My weapon of choice around the jobsite is a wonderful multi-purpose carpenter's bench that I make from scrap lumber. The environmentally friendly benches are usually made by lunch of the first day. I use the scrap lumber that is generated during the construction of the wooden sub-floor or wall assemblies. The benches are far stronger than traditional saw horses and they also serve as a tool caddy, emergency stepladder, and a great place to sit down and eat lunch.

|

|
You will not find my bench in a store, however you can build one in less than a half hour using some simple tools and minimal lumber. If your friends, neighbors and relatives are like my past customers, I guarantee you that you will be building quite a few of these great tools. I commonly left my benches behind for my customers as a gift. Trust me, your friends and neighbors are going to borrow your bench for extended periods of time and "forget" to return it.
To start this project you are going to need a circular saw, a drill with a one half inch spade bit, a jig saw, a level, a framing square, tape measure, pencil, a screw driver, and some 2.5 inch long galvanized coarse threaded screws. If you want a fancy bench you will need a router as well. Your lumber requirements are simple. All you need is a four foot length of 2 x 12 and a four foot by three foot piece of scrap 3/4 inch plywood or oriented strand board (OSB).
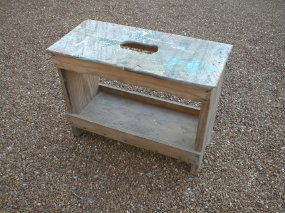
The completed bench measures 14 and 3/4 inches wide at the top, 32 inches long and it is 24 inches high. I always like to cut all of my lumber before I start to assemble the bench. The legs of the bench are made from two pieces of 2 x 12 that measure 11 and 1/4 inches wide and are 23 and 1/4 inches long. A V notch is cut in the bottom of each leg so that just a 2 inch long portion of the 2 x 12 contacts the ground at each corner.
All of the other bench parts are made with the plywood or OSB board. Six pieces need to be cut in order to begin assembly. If you are using plywood, be sure that all pieces are laid out so that the longest dimension is parallel with the grain of the wood. OSB layout is not as critical. The top measures 14 and 3/4 inches wide by 32 inches long. Cut out the top and bottom stabilizer braces next. The braces measure 3 inches wide by 30 inches long. The last piece to be cut is the bench's bottom shelf. It measures 11 and 1/4 inches wide by 27 inches long.

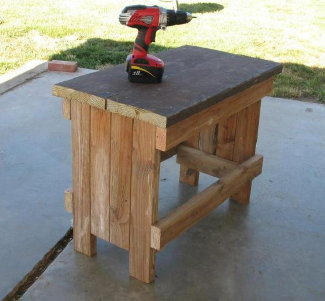
This is an adaptation of my workbench. It was built by Mike Radcow. As you can see, Mike used all 2x material to enhance the strength. But you also need to be strong to lift his model. It is a beautiful modification to my simplistic bench. Good job Mike!! PHOTO BY: Mike Radcow
The bench assembly begins by attaching the top braces to the top outside 1 and one half inch wide corner of the 2 x 12's. Once attached, the top of each brace should be flush with the top of each leg. Use two screws at each connection point. The bottom braces are attached in the same manner. However, the bottom of the lower braces should be held up 4 inches from the bottom of the legs. The shelf can now be installed. If you cut your lumber correctly, it will fit snugly in between the legs and the bottom braces. The underside of the shelf should be flush with the bottom edge of the lower braces. Install 3 screws through each brace to secure the shelf. The braces act as shelf sides and form a convenient storage area within the bench. You will find this to be a perfect place to store nails, shims, paint brushes or other items for different tasks.
The final piece to be attached is the top. Once again, if all cuts are accurate you will find that the top overhangs the legs and top braces one inch on all sides. Attach the top by driving at least 3 screws into each leg and 2 screws into each top brace. Use the drill and jig saw to cut out a 2 inch by 4 inch rectangle in the center of the top. This cutout acts as a hand hold that allows you to easily lift and transport the bench using one hand. Equip the router with a profiled bit to give the top's outside edge and the interior edge of the hand hold a finished touch.
If you decide to stand on the finished workbench for any reason, be aware that it is unstable. If you shift your weight or change your center of gravity, the bench can tip without any warning (the voice of experience screaming!). You can fall and seriously injure yourself. Only use the workbench as a step stool as an absolute last choice. It is worth the trip to the garage or truck to get a stable step ladder.
Related Articles: Work & Storage Bench Assembly, Carpenter Workbench with Tool Storage
One Response to A Saw Horse Substitute – Tim’s Carpenter’s Bench