Backsplash Tile
DEAR TIM: I want to spice up my bathroom with backsplash tile. I’ve seen a kitchen tile backsplash and loved it. Are backsplash tiles different from other tiles? Can you help me with any backsplash tile ideas as well as do’s and don’ts? I’m especially interested in subway backsplash tile. Mara V., Brookville, IN
DEAR MARA: Two years ago, I installed for my wife a very unique backsplash tile that was part of our major kitchen renovation. The tile consisted of a decorative band of tile that rested on the granite countertops. Above this band of tile, larger tiles that simulated basket weaving filled the gap up to the wall cabinets. Visitors to our kitchen always remark how interesting the backsplash is. I have to admit myself that it’s stunning.

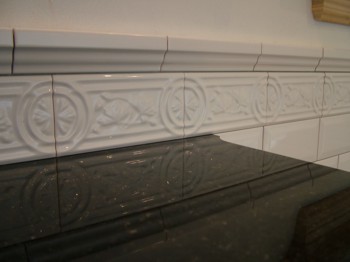
This two-part decorative backsplash tile just needs grout before it makes its debut. PHOTO CREDIT: Tim Carter
The tile for a backsplash is not much different than regular ceramic tile. What’s important, in my opinion, is that it have a durable glaze, especially in areas where it will get wet and soiled. You don’t want to stain the tile with personal hygiene chemicals that might get splashed onto the tile as you use your bathroom. Accidents happen, but a good glazing can prevent permanent damage.
Backsplash tile designs are as abundant as stars in the night sky. All you have to do is go to a specialty tile store to get a feel for the hundreds, if not thousands, of tiles you might use for a backsplash. Your choices can range from standard tile with a regular bullnose finishing tile to custom-made tiles that have your own ideas and colors as part of the tile. In between these two extremes are endless possibilities of tiles that will make your bathroom stand out from the crowd.
It’s interesting that you mentioned subway tile. My wife just selected a subway tile that has beveled edges to use as a wainscot tile in our master bathroom. The tile we used had accessory tiles that we used as a backsplash. It’s a two-part backsplash tile with the bottom tile measuring 3 inches by 6 inches. This tile has a repeating pattern of concentric circles and leaves.
On top of this decorative tile, we placed a tile that mimics crown molding. This tile is only 1 and 1/4 inches high, but it’s 6 inches long. It has a finished top edge that sticks out from the wall nearly three-quarters of an inch. It’s extremely distinctive and makes it look as if the tile were installed in the early 1900’s.
There are countless tips I can offer with respect to installing this tile, but I’m horribly limited on space. Suffice it to say that the wall surface needs to be clean, free of defects and very smooth or flat. The tile you select will determine the mastic you use to attach the tile to the wall. I had to use organic mastic for the decorative tile, but cement thinset to permanently bond the crown-molding tile to the wall.
Be sure to think about how the tile will end. Most tiles do not have glazed edges. The tile manufacturers almost always make special accessory tiles that allow you to terminate the tile so you don’t see an unfinished edge. Be sure you talk about this with the salesperson at the tile store. I always suggest taking in some rough drawings of what you want to do as well as photographs of your current room that will show the tile salesperson the challenges you face. The last thing you want is to discover you can’t get the exact look you have constructed in your mind.
Be aware that to get a great bond, you can’t leave an organic mastic open to the air for a very long time. This is especially true in hot, dry climates. If the mastic starts to develop a skin, the tile will not bond well. You may discover it’s best to apply the mastic to each tile separately rather than spread the mastic on the wall. If you spread the mastic on the wall, keep in mind it works best if you cover it with the tile within ten minutes.
Cement-based thinset works the same way. Once mixed with water, you only have so many minutes to use it. I would only mix as much thinset as you can use and cover with tile in one hour or less.
Be sure to wait one day before you grout the tile. This wait time allows the mastic or thinset to harden. Some backsplash tile require you to create the spacing between tile. You can purchase plastic spacers that create equal gaps, but coins can do the same thing. On my recent backsplash tile job, I used dimes to create the perfect grout line between the crown-molding tile and the decorative band of tile below it.
When setting tile, the mastic or thinset might ooze in between the tiles in case you put too much adhesive on the wall. If this happens, it’s imperative you remove this adhesive from the joint immediately. If you don’t get the adhesive out of the joint, the grout will not be able to penetrate between the tiles.
I use any number of tools to remove excess adhesive from between tiles: a razor blade, toothpicks, or a thin screwdriver. When using metal, work slowly so you don’t mark the tile. Use a damp sponge to remove mastic or thinset residue from the face of the tile.
Column 791