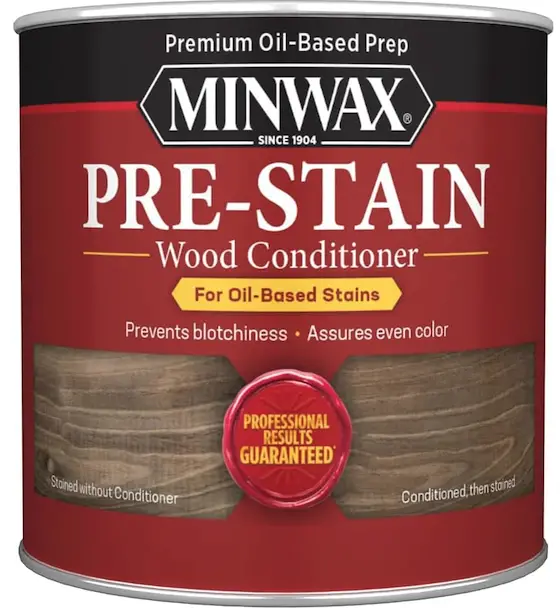
Wood Conditioner Before Stain
Without proper preparation, a dark stain like this can turn out horrible. There are many factors in play that produce pro results. Copyright 2025 Tim Carter
Wood Conditioner Before Stain - It's What Pros Use
How many times have you used a stain to change the appearance of a piece of bare wood that’s inside your home? Did the job turn out like the finish you see on high-end stained cabinets or other furniture? My guess is you weren’t even close. I had the same poor results for at least ten years until I discovered all one needs to know to ensure stained interior woodwork has a professional appearance.
It’s very important to realize that all wood is not the same. The cellular structure of the wood controls, to a very large degree, how easy or hard it is to achieve stunning results when you apply a colored penetrating stain.
Trees are Like Bundles of Cocktail Straws
A live growing tree in the forest is really nothing more than millions of tiny vertical straws bundled together. Imagine taking very tiny cocktail-drink straws and putting a rubber band around them. These tiny tubes are how the sap moves up and down through the tree. Each spring the tree creates thousand of new tubes as the next light-colored spring wood growth band is created. The quantity and inner diameter of the tubes varies with the wood species.
The light-colored wood between the dark stripes of summer wood grain is the spring wood. The tubes in this spring wood soak up stain more readily than the darker denser summer wood grain.
Soft woods like clear white pine soak up stain like a sponge. You can end up with a huge mess of blotchy stained wood in seconds if you don’t know what to do and take all the steps necessary to prevent disaster.
Sand the Wood Until it Resembles Glass
Professionals go to great lengths to sand the bare wood until it resembles glass. You want the wood as smooth as possible before applying stain. This sanding is also a requirement for the final clear finish to be smooth.
You often need to sand in stages using sanding grit that gets smaller and smaller in size. To add even more complexity, not all sandpaper is the same. Aluminum oxide paper self-sharpens as you use it. Red garnet sandpaper gets dull as you slide it back and forth along the wood grain. This may be desirable should you want a silky burnished texture to your wood.
Do you know about wood conditioners? It took me years to discover this wood-staining magic trick. A wood conditioner is a clear liquid you apply to the bare wood just before you apply the stain. The conditioner chokes off the tubes in the wood, preventing too much stain from soaking into the wood.
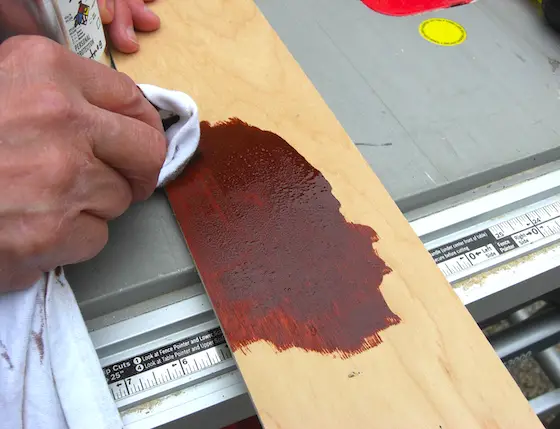
Years ago I did a short video for a local TV station showing the dramatic results using a wood conditioner. I used a piece of clear white pine that is a common wood for interior window and door trim.
I sanded the wood and then applied the wood conditioner to just half the length. I allowed it to dry as suggested on the label. I brushed on the dark stain and it looked the same on the entire length of trim. But the moment I took an old towel and wiped off the excess dark liquid stain, the difference was like night and day.
The part where I used the wood conditioner was gorgeous. You could see all of the wood grain. The part that had no conditioner was blotchy, dark, and looked horrible.
You can unknowingly cause a problem that might not appear for several years. The clear finish you apply can change color when subjected to light and lots of ultraviolet light. Oil-based urethanes and varnishes have a tendency to transform to an amber shade over time.
Water-based urethanes often stay crystal clear forever. Do your research and make sure your stained woodwork stays the color you desire for many years.
You can also ruin your stained woodwork by not using the best wood filler to hide the holes created by the nails. I prefer to stain the wood trim and coat it with the clear finish before installing it. I then use a color putty that matches the color of the stained wood. You can blend different shades of the putty to get an exact match.
I often apply the wood putty using a very small dental tool. I make sure the putty is compacted in the hole and flush with the top of the wood. I finish off the job using an artist brush to apply a dot of clear finish to the putty.
Column 1606