Building a Loft Bed
Constructing a loft bed for your son or daughter is a pretty neat project. It requires just a few simple tools, and not a lot of time. The biggest thing you need to know is the size of the room, the height of the ceiling and the size of the mattress!
The One Inch Rule
The biggest mistake you can make is to try to make the bed too tight. This means making the tolerances too close. For example, if the ceiling height in the room is exactly 8 feet, then make the 4x4 posts only 95 inches long. Make the loft platform 1 inch larger on all sides and ends so that the mattress has a little wiggle room.
Different Variations
The loft bed I described in another column is just one of many possibilities. If you want to gain some headroom beneath the loft area you can recess the mattress within the 2x6 frame. This means that you need to redesign the loft frame slightly.

All you do is make the inside dimensions of the frame larger. The size of the plywood cutout remains the same in both situations. In the deluxe recessed version, the plywood drops down inside of the frame. It is held in place by 2x2 ledger strips that are screwed to the bottom inside of the frame along the two long sides. I would space the screws at 9 inch centers as there is the possibility of a significant weight load on the loft. The plywood cutout is then dropped down onto these ledger strips. There is no need to screw the plywood to the strips as gravity and the mattress hold it in place.
This recessed frame set-up will allow you to slide the entire frame up on the 4x4 posts about 3 more inches until you reach the minimum ceiling height clearance as stated by the university.
The Ladder
The hardest thing to build is the ladder that gets you up into the loft. It requires moderate skills. You can't make the ladder until you build the loft. The reason for this lies in the fact that you must know the height of the top of the loft frame before you can cut the two side stringers of the ladder.
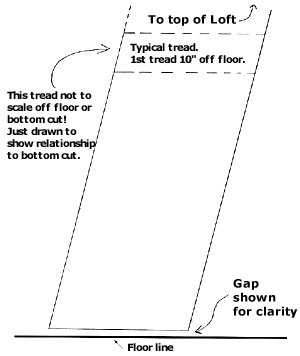
The ladder requires angle cuts. I have created some basic images that might help you to understand what is necessary to make the ladder fit correctly against the loft bed frame and the floor. In this image you see how the top of the ladder must look when it fits against the loft bed frame.
I recommend that you make a similar template from a piece of cardboard and make a stiff cutout that you can tape to the side of the loft frame. This allows you to take a standard steel tape measure and hold it along the outer edge of the cutout and project a line down to the floor. It helps if you have an assistant do this with you. When the end of the tape measure touches the floor, you can get a length reading at the top point of your cutout. This tells you the length of each ladder stringer.

Use this measurement and a template of this image to make a full scale cardboard cutout model of a ladder stringer. Use a razor knife to carefully cut the angles and take it over to the bed. See if it fits. If you took accurate measurements, you should have an excellent fit.
The Treads
The ladder treads only need to be 12 to 14 inches long. You use the same 1 inch thick by 3.5 inches wide lumber that you used for the ladder stringers.
The treads need to be level once the ladder is built. You achieve this by making the tread notches parallel with the bottom cut angle of the ladder stringers. If your cardboard cutout of the stringers fit against the floor well and the side of the loft frame, you can see that a line parallel with the bottom of the ladder legs would also be level.
For a really strong ladder, you need to make 1/4 inch deep notches in the sides of the ladder stringers that the treads fit into. You can do this with a circular saw that has the blade set to cut only 1/4 inch deep. Make multiple passes along the area that needs to be notched. Place the treads so that the top of each one is about 10 to 12 inches above the one below. Use two screws through each stringer to attach the treads to the stringers. Sand any sharp edges on the stringers.
Column B280