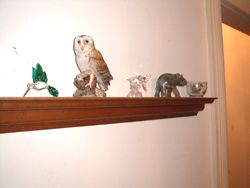
Decorative Wall Shelf in One Hour
DEAR TIM: I have all sorts of interesting knickknacks that I have on standard bookshelves and cases. But I would like to display them on the walls in many rooms of my home. Can you think of a way to make a simple yet elegant shelf that I can use for this purpose? Please keep in mind that some of the shelves need a curb that would stop plates from sliding forward. Oh yes, I am on a tight budget too! Denise H., Kettering, OH
DEAR DENISE: My father in law has a saying that I believe is fitting for this occasion. When the discussion turns to someone who appears to be lucky or successful he often says, "That person happened to be at the bus stop when the bus came by." Well, hop on board and take your seat. I'm driving you to the lumberyard to get some decorative crown molding and a small piece of 1x4 lumber to solve this problem.

You can't see the cool french cleat that holds this shelf to the wall.
Your problem is multi-faceted. We need to create a ledge approximately two or three inches wide, the face of it needs to be appealing and it needs to have a sturdy and hidden mounting system. Have no fear, I can overcome all of these challenges.
Crown molding works well for this project because it fulfills our first two requirements. The top of most standard crown moldings ends up about two or three inches from the face of a wall when it is installed. The resulting gap is never seen in most instances because the crown molding is tucked tightly against the ceiling in a room. The milled profile of the crown molding creates the decorative relief that will compliment your assortment of knickknacks. If you have different sized knickknacks, you can purchase different sized crown moldings so that the shelf will be in proportion to the articles on display.
Simply cutting a piece of crown molding to length will not work. Each end of the molding needs to be mitered as if it was wrapping around an outside corner in a room. The tiny pieces of crown molding that make the turn and touch the wall at each end are simple triangular pieces of crown molding cut at a 45 degree angle.
To create the necessary flat platform that extends from the top of the crown molding to the wall, you will use the 1x4 lumber. This is actually the most demanding part of the project since the lumber needs to be ripped to a precise width and length and the three edges that contact the back of the crown molding need to be cut at an angle to match the sloped faces of the top rear of the crown molding. Once the shelf is cut and in position, drive small brad nails through the top face of the crown molding into the angled faces of the wood platform.
If you have a table saw or have access to one, you can accomplish this task in a few minutes. The crown molding I prefer to use happens to tilt away from the wall at a 45 degree angle so my cuts on the platform are simple 45 degree matching angles. The angle on the scrap 1x4 doesn't have to be perfect, it simply needs to be enough so that the top of the board is flush with the top of the crown molding. To create the curb for the plate shelves simply cut the shelf a little short in both width and length. As you drop the shelf into position behind the crown molding, the back of the crown molding ends up higher than the shelf.

Click here to watch a video on cutting and working with crown molding.
I hang my crown molding shelves using some extra 1x4 lumber. I cut a piece that is 3/4 inch thick by 3/4 inch high and is about five inches less in length than the overall width of the shelf. I attach the piece of lumber to the wall using screws that penetrate into wall studs. I drop the crown mold shelf assembly onto the wood cleat and then drive small screws through the top of the platform into the 3/4 by 3/4 inch cleat. If you have the proper tools and supplies on hand, you can make one of these shelves in less than an hour.
If you REALLY want to discover how to install Crown Molding, you need my Crown Molding eBook .
Column 399