How to Clean Shower Grout

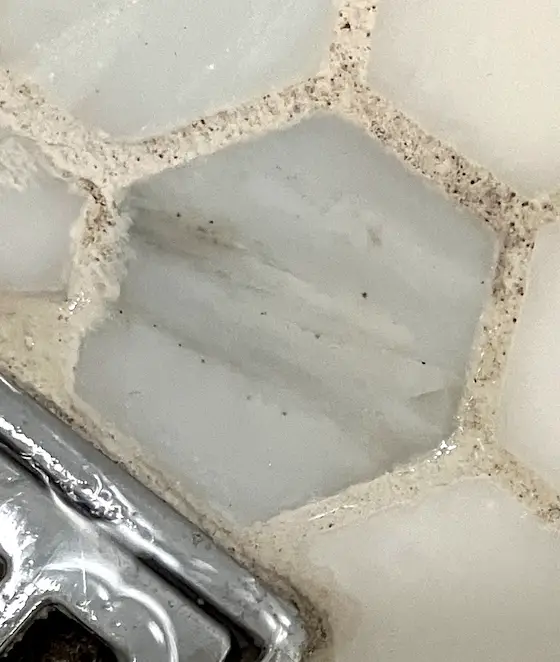
Look below at a second photo where I've zoomed in on this one. You’ll see flecks of dirt left behind by an inexperienced cleaning person. Copyright 2022 Tim Carter
How to Clean Shower Grout - And Mop Floors Too!
Sarah reached out to me a few days ago. She was more frustrated than I get when I miss a 2-foot putt at the golf course. Six months before she had a new master shower installed with a marble-tile floor. The pieces of marble are small 1-inch hexagons.
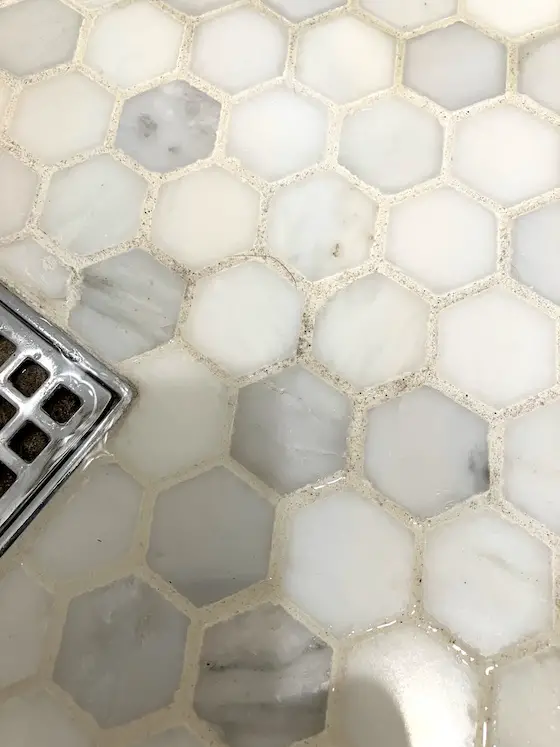
Sarah’s finding impossible to keep the grout clean. Fortunately she uploaded a high-resolution photo of the tile floor via my Ask Tim page on my www.AsktheBuilder.com website. That photo allowed me to zero in on what I believe is the source of the problem.

See those black flecks? They're even on the smooth surface of the marble. That's a clue that they should be very easy to remove using the correct cleaning TOOL.
Sarah’s conundrum reminded me of another woman I had a contentious back-and-forth email exchange perhaps ten years ago. That memory caused me to think long and hard about how I’d respond to Sarah. You see, all those years ago the other woman claimed I had ruined her tile floor.
How to Offend a Woman in Seconds
I had sold this woman a bottle of the most powerful oxygen-bleach cleaner you could get. My wife and I used to own a company that manufactured the highest-strength oxygen bleach cleaner available in the USA. The two ingredients were made in the USA and it was certified organic. Most of the oxygen bleach products I see online are made with inferior Chinese chemicals and there's quite likely more filler in the bottle than active ingredient!
She was using it to clean her wood deck. For whatever reason she took her shoes off while cleaning the deck and got her socks saturated with the cleaning solution. This woman then walked back in her home with her wet feet across her tile floor.
This cleaning solution was so powerful that it often cleaned without you having to scrub. It happened on the woman’s kitchen floor. When the solution dried, you could clearly see her footprints. She insisted my solution had etched and ruined her tiles. She didn’t take too kindly to my retort that she was a poor housekeeper and that while she thought her kitchen floor was clean, it was far from it.
Fortunately she had a pantry closet with the same tile floor. I shared with her that if she would go into the corners of the pantry where no one ever walked, she’d see the original color of the tile. I never heard back from her.
Many People Don't Know How to Clean
Based on the photo that Sarah sent, it appears she, or the person responsible for cleaning the shower, doesn’t know how to clean. You tell me how I’m supposed to communicate that to her. Most women I know would react with flared nostrils. But I digress.
When I looked at Sarah’s photo, I could clearly see small flecks of dirt that were clinging to the grout. Sarah asked me in her email if the wrong grout had been used. The answer was absolutely not. It appears to me tile setter used a sanded grout. Once I zoomed into the photo, I could clearly see what appears to be tiny grains of milky silica sand. The silica sand makes the grout strong and very durable.
What often happens is the tile setter strikes the grout joints with the grout sponge and removes a bit too much grout. The top surface of the grout is now below the top surface of the tiles.
You Must Use the Correct Tools
Cleaning, like many other tasks, requires that you use the correct tool for the job. In Sarah’s case the cleaning person may be using the worst possible tool. For example, a sponge or scouring pad of some sort might have been used for the past six months. These don’t have the ability, in many cases, to apply enough mechanical agitation to the grout to get small pieces of dirt and grit out of the grout.
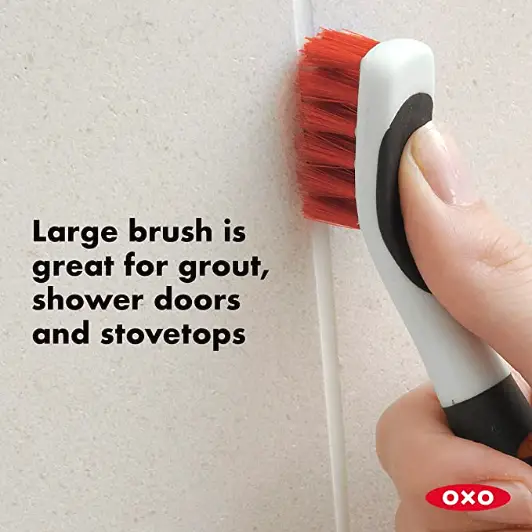
The best tool to clean grout is a stiff scrub brush that’s equipped with nylon bristles. These bristles need to be stiff enough that they don’t flop around like a toothbrush. They need to have just a small amount of flex to them as you move the brush across the grout.

This is a perfect nylon brush that will allow you to have the bristles contact the grout. GO HERE to order one now.
What’s more, the cleaning strokes have to be parallel to the grout lines to be effective. If you slide the brush across the grout lines at a 90-degree angle, the bristles might not get down to the surface of the grout with enough pressure to effectively clean.
The type of tile Sarah chose is the hardest one to clean. Each small 1-inch piece of tile has six sides each oriented at 60 degrees to one another! Imagine trying to orient the scrub brush to have the strokes be parallel with all of the grout joints.
You may have been taught to use circular scrubbing motion to clean floors. That works well when the floor surface is all in the same plane and smooth. Recessed grout lines are the bane of most professional cleaning people.
Another cleaning tip for showers is to be sure to use a squeegee to wipe down the walls and the floor after you shower. The goal is to remove as much water as possible from the surfaces. Water is part of the recipe for mildew and mold growth. It’s best to actually use a second older towel to wipe down the shower surfaces drying them as you dried your skin. Keep the shower door open or the shower curtain pulled back after you leave the bathroom. You want the shower to dry as rapidly as possible.
How To Mop a Floor
I was taught how to mop a floor when I was fourteen years old. It's not hard to do, but many people do it wrong. Here's how to get amazing results.
Step 1. Sweep the floor to get up all loose debris and grit.
Step 2. Get a traditional string mop that doesn't have a bound bottom like you see some janitors use.
Step 3. Fill the mop bucket with clean soapy water. Get the mop saturated with the water. Squeeze out excess water.
Step 4. Spin the mop like an amusement park ride as you put it on the floor. The strings of the mop should be radiating out from the center of the mop handle.
Step 5. Use sideways back and forth motion about four-feet wide pulling the mop closer to you.
Step 6. Put the mop back into the bucket, swish it around and repeat steps 3 through 5.
Step 7. Change the water frequently as soon as it appears murky and filthy.
Step 8. Rinse the floor with clear water and change this water out too as it gets filthy. Trust me, it will because while the floor SEEMS CLEAN, it's not.
Column 1483