Washing Machine Water Valve Stuck

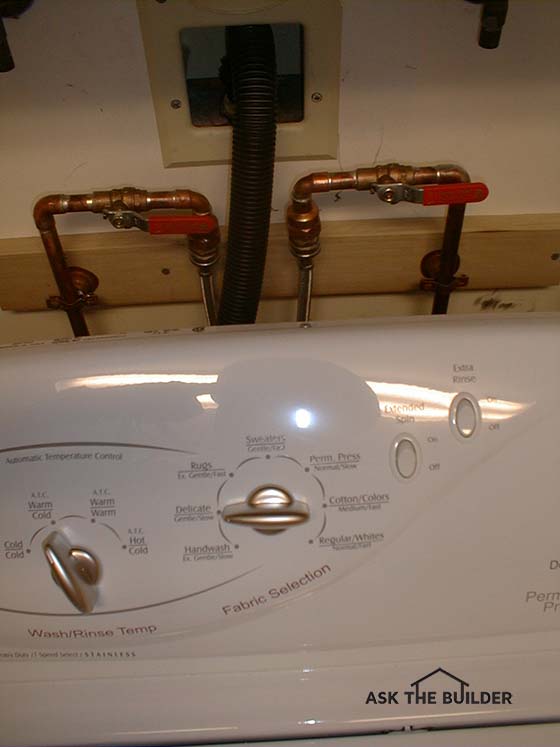
Here are two ball valves that control the hot and cold water into my washing machine. I have them up above the machine in view so it's easy to operate. I also exercise them once a month so they don't get stuck. Copyright 2017 Tim Carter CLICK THE IMAGE NOW TO ORDER BALL VALVES.
Washing Machine Water Valve TIPS
- Locate main water shut-off valve
- Install ball valves
- WATCH soldering videos below
- Keep valves visible
- CLICK HERE to Get Tim's FREE & FUNNY Newsletter!
DEAR TIM: One of my washing machine water valves is stuck and I can't turn it. The other water inlet valve that supplies cold water to our washing machine drips slowly and water accumulates on the round handle.
I see a hex nut at the base of the stem that connects the handle to the valve body. What happens if I turn that nut?
Will I be forced to replace the valve? If so, what is the best type of valve to buy and why? How do you solder the new valve? Greg H., Atlanta, GA
DEAR GREG: Let's stop the leaking valve first then deal with the stuck valve.
Turn The Nut
If you turn the nut counterclockwise looking down on top of the valve, the leak will get drastically worse. If you turn it clockwise, perhaps one-eighth of a full revolution, there is a good chance the leak will stop.
See far below some additional tips from Connie on dealing with old packing nuts.
CLICK HERE to get FREE & FAST BIDS from local plumbers who do repair work.
Packing Nuts Old Technology
The nut in question is called a packing nut. It's the component of an old, and old-technology, valve that serves to keep water from squirting into the room. The actual stem that connects the handle to the valve is surrounded by a packing material.
This material must be compressed around the stem and the inside of the valve to keep pressurized water from leaking out of the valve body past the stem. The nut you see provides this compression when it is tightened.
Packing Dries Out
The packing material can dry out over the years and lose it's leak-stopping super powers.
IMPORTANT TIP: The packing around a valve stem can wear out. You may stop the leak as soon as you tighten the nut, but the next time you open and close the valve be sure to inspect it every hour or so.
It's possible for the valve to leak again and again. At some point you will reach the limit of tightening the packing nut and water will drip no matter how tight you have turned it. This happens when the packing material has reached the end of its useful life.
Stuck Valves
I got my master plumber certification before I was thirty years old. I've always loved plumbing.
Before you even attempt to open that stuck valve, go and locate your main water shut-off valve. Be sure that valve works. In fact, turn off all the water to your home before you try to wrestle with the stuck valve.
Many a homeowner has caused a massive gushing mess by breaking a valve or pipe where it connects to the valve by applying too much pressure to unstick it.
Don't be that person filing an insurance claim.
Use A Wrench
Get a pipe wrench and attach it to the valve handle. If the valve is inside on of the tiny recessed washing machine boxes, you're pretty much toast. You'll never get a wrench into that spot to be able to do any good.
You can try any tool you can think of to turn the valve. I'll wager you'll have less than a 25% chance of success.
And even if you do get it unstuck, there's a chance the calcification inside the valve parts will not work to completely shut off the water.
If the valve is really old, you'll end up snapping the valve stem.
Cheap Stem Valves
Based upon your description of the existing valve, it sounds like you have a fairly common shut off valve. These valves are very inexpensive and fraught with maintenance headaches as you now know.
Often when you want the valve to stop the flow of water, it will not do so as the rubber or plastic washer hidden within the valve has worn out. The valve seat inside the valve can also become encrusted with sediment.
Ball Valves Are Best
If you want a shut off valve that is virtually maintenance free, you should seriously consider replacing your existing valve with a ball valve. These shut off valves are constructed differently than the valve you have.
The inside of a ball valve is just that - a stainless steel ball that has a hole bored through the middle of the metal sphere. A shaft is welded to this ball that connects to a flat handle.
When you rotate the handle just 90 degrees, the valve turns completely on or off. If you rotate the handle anywhere in between, you get partial or controlled water flow.
Hard Plastic Seat
Ball valves have a wonderful hard plastic seat that surrounds the entire ball. It's not much different than the hip joint in our own bodies.
The fit between the ball and the plastic seat is so precise that each time you move the handle, the valve cleans itself of any and all deposits.
CLICK HERE to get FREE & FAST BIDS from local plumbers who do repair work.
Full Flow
Another advantage of ball valves is full water flow. The diameter of the hole in the ball is often identical to the size of the water line that feeds the valve. This full-bore opening provides for unrestricted water flow through the valve. The valve you have now does not offer this advantage.
New Nylon Packing
Ball valves also have a small packing nut that sometimes requires adjustment. But once tightened, they rarely leak again.
The packing is a synthetic hard plastic or nylon. They can last for decades with no leaks.
Low Cost
The ball valves also cost just one or two dollars more than a conventional shut off valve, so in my opinion they are worth every penny. In fact, I would gladly pay even more money for the years of leak and trouble-free performance they deliver.
My washing machine is served with ball valves that give me enormous peace of mind.
Exercise the Valves
To prevent valves from getting stuck, you need to exercise them. This means you need to operate the valve. It's a good idea to do this twice a year. With modern technology, there's all sorts of ways you can set reminder to do this.
Burst-Proof Hoses
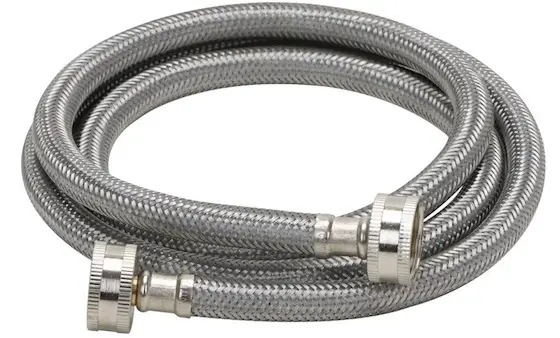
Furthermore, I installed burst-proof water supply hoses from the valves to the washing machine. These rubber hoses are sheathed with stainless steel fabric that prevents them from breaking. I urge you to install these hoses when you replace your valves. CLICK HERE to see an assortment of burst-proof stainless-steel washing machine hoses.

This is the brand of stainless-steel braided washing machine hose I use. I've never had a failure with this brand. CLICK THE IMAGE NOW TO BUY THIS HOSE. You may need two of them.
Soldering
Soldering a ball valve onto copper water lines is easy. The water lines must be void of any water so be sure to turn off the main water valve in your home and drain the system.
Soldering Copper & Valves Video
Watch these videos to see how to solder and a great torch to use to solder.
Clean Fittings & Pipe
The ball valves and copper tubing must be cleaned with sandpaper or a wire brush to remove all oxidation. Apply a light coat of soldering flux paste to the copper tubing and the inside surface of the ball valve.
Close Ball Valve
Insert the copper tubing into the valve and make sure it is fully seated. Rotate the handle and close the ball valve. Doing this helps maintain the shape of the plastic seat within the valve as you heat the valve with the torch.
Solder Both Sides
Be sure to insert an additional piece of copper tubing into the other end of the valve and solder both sides of the ball valve at the same time.
Lead-Free Solder
Use lead-free solder to create the soldered joint. Apply uniform heat with a torch to the ball valve body and to the tubing. You should heat the valve so that solder will melt and flow freely into the joint when the torch flame is removed from the valve and tubing. Once you have soldered both joints, use a dry rag to gently remove any molten solder drops that are hanging from the joint.
Cool Down Quickly
Immediately apply a damp rag to the body of the ball valve. Be very careful since hot steam will be created as the stored heat in the valve flash heats the water in the rag. This moist rag cools the ball valve slowly so that you do not overheat the plastic seat within the ball valve body.
Install Balls Everywhere
Ball valves can and should be used at many locations within a home. A ball valve absolutely should be used as the primary shut off valve for the main water line of your home.
It's easy for plumbers to install a ball valve for use as the shut off valve under every plumbing fixture. A simple adapter can be soldered to the copper tubing leaving the valve that allows you to attach a flexible water line between the valve and any fixture.
Reliable
One of the best things about ball valves is their reliability. As a traditional valve ages, the inner parts can corrode and fail as you turn the valve handle. The inside of most ball valves are made from plastic and stainless steel.
Neither of these materials will corrode. I have turned the handle of a ball valve that had not been touched for fifteen years and it worked as if I had installed it the day before. Ball valves rock!
Author's Notes:
I was very fortunate to receive a letter from Connie Dearolf who lives and works in Trenton, NJ. Connie works for the Trenton Water Works as a meter repair person and read the above column with great interest.
She scolded me for not including the following tips. I did write her back and tried to explain that newspapers hold me to a specific column length and one simply can't include all of the information one might like to. But here are some helpful things Connie thought all should know:
"....three things you didn't mention regarding stopping leaks at a valve packing nut:
- If tightening the nut does not stop the leak you can put Teflon tape on the stem threads. Wrap the tape clockwise.
- If Teflon tape doesn't stop the leak, you can purchase packing at a local plumbing supply store. Use the string-like packing to repack the nut.
- Be careful about tightening the nut too tight! It can crack and you will be forced to replace the packing nut or the entire valve.
Additionally, you didn't mention another common problem with gate valves, especially older ones. If you close a gate valve too tightly, the gate may drop and break off of the stem. It will be permanently in the closed position......" Connie Dearolf, Trenton, NJ
CLICK HERE to get FREE & FAST BIDS from local plumbers who do repair work.
Column 484