Lockset Installation Tips & Required Tools

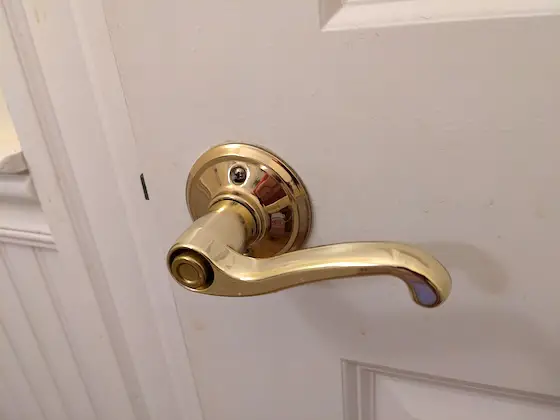
Lockset Installation - This is a standard cylindrical lockset sporting a lever handle. The dead giveaway that it's NOT a mortise lockset is the presence of the two screws on the round brass plate. You'll only see these on one side of the lockset. Photo credit: Tim Carter 2024
Lockset Installation Tips & Required Tools
Cylindrical Locksets
A cylindrical lockset is comprised of two sections. This lockset fits into a large-diameter hole you drill on the face of the door.
Cylindrical locksets are, by far, the easiest to install. This is especially true if you replace an existing lockset or install a new one in a pre-drilled new door.
How Long Does it Take to Install One?
The installation time should not exceed 30 minutes if the large hole is drilled in the door.
Required Tools
You will need the following tools to install a typical cylindrical lockset:
- Measuring tape
- Drill
- 2-1/8 inch hole saw
- 7/8 boring bit
- 7/64 drill bit
- /2 inch wood chisel
- razor knife
- Phillips screwdriver,
- hammer
Installing a Cylindrical Lockset Without the Pre-Drilled Hole
If, by chance you are forced to install a cylindrical lockset from scratch, the first thing you need to do is drill the lockset and latch holes. To determine where the center of the holes are, use the template which is provided as part of the lockset package. There are two important considerations: the backset of the lockset and the height of the lockset off the floor. The backset is the distance from the edge of the door to the center of the lockset hole. As I mentioned earlier, this dimension is commonly 2 3/8 or 2 3/4 inches. Doors that have glass or narrow stiles almost always require 2 3/8 inch backsets. If you use a larger size, the decorative rosette might overhang the stile on a paneled type door. Flush doors do not pose this problem. Commonly, the centerline height of a cylindrical lockset is 36 inches off the floor.
The layout of the lockset hole is critical. Almost all doors have a very slight bevel. Normally you would not realize this. If you have an accurate combination square, check for this bevel. The bevel is necessary, especially on thicker doors, so that the door does not hit the jamb when closing. Without a bevel, the gap between the door and the jamb, when the door is closed, would be objectionable.
Layout the holes starting from the longest edge. Be sure to subtract the bevel distance when you layout the centerline on the other side! When drilling for the lockset hole, use a standard hole saw. Slowly begin drilling from one side. Drill about 3/8 inch into the door.
Now, start to drill from the other side. This practice ensures that you will not splinter the face of the door, had you tried to drill entirely from one direction. Drill the hole in the edge of the door for the latch, being careful to make sure the drill is level and remains square to the door while you are drilling. This is not easy to do!! Take your time. If this latch hole is not drilled properly, assembly of the lockset will be impossible. The latch will be in a bind and will stick. This hole must be right!
Once you have drilled the holes, assemble the lockset. Check for smooth operation. If you did everything right, the lockset will operate just fine.
Installing the Strike Plate on the Door Jamb
Now it's time to install the strike plate. This is really somewhat simple. The most important part is to get the strike plate positioned on the jamb so that the door latches properly. If you position the strike plate incorrectly, one of two things may happen: set too shallow, the door will rattle against the door stop; set too deep, the door latch will not be able to enter the strikeplate.

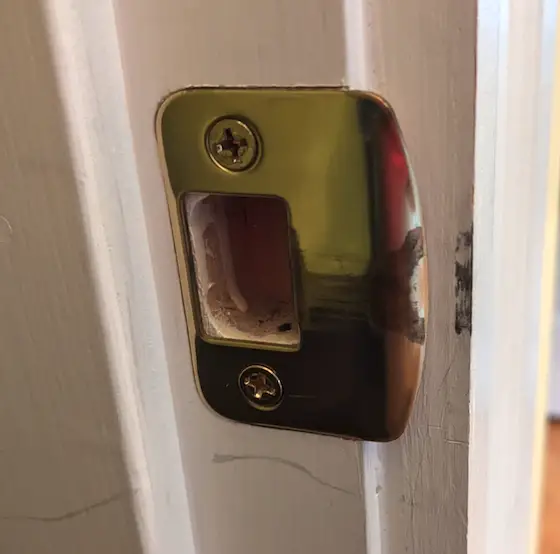
This strikeplate has seen lots of use. More care could have been taken to make the hole for the latch cleaner. Photo credit: Tim Carter Copyright 2024
The tolerance is critical. You have only 1/16th to 1/8 inch to play with. When you are confident that you have the dimension right, place the strike plate on the jamb and lightly trace around it with a sharp razor knife. Do this carefully!!! I have used this method for years to create a very tight recess for the strike plate to fit into. Chisel out the necessary wood, drill the latch hole and install the strike plate. If you have taken your time, the operation will be a success.
Mortise Locksets
If you have never installed a mortise lockset before, I recommend that you not try to do it, unless you are a very skilled individual. These locksets require patience and precision layout. There is absolutely no room for error. You also need access to a special tool - a door mortise. This special tool creates the cavity for the lockset case. It is a powerful tool, and if used improperly, will ruin a $300 to $1,000 door in a matter of seconds!
Many of the installation steps are the same as in cylindrical locksets, however there are more of them. There are usually several different holes to drill on each side of the door. The holes are at different locations and are not always the same size. A master carpenter might spend four to six hours installing a mortise lockset. How long do you think it will take you?
Deadbolt Locks
CLICK HERE to read all about installing deadbolt locks.
Column B52