0:00
I want to talk a little bit now about the piers and most specifically the forms that are used to
0:10
to create them. Take a look at this. So I'm using this 12 inch diameter top and the base flares out
0:20
to 18 inches. It's called Form Footer, and it's really a unique system. It comes as a kit, and you
0:30
just snap it together with no tools. It even comes with a reinforcing steel already cut and already
0:37
bent. That is an enormous time saver if you're a do-it-yourselfer. What you're looking at right
0:42
here is the actual base, and that's 18 inches in diameter, and then here is a reducing collar
0:49
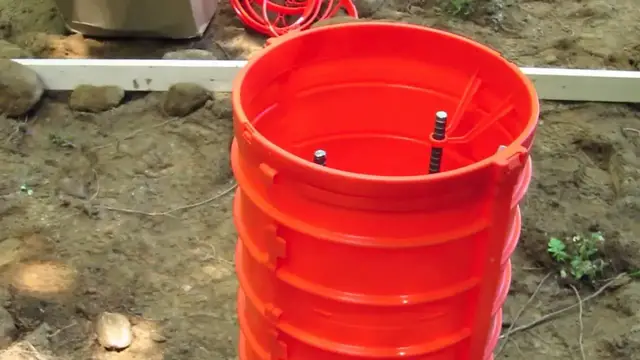
that transitions from the 18 to the 12, and then the tower is actually two sections
0:56
that you snap together and then at the top is a ring that holds it all together and it has two very important braces I guess you would call it that hold the reinforcing steel And you notice that down in
1:12
the base, the reinforcing steel, you know, is in a cross pattern. Once again, they're already pre-cut
1:17
and then these are the two vertical pieces of steel that come up that are already pre-bent
1:22
But look what it looks like when it's already installed. So if you look down, you can see that everything is designed to hold the steel
1:31
and it works really, really well. But this is looking down inside the tube
1:37
Very, very neat system. And if you need to go taller, you can continue to add tower sections up from this one
1:43
If you need to go down, you know, 54 inches, 6 feet for frost
1:47
you can just continue this tower all the way up. Why is this form so much better? I'll tell you why. Here's the alternative. In the old days
1:57
you might have to you might take one of those cardboard tubes you know this brand name sauna tube and you would have to first pour the pad down in the ground the concrete let that get hard
2:10
that'll take a day, and then come back and put in your cardboard form on top of the
2:15
you know, the wide footer, and then you have to figure out a way to brace it all
2:20
and, you know, and that just takes all kinds of time. Well, guess what
2:24
this particular product allows you to you just have to level the soil at the bottom of the hole
2:31
place this this this this form you know into the hole and make sure it's plumb and then put a little
2:38
bit of dirt around the base and you're ready to pour I mean it takes minutes to install it it's
2:44
really really an ingenious system and if you're going to do piers for a shed for a deck whatever
2:48
it might be you really want to look at this system give it a hard look it's a huge time saver
2:53
just imagine how hard it might be for you to take a hacksaw and cut the
2:58
reinforcing steel or you have to go buy it It all comes delivered to your house to your doorstep already cut Great system I going to show you in the next video what it looks like when one of these actually when two of these are in place One of
3:11
them just set in the hole and the second one with dirt around it ready to go, ready to pour
3:18
I hope you enjoyed that video and found something helpful and useful. How would you like to get tips
3:22
like that for free each week in your email box? Sure, it's easy. All you have to do, subscribe to
3:29
my askthebuilder.com newsletter. Look below. See that link? Just click it and you'll be taken to
3:35
the signup form. You're going to get new tool reviews, new product reviews, all sorts of great
3:40
tips, and the best part, it's free. If you want to discover more home improvement tips, go to askthebuilder.com