Repair Front Porch

mosaic tile front porch repair

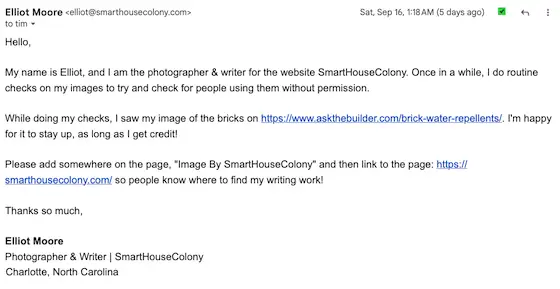
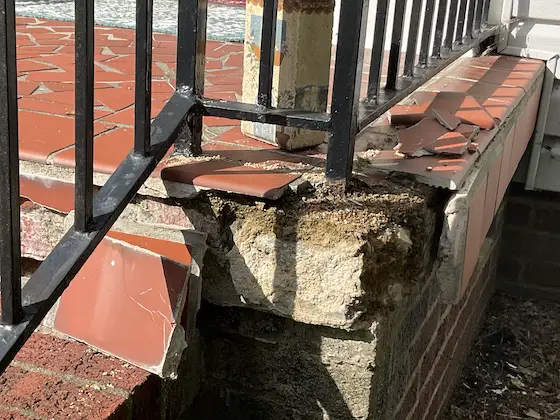
This porch was constructed in 1949. Its best days are undoubtedly behind it. Copyright 2023 Tim Carter

Repair Front Porch - Mosaic Tile and Concrete Base

In the past week, Don asked me for advice. He lives in the extreme northeast corner of North Carolina just 15 miles from the Atlantic Ocean. His front porch stoop is in very bad shape. Back in 1949 when the house was built, the tile setter used quarry tile to create a mosaic look on the flat surface. He then mortared full tiles to the sides and front of the poured concrete stoop.

Don shared that the repairmen he’s talked with are very nervous as to how to proceed. Some of the mosaic tiles are cracked and when you tap on some tiles it produces a hollow sound. Many of the full edge tiles are falling off. In other words, the 74-year-old porch is in poor condition.

Don mentioned that he and his wife want to keep the original look and he wondered what might be the best plan of attack. Based on the photographs he sent, my opinion is it’s time to get rid of all the old tile and rotten concrete base beneath the tile.

If Don hired me to do this job, the first thing I’d do is take photographs of the mosaic tile layout that forms the flat surface of the porch. If there was enough money in the budget, I’d create a map of the mosaic tiles. I’d take the time to trace the pattern of the tiles onto construction paper. These templates of each of the pieces of the random-shaped tile would be numbered and put on the map.

I know this is obsessive-compulsive, but if Don and his wife wanted the exact same look and money was not an object, then this is exactly what should be done. I’ve worked for customers in the past that had these financial resources. While it’s rare to have a budget that will allow this, I have to tell you it’s intensely rewarding work.

There are many possible reasons why Don’s porch fell apart. The truth be told, there’s no reason why it shouldn’t have lasted 150 years or more. For starters, Don lives in a very mild climate. While it does get cold and the temperature drops below freezing in winter months, it’s not the extreme cold I suffer from where I live in New Hampshire. It could even be worse had Don’s house been in International Falls, Minnesota!

I’m quite sure if I visited Don’s city I could locate several railroad bridges that were constructed in the early 1900s. The concrete abutments supporting the bridge beams are probably in good or very good condition. I can take you today to similar ones in Cincinnati, Ohio that suffer from much worse weather than what Don experiences. These railroad structures are in great condition.

The reason the railroad bridges are in such great shape is because the bridge engineers and designers specified that lots of Portland cement be used in the mix. Today the minimum specification for most exposed concrete is 4,000 pounds per square inch (PSI) or a six-bag mix. This means six 94-pound bags of cement are in each cubic yard of concrete. You can always add more cement. The cement is the glue that holds together the sand and stone in the concrete.

I would order an 8-bag mix for Don’s new concrete stoop. This might elevate the strength up and over 6,000 PSI. I’d also be tempted to add a bit more pure Portland cement to the thinset mix used to bond the new quarry tile to the concrete.

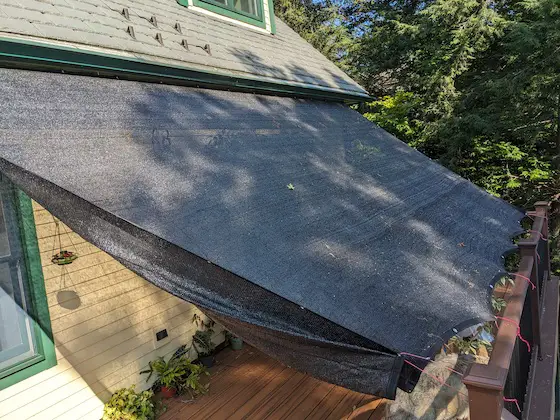
There are a few other things I’d do if Don hired me. For starters, I’d tell Don that the best weather to install the concrete and tile would be in the fall or spring. I’d want daytime temperatures to be around 60 F with no threat of rain. I’d want the nighttime temperature to not drop below 45 F.

I’d precut all the new mosaic tile and lay it out on a flat surface that matched the size of the new porch. I’d want to make sure all the tile were the correct size. This would be done before the new concrete porch stoop was poured.

I’d pour the new concrete porch late in the day on a Monday or Tuesday. I’d plan on installing new tile on the concrete the next morning at 7:30 AM. Cement paint would be used as a bonding agent between the fresh concrete and the thinset mortar. You add clear cold water to Portland cement mixing it to the consistency of gravy to create cement paint. I was taught to do this by wise concrete masons who applied cement stucco to exterior steps in Cincinnati many years ago.

Once the tiles were all set, I’d cover the tile with plastic to help retain the moisture in the fresh thinset and concrete base. I’d wait at least 48 hours before I’d think about grouting the tile. Once grouted, I’d cover the porch and edges again with plastic to hold in the moisture. I’d not take the plastic up for at least three days.

The concrete stoop, the thinset, and the cement-based grout all need water to cure properly. If water leaves these things too rapidly, they never attain their desired strength.

A month or two after the porch was finished, I’d apply a clear silane-siloxane sealer to the new porch. This would minimize water infiltration into the grout. Water that seeped into the grout and original concrete is what destroyed Don’s porch. Don’t let it happen to you.

Column 1526

Elliot Moore Smart House Colony

Elliot Moore Smart House Colony Scam

On September 16, 2023 at 1:18 AM in the morning, I received an email from Elliot Moore.

Elliot claims he is a writer/photographer for a website called SmartHouseColony. He put forth an allegation that I had stolen one of his photographs which you see on this page of my AsktheBuilder website.

elliot moore email

Here's the text of his email if you can't read what you see in the above screenshot:

My name is Elliot, and I am the photographer & writer for the website SmartHouseColony. Once in a while, I do routine checks on my images to try and check for people using them without permission.

While doing my checks, I saw my image of the bricks on https://www.askthebuilder.com/brick-water-repellents/. I'm happy for it to stay up, as long as I get credit!

Please add somewhere on the page, "Image By SmartHouseColony" and then link to the page: https://smarthousecolony.com/ so people know where to find my writing work!

Thanks so much,

Elliot Moore
Photographer & Writer | SmartHouseColony
Charlotte, North Carolina

I immediately responded to Elliot. Here's my reply:

Good Morning, Elliot.

TNX for reaching out. I'm flummoxed. I just went to that page of my website. I shot each of the photos on that page. Can you please give me a screenshot of what photo you think is yours and tell me where it was taken?

Looking forward to your response.

Tim Carter - CEO Ask the Builder

All My Photos

All of the photos on my page are mine. I shot each one. They were taken at the home of one of my newsletter subscribers. I was at the home applying the water repellent to the brick with the help of an employee of the company that made the water repellent.

Did Elliot Respond?

Elliot never responded to my email reply. IN MY OPINION, I believe he's trying to run a clever SCAM with website owners. He's trying to get website owners to LINK to his website. These links would help his website appear higher in Google's organic search rankings.

In my opinion, I feel that Elliot is counting on any number of website owners to not bother checking WHERE they got a certain photo and just insert his requested link. It takes seconds to create the link he asks for.

If my suspicions are true, then Elliot is not only a clever guy, but he's also, IN MY OPINION, a very unethical person. Let me know what you think in the comments below.

If Elliot is as smart as I think he might be, he's probably got a Google Alert set to his name and he'll see this page I created in his honor in less than 48 hours.

Elliot, if you read this, chime in and let all know WHY you never responded to me.

Three Season Room Problems

three season room door and windows

Does your three-season room look similar to this? These rooms, if not built correctly, can create a plethora of problems you’d never imagine. Copyright 2023 Tim Carter

Three Season Room Problems - There Can Be Many

Not too long ago Philip reached out to me. I’ve mentioned in past columns that each week I solve countless problems for homeowners just like you. For me, it’s similar to putting together a jigsaw puzzle or playing the board game of Clue. You present me with all sorts of jumbled data points that make no sense to you and it becomes my challenge to solve the problem. Believe me, it keeps my tiny gray cells limber!

In Philip’s case, he had a three-season room constructed up off the ground about 30 inches. It had composite decking for the floor with the requisite 1/4-inch gaps between the decking boards. Philip and his wife wanted to install solid luxury vinyl plank (LVP) flooring. As you may or may not imagine, this presents all sorts of problems.

In a normal three-season room, if it rains through open windows and gets on the decking, it’s normally no big deal. The water can drain through the gaps in the decking to the ground below. No harm, no foul.

LVP flooring interlocks. There are no gaps. Add to this, most manufacturers require a solid underlayment of some type under the LVP. I just installed some LVP at my own home and used a thin foam one that had a waterproof coating. Can you see where this is headed?

Water is your biggest enemy when it comes to a three-season room. The best ones are constructed like a four-season home. If your home is constructed properly and you have generous roof overhangs and closed windows, rainwater rolls off the windows, doors, and siding to the ground just like water off a duck’s back.

Water Can Get Into a Three-Season Room

The issue is some three-season rooms are not built like your home. The exterior walls of your three-season room may rest on top of the finished flooring and pass under the wall to the outside. Your three-season room may be on a slab and the slab is wider/longer than the exterior walls. This is very common in warmer climates. I’ve seen countless photos of situations like this.

You never want water to get on the flooring in your home for all the obvious reasons. Imagine in Phil’s case if water or snow enters his room and gets under the LVP flooring. While most, if not all, LVP is waterproof as well as the underlayment, where will the water drain to? Will it get trapped under the LVP and start to create mold issues?

Fortunately, Phil’s room is built like his home and the only danger of water getting on the new LVP flooring is from a window left open by mistake during a rainstorm. That can happen to anyone at any time even in a regular home.

Water Seeping Under Doors

One of the biggest conundrums you’ll face is with your exterior door or even sliding doors that allow you access to the great outdoors. In Phil’s case, his existing composite decking runs under the exterior door to a landing outside the room. This is a huge problem.

Water can work its way under the door threshold via capillary attraction, wind, or even negative slope on the exterior landing causing water to run towards the room! These same water infiltration issues are common on many condominiums that have exterior concrete patios poured at the same level as the concrete floor inside. Cantilevered decks using wood floor joists have a history of creating interior wood rot for the exact same reason.

Decks & Landings Must Be Lower

If you’re building a new three-season room that might become a four-season space, be sure exterior decks, landings, etc. are always 2 or 3 inches lower than the interior finished floor to prevent water from getting inside.

Make sure your contractor building the room constructs it just as you would a normal home so it’s impossible for water to enter inside a wall or flow under a wall. If you think this might happen, perhaps you should frame your walls with treated lumber to prevent future rot. You can also purchase treated plywood to sheath the exterior walls.

Don’t forget to raise the pre-hung exterior door so the bottom of the metal threshold is at the same level as the top of the finished floor. This allows you to install a proper flashing under the door and gives you plenty of room for a thick throw rug or mat on the interior floor next to the door.

Give serious consideration to a hip roof if possible. You’ll enjoy the spaciousness of a vaulted ceiling in the room with a slow rotating paddle fan on those warmer days. Plan for how you’ll heat the room should you transform it into a year-round room. I’m happy to help you should you get flummoxed!

Column 1525

Minimize Exterior Maintenance

cupped exterior wide facia board peeling paint

Minimize Exterior Wood Maintenance - You may have exterior wood on your home that looks similar to this. There are several ways to minimize or eliminate maintenance of these surfaces. Copyright 2023 Tim Carter

How to Minimize Exterior Wood Maintenance

One of the things I enjoy most about writing my column is communicating with readers just like you. As often happens, a reader will visit my www.AsktheBuilder.com website and use the form on the Ask Tim page to get help.

Not too long ago Bob did this. He lives in Coeur d’Alene, Idaho, and reads my column in his local paper. Bob said, “I really enjoy your columns. Your practical knowledge and no-nonsense approach remind me of my father-in-law who was an architect and builder. He answered all my questions until we had to send him back to Heaven.” Bob mentioned that he was also an amateur radio operator like me. It’s loads of fun to hear from readers with similar interests!

Bob then went on to ask for my advice on how to replace his cupped and cracked 12-inch-wide wood facia boards with a more durable material. One of the dealbreakers was that he wanted to paint the replacement material to match the dark green color of his existing trim.

Three Possible Methods

Three different methods immediately popped into my mind. The least expensive method is to paint the existing facia boards assuming they’re still in fair shape. Bob did send two photos and the boards have seen better days. There are quite a few exterior spackling compounds and epoxy wood fillers that do a magnificent job of filling large cracks and holes. These materials can be sanded and they all accept paint. Cupped boards can sometimes be made flat using stainless steel screws.

Urethane House Paint

You may have had bad luck with paint in the past. Believe me, I understand that frustration. What would you say if I told you I know of an exterior house paint that can last 25 years if you simply apply it according to the simple instructions on the label? You’d probably think I fell and hit my head. I used this paint on my own home in Cincinnati in 1997 and it still looks as good today as the day I painted my redwood siding.

The resin component of the paint is urethane. Realize that paint at its most basic level is nothing more than colored glue. You want to use a paint that is ultra-sticky and urethane fits the bill. Visit a traditional national-brand paint store and you’ll discover that urethane exterior house paints can be purchased in any color and different sheens.

Wrap Facia in Aluminum Coil Stock

The second method I thought of was to wrap the facia boards with painted aluminum coil stock. Millions of feet of wood trim on houses has been covered in this manner over the past fifty years. My childhood home had it done in the 1960s. Aluminum holds paint exceedingly well and some coil stock comes from the factory painted a dark green color.

You can rent a metal-bending brake from a tool rental business. These simple machines allow you to make precision bends so the aluminum conforms to the shape of the facia boards. There are numerous videos on YouTube that show you exactly how to use a brake. It’s never been easier to discover how to do something. You can also watch other videos showing you how to install coil stock over facia boards.

Replace Facia With Plastic or Composite Trim

The most expensive and time-consuming method is to remove the facia boards and replace them with a non-wood material. Fiber cement is an option. I have fiber cement siding on my own home and a shed I built. You can paint it any color you prefer. While it has wood fibers in it, the cement prevents the boards from cracking, cupping or rotting like ordinary wood.

You can also use a plastic facia board. There are several brands. The only drawback with plastic is it has a very high expansion/contraction coefficient. The manufacturers caution that painting the material with dark colors can lead to catastrophic paint failure as the plastic material expands beyond the limits of the paint.

I have tested this material on my own home with great success. I had to replace my front door several years ago and used this plastic trim instead of going back with wood. This door faces south and doesn’t have any protection from the sunlight. It’s painted a fairly dark green and after six years the paint has not peeled. I did use the urethane paint and because it’s so sticky I feel that’s the reason the paint continues to bond to the plastic.

You can often avoid the expensive process of replacing wood trim by simply protecting it from the ravages of water. Water and wood trim don’t play well together. If your wood trim, siding, fencing, railings, etc. are in great shape, think about taking the time to do what I did with my house all those years ago. Get the urethane paint, read the label, and apply it exactly as directed. You may never have to paint it again!

Column 1524

How to Prevent Cost Overruns

cracked concrete slab

Prevent Cost Overruns - This new concrete sidewalk cracked within months. The homeowner was distraught. There are things he could have done to prevent or minimize the crack. Copyright 2023 Tim Carter

How to Prevent Cost Overruns on Your Projects

You have a county coroner who performs autopsies on some who have been sent back to Heaven. I do autopsies too each week. Many of them. You may have been one of the many homeowners who have reached out to me asking for me to throw you a life preserver as you splash and flail about in the waters of misery. Your repair or remodeling job has gone off the rails. Or perhaps your new-home project is sinking faster than the Lusitania.

To help prevent you from losing vast sums of money, I’m going to share a few recent tales as well as my autopsy results. Often there’s a common thread. It’s my hope you’ll soon see that you need to hold back the trust you place in contractors. Let’s get started.

Several days ago Michael reached out to me. Months ago he invested many thousands of dollars in a new concrete sidewalk, driveway, and front porch at his home. Not too long after the work was completed, he noticed a large crack in the sidewalk leading to his porch. The crack was getting wider by the week.

He asked me, “…is this normal cracking for new concrete and should I accept a patch or should another repair method be used?” I responded that it’s normal for concrete to crack. I pointed him to a past column of mine that explains in great detail the dynamics of concrete. You can read this column on my www.AsktheBuilder.com website.

In a nutshell, concrete cracks because tension forces build up within a slab as it cures. On average you can expect concrete to shrink 1/16th of an inch for every ten feet of slab length. Cracks happen for lots of other reasons too. Expert concrete masons install control joints in slabs to try to encourage the crack to happen where it can be disguised rather than a random irregular crack across the slab.

I shared with Michael that had he purchased a small guide I created a few years ago the crack might not have appeared. In the guide, I share an illustration showing how inexpensive reinforcing steel could have been used to minimize the crack ensuring it never grows beyond a hairline crack.

concrete sidewalk illustration steel reinforcing

This is a watercolor illustration I made showing how to install concrete. CLICK IT to get all the tips. Opens in a new window.

I garnered from Michael’s tale of woe that he had placed far too much trust in the contractor. He assumed the contractor would do everything right to ensure the concrete would look great for decades. Misplaced trust often leads to disappointment. Michael should have invested a few hours time to discover how to prevent concrete cracks.

Days before I heard from Michael, I was talking on the phone with a woman who’s hired me as her virtual general contractor to rebuild a house from the foundation up. You can do the same as I take on a few clients like this each year.

She’s in the midst of a massive remodel of a home in Maine. A flaw in the house’s block foundation was discovered by a contractor doing demolition work. The project architect never saw it or if she did she didn’t think it was a big deal. I’m not sure if an ASHI home inspector was used when the house was purchased. She/he may have spotted the flaw allowing the woman to negotiate a better price on the house.

The block foundation might have to be removed and a new cast-concrete foundation will go in its place. If this needs to happen, I estimate this will create an immediate painful cost overrun of about $60,000.00. Imagine having to swallow that so early in a huge project. It’s very possible the flaw would have been identified in a $650 house inspection by one of the top inspectors out there.

It's possible the concrete block foundation might be able to be reinforced with pea-gravel concrete, rebar and/or junior I-beams. This conundrum is being discussed as I write this column.

The day after dealing with the block foundation issue I spoke on the phone with Rita. She’s invested in past consult calls with me about a failed garage foundation. This time is was an issue with her son’s new three-story townhome. The temperature on each level varies by a great deal.

She wanted to know what could be done to try to create more even temperatures throughout the residence. I shared with her that she had a few options that might work. I also shared with her that I didn’t have that issue at all with the heating and cooling in any of the houses I built.

My houses had all the correct-sized ducts leading to each room. Detailed calculations were performed to determine exactly how much hot or cold air needed to be put into each room to keep it at the desired temperature. Each room except kitchens and bathrooms had strategically placed return air ducts.

You can avoid financial and emotional heartache by investing time BEFORE you sign a contract. Never before has it been easier to get up to speed on the right way to do things. Many manufacturers and trade associations have fantastic videos you can watch to get a feel for how products are supposed to be installed.

It’s your job to watch these or read installation instructions ahead of time so you can determine in conversations with bidding contractors if they know how to do the job correctly. You can also hire me to help you get up to speed. The last thing I want to do is perform an autopsy on your failed project. Do your due diligence or suffer the consequences.

Column 1523

DIY Dangers and Structural Collapse Hazards

diy pole building structural collapse soon

DIY Danger Structural Collapse - While you may think this structure looks sound, it’s not. Fortunately the town inspector saw it and is forcing the owner to tear it down. Copyright 2023 Tim Carter

DIY Dangers - You Can Cause Structural Collapse

I live in rural central New Hampshire. It’s the Live Free or Die state. I believe in that motto to a very large degree but I’m also interested in making sure innocent people don’t get hurt or killed should a building or deck collapse.

Just a few days ago I was driving along the main backroad I have to take to get groceries. Lo and behold out of nowhere a small pole barn was taking shape. I was stunned simply because I had not seen any excavation or foundation work in progress. Understand that I travel up and down this road at least four times a week.

I decided to stop by, say hello to the owner, and ask if I could look at the large framed building. The homeowner was very cordial and welcomed me. “I’ve got four days labor into this and just yesterday the building inspector nailed a STOP WORK sign on it,” said the perturbed man.

“The inspector told me not only was it too close to the road, but it had to come down. He said there are all sorts of mistakes and it’s unsafe,” said the DIY homeowner. I offered him as much consolation as I could muster as I didn’t want to share with him I was in total agreement with the inspector. There were far more things wrong with the structure than were right.

I felt his story was worth sharing with you because had this structure not been seen by the inspector, there’s a very good chance someone could have been killed or severely injured when it would collapse in the next windstorm or snowstorm.

Allow me to share many of the mistakes I saw standing just 20 feet away. Then I’ll offer up how to build something the right way should you get the itch to swing a hammer.

First and foremost this small pole barn had no foundation. I’ve seen some New Hampshire barns built where the giant timber base plate is set on stone. But this homeowner had tacked together treated landscape timbers and simply laid them on the grass and some coarse gravel he scattered about. He did a very poor job of leveling the ground and one wall had a huge sag in it.

The vertical wall supports were just the same landscape timbers as was the top plate of the walls. He had used regular 16-penny nails toenailing these thick timbers together. It was the worst framing job I’ve ever seen. Any structural engineer would have nightmares about this while personal-injury lawyers would be salivating.

There were crude small diagonal braces at the base of some of the vertical supports, but these were no doubt temporary. They would have to be removed to install whatever siding was going to cover the walls. Diagonal bracing in walls is necessary so they don’t rack and fold up like a row of dominos might fall when you tip the first one.

The roof rafters were the correct size but the center ridge board was very much undersized. The well-intentioned DIYr installed small collar ties just under the ridge but their location offered minimal resistance to the roof collapsing under three or four feet of wet snow which is quite common in this part of the state.

Great Homeowner Structural Book - Easy to Understand

How do you avoid this situation if you’re trying to be a weekend warrior or hire the job out to a carpenter? Step one is to obtain a very basic understanding of all the structural elements in what you’re building. There are all sorts of books you can read but I have a nifty PDF e-book written specifically for homeowners like you.

basic structural ebook cover

This is an easy-to-understand book telling you how to avoid building collapse. CLICK IT NOW for INSTANT DOWNLOAD - Opens in a new window

No matter what you’re building or remodeling, this is something you should have handy. You can get it by going here.

Once you have an idea how to build something, visit your city or town zoning office to see what laws or ordinances are in place you must follow. You’ll discover that most residential building lots have no-build zones adjacent to the property lines. The zoning employees will share what the distinct setback lines are.

Assuming you can build what you want on your lot, now it’s time to secure a building permit. You’ll need some plans for this. There are any number of websites that sell plans that should enable you to secure a permit. If there are deficiencies in the plans, the plan reviewer will instruct you on what you need to add to the plans to get the permit.

This will give you a good start, but realize that plans are no substitute for decades of building experience. If you intend to do the work yourself, it would behoove you to establish a lifeline with a seasoned pro who can offer advice. If you decide to hire the work out, you must invest the time to go visit finished jobs of the pro to prove to yourself she/he can meet or exceed your quality expectations

Column 1522

Long Lasting Asphalt Shingles

worn asphalt shingles cupola with copper roof

Long-Lasting Asphalt Shingles - Look at how the shingles getting regular doses of copper ions look as good as the day they were installed. Copyright 2023 Tim Carter

How to Make Your Asphalt Shingles Last 50 Years

Eight years ago I was in the middle of a roof replacement project on my own home. My thirty-year warranted asphalt shingles looked like they were fifty years old. They were curled, large patches of felt paper with no granules were showing, and each time it rained my deck and sidewalk were littered with the colored ceramic granules.

I was furious because I thought I’d never have to install another roof in my lifetime. On one particularly hot day, while removing the wretched pieces of crap, I got so disgusted and angry that I not only swore like a sailor at the shingle manufacturer, but I also vowed to get to the bottom of the issue.

My quest for the truth started with an outreach to the national association that many of the shingle manufacturers fund. The professional public relations person whose job it is to deflect attacks or hard-hitting questions stonewalled me. He said, “It sounds like you need to reach out to our members individually.” Challenge accepted.

I did just that and the tough questions I sent to each of the top manufacturers generated milk-toast answers and some answers had nothing to do with my questions. The manufacturers knew I was hot on the trail of something that was seriously wrong but they were hoping I’d give up or not discover the truth. Never ever underestimate the strength or stamina of your opponent was my mantra back when I played high school sports.

Tens of Thousands of Bad Roofs

It was then I decided to see how bad the issue was. After all, I was seeing ads in my local newspaper for a roofing company that helped homeowners settle claims against manufacturers for defective roofs just like mine. I decided to tell this story in one of my past columns and set up a form you could use to tell me if your roof was failing before its time just like mine. The responses flooded in from all over the USA.

The day my column ran in the Washington Post, I received an email from a person within the shingle industry. He said we needed to have a phone conversation. This professional was ethically challenged and was rejoicing there was finally someone, me, who was poised to expose what was going on. He allowed me to record the interview and just asked for me to protect his identity so would not lose his job. Thank God for whistleblowers!

The reason my roof, and possibly yours, was failing early was tied to making more money plain and simple. Rather than have shingles last 25, 30, or more years, many of the manufacturers decided they wanted each homeowner to purchase a new roof. Back in 2015, the National Association of Realtors shared with me that the average length of stay in a residential home is but nine years.

My deep-throat source told me that some of the manufacturers were pre-aging the asphalt by blowing an excessive amount of air into the virgin asphalt. You do need to blow some air into asphalt to prevent it from melting and running down your roof into your gutters or onto the ground. But blow too much air into it and the asphalt becomes over oxidized making it brittle from the get-go.

I decided to take all I had discovered, including the facts in the interview, and write a short book. It’s called Roofing Ripoff - Why Your Asphalt Shingles are Falling Apart and What You Can Do About It. It’s available as an INSTANT DOWNLOAD PDF file from my shopping cart. It's also available as a paperback and an audiobook on Amazon.

roofing ripoff book cover

Here's my Roofing Ripoff book. It's an easy one-hour read. You'll save $5,000 reading it. GUARANTEED.

As I was compiling the book, I went to lunch one day with a friend of mine. As we left the restaurant the sun was shining on the roof of the vacant Tilton, NH post office. The south-facing roof was in horrible shape with the shingles curled and most of them missing the protective ceramic granules.

However, there was a ten-foot-wide strip of roofing from the peak to the drip line that was in very good condition. The difference was night and day. Perched just above this strip of asphalt shingles was a large cupola with a copper roof. Instantly I theorized that copper ions blasted off the cupola roof by the photons in ultraviolet light were washing down on the shingles with each rainfall. My theory was the copper was somehow keeping the asphalt supple.

I consulted with three physical chemists and they confirmed that copper would bond to asphalt molecules that were also split apart by the photons. Copper, however, prevents cross-linking of the asphalt. Cross-linking happens when oxygen bonds with the asphalt. When this happens and too many asphalt molecules connect together, the asphalt becomes brittle and loses its ability to stay flat and hold onto the ceramic granules that are shingles’ sunscreen.

You can extend the life of your asphalt shingle roof by installing ten inches of thin copper up at the peak of your roof. You can blind nail a 12-inch-wide strip of this copper just as I did at my daughter’s new home. It’s important that the copper be exposed to sunlight and it must rain periodically for the magic to work.

copper roof strip on roof peak

I was the first person in the world to identify that copper prevents the oxidation of asphalt molecules on asphalt shingles. See how easy it is to install this copper on a new installation? 

Column 1521

Sandpaper Boot Camp

sheets of sandpaper

These are just a few samples of the many types of sandpaper in my shop. The small one is a flexible pad made to sand three-dimensional shapes. Copyright 2023 Tim Carter

How Much Do You Know About Sandpaper?

I’m thankful to have had enough trips around the sun that my adult children are finally calling me asking for advice about their projects. I hope you’re blessed to experience this transfer of knowledge. First things first, it’s a real treat to help them avoid mistakes followed closely by the warm feeling I get knowing they reached out to me rather than watch some unknown person on YouTube.

Just days ago my youngest daughter called me from 3,000 miles away. She had just purchased a used chest of drawers she wanted to refinish. She didn’t like the color one bit and was going to sand off the old finish.

“Sweetheart, sanding off an old finish is fine for wood floors where you can use a big drum sander. It’s really hard to do this with furniture. I suggest you use a liquid stripper to remove the finish and some of the stain. Once the wood is dry, then you can start to sand.” She hadn’t even considered stripping off the clear finish with a liquid. I suspect she had never seen it done before. Little did she know I did this fifty years ago with her mother as we used to collect and refinish antiques before we were married.

A second call came a day later asking about what sandpaper to use. My daughter had gone to a big box store and was overwhelmed by the selection of sandpapers. Perhaps this has happened to you. It can be daunting.

Chinese Invented Sandpaper

The origin of sandpaper has been attributed to Chinese craftsmen. They blended natural gum with crushed seashells and sand and applied this paste to parchment paper. While crude, it was an ingenious tool used to make wood quite smooth.

Seashells are simply calcium carbonate which has a hardness of only three on the Mohs hardness scale. While this is low, it’s hard enough to smooth just about any wood those ancient craftsmen were working with. My guess is they discovered that certain types of sand had a hardness much more than the seashells. There’s a good chance they found that quartz sand, with a hardness of seven, did a fantastic job of transforming rough wood surfaces to those that rivaled glazed pottery.

Natural and Man-Made Abrasives

The modern sandpaper you see at hardware and paint stores is made from a combination of natural and man-made abrasives. Red garnet is a natural mineral and a favorite of woodworkers. The tiny garnet particles get rounded off as you use the paper. As they dull, the garnet works to burnish the wood producing a highly polished surface. Red garnet sandpaper has a distinctive reddish-orange color.

Should you want to polish metal, you’d do well to work with emery cloth. The finer grades can polish most metals to a mirror-like finish.

Aluminum Oxide Self Sharpens

In my opinion, the workhorse abrasive is aluminum oxide. Sandpapers made using this material have a light or medium-brown color. They’re extremely common and work well to sand most materials around your home including wood, plastic, drywall, and hardened paint.

Aluminum oxide is the opposite of garnet. As you use aluminum oxide sandpaper, tiny fragments break off creating a new sharpened edge. Think of it as self-sharpening. It’s remarkable when you stop and think about it.

The grit numbers refer to the size of the particles that are doing the sanding. The lower the number the coarser the grit. A sandpaper that is 60 grit might have particles on it the size of table sugar. A 220-grit paper might have pieces that match finely ground pepper. Look at an individual piece of sandpaper and you’ll notice the particles are just about all the same size. This is by design.

The abrasive particles are processed through a sifting machine much like gravel is sorted and sized. When it comes to sandpaper the grit number refers to the number of particles that fit through a certain size screen that measures about 1 inch square.

Ultra-Fine Grit Polishes Wood

Some grit is so fine it resembles baking flour. Fine abrasives are used to create high polishes. The coarse grit is used to remove lots of material quickly. When speaking with my daughter, I suggested she try 120-grit paper first and see if it was too aggressive. My thoughts were the chest of drawers was made from pine. It’s a very soft wood and a coarser sandpaper can scratch it with ease.

I told her once she tried the 120 grit then switch to 220. That grit is considered very fine. That said, my final advice was, “Once you finish with the 220, try a piece of 320-grit red garnet paper. You may discover it makes the pine as smooth as a piece of glass.”

If you’re applying a clear finish to wood, it’s vital you get the wood as smooth as possible. If painting wood, you don’t have to invest as much work as the thicker paint film can fill and bridge fine scratches created by sandpaper. In fact, small scratches can actually help the paint hold onto the wood better.

As with most home improvement projects, you have to know what to do and when.

Column 1520

Why is it Hot in My House

sun filtering tarp on deck blocks 70 percent of the sun

Why is it Hot? - This special inexpensive tarp controls the amount of sunlight that can pass through it. It may look ugly but it keeps the room inside the house 15 degrees cooler. It’s just one way to combat heat inside a home. CLICK HERE to see many of these tarps. Copyright 2023 Tim Carter

Why is it Hot in My House? There are Many Reasons

Are you hot and bothered? It’s been a very hot summer so far with record temperatures in many states. Here where I live in central New Hampshire, we’ve had a long spell of high humidity mixed with higher-than-normal temperatures. Normally you have to sleep with a blanket in the summer with your windows open. Not so this summer!

Fans Cool You Well

There are quite a few things you can do to stay cool in the summer not the least of which is just use any number of fans to blow air across your body. If you remember anything at all from your high school physics class you know that evaporation is a cooling process.

Evaporation is a Cooling Process

When you perspire, the sweat on your skin can pull heat from your body as it evaporates. The issue is in high-humidity situations the evaporation slows down because the air around you is just about filled up with all the moisture it can take. This is why it can be stifling hot and uncomfortable just before a rain shower as the relative humidity approaches 100 percent and no matter how much you sweat, it’s going to have a difficult time leaving your skin.

Insulation Can Keep Your House Hotter!

Let’s discuss insulation. You may fall victim to a salesman who says you need to install much more insulation in your attic to stay cool. Realize that insulation does but one thing - it SLOWS the transfer of heat. That’s all it does. Nothing more.

This means if the inside of your home gets hot then the more insulation you have in the walls and attic, the longer your rooms will stay hot. Insulation does a great job of helping you stay cool if you have air conditioning as the insulation slows the heat from getting to the cooler room temperatures. This is a basic law of thermodynamics - heat moves to where it’s colder.

Solar Attic Fans are a Joke

Did you fall for the sales pitch about solar attic fans? Do you realize they really don’t do much at all to lower your attic temperature? An attic can easily reach temperatures that approach 150F. I have infrared photos of my own roof with the surface temperature reaching close to 160F.

Solar Powered Attic Fan

This is a solar panel supplying free electricity to the attic fan under the silver dome on the rear roof. The fan blades spin, but they don't lower the attic temperature at all. Copyright 2023 Tim Carter

When the shingles get that hot, they transfer that heat to all the lumber that is used to create your roof. All this lumber radiates the heat toward your rooms just like the heat you feel from glowing embers around a campfire. All the tiny solar fan can do is move a minimal amount of air to try to cool down the lumber. The lumber stays hot for hours after the sun goes down and the fan stops spinning.

Don't Buy an Oversized AC Unit

Just yesterday I received an email from a newsletter subscriber of mine. He shared a tale about how he failed to listen to my advice about the size of air conditioners. He needed a new central air conditioner and the correct size was sold out. He decided to get one the next size up.

Never do this. When you oversize an air conditioner it will short cycle. It will blast lots of cold air into your home and tell the thermostat to shut off. Air conditioners need to operate for 10 or 15 minutes at a time to remove the humidity in the air. Doing this is what keeps you comfortable. Short cycling creates a cold clammy environment.

Paddle Fans are Fantastic

Don’t underestimate the ability of simple paddle fans, box fans, and rotating multi-speed fans to do a fantastic job of keeping you cool. They do a magnificent job. You know this to be true because when Mother Nature does it for free with a cooling breeze when you sit outside, you often say out loud how wonderful the air is moving across your body.

Window Films Work Well

You can also purchase clear window films that do a superb job of blocking direct solar radiation into your home. Look for films that also block ultraviolet light as this will prevent rugs, upholstery, artwork, photographs, etc. from fading.

Sun-Blocking Tarps

Just two months ago my wife purchased a very inexpensive tarp that has slots in it. It blocks 70 percent of the sunlight that hits it. We hung it from below a gutter across our deck to protect some indoor plants from the blistering sun. The plants had to be moved to the deck while the hardwood floors were refinished.

The first thing we noticed was the room shaded by the tarp was about 15 degrees cooler than the room next to it. Sunlight used to pour into a large French door that was now shaded by the tarp.

Just engage your God-given critical-thinking skills and you’ll be amazed at how simple it is to beat the heat. And if you get frustrated, head off to a local clear-water lake and jump in!

Column 1519

New Home Budget

new home construction house wrapped

New Home Budget | This new home should have been finished a month ago. If things continue to creep along, my guess is the owners will move in about ten months from now. Copyright 2023 Tim Carter

How to Create a Realistic New Home Building Budget

Are you thinking of building a new home or doing a major remodeling project? If so, I’ve got some sobering news for you. After reading this column you may understand why the moniker my three kids coined for me years ago is spot on. Around the Carter house, I’m known as the Dream Crusher.

First things first. Your new home or remodeling job will happen. The issue is how long will it take for your dreams to come true and at what cost? I’m all about setting realistic goals and managing expectations. I’m going to do my best to ensure you’re not about to embark on a voyage that will lead to financial disaster or have you dashed upon hidden shoals of contractors and subcontractors who suffer from time blindness.

I receive emails each week via my www.AsktheBuilder.com website detailing all sorts of horror stories about building projects that have run off the rails. The trend is increasing, not decreasing. My own daughter just a few years ago was a victim. She built a new house with excellent plans on Mt. Desert Island in Downeast Maine.

My Daughter's New Home

It was a simple rectangular house with an attached garage. In my prime, I would have completed the job on time in about seven months. There would have been no cost overruns. From the time the lot was cleared until the day she moved in, twenty-two months had passed. The project came in $100,000 over budget.

A neighbor of mine just two houses away started a major remodeling job ten months ago. The roof of their garage was demolished to create a second-story one-bedroom apartment. A small addition was added on the first floor to create a bigger kitchen.

I had done quite a few similar jobs just like this years ago. Had I taken longer than four months to complete each one, I’d have gone bankrupt. The dumpster is still in her driveway, a sub-contractor’s trailer is still parked on my street, and I estimate the job will not be finished for months. I can’t tell you how much the job is over budget but my guess is inflation alone is creating a 20 percent overage.

Prevent Financial Stress

Here’s what I would do if I were you. Let’s start with preventing a financial time bomb. It’s mission-critical you are not financially stressed or face the prospect of running out of money sitting with a partially finished project.

How to Create a Realistic Budget

Step one is to create a realistic budget. This requires basic math skills. If you own your own home meet with the top three realtors and discover what your house might sell for. Determine what equity you’ll have after the house would sell. Add this amount to the construction loan you’ve been pre-approved for. This is your not-to-exceed number. Your contract sum with a builder should be approximately 80 percent of this number. This provides for a reasonable amount of dry powder to cover cost overruns.

Step two is to meet with two or three builders. Ask them to show you one or two recently completed houses that are similar to what you want. Have them tell you what the final finished price was. Ask for a set of plans so you can do the math to see what the actual cost per square foot was.

Divide your not-to-exceed number by the square-foot cost average. This tells you how big your new home can be. Will you have enough square footage? Don’t forget to factor in the cost of plans, the purchase price of the land, etc. If after doing this you feel you can move ahead, now is the time to draw plans.

You must have excellent plans and specifications before you go out to bid. All products should be specified on the plans. There should be no allowances. Once you have the green light for the project, purchase as many of the materials and products as you can early in the job. My daughter rented a storage space to store all the cabinets, light and plumbing fixtures, windows, doors, etc. Doing this prevents price increase surprises.

If you’re doing a major remodel, most of the above advice applies to you. To be on the safe side, I’d allow for cost overruns in the 25 to 35-percent range. Who knows what surprises lurk behind your existing walls?

The national labor shortage in many trades is the primary reason jobs are taking longer to complete. This issue is much worse in some cities than others. Add to this the mismanagement of resources by contractors who have never taken a business class in their lives and it’s a recipe for disappointment.

Prepare yourself for delays, countless excuses, and frustration. Think about taking up yoga or deep meditation to help manage any stress you’ll undoubtedly encounter. I wish you the best of luck and realize I do phone construction consulting should you need help.

Column 1518