Clay Paving Brick

clay paving brick mortared to a concrete slab

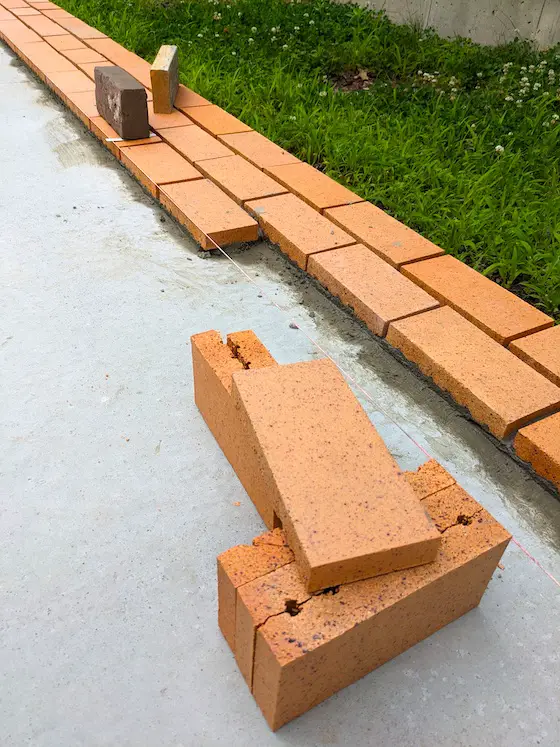
Clay Paving Brick | You’re looking at spilt clay paving brick I’m installing at my son’s house. These bricks will never change color and can last hundreds of years. They are not inferior like brick pavers made from concrete. Look at the photos here of how concrete pavers change color and erode. Copyright 2023 Tim Carter

Clay Paving Brick are the Best - Forget About Concrete Pavers

If you read my column on a regular basis, then you know about two months ago I touched on the perils of using paving brick made from concrete. That column talked about how those bricks fade in color over time as the thin colored cement paste succumbs to Mother Nature and high-pressure streams of water that rush out of the ends of pressure-washing wands.

I shared at the end of that column a project I’m working on at my son’s new home. Each weekend he and I are bonding while sweating profusely as we install perhaps the best pavers known to man. They’re made from clay and so durable they can be used to construct roadways. The color will never fade, and if one of the bricks gets chipped the color and texture inside the brick are the same as what you see on top. We’re using pavers made from clay and fired in a kiln until they’re as hard as rock.

I’ve used clay paving bricks on the past two homes I occupied in Cincinnati, Ohio. My son learned to walk on the last clay paver patio I built in the rear yard of the stunning Queen Anne Victorian home I built there. Twenty years before that I had installed a similar clay paver patio at the second house my wife and I owned. That patio looks as good today as the day I installed it back in the late 1970s.

clay paving brick patio on top of a concrete slab

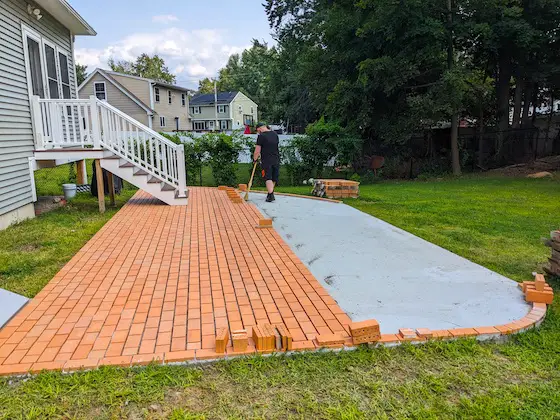
It's taken a total of about 40 man hours, me laying the brick and my son mixing mortar, to get this far. All the bricks will be installed in just two more days of work. Then it's time to fill the gaps with high-strength grout. Copyright 2023 Tim Carter

I was introduced to clay paving brick by my future mother-in-law. When I was dating my wife, I noticed one evening two pallets of used salvage pavers sitting in the driveway. I asked about them and soon discovered they were destined to form a wonderful patio in the rear of her house under two magnificent shade trees.

One thing led to another and I volunteered to install the brick under the guidance of my future father-in-law who was far too busy with his medical occupation. Among other things, he taught me how to create a baseline to ensure the brick would be installed in a perfectly straight line.

You should be attracted to clay because it’s an abundant natural resource. Brick technology dates back thousands of years. It’s a time-tested building material. Thousands of miles of roadways have been paved with hard-fired clay brick. Just weeks ago one of my newsletter subscribers sent me one of the thick historic dark-brown clay pavers used to build the famous Brick Road in Florida. That historic brick is now sitting on a shelf in my office. Visit Athens, Ohio, and go downtown. You’ll see hundreds of paving brick that are still in use today in their downtown district.

clay paving brick old brick road florida

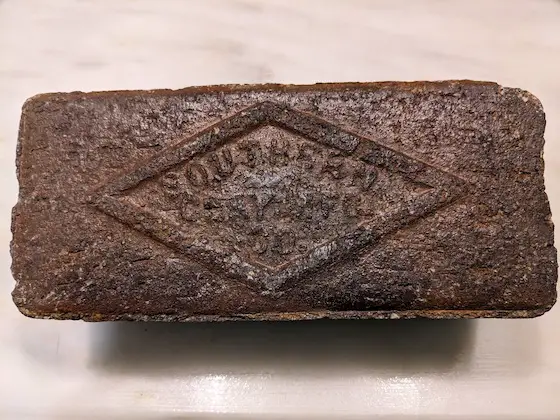
This is a real clay paving brick made by the Southern Clay Brick Company. It's 8 and 5/8ths inches long, 4 inches wide, and 3 inches thick. It was salvaged from the Old Brick Road in central Florida. Copyright 2023 Tim Carter

Instead of using the thick traditional clay pavers, I’m using a split paver that measures just under 4 inches wide by just under 8 inches long and is only a little over an inch thick. You can set it in a sand/cement base, but I’m going the extra mile and mortar each brick on top of a steel-reinforced concrete pad. Once complete, you could drive a truck onto my son’s patio and it would not crack.

The remarkable thing about this system is the ease of installation. You might think it’s not DIY friendly. In fact, it’s the opposite. The only really hard thing about the job in my opinion is getting the concrete slab poured correctly.

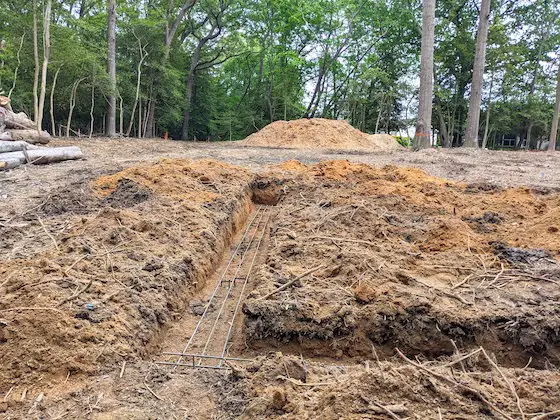
It’s vital the slab be in the same plane and flat. This means there can’t be any humps or deep furrows in the concrete. Any decent concrete mason can screed the concrete to achieve this goal. I poured my son’s concrete 5 inches thick and put the 1/2-inch steel rebars two feet on center in both directions. The steel looked like a piece of giant graph paper before it was entombed in the wet concrete.

Over the years I’ve discovered the best way to install these bricks is to install the border brick first. This is especially true if your patio or sidewalk is going to have curves. A square or rectangular patio is by far the easiest to build as it will require minimal cuts. We have a mix of straight and curved edges at my son’s house but I made sure that the overall size of the patio will have full-sized brick requiring no cuts. It just so happens that three rows of the brick we’re using equals 12 inches. His patio will end up having 45 rows.

The mortar mix is easy to make. I have my son mixing three parts of fine sand with one part of Portland cement. I have him mix just two or three gallons at a time in a wheelbarrow. Just enough water is added to make the mix resemble wet applesauce.

I lay each brick in enough mortar so it oozes up the sides about one-half inch. The rest of the joint is filled at the end of the job once all the brick are in place. I use a special big bag just like bakers use to decorate a cake. However, I don’t use icing! I blend one part very fine sand to one part Portland cement to make my grout.

tim carter laying clay paving brick on concrete

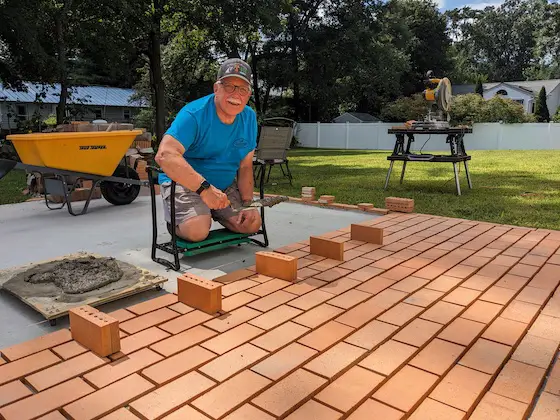
Here I am using my 45-year-old Marshalltown trowel to install one of the thousands of split clay pavers that will create my son's patio. Copyright 2023 Tim Carter

The grout would probably test out in excess of 12,000 pounds per square inch. It wears like iron and will resist freezing weather for decades. I’m in the process of recording several in-depth videos of the installation process.

Column 1517

WaMa Hemp Underwear

wama hemp mens underwear

These are the three pairs of small clothes I got from WaMa. They would have fit perfectly had they sent them to me back in 1967 when I weighed 175 pounds. Copyright 2023 Tim Carter

WaMa Hemp Underwear - It Squeezes You

Three months ago I began to test WaMa Hemp small clothes. It's not the first time I've tested underwear. Several years ago I tested Duluth Trading Buck Naked U-trousers.

I was approached on April 17, 2023 by Rose. She's a public relations person that works for WaMa.

I knew right out of the gate that this might not be a normal encounter. Rose said in her outreach, "*Note: Our sizing may run smaller than most brands so if you are in-between sizes, we recommend you size up."

I warned Rose that my reviews are honest and that I hold nothing back. She sent me a $100 electronic gift card to order whatever I wanted from their website.

What's that old saying? Be careful what you wish for.

Cloaked Intentions

I did as Rose suggested. But then found out that her advice was not accurate. I should have ordered two sizes up. WaMa Hemp underwear unwashed is tight! If you want all your intimate body parts to be squeezed like you'd hold onto a rope dangling from a skyscraper, then you want WaMa Hemp underwear.

Within a day of my responding to her review request, Rose asked if my review would be posted within 30 days and she ended with, "Also, can I confirm if the backlink will be a do-follow link? "

My my my... What WaMa really wanted was a sip of my SEO tier-one nectar. Not so fast, Rose and do-follow links are valuable. Much more valuable than three pairs of underwear that cost Rose's company about $2 each to manufacture.

As Captain Hook said in the remake of the movie Peter Pan, "Bad form, Rose."

The Squeaky Wheel Gets the Grease

Rose reached out to me again on May 2, 2023. I believe I had just received the three pairs of small clothes a week before. She said, "Hope you are doing well. Just wanted to follow up with you to see when you'd be able to post your review. I'll be sure to share it around on our social media once it is published."

I responded,

"I'm still testing. So far the results are mixed. Please keep in mind I'm truthful to a fault for all the obvious reasons.

I was disappointed on the day I ordered as the colors and styles I wanted were unavailable.

I developed a slight rash the first day I wore one pair. I didn't get the rash with the second pair.

I washed one pair and let them air dry. I never put anything with elastic in the dryer. There was some shrinkage.

I would say the garments run 1.5 sizes SMALL and am mystified how that can happen with all the other brands being out there and they have true sizing.

Rhetorical question: Why is it not possible to copy the exact measurements of the competition and have true sizing?"

wama hemp underwear label

Here's the label from the pair that my Mom would have LOVED to see me wear. I ordered these in her honor as purple was her favorite color. You can see the garment is made in China. China has a robust reputation of stealing technology and copying other things. One would think they'd have a good grasp of how to copy the sizing of clothes. But what do I know? I used to eat lunch for 20+ years sitting on upside-down drywall mud buckets. Copyright 2023 Tim Carter

Testing Halted

I tried wearing the purple and brown small clothes twice but they were so tight and uncomfortable that I gave up. I've consigned the WaMa small clothes to my rag box.

If you order some, go at least two sizes up. Good luck.

I'm sure you've noticed that there's no link to WaMa. Paid links are NOT organic. Paid links litter the Internet and do visitors no favors. That's why I don't do them.

LVP Flooring Installation Story

lvp flooring being installed

LVP Flooring Installation | This is luxury vinyl plank flooring being installed in my own home. It’s very DIY friendly so long as you can read and follow instructions. Copyright 2023 Tim Carter

LVP Flooring Installation - It's a Remarkable DIY Product

Author's WARNING: Read Judy's email to me below about where NOT to install LVP flooring.

Several months ago a pesky mouse caused a small water leak in a PEX water line that supplied water to a second-floor bathroom in my home. A new hump in our master bedroom hardwood floor foreshadowed what I’d discover hours later at dawn.

By then, the water had leaked to a basement bedroom as well. The water ruined the hardwood floor in the first-floor master bedroom and warped a plywood-based tongue and groove floor in the basement my lovely wife uses as a plant conservatory. Suffice it to say both floors had to be replaced.

My wife asked if there was a waterproof floor that looked like real wood that could be used in the basement room. She didn’t want to worry about spilling water as she watered the countless orchids she grows in the room. I told her that we should give luxury vinyl plank (LVP) a serious look. Technology has advanced to such a degree as the average person can’t tell the difference between real wood and high-quality LVP that mimics wood.

lvp flooring over underlayment

This is the LVP I installed. It was called Honeycomb Oak. The average person would never know it's NOT real wood. Copyright 2023 Tim Carter

Vinyl flooring is now approaching its 100th anniversary. I clearly remember helping my Dad install 12-inch squares of vinyl tile in what used to be the garage of my childhood home in 1961. The 1960s time period was the first golden age of vinyl tile as countless millions of square feet of vinyl composition tile (VCT) were installed in houses and businesses all across the world. I believe we’ve entered the second golden period of vinyl flooring with the dazzling LVP flooring choices.

If you start to research LVP, you’ll quickly discover it’s nothing like the VCT tiles of old. Those tiles were solid in color all the way through the product. Modern LVP is more like a layer cake. There are several layers of materials that create the actual plank or tile.

The product my bride and I decided on was a high-quality one that has a 20-mil-thick wear layer. It’s a medium-brown color that is extremely close to the red oak hardwood floors we had in the last home I built for my family.

The wear layer is the thin top surface you walk on. It’s not uncommon for them to range anywhere from 6 to 40 mils. Thicker wear layers are better. As with anything, you can keep the LVP looking like new by keeping it clean and free from grit.

Installing LVP flooring is extremely simple. The one I chose is a floating floor. This means there’s no glue or adhesive required. The planks just lay on the floor and their combined weight and the fact they all interlock prevent them from moving when walked on.

To have a successful long-term installation it’s imperative you read the installation instructions for the LVP you choose to use. I beg you to do this even if you hire a professional to do the job. You want to interview the pro before you sign a contract making sure he will do everything right.

There are several things that must be done when installing LVP. The surface the LVP will lay on needs to be flat. Flat doesn’t mean level. Flat means that the surface is all in the same plane. You can’t have shallow areas or humps. These defects can make it impossible for the pieces to interlock. Hollow spots under the LVP can cause the tongues or grooves to break over time from flexing as you walk on the floor.

concrete floor leveling compound lvp repair

The dark gray area is a cement-based floor leveling compound spread on either side of a crack in the concrete slab. Copyright 2023 Tim Carter ALL RIGHTS RESERVED

You can easily mix and spread floor-leveling compounds to make a floor flat. I used a cement-based product to cure several trouble spots. The product, once mixed with water, resembles cake icing. It’s easy to spread to a feather edge using a drywall broadknife tool.

LVP has a huge expansion/contraction coefficient. This means in gets bigger as it gets warm or hot. As such, you must create a gap around all the edges. Your instructions will tell you how much depending on the size of the room. Do NOT skip this step. If you fail to install the gap, the LVP flooring will buckle when it gets hot.

Your instructions may call for an underlayment. If so, install it. Be sure the subfloor is free of all debris. Vacuum the existing surface to ensure there’s no grit or chips under the new underlayment.

lvp underlayment

This is the fan-fold foam underlayment I installed. The yellow coating is a vapor barrier. Copyright 2023 Tim Carter

With no experience whatsoever installing LVP, I was able to install the planks in the room and a closet in less than six hours with no help. Simple cuts were made with a sharp razor knife.You score the LVP several times just like drywall. and then snap it. I used a simple rubber mallet to pound the side joints so they interlocked.

My wife was astounded at how the new floor looks like real wood. I’m also impressed. Be sure to look at all the different brands to find the most realistic LVP should you want to fool your friends and neighbors!


Here's an email I received from Judy in Redmond, Washington:

"I installed LVP in my laundry room per directions with the gap all along the walls. I regret it now since my front loader washing machine gyrated opening a gap of nearly 1/4".  Aren't these things (LVP) basically plastic and the instructions recycled from floating wood floors? The subfloor is a concrete basement slab."

I replied that vibrating washing machines can absolutely cause LVP panels to UNLOCK. You'd do well to NOT install LVP in your laundry room.

Column 1516

Penetrating Deck Sealer

peeling outdoor wood deck sealer

Best Penetrating Deck Sealer | Just three years ago this cedar decking looked like an exquisite piece of fine furniture. It had just been sealed with a top-quality outdoor sealer. Look at how it’s peeled. Copyright 2023 Tim Carter

Where is the Best Penetrating Deck Sealer?

Do you have a wood deck? How much time do you invest in cleaning and sealing it? How many gallons, currently priced around $55.00 per gallon, of high-quality sealer do you use to make your deck look fantastic? I pretty much know all the answers because I’ve dealt with cleaning and sealing outdoor decks. fences, and other wood for decades.

Deep experience is often coupled with cynicism. I’m acutely susceptible to this because it’s my job to think analytically about building products and tools. I feel a deep responsibility to find the best products and then share that information with you. When it comes to deck and outdoor wood sealers, I’m not certain there is a great product currently on the market.

In the three decades I’ve penned this column I’ve written about all sorts of products telling all the truths that the manufacturers conveniently leave out. I’ve been a master plumber since 1981 and when I saw the big push about the wonders of tankless water heaters I shared that in certain cases you’d never save money with them. Your energy bills would go up because you’d have an endless supply of hot water. I shared that you have to amortize the much higher installation cost. This meant it would take years to break even.

If my claims were wrong, I would have heard instantly from the water heater manufacturers. They would have demanded a retraction or correction column. I never heard a word. The exact same thing happened less than ten years ago when I exposed how asphalt shingles were being pre-aged. This means they don’t last as long as they should on your roof. Did the shingle manufacturers reach out crying foul about all the facts in my Roofing Ripoff book? The answer is no. That means my claims were correct.

roofing ripoff cover

Now let’s see what the deck sealer manufacturers are going to say. Less than thirty years ago deck sealers used to be true stains. They would soak into the wood and not leave a film on the surface. I distinctly remember testing one that use synthetic resin instead of natural oils. Natural oils like tung, linseed, and others are delicious food for mildew and algae. Not so synthetic resins.

That magic sealer penetrated into the wood and would look great for about three years. All you had to do to reseal the deck was to wash it with soap and water or an oxygen bleach solution. You’d then apply a fresh coat. The product never peeled. Back all those years ago many deck sealers were true penetrating stains.

But things started to change in the last two decades. Just about every deck sealer I’ve tested has peeled. In other words, the sealers are more like paint and varnish rather than like a wood stain that soaks into the wood.

The issue is when the film-forming deck sealer fails, it’s a catastrophic failure. Some of the sealer peels and some doesn’t. If you just clean the deck and reseal it not removing the unpeeled sealer and taking the deck to bare wood, you often get an uneven finish that appears blotchy.

To achieve great results when it’s time to reseal your outdoor wood, you have to strip off the old finish or sand it off. That is mind-numbing work, to put it mildly. This fact begs the question: Why would the manufacturers create film-forming products that cause you and millions of others so much agony? Is it to sell more sealer faster?

Realize that when I start to ask penetrating questions about product failures of any type, I often get the silent treatment from the public relations (PR) people who work for the manufacturers. Having done expert witness work for nearly thirty years I believe I know why. The attorneys working for the manufacturers don’t want information out in the public domain that might hurt the manufacturer in a future private or class-action lawsuit. This just happened to me when I started asking tough questions about lithium-ion batteries. No PR person would return my calls or emails.

You and I both have to battle unethical or misleading information on product labels. The most recent deck sealer I used, Cabot Australian Timber Oil, showed great promise when I applied it three years ago to my new cedar dock panels. The label said it was a penetrating finish. I thought for sure it would be like the sealer of old that was truly a penetrating stain.

It turns out it was a film former. Technically I’m sure an expert on the witness stand would or could say that some of the product did penetrate into the top layer of wood fibers. But I feel half-truths are whole lies. The manufacturer of the product I bought could have also added a phrase, “…and once dry a protective surface film stops water from entering the wood.”

Had that description been on the label, I would have instinctively known it was a film former destined to peel. All of the wood leading to my boat dock I treated with this product is looking horrible and if I want it to look fantastic, it’s going to be a huge project to get rid of the old inferior product.

What are your options? Well, you can bite the bullet if you intend to live in your home for many years. You can get a top-quality composite deck material that requires just a simple cleaning each spring to get off any dirt from winter storms. I did that with all my decks and now I’m contemplating doing it with my boat dock. Wish me luck!

Column 1515

Irish Setter Crosby 6 Inch Boot

Irish Setter Crosby 6-Inch Boot #83602 - Style, Comfort & Durable

I had the opportunity to test a pair of Irish Setter Crosby 6-inch boots. Thank you, Red Wing Shoes for sending them!

Irish Setter is part of the Red Wing Shoes brand. Early in my construction career, I bought only Red Wing boots and shoes.

I was not disappointed at all with the Crosby boots.

They were comfortable and offered great support. My weak ankles need all the support I can get!

Here are the primary features:

  • waterproof
  • non-metallic toe
  • electrical shock resistance (ESR)
  • puncture resistant

Check out these photos. As you know, each one is worth at least 1,000 words:

irish setter crosby 6 inch boot

This is a great-looking boot. It comes with the Red Wing legacy. What more could you want?

irish setter crosby 6 inch boot

The black patches add great contrast and the orange stitching really finishes off the look.

irish setter crosby 6 inch boot

Decades ago boots weren't waterproof. Now they are. Your feet now stay dry all through the workday.

irish setter crosby 6 inch boot

When you see these Crosby's coming your way, step aside!

irish setter crosby 6 inch boot

This sole pattern provides amazing traction and slip resistance.

Old Frigidaire Commercial

Old Frigidaire TV Commercial

Advance to 2:55 to see how we've gone BACKWARDS with respect to refrigerators.

A spreadable butter compartment!!!!! This means that part of the box was a little warmer!!!

Check out the removable fruits and vegetables fold-down tray!!!!


Building on Solid Soil

footing trench topsoil with tree roots not removed

How to Build on Great Soil | The DIYr that dug this footing made several serious mistakes. The biggest one is they didn’t remove all the topsoil and organic material from the center of the building site. Copyright 2023 Tim Carter

Building on Solid Soil - Get a Free Soil Map

My college degree is in geology. At the time I was in school, I had no idea how valuable this knowledge would be once I became a full-time builder. There’s a very good chance I was the only builder in Cincinnati, Ohio that knew soil maps existed and how to interpret them. Watch this video about soil maps.

Cincinnati has a little-known reputation for having the highest per capita amount of houses damaged by landslides. California gets all the ink and headlines in the news when their winter storms cause dramatic images of houses falling into the ocean but Cincinnati is plagued by slow-moving landslides that affect thousands of parcels of land.

A few decades ago, the most expensive retaining wall ever built was completed in Cincinnati at the base of Mt. Adams. I’m not sure this record still stands, but it’s all because of poor soil conditions on many of Cincinnati’s hillsides. I was exposed to this reality while in college and I’ve never forgotten it. You can read a magazine article steeped in political and racial bias about the history of this massive retaining wall here.

mt adams cincinnati I-71 retaining wall

This is an aerial photo of the massive retaining wall at the base of Mt. Adams in Cincinnati. huge steel cables penetrate into the bedrock and are anchored inside a tunnel deep within the earth. Photo credit: Cincinnati Enquirer - Fair Use Doctrine usage

expensive mt adams retaining wall I-71

This is a great close-up shot of the massive retaining wall showing the huge concrete piers that penetrate deep into the colluvium at the base of Mt. Adams. Copyright Bill Griffin Photography - Fair Use Doctrine - CLICK HERE for Bill's Instagram page.

Your house has an intimate relationship with the ground. They constantly touch one another. The same is true for any structure built anywhere on the planet that doesn’t float on water. The foundations of all buildings connect to the earth. The ground must be able to support the weight of the building. If it doesn’t, the house will shift later causing all sorts of expensive structural issues such as cracked foundation walls, doors and windows that don’t fit right, and tilted floors.

Years ago I became friends with an intellectual property attorney. He and his wife purchased a lot from a large tract builder. The builder then proceeded to build a large home for my friend. A few years later the attorney called me to come over and look at some disturbing things inside the home. The center of his basement floor had a disturbing huge hump in it. The center I-beam that ran the length of the house was twisted and the 2x4 plate on top of it was only 7/8ths of an inch thick due to being compressed.

A massive crack extended from the foundation up to the roof. It turns out this building lot used to be a deep ravine. The subcontractor who did all the cut-and-fill groundwork made a massive mistake by bulldozing trees and brush into the ravine and then proceeded to cover it up with dirt. My friend’s house was sinking into the ground as the dirt filtered down and filled all the voids around the trees.

When the hole was dug for his foundation, the ground looked fine as the fill had been compacted at the time. You could have only discovered the hidden time bomb had you looked at a topographic map of what the land looked like before the developer purchased it. This map would have shown the ravine that was filled in. Even so, all could have been fine had no organic material been covered over in the ravine. You would have only known this if you would have paid for a geotechnical engineer to come out and do a core sampling of the soil.

Several months ago a visitor to my www.AsktheBuilder.com website asked for advice about pouring footings for a new house he was building. He had purchased a lot that had lots of mature trees on it. He cleared many trees to get ready to build but he failed to remove all of the topsoil that would be under the house.

The photos he sent were deeply disturbing. He had dug the trenches for the footing and got down to the B horizon in the soil where there was no organic material. However, at one corner of the house, he had not dug deep enough and was about to pour the concrete footing on topsoil.

The center of the excavation still had all sorts of topsoil and tree roots in it. He was going to pour the concrete slab on top of this mess! I pointed out all the mistakes I saw and we parted ways. I have no idea if he corrected the mistakes. If not, he’ll pay dearly down the road.

You don’t have to be a geologist to understand a soil map. Almost all counties in the USA have been mapped and you can now obtain these invaluable building aids online for free. You’ll be able to locate your lot on the map with little effort. Once you do this, you can then see what soil is present. The map then tells you all the characteristics of the soil and how suitable it is for building.

Never build anything on topsoil. It contains organic material that can rot and it’s not capable of supporting concentrated loads. Never build on soil that contains tree roots, or vegetation of any kind. If you’re digging in clay-rich soil and experience a rotten egg smell or other offensive odor, it could be rotting organic material in the clay. Invest the money in a consult with a geotechnical engineer if you have the slightest suspicion that the soil is questionable.

Before you purchase a vacant lot, do lots of due diligence. If it’s a new subdivision, obtain the cut-and-fill plan from the developer. Avoid lots that are on fill dirt. Look to buy a lot on an area that was cut as there’s a very good chance the ground on that lot mimics the rock of Gibraltar! That’s a good thing so long as you’re not buying a lot that’s all ledge and solid bedrock that requires blasting! That’s the other extreme of bad soil.

Column 1514

Little Known Deck Building Tips

deck joist diagonal bracing deck beam beam bracing

DIY Deck Building Tips | You don’t often get to see the underbelly of a deck. There are very important structural elements in this photo a DIYr might never incorporate into her/his deck. Copyright 2023 Tim Carter

DIY Deck Building Tips - Prevent Deck Collapse!

Are you about to build a deck yourself? Perhaps you’re going to hire a professional. My guess is you don’t know as much about the process as you should know. Add to the mix the cable TV shows that go on and on and on about how simple it really is.

To be honest, it’s not all that easy to build a great and safe deck. There are countless small tips that you’d probably never know about. I get it. There are lots of small tips about being a doctor, nurse, accountant, forklift driver, and countless other professions that I don’t know about. Allow me to share with you some very important things that just might ensure your new deck doesn’t collapse.

It’s important to realize that decks are not at all different than the floor in your home assuming you don’t live on a concrete slab. Unfortunately, you typically don’t get to see how a floor is framed unless you have an unfinished basement. There you can see the floor joists, possibly ancient cross-bridging, and how the joists are connected to beams and the foundation wall.

One thing most people fail to think about is that a deck is exposed to the weather whereas the floors in your house are immune from the weather if you keep doors and windows closed when it rains. The treated lumber you’re about to buy contains lots of copper. This copper is leached out each time it rains and becomes a corrosive liquid brew when it comes into contact with iron or steel that’s not protected with lots of zinc, chrome, or nickel.

In other words, all of the bolts, screws, nails, joist hangers, framing connectors, etc. that you intend to use must be of the highest quality. Poor-quality electroplated galvanized nails or screws could begin to corrode in just a few years. Double-dipped hot galvanized metal is a smart choice. Stainless steel should be on your radar if you’re building close to a saltwater marine environment. Don’t underestimate this sinister corrosion that starts the day you finish your deck and then it rains.

Think twice about allowing treated lumber to touch the ground or soil. I’ve witnessed treated lumber rated for direct burial rot and be damaged by wood-destroying insects. You want to be able to always see your treated lumber. Use high-quality galvanized post bases that elevate the deck posts up off your concrete piers.

Avoid bolting horizontal beams to the sides of deck posts. When you do this, all of the weight of the deck is concentrated on the tiny surface area of the top of the bolts. It’s far better to use 6x6 posts where you create a notch at the top of the post. The beam sits on the notch and is through bolted to the tongue of the post that extends to the top of the beam. Note I said through bolts, not lag bolts. Through bolts have machine threads and you use a large flat washer and nut to connect the pieces of wood together.

deck post notching

Deck post notching is easy if you use 6x6 treated posts and a builder's level. The beam that supports the deck joists will rest upon the flat area of the notch at the top of each post. Copyright 2023 Tim Carter

The floor in your home resists racking back and forth because the sheets of 3/4-inch subflooring interlock are all nailed to the floor joists. If you use composite decking as I have on my deck, the decking is not screwed to the joists except at the ends. Hidden clips hold the decking to the floor joists.

To prevent racking, you need to install diagonal bracing under the floor joists. I happened to use two 2x6s that extend from the corners of my deck and meet at the center forming a huge letter V under my deck. Where the 2x6s touch the floor joists above, I installed two massive 4-inch-long timber screws with a giant flared head. This bracing method is time-tested and has been used to make house walls stiff to resist side-to-side motion.

Be sure to apply modern tape on top of your deck joists before installing the decking. The tape minimizes water infiltration into the joists where the fasteners connect the decking to the joists. Water that enters alongside the fasteners creates larger and larger cracks over time allowing more water to enter the joist causing premature failure.

Are you struggling how to get your concrete piers in the perfect location? Here’s an old trick a fellow carpenter taught me. Purchase a few long 2x4s that you use to create the shape or outer dimension of the deck. Say your deck will be 12 x 16 feet. Nail the 2x4 lumber together, square it up, and install a few diagonal braces to keep it square. If you’re on a slight hill, install temporary legs to make the top of the 2x4 box level and in the position where your deck will eventually be. Now you can use a plumb bob or level to project down to the ground exactly where your support posts will be. Take the time to calculate where the concrete pier needs to be so the support post is centered on the pier.

If you don’t know how to square up a deck or the simple frame I just described, watch the following video. Don’t worry, your high school math teacher will not spin in her grave. She’ll actually be proud that you figured out a way around that tough algebra.

Column 1513

Hardwood Floor Refinishing

birch hardwood kitchen floor being sanded

Hardwood Floor Refinishing | The old finish on this hardwood floor has been removed near the cabinets. The mind-numbing work of scraping up against the edges remains to be done. A tremendous amount of skill is required to produce a satin-smooth finish. Copyright 2023 Tim Carter

Hardwood Floor Refinishing is Hard Work - Best Done by a Pro

This past week I, along with my beautiful and patient bride of forty-nine years, had to endure the throbbing and nerve-rattling experience of a massive hardwood floor sander grinding off the finish from the birch hardwood in our home. We were huddled in the basement along with our nervous pets as the workmen busied themselves with restoring our floors.

Just over two months ago a chubby mouse gnawed a tiny hole in a PEX water line leading to a second-floor bathroom. The resulting slow leak happened while we slumbered. The water seeped under the hardwood floor in our master bedroom. Since wood is hygroscopic, it swelled and buckled creating multiple ridges like the ice does on Lake Winnipesaukee in the dead of winter. Even though I shut off the water to the bathroom immediately upon discovering the leak, $35,000 worth of damage was caused by the pesky rodent.

I’m sharing this experience with you in case you’ve been lulled into a false sense of security watching the make-believe cable-TV home improvement show hosts that tell you how easy it is to get professional results when refinishing hardwood floors. They’re bald-faced liars that ride on unicorns.

Allow me to share with you nearly fifty years' worth of building experience with respect to all that’s involved when creating a mirror-like finish on hardwood flooring. If, after digesting what I have to say, you decide to still try to tackle the job yourself, for the love of God do it in a small room that can be sacrificed on the altar of obstinance.

The first step in refinishing an existing hardwood floor or sanding virgin hardwood is to do a rough cut with a massive drum sander. These machines weigh well over 100 pounds. They require a velvet touch when operating so you don’t create shallow dips where the machine changes direction as you go backward and forwards.

This massive machine leaves a border of unsanded wood around the edges of the room. A different smaller hand-held disc sander is used to get right up against the edge of woodwork or other objects that stick up from the floor. If you think operating the huge drum sander is hard, wait until you start carving crescents in your hardwood using an edger. It takes hours of practice to become somewhat proficient using this tool.

Years ago it was back-breaking work using an edger. Fortunately, a floor finisher came up with a brilliant invention called an edger dolly. The young man who edged all my floors sat on this wheeled dolly moving all about the rooms in my house. A chest pad is part of the makeup of the dolly. This design allows you to position yourself comfortably in the dolly. You expend all your strength in controlling the edger instead of trying to maintain your balance while using the sander.

The hardest work of all, in my opinion, is using the hand scrapers. These basic tools work just like a straight razor. A barber pulls a razor across your skin to carefully remove hair. The floor finisher pulls this sharp tool across the wood in corners and other places the edger can’t get to. Once again, a scraper in the hands of a novice will damage the wood in seconds. Watch a hand scraper in use here.

You might think at this point you’re ready to apply three coats of the finish. Think again. It’s time to break out the palm sander and a wonderful rotary floor sander to get the wood satin smooth. The palm sander is used along the edges of the room while the rotary sander is used in the wide-open areas of the floor. Watch a large rotary sander here.

The best rotary sanders, in my opinion, have about six small rotating sanding discs that are part of a larger orbiting sander disc. This sander works just like a floor buffing machine that you might have seen a custodian use to polish vinyl tile or terrazzo. You must keep moving back and forth to produce a professional finish. Applying slight tilting pressure with the handle gets the rotary sander to move left or right. It requires some practice so you don’t crash the sander into a nearby wall.

It’s now time to remove all the dust from the hardwood. There are all sorts of ways to do this. Once the dust is gone, you can apply the first coat of sealer. Be sure to use one that will not raise the grain of the wood. After it’s dried, you screen the floor to buff it, remove the dust and then add a second coat of finish.

Some installers stop at the second coat. I prefer three coats of durable finish. Once again, you must lightly screen the second coat of finish. This screening process is how you create the mirror-like finish that’s satin smooth. It’s imperative you remove all dust before you apply the last coat of finish. Go here to see what fresh finish looks like as it's drying.

Avoid the temptation to move furniture and carpets onto the floor the next day. Almost all floor finishes require a minimum of 72 hours of curing time to attain the hardness required to prevent things from sticking to the finish. If you can wait 96 hours, do so. Are you ready to go rent all the tools? I didn’t think so!

Column 1512