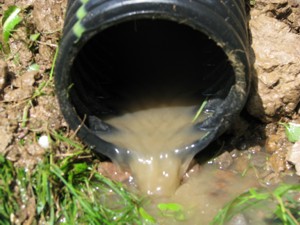
The drain tile is the white pipe under the gravel. The red arrow points to it. The builder has it in the right position, but it needs 2 inches of gravel under it and at least 2 FEET of gravel over it. READ MORE BELOW Copyright 2018 Tim Carter
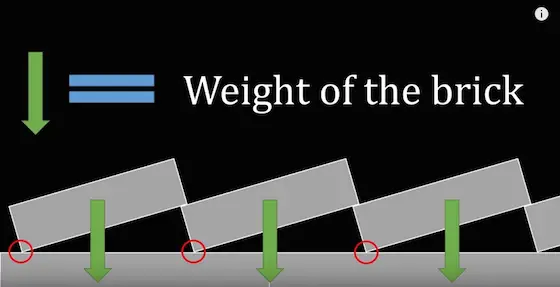
"Water moves horizontally through soil. Water occupies the void spaces between the particles of soil. The deeper you go into a soil, especially if it is clay, the less space there is for water. Drain tile needs to capture this water and pipe it far away from your home."
! ! ! See Author's Notes at Bottom of Column! ! !
What is Drain Tile?
Drain tile is a perforated pipe that allows water to enter into the pipe. It's installed at the base of a foundation. Water in the soil flows through washed gravel on top of the pipe and is carried away from the foundation where the pipe exits the ground.
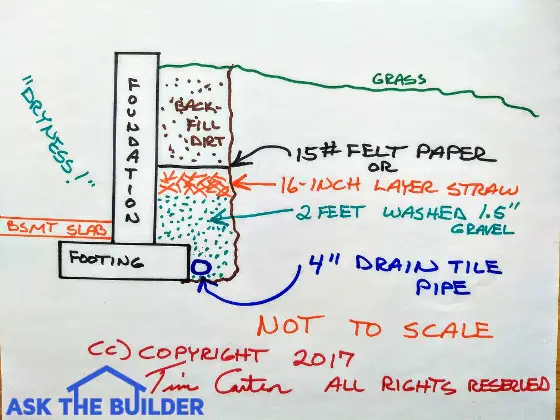
Here's drain tile and how it should be installed. The missing part is what happens with the round drain pipe. It will either extend sideways to daylight if the slope is steep around the house, or it will go under the footing to a sump pit in the basement or crawlspace. (C) Copyright 2017 Tim Carter
Is Drain Tile Part of a Foundation Waterproofing System?
Yes, drain tile is just one small, but important, part of a foundation waterproofing system. There is a big difference in exterior foundation waterproofing treatments. You may think that your new home foundation has been waterproofed because you saw some black stuff sprayed on the poured concrete in the top left corner of the above photo.
I'm willing to bet that fewer than 1 in 100 new houses in the Greater Cincinnati housing market have waterproofed foundations. Most are dampproofed. What do you think is happening in your city?
It's important to realize I had the good fortune to work on many older homes in Cincinnati, Ohio early in my building career. Quite a few of the homes were built in the late 1800s and early 1900s. Most of those never had drain tile or any foundation waterproofing.
Drain tile started to appear in the late 1920s and 1930s. It was very crude and consisted of 4-inch diameter red clay pipe that was 12 to 14-inches long. Pieces of this pipe were butted up against one another next to a poured concrete foundation footer.
The laborer would put a 1.5-inch-wide strip of asphalt felt paper over each butt seam to prevent mud from getting into the pipe.
Water entered the butt seams where two pieces of clay tile touched one another. Rarely was washed gravel put on top of the clay pipe. It was a mistake to leave out the gravel.
Does Brush-on Asphalt Waterproof a Foundation?
Beginning in the 1950s there was widespread use of asphalt on new foundations. This was hand brushed or troweled onto a new foundation by laborers.
Does Asphalt Stop Water Vapor?
Yes, asphalt is a great material to stop water vapor. Concrete soaks up water. If you place moist earth around an unprotected foundation, your basement will be damp. Surely you have been in an older basement and smelled this moisture. Older homes rarely had any treatment on the concrete or stone.
The asphalt did a great job of minimizing water soaking into the foundations. However, it did not possess the ability to bridge or fill a crack which may develop in the foundation. You see, after a period of time, asphalt becomes somewhat brittle. When a foundation treated with asphalt cracks, the asphalt cracks too!
Are there Rubber-Modified Asphalt Recipes for Waterproofing Foundations?
Yes, Owens Corning modified standard asphalt by adding some rubberized compounds. The result was a compound that had a certain amount of flexibility. Other companies developed synthetic rubber compounds that have far greater elasticity than the modified asphalt.
Even before either of these products was available, commercial builders used cardboard panels filled with bentonite for waterproofing. Bentonite is a special natural clay product that swells when wet.
Water carries the clay into the crack, it swells and plugs the leak! The bottom line is that you can truly waterproof your foundation. It just takes a little homework on your part to select the right product for your particular building situation.
Do Dimple Mat Waterproofing Systems Work?
Yes, the dimple mat waterproofing systems work well if installed correctly.
The latest technology is to install a barrier that allows water to freely drain down to the drain tile along the entire height of the foundation wall covered with soil.
One product is Delta MS. Look at this install:
This system connects to the drain tile. It's a great waterproofing solution. I'd add more gravel and no matter what the MS Delta people say, I'd cover the gravel with a foot, or more, of straw. This column was SO GOOD that I shared with the 31,000 subscribers who read my December 19, 2018 AsktheBuilder Newsletter. Copyright 2018 Tim Carter
Why Is Drain Tile Important?
The company who waterproofs your foundation will most likely insist that they install or monitor the installation of your drain tile system. Very few builders that I'm aware of take the time or interest to adequately install drain tile.
Water naturally flows toward your foundation. This is especially true if you live on a hillside or even a slight slope which, by the way, most of us do!.
To make matters worse, the soil that is used for backfill around your house is rarely compacted. When it is dumped around your house it has huge amounts of air in it.
Backfill dirt is a problem because it contains lots of air and void spaces.
This dirt was fluffed up and pumped full of air when it was dug from the ground. It can take years and years for this ground to naturally compact. In some cases, where roof overhangs protect the dirt, it can take decades for it compact.
The soil can always have more air in it than the soil that is only 5 or 6 feet away. This can spell BIG trouble for your foundation if it is not waterproofed AND if you have a bad drain tile installation.
From the above discussion, you can see why draintile is important, I hope. The point is this: the backfill soil has the capacity (because of the large volume of air) to hold large quantities of water. You need to collect this water rapidly and get it away from your foundation. That is the job of the drain tile.
That is a phrase I often used to tease my coworkers after we would finish a task. It was an inside joke. However, the phrase applies to drain tile.
You only have ONE chance to put it in. It gets buried deeply. It can clog up if not installed right. It's expensive to redo. For these and several other reasons, you need a quality installation.
Where Does the Drain Tile Go?
I always like to install the drain tile on the side of the foundation footer. Many builders simply install it on top of the footer.
The water in the soil enters the drain tile from below not at the top. Most homeowners feel the water flowing down through soil magically finds its way into the slits or openings at the top of drain tile. That's folly.
Installing the drain tile on top of the footer means that your water table will be at the top of the footer. My method puts the water table about 6 inches below the top of the footer. You want the level of water as low as possible.
When Should the Drain Tile Be Installed?
I recommend that the drain tile is installed the day after the footers are poured. I used to help strip the forms and then put a 1 to 2-inch layer of 1-inch gravel alongside the outside of the footer.
I would then install the drain tile continuously around the footer. Finally, we would cover the drain tile with 1-inch gravel flush with the top of the footer. This would complete phase one of the operation.
There are advantages to doing the job this way. First, the space between the side of the footer and the wall can fill with collapsed dirt and/or concrete overflow from pouring the foundation wall. This stuff is tough to dig out and remove once the basement walls are poured. Besides, it is tough to work in the narrow area left along the foundation after the walls are up and poured.
Complete Installation After Waterproofing Foundation
Once the foundation is waterproofed, you can continue the drain tile installation. I recommend that you install an additional 2 to 3 feet of 1-inch gravel cover above the footer. On top of this, install tar paper or a 6-inch-thick layer of straw before installing any backfill dirt.
The tar paper and straw prevent the drain tile from getting clogged with silt.
The elimination of the straw or tar paper is a huge mistake. The backfill dirt is fluffed up. Rainwater carries small silt particles down into the soil until it self-compacts.
The first thing to remember is the backfill dirt has lots of air voids that are waiting to get filled with this silt. This silt will clog the gravel and drain tile if you don't stop its downward movement.
Best Drain Tile Empties to Daylight Like a Natural Spring
So where does the drain tile water go? Good question!
If you're lucky, it drains out to daylight somewhere on your lot. Here is what I mean. If you're building on a sloped lot, maybe you are lucky to have enough fall within your property line whereby the drain tile can daylight. There is no need for the pipe to have a slope. It can be laid virtually perfectly level from the footer until it daylights. The net result is that you are simply providing a resistance-free path for the water around your foundation to escape.
If you are unlucky, like me, you need to install a sump in your basement. The draintile pipe gets to the sump either through or under your footer. I always install a 6-inch pipe under the footer right where I know I will install the sump. I actually install this pipe before the footer is poured. It's tough to tunnel!
An electrical pump pumps the water from the sump to either the outside of your house or into a stormwater drainage system. Never allow the sump water discharge pipe to dump the water alongside your foundation. This simply soaks the soil again!
Battery backup sump pumps are available to assist the regular pump in the event of primary pump failure or a storm-related electrical outage.
Backfilling Basement Foundation Walls
Many a foundation crack is related to backfilling. Very few homeowners realize the risk of backfilling a foundation too quickly.
Don't forget that your foundation walls are simply beams or retaining walls. The walls act as a beam once the basement floor and the first-floor subfloor are attached.
Without these two elements, a foundation wall can tilt inwards, crack, or even slide off the footer! Don't allow your builder to backfill until these floors are in place!
Also, did you know that it takes approximately 28 days, under ideal conditions, for concrete to reach 75 percent of its design strength?
I know of builders who backfill foundations within four days of being poured! I've seen huge cracks develop from foundations that were backfilled prematurely. Don't let it happen to you!
Slope Dirt Away From House Foundation
Model building codes mandate that the soil must fall away from a foundation. They actually state that there must be 6 inches of fall within the first 10 feet of horizontal distance away from a house.
If lot lines are too close for this to happen, then there must be some sort of drainage channel that allows gravity to pull water away from a foundation.
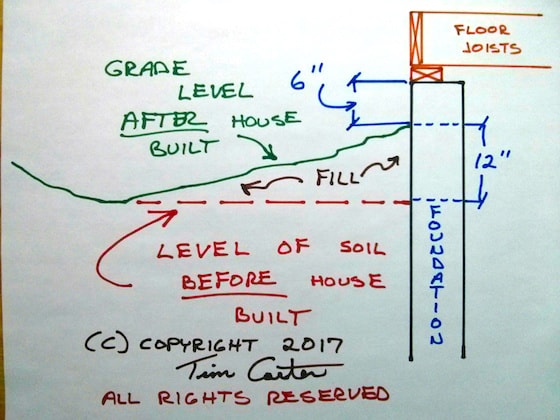
I made this drawing. You can see the foundation wall with a typical sill plate and floor joist. The red line is the lot before the excavator shows up. The top of the foundation should end up 18 inches ABOVE the red line. Use the dirt from the hole to create the slope away from the foundation. (C) Copyright 2018 Tim Carter ALL RIGHTS RESERVED
Furthermore, once this water is away from the foundation it needs to be directed to the lowest part of the lot. In other words, the lot grading plan needs to be completed so that water drains off the lot much like it did before a house was built on the lot. It is a common sense issue. This can be easily accomplished if the house foundation sticks up out of the ground and backfill soil creates the needed slope.
If you have ponding problems now and it is too difficult to re-grade your yard you can drain these swampy areas fairly easily. All you need to do is install a linear french drain system in the yard. This is a simple trench system that contains perforated drain pipe and gravel. The trenches are just 6 inches wide and about 18 to 24 inches deep. They follow the contour of your yard until they go past your house. Then the bottom of the primary trench levels out and before long the pipe will daylight!
You may wonder if my advice is worth anything. Well, read what Jim Sanders wrote to me when he was at the end of his rope:
"Hi, I just wanted to write to give you the results of my "Trench Drain". I have had a wet crawlspace for 15 years. Water would fill the crawlspace at times, so we actually had to drill weep holes at the base so that it would enter the basement and eventually, the sump pump.
I have tried everything. Several contractors said that the only thing we could do was to bring the water into the house via drainage tile and let it enter the sump pump. That would work, but because I live on a 6' elevation, there is no reason that I should have water problems. It became like clockwork...when it rained, we would rush home from the lake or wherever we were vacationing so that we could be prepared to start the backup generator, in case the power failed. We even had our alarm company put a sump alarm on our system, so they could notify us if we had a power failure. Battery backup was not an option, because sometimes we lose power for days and during any rain, our sump would run every 7 minutes...just like clockwork.
I found your site and read the article on the trench or French drain. At first, it sounded a bit like "holistic healing" to me. I failed to understand why a 2 ft. deep trench, 4 ft. away from the house would do any good. How could this simple thing correct an extreme water problem that has plagued me for years, cracked my foundation, settled my garage floor and ruined almost every vacation?
The Linear French Drain trench running from the house. PHOTO CREDIT: Jim Sanders
I decided "what the heck". I had to dig by hand using a trenching spade and a pick-ax, because the builder back-filled our property with brick and blacktop. It took quite a bit of time. Because the ground level varies so much on that side of the house, I was not able to achieve exactly 2 ft. deep. It varied from 18" to 30" in spots, but the slope was downhill. The trench is about 80 ft. long. At times, I thought about filling it all in, because I just didn’t believe that it would work.
I stoned it, put tile in, and filled it with #1 round stone. I socked the pipe just for safety measure and I also used geotextile fabric on top, so I could cover with dirt and grass. I also ordered some clay and pitched from the house to the drain.
After a short rain, water is running away from the house. PHOTO CREDIT: Jim Sanders
Result? For the last month, we have had 7 or 8 torrential rains, the worst of which was last night. It rained so hard, that our lawn washed out in spots because of the high clay content. Our sump pump, that normally ran every 7 minutes during and after rain, has not turned on for 4 weeks. The silt at the bottom of the sump well is now dry and cracking. Our crawlspace has not shown a trace of water or even moisture.
Since I couldn’t see correcting the foundation cracks or the garage floor settling and tilting until I corrected the problem's source, I waited to see if the trench drain worked first.
This week, I had a company come in and perform sort of a "mud-jacking" technique on the garage floor, which worked perfectly. Also, during the past few weeks, I parged the cracks in the foundation.
A dry sump pump. PHOTO CREDIT: Jim Sanders
I just wanted you to know how this worked. I stressed for many years over this issue and the solution was nowhere near as difficult as I thought it would be.
As a side note, I went to the end of the drain tile during a hard rain to see what was happening. Water was running out of the drain tile in about the same exact volume that it previously ran out of the weep holes in my crawlspace. This winter will be interesting, because last year, the ground next to the house was so saturated that during a thaw, my sump would run constantly. I'm guessing that the ground between the trench and the house will probably be drier now going into this winter."
You can't make this stuff up. I just had another run in today with a PR firm that represents a major manufacturer.
I was going to sit on this news for a few days since I just sent out a blast to you, but this is a life-safety issue.
And as one of the subcontractors that works for my very good friend Nick Motz in Cincinnati says, "Life safety takes precedence over all else."
In this case he's right.
This one's all about propane.
I BEG you to Forward this news blast to anyone that's a big DIYr or any young people that you feel might not know about the DANGERS I'm about to reveal.
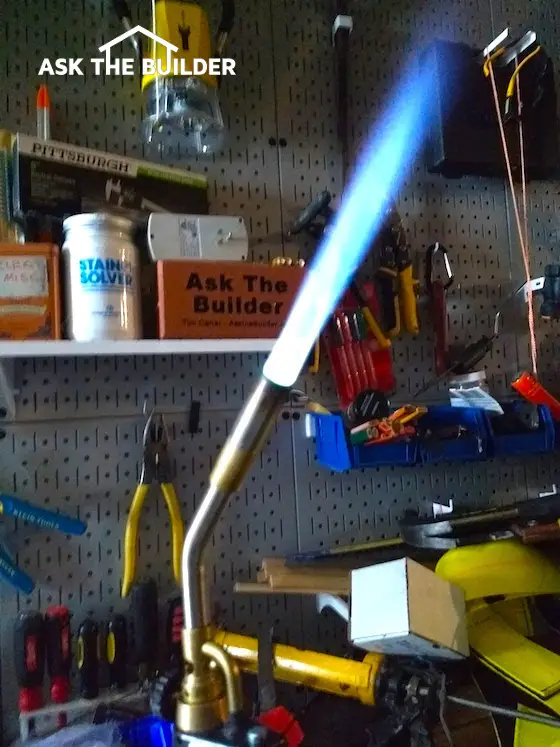
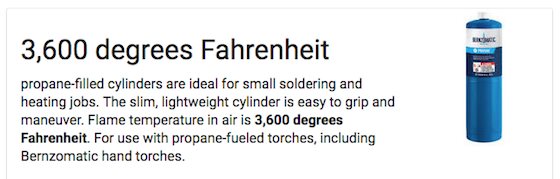
See that cool blue flame? It's anything but cool. Put a sensor in the white area and it will probably measure 3,600 F. Copyright 2018 Tim Carter
Once again, LEAVE A COMMENT at the bottom of the column after you read it if you want to send a message to manufacturers or PR firms.
I want to add that I've offered my consulting services to manufacturers for years to punch holes in their products BEFORE they go to market or BEFORE they go to press.
I obviously do a horrible job of marketing this service because no one has ever hired me. My guess is they feel they know better.
Date Bar Cookie Recipe
I got numerous requests for Kathy's delicious date bar cookie recipe. She's going to share it.
See that cool blue flame? It's anything but cool. Put a sensor in the white area and it will probably measure 3,600 F. Copyright 2018 Tim Carter
PR Blunders - Be Very Careful and Use Common Sense
Published: January 17, 2018
I'm a member of the working press covering the home improvement beat. My syndicated newspaper column Ask the Builder still runs in sixty newspapers across the USA.
At the present time, public relations (PR) firms send me press releases each week sharing news about new building products. I received one this morning that had me shaking my head.
The press release is just below and I've included the grammar, misspelling and style errors.
I've DELETED the manufacturer and product name as well as the PR company/contact to avoid a legal dustup in case they feel I'm libeling them. Their names are really not that important. What you should focus on is the message in the press release.
After you read it, I'm going to slice and dice it for you.
Hi Tim,
As much as we’d like it to, home maintenance doesn’t stop when the temps drop. Cold weather means slippery sidewalks, frozen padlocks and high heating costs. I wanted to share some DIY tips and home hacks for the winter season that can be done with just one tool – a blowtorch.
Here are 6 (stylebook suggests spelling out 'six') easy to handle winter home hacks:
Don’t get locked out: Use a _____ torch to prevent lockouts by thawing a frozen padlock with a few quick strokes of heat.
Avoid slips and falls: Use that same ______ (or, the _______) to melt snow and slippery ice patches covering your walkway or steps. Then use a broom to brush away the rest. BONUS: This technique works faster than using salt.
Loosen your garden hose from the faucet: Use your ________ to loosen and remove a garden hose that is frozen to the spigot. Move the torch around the spigot to spread the heat around (don’t leave on one spot). This will keep cold air from freezing your pipes.
Replace old weather stripping: Make sure your windows are sealed to keep heating costs down. Use a micro-torchto heat and remove old caulk and a paint scrapper (should only have one 'p') to peel away, then replace with new sealant.
Stay warm with an indoor fire: Wood damp from snow? No problem - use a _____ torch to light logs for an indoor fire.
Light burners on a gas grill: In the event that burners are not working, use a ______ to light the grill. Just be sure to put the torch in the grill before you turn on the gas.
The torches are available at Home Depot as well as other national hardware retailers. Photos and more information is (should be 'are') available if you’re interested – please let me know what you think!
Thanks, PR Woman's Name / Firm Withheld
Master Plumbers and Blowtorches
I've been a master plumber since age 29. A blowtorch in conjunction with my lack of experience created a scar on my hand that's been there for about 30 years.
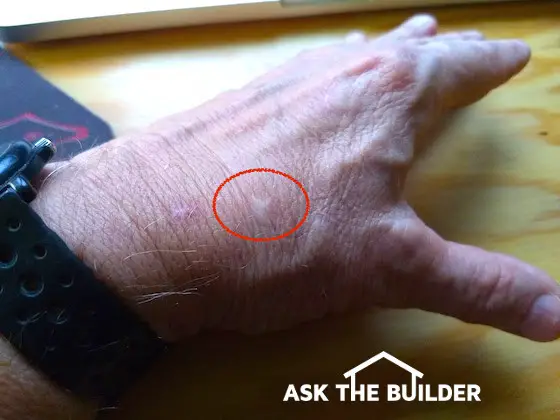
A third-degree burn scar is in the center of the red oval. Blowtorches can do serious harm in seconds. The voice of experience talking. Copyright 2018 Tim Carter
A drop of molten lead from a blowtorch dropped onto my hand while it was crammed into some tight framing. I was unable to move my hand to get rid of the sizzling metal and a third-degree burn was the end result.
A blowtorch fueled with propane develops a flame temperature of 3,600 F degrees.
Propane can burn hot. You can melt several metals with this kind of heat. Combustibles ignite in seconds. Copyright 2018 Google, Inc.
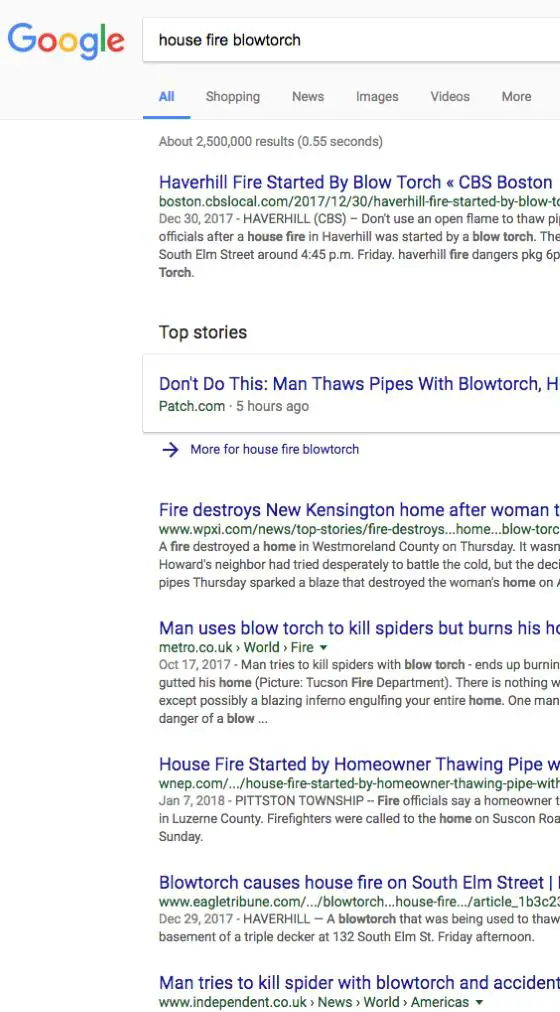
If you decide to use a blowtorch fueled with propane anywhere around your home, you can start a fire in seconds. I know as I've started more than one house on fire while soldering copper fittings. Fortunately I had planned ahead and had buckets of water nearby in case something when wrong.
The Internet is littered with thousands of blowtorch stories that ended badly. Some where people have died. It's insanity someone would recommend the use of open intense heat near combustible materials. Copyright 2018 Google Inc.
What's Wrong With This PR Blunder?
The first thing to remember is this press release is going to be printed word for word by many news outlets and a plethora of inexperienced hobby bloggers. You'll be able to do a Google search using quotation marks surrounding select sentences above to find news outlets where the above press release will be published in all its glory.
Young people who have never used a blowtorch are going to follow the tips.
Allow that to sink in. Young people will be working with open flames producing intense concentrated heat.
Another key point is the manufacturer of the blowtorch approved the press release. They are culpable for being the source of the questionable tips.
The manufacturer instructs the PR firm to put out messaging to sell product in different seasons. That's how it works. Ask any PR person.
Let's look at each of the six tips above:
Tip 1: Let's say that padlock is against a $6,000 fiberglass door. Within seconds you'll scorch the fiberglass. A painted wood or steel door will suffer immediate damage to the paint.
Tip 2: That 3,600 torch temperature is going to cause concrete to spall in just seconds. The rapid expansion of the ice-cold concrete will create pop outs in no time.
Tip 3: Have you ever been inside an old house to see what's behind a hose bib or faucet? You'll likely discover old newspapers, dust, wood chips from drilling the hole, etc. Hot gases from the torch can ignite those and a fire start all while you're outside using the blowtorch.
Tip 4: Want cold glass to crack? Remember, the tip is to do this now, not mid-summer. Just get a micro-torch tip near cold glass and watch what happens.
Tip 5: I'll grant them this tip. A blowtorch might help you get a wood fire going, but dry kindling is far better.
Tip 6: There's not a firefighter I know that would think using a propane torch is a good idea to light a grill that's malfunctioning. There's a reason the grill is not working right. Install new spark igniters.
PR Firms Have a Fiduciary Responsibility
I emailed the woman who sent me this press release warning her of the dangers.
She responded saying, "Thank you for your feedback. Each technique listed was vetted and approved by ________ engineering team for their safety."
I responded telling her that all she has to do is pass the press release by any firefighter and then added, "Your PR firm has a fiduciary duty to ensure the public is protected and for you to just *trust* the information given to you by the client is okay is naive at best."
An hour later she emailed saying, "Thank you for flagging your concerns. We are discussing with ______."
It's my opinion that PR firms have a responsibility to protect the public. These companies are paid professionals and if they belong to any associations they're bound by a code of ethics. The code of ethics for the Public Relations Society of America states:
Act promptly to correct erroneous communications for which the practitioner is responsible.
They shouldn't be going around spreading information that could harm or kill someone. They should push back against their clients and use common sense.
I'm waiting to see how long it takes for the PR firm to correct the erroneous information they circulated.
That's how I feel. What's your take? Leave a comment below.
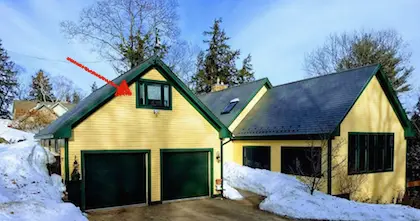
Yesterday, I chatted a small love message to Kathy my wife. I was in my man cave (click here to see my awesome cave floor) over the garage, see the photo just above, and she was down in her warm basement conservatory office with a view out to the lake and her bird feeders.
I thanked her for making these to-die-for date cookies. She makes them once a year for Christmas. It's important to realize that I carefully control the consumption of these delicacies because once gone, you don't see them again for many moons.
Yesterday after lunch, I ate one to try to get rid of the jalapeno burn that beset my stomach. I was in a small amount of discomfort from eating leftover pizza that had copious amounts of jalapeno slices on it.
I share this with you because not only should I send Kathy more love notes, but I also need to do the same with you.
Too often I forget how lucky I am to have you as a subscriber. You may have been one of the many that not only read the crazy AZEK story on Saturday, but you also made the small effort to answer the question AND leave a comment at the bottom of the column.
You have no idea how valuable that feedback is to me and others.
Your feedback might save livesbecause it sends a message that could cause a company to rethink how they sell a product.
Thank you so much and I'd give you a big hug right now if we were face to face.
Sewer Gas Feedback
Have you ever had sewer gas in your home or business? If so, I'd love to hear from you.
I'd like to use your feedback to help others who suffer from this dilemma.
Please CLICK HERE and take a few moments to answer a few questions. I've also included an area where you can type out a short story sharing what happened.
THANKS in advance for taking the time to do this.
Furnaces & AC Units in Unconditioned Spaces
As I was creating this newsletter, I got a fascinating email from Dixon who lives in the Commonwealth of Virginia.
His furnace is up in an unconditioned space above his house or garage. He had an issue with his condensate line freezing and wanted advice on how to prevent it from happening so his heat wouldn't shut off.
As is typical with me, I offer unorthodox and tough-love advice. Sometimes it's hard to accept for a number of reasons. Yes, I know I can do a better job of sugar coating my responses.
Here's what I sent back:
Forget about heat tape. VERY DANGEROUS STUFF.
Increase the size of the condensate drain pipe. 2-inch minimum.
Finally, I'd NEVER EVER put a heating / cooling unit in an unconditioned space.
For a HOST of reasons ... the first being it doesn't even make sense to have a furnace out on a patio in the winter....
That's basically what you have ...
If you're building a new home, don't let the architect or builder convince you to put your furnace or AC unit up in an attic or other unconditioned space.
I don't care WHAT THEY SAY. It's a mistake.
Create some small utility room on the main floor and put it in there.
You'll NEVER EVER regret making this decision to keep the unit out of an area where the temperature extremes work AGAINST what you're trying to accomplish inside your home.
Think about it. Why would you want your furnace and ductwork to be surrounded by air that's minus 20 F?. Why would you want the AC unit to be working away up in an attic space where the air temperature is a blistering 150 F?
It's INSANE ...
What's more, it's easier for a service man to work on the unit if it's in a room where he has easy access to the equipment.
Please take a few moments and complete this short sewer gas survey IF you've had sewer gas in your home or business in the past. If you're a business, I offer a consumer survey service. It's very affordable.
If you have sewer gas NOW, you can also complete the survey.
Thanks so much!
If you need help now to solve your sewer gas problem, CLICK HERE to arrange a private phone call so Tim Carter can help you.
The past three days, we've been blessed with the January Thaw here in central New Hampshire. It's been a welcome relief and my boiler has finally been able to take a well-deserved break!
Two days ago, I was in Orlando, Florida getting ready to ride to the airport in my first Lyft ride. It was near 70 F and the three days I was in FL were both fun and work.
I'll bet I walked fifteen miles in two days back and forth between the two convention halls and up and down through the halls. In the rush to leave, I couldn't find my darn Fitbit!!! That would have kept track for me.
Cabs are DOOMED!!!! Using the Lyft app to get a ride to the airport was a hoot. A cab ride was over $45.00.
My Lyft ride with Alberto was $20.36. The Lyft app is so intuitive. Be sure you have your phone's GPS on when you fire it up.
The Builders Show Wrap Up
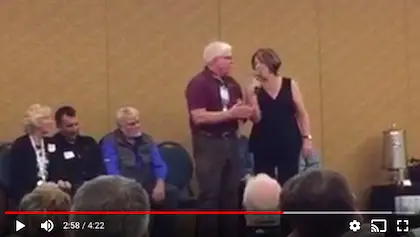
This was a very strange show for me. Tuesday was a long day. The highlight of the day was a media dinner where I was hypnotized along with five other members of the audience.
I've always wanted to be hypnotized. Let me assure you, it's REAL.
The hypnotist was a comedian and those in the audience got lots of laughs watching us do silly things on the stage. In the video screenshot above, the hypnotist told me to count my fingers, but the number SIX does not exist.
I was so confused when I got to eleven fingers!
I have NO MEMORY at all of any laughter. I thought I was out for five minutes. Several in the audience who saw me the next day said, "Five minutes? Are you joking? You were down for at least 45 minutes, probably more like an hour."
HOLY MOLY!
I was very relaxed after coming back to reality and I'd do it again in a heartbeat. If you ever have the chance to get hypnotized, do it.
The next morning got off to a very bad start. I had an early breakfast meeting with the folks at DAP. It was a total fiasco.
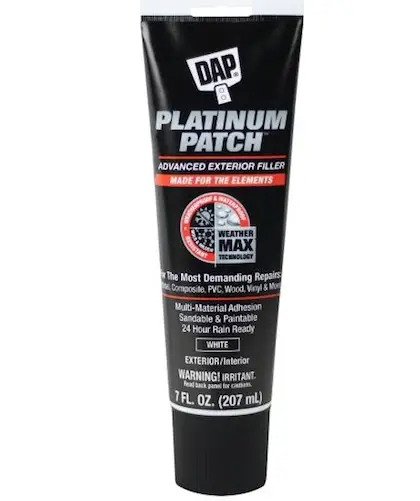
It's a very long story, but they showed me two new products they were excited about. One is an exterior spackling compound and the other is a glue. DAP is trying to go after Liquid Nail and other glue-in-a-tube manufacturers.
I was introduced to the two product managers. One was a very nice young woman and the other a young man. I'd be willing to bet $100 neither was over 27 years of age.
The young woman told me all about the things outside you could use the Platinum Patch on: vinyl siding, fiber cement siding, wood, concrete, paver brick, brick, etc.
I listened politely then said, "How long does it take to cure?"
I'm pretty certain she said twenty-four hours.
I believe there was only one other media person that came to the event so a few of the DAP people had gathered around me.
"Can you tell me what happens after 48 hours when I decide to clean my patched driveway? I'll roll my 3200 PSI pressure washer out of my garage, put the 15-degree tip on the wand and aim it 4 inches away from your new filler."
No response. You could hear a pin drop.
"Wait. You mean you didn't test to see how your magic filler stands up to a pressure washer? The general public uses these destructive machines to clean just about anything. What happened when you tested the patched vinyl and fiber cement siding using the pressure washer?"
Silence. From their reaction, I felt they had not done the tests, or if they had, they were unwilling to share the results.
The young man told me about the new magic glue. He talked about how it would be excellent to use to install ceramic tile on a wall.
In fact, he had me glue a 12x12 piece of tile to a sheet of drywall that was on a display wall in the booth.
"Have you ever installed ceramic tile at a real job site?"
"No," he answered.
"Do you know how ceramic tile is installed?"
"Not really," he replied.
I proceeded to tell him how it was done and suggested that when the show opened he ask booth visitors what they did for a living in case a tile setter came to the booth.
This would save the young man from being embarrassed.
I shook my head and left the DAP booth. Believe me, they were quite happy I was gone.
Moral of the Story:
Be VERY CAREFUL about new products and use LOTS of common sense when you think about how the product may react to normal wear and tear. Ponder what may happen to the product AFTER it's installed.
The Azek Disaster Meeting
Less than an hour after leaving the DAP booth, I found myself at the Azek booth. Azek is known for making exterior plastic trim boards and other outdoor products for your home.
I listened to their pitch about their new deluxe trim products. The wheels fell off as soon as they showed me an aluminum deck railing system.
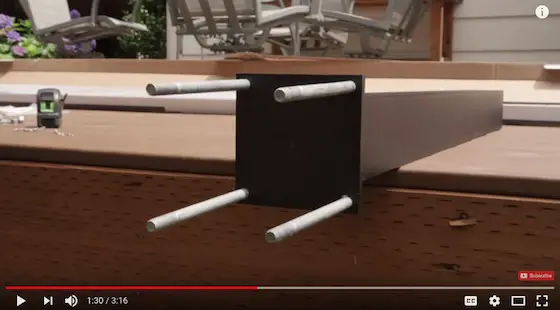
Here's a great shot of the fastening method for some Azek aluminum deck posts. The four bolts must be made from a material that will not corrode when water surrounds them and the treated lumber they pass through. Copyright 2018, Google / YouTube, Inc. Fair Use Doctrine screen capture
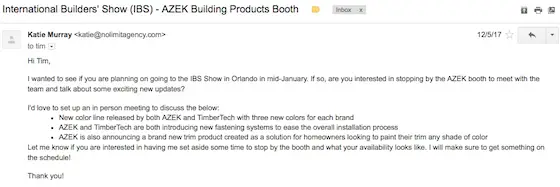
Just two days ago, January 10, 2018, I was at the International Builders Show in Orlando, Florida. I visited the AZEK booth and was talking with an AZEK employee about bolts that should be used when installing the AZEK aluminum deck posts. (Full background story on the Builders Show in the January 13, 2018 Newsletter.
The first thing to remember is AZEK invited me to come to the booth.
Here's a screenshot of the invitation to come to the Azek booth.
It's important to realize I write a syndicated newspaper column that's still published by sixty-plus papers. In addition, I have over forty years of hands-on experience working in the field in the homes of paying customers. Another key point is I have nearly 50,000 newsletter subscribers who regularly participate in short surveys.
The combination of these three things allows me to provide a unique insight as to the wants and desires of consumers and I can identify building products or systems that might not be as good as they can be.
What's more, I'm mindful of a growing and disturbing trend of young builders, carpenters and DIYrs that aren't aware of serious structural dangers when metal fasteners come into contact with outdoor treated lumber and water.
It's basic high school chemistry.
AZEK Aluminum Deck Post Bolts Can Corrode Fast
Just before leaving the AZEK booth, the AZEK team members wanted me to see an aluminum railing system they were displaying at the show. Within minutes, I got into a tug-of-war discussion with a young AZEK employee after he showed me the cast flange at the bottom of the aluminum deck post.
The conversation went something like this:
"Do you supply the needed stainless-steel through bolts, washers and nuts with the posts?"
"No," said the AZEK employee.
What followed was a brief discourse about how the entire safety of the railing system is dependent upon the through bolts never rusting or corroding.
The through bolts are a primary structural component of the deck railing system. If they fail, the railing can be pushed over with ease.
Should this happen, a person/people could fall many feet to the ground and be seriously injured or die.
Rapid corrosion of metal fasteners happens when you mix modern treated lumber, water and normal steel bolts that have a thin zinc coating. You need special fasteners that are highly resistant to corrosion when it comes to deck railings and posts.
High-quality type 316 stainless steel is the material of choice to avoid corrosion.
Expert Witness Work Provides Perspective
I mentioned to the AZEK employee that I've been doing expert testimony work for about 15 years or more and that my most recent case involved the Brazilian Ambassador's roof on the island of Antigua.
I shared with this young man the chain of events that unfolds when a building product failure becomes the focus of a lawsuit.
Should someone be injured or die because an AZEK aluminum deck post fails because of a corroded bolt(s), one of the first companies that's going to be named in the subsequent lawsuit would be AZEK.
The first thing to remember is it doesn't matter that the aluminum post didn't fail. Fasteners are required to connect the AZEK railing to the deck.
AZEK and their engineers undoubtedly know about, or should have known, the importance of fasteners and more importantly what it takes to ensure their railing system stays safe for the life of the deck.
The plaintiff's attorney would discover in the deposition phase of the lawsuit that the AZEK engineers ran tests to ensure the railing was safe. No doubt questions would be asked as to what types of fasteners were used in the test procedures.
I know this because I've been asked countless probing questions while under oath sitting at a large wood table with a court stenographer and voice recorder capturing my every word.
AZEK, by selling a deck-railing product, is expected to be knowledgeable about what it takes to create a safe product.
That's a given. Technology has really raised the bar for manufacturers when it comes to product liability and doing a better job. AZEK has the ability to set up a Google Alert for every mention of AZEK or one of its products so it stays up to date with all that's going on.
Let's assume AZEK is named as a defendant in a lawsuit where a person died because their railing system tipped over after the bolts holding it rusted. In addition, assume this happens six months from now after this column has been published on the Internet.
As soon as the plaintiff's attorney discovers this column early in the discovery process while she/he researches all that's been published about AZEK aluminum deck railing systems, it's going to be time for AZEK to open up their checkbook. I say this assuming that AZEK continues down the pathway of not supplying the best available fasteners with their railing system.
I'm no legal expert nor am I offering legal advice to AZEK. All I'm doing is sharing my own personal experiences having been a part of lawsuits where I was an expert witness.
Imagine if this hypothetical lawsuit proceeded all the way to a trial. If you want to see how the jury might vote after they deliberate the facts in the matter, be sure to answer the question at the bottom of this column and then look at the results of others who've answered before you.
Simpson Strong-Tie Ally - Corrosion is a Real Danger
"Don't you feel it would be a good idea to include stainless-steel bolts, washers and nuts with your product so you do your best to ensure that your railing system doesn't fail?"
I went on to explain that another exhibitor at the show, Simpson Strong-Tie, had all sorts of literature and experts at their booth that would explain how deck railing posts must have the highest-quality fasteners to be safe for decades.
Simpson Strong-Tie also publishes excellent documents with great illustrations showing how to make safe connections. This is not hard to do.
CLICK HERE to see an example of how to make a wood deck railing post very safe. Pay close attention to the fact that they do include the fasteners and you can pick one that has stainless steel!
We discussed the insignificant cost of high-grade USA-made type 316 stainless-steel through bolts. For a company like AZEK to purchase them in bulk, my guess is the cost per bolt, washer and nut combo would be less than 50 cents each. This means the cost of a post would have to be increased by just $2.00, perhaps $3.00 to cover the cost of any packaging for the hardware.
Here's a typical stainless steel through bolt you might use with an Azek aluminum deck post. The bolt costs about 54 cents each. You can buy a pack of them at Amazon.com for $8.07 here in January of 2018.
Although I didn't record the conversation, I wish I had now, I'm quite certain the young man's exact response to my question above was, "Our competitors are not including the hardware and no one would pay the extra money for them."
"Would you like me to prove you wrong? I'm more than happy to do a survey of my tens of thousands of newsletter subscribers and my YouTube subscribers. Let's see what they have to say."
The AZEK employee had no interest in me doing this no-cost survey for them.
"You know what, I'm just going to do the survey on my own and I'll share the results with you. I'm willing to bet that a vast majority of consumers would GLADLY pay extra money for the correct fasteners knowing their railing system will not fail."
You don't have to have a MBA in marketing to see the huge opportunity here. Can you picture this TV or magazine ad:
"Our competitors don't include the required stainless steel fasteners with their deck posts. They just hope the contractor will use the right ones. Do you want to HOPE that your deck railing doesn't fail? Specify AZEK aluminum deck posts with included stainless steel bolts and know your loved ones will be SAFE."
But What Bolts Should Be Included?
You may think it's impossible to include the right bolts. It's not. The AZEK engineers can easily do the following:
develop a preferred installation method for both wood and concrete situations. Believe me after framing countless decks, it's not hard to come up with a standardized method that will work in almost all cases. CLICK HERE to see how the Simpson Strong -Tie engineers convey the best way to install their hardware.
for wood, show the size, number and placement of blocking pieces as you see in the video above. Also show the exact type of corrosion-resistant fasteners required to secure them to the deck floor joists. If the blocks fail, then so to will the railing no matter what bolts are used!
for concrete, show the correct stainless-steel stud anchors, epoxy if necessary, and the minimum distance the holes must be from the edge of concrete slabs.
create a short installation video showing how to install the blocks and bolts - put a sticker on the post advertising the video.
A Company That Does it Right
Just three weeks before going to the Builders Show I had the delightful experience of installing a product from a company that understands consumer wants and values their time and safety. I've installed thousands of products in my career and when I opened the box and saw all the included parts, a gigantic grin appeared on my face.
Pay close attention to the clear packaging just under the floodlight in this photo:
Here's what you get with the Ring Floodlight Cam. You even get EXTRA parts in case you're a klutz and drop something. The orange screwdriver works to tighten the white finish nuts that secure the floodlight to the galvanized steel baseplate in the photo. Copyright 2017 Tim Carter
What you see is the Ring Floodlight Camera. It's got all the parts you'd ever need, and even a few extra things in case you drop something!
Brilliant. You bet I'm willing to pay $2 more to save a trip to the hardware store! You bet I want the best screws to install the floodlight so it doesn't fall, short out and cause an electrical fire at my house killing me and my loved ones! Kudos to the folks at Ring!
Ladies and gentlemen of the jury, it's now time for you to weigh in. Answer the following question and let the chips fall where they may:
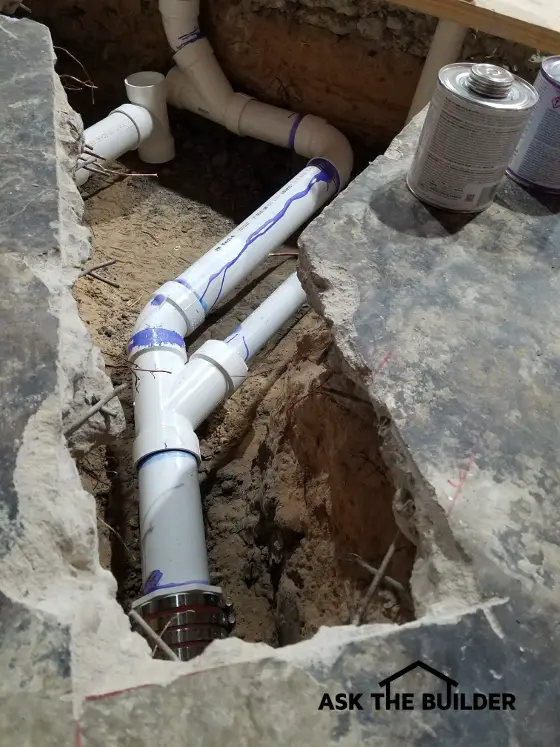
Here’s a homeowner’s attempt at installing a DIY toilet. He’s already made two grave mistakes. (C) Copyright 2018 Tim Carter
Plumbing Mistakes
I’m blessed. Not only do I get emails each day from readers like you, but I also get questions from the Ask Tim page at my AsktheBuilder.com website. Believe it or not, these questions are never tiring and it’s like Christmas morning when I open them. The high-resolution photos that often accompany the inquiries are like magic eye candy to me. My wife thinks I’m nuts!
Today was no different. Wayne reached out to me from Houston, Texas. He decided that he was going to do some serious DIY plumbing at his house and as he put it, “I’ve racked my brain and can’t come up with a code-approved way to make this happen.”
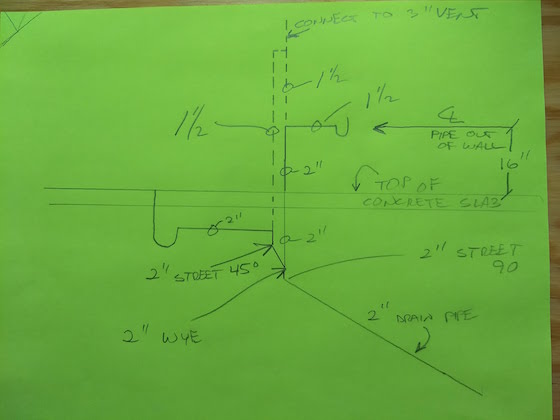
Here's part of the plans I drew up for Wayne. I call out special fittings in many cases to help make the systems work. Copyright 2018 Tim Carter
It just so happens I’m a master plumber. I’ve been one since age twenty-nine. I did all the plumbing on most of my jobs and thoroughly enjoyed it. Designing and installing plumbing drain and vent lines is like a giant 3D puzzle to me. As crazy as it sounds, it’s fun.
I’m not going to try to transform you into a plumber with this column, but I’d like to share some pointers that might come in handy if you decide you want to do what Wayne’s trying to accomplish. If you want to leave the job to a real plumber, the tips might allow you to verify he’s using the best practices at your home.
Transporting waste water from your home to a city sewer or your own septic tank is serious business. In the late 1800s when indoor plumbing started to take hold, plumbers were treated with equal, or greater, respect than physicians of the time. Once it was understood that sewage was the cause of serious disease, anyone who was willing to pipe it away safely was considered to have a super power of sorts.
The drain and vent pipes in your home mimic what Mother Nature does on a much grander scale. The issue is most people don’t stop to ponder what they see with their eyes.
Look at how creeks, streams and rivers work. Small streams eventually connect with larger rivers. When they intersect, the angle is rarely a hard 90-degree turn but more often some gentle angle close to 45, 30 or 22 degrees.
The blood vessels in your body are designed the same way. Don’t ignore technology that Mother Nature has perfected when it comes to the best way for liquids to flow.
You should design your wastewater pipes in a similar manner for the most part. It’s a bad plumbing practice to have a hard 90-degree bend in a horizontal drain line that’s buried in a slab or otherwise hidden. If you have to make a 90-degree bend, use two 45-degree fittings and put a small piece of straight pipe between the fittings if possible.
It’s fine to have a larger-radius (sweep) 90-degree bend at the base of a vertical drainage stack where the wastewater starts to travel horizontally. It’s also a good idea to have a sweep 90-degree fitting where a drain pipe pops out of a wall for a kitchen, vanity or laundry sink.
Drain-cleaning flexible snakes can navigate around these sweep 90 bends but may drill through a plastic PVC or ABS a hard 90-degree fitting in by mistake. You can use those hard 90s all day long in your vent pipes that supply your plumbing system with much-needed air.
Don’t forget about pipe slope. Use gravity’s magic force to get your solid and liquid waste out of your home. All drain lines should have a minimum fall of 1/8 inch per foot of horizontal run. Some codes allow 1/4-inch of fall per foot.
If you slope the pipe much more than 1/4-inch per foot, you can set yourself up for future clogs as the liquids may outrun the solids in steep-pitched pipes. The solid waste may sit in the pipe and accumulate creating a clog. Avoid the temptation to create lots of fall in your horizontal drain piping.
If you’re unclear about the magic vent lines in your home, you should watch a video I taped. This video will get you up to speed so you don’t make critical venting mistakes!
Column 1231
Expert Advice For Your Home
Subscribe to the FREE Ask the Builder newsletter to receive professional advice for your home. Complete the form below and each week you'll get:
DIY Tips
Tool Reviews
Project Guides
Product Discounts, Giveaways & more.
Unsubscribe at any time. We respect your email privacy.