Ring Floodlight Cam Review

ring floodlight cam

This is my Ring Floodlight Cam after it's unpacked and ready to be installed. You're going to LOVE LOVE LOVE the quality of this bad boy. Copyright 2017 Tim Carter

Ring® Floodlight Cam Review - A Dream Security Spotlight

My wife doesn't like our new Ring® Floodlight Cam.

"You're a creeper," she says to me. That's because our Ring® keeps a vigilant eye on who comes down our driveway. She doesn't like to be watched so she's not happy with me. I tell her, "Just don't go up the drive."

That goes over like a lead balloon. 😉

But I LOVE LOVE LOVE my new Ring® Floodlight Cam because I can see who's coming, I can talk to them and the floodlights make it look like daytime when they come on. It's a marvelous piece of technology.

Related Links

Ring Video Doorbell Review - WOWZA Is It Nice!

Nutone Knock Review - #FAIL Try Again Nutone

Are All Parts and Tools Included?

When you unpack the Ring® Floodlight Cam, you'll soon discover you have everything you need. All parts and tools are included. Check out all that came with mine:

Ring Floodlight Cam

Here's what you get with the Ring Floodlight Cam. You even get EXTRA parts in case you're a klutz and drop something. The orange screwdriver works to tighten the white finish nuts that secure the floodlight to the galvanized steel baseplate in the photo. Copyright 2017 Tim Carter

Does the Ring Floodlight Cam Have Lights, Sound, Siren and Motion Detection?

The Ring® Floodlight Cam comes with LED spotlights - this means no bulb changing. WOOT!

It's got complete audio so you can listen to what's going on outside. You can talk through the speaker too.

If you want to scare away any people of interest that cause the lights to come on, you can touch your smartphone screen and activate a siren.

Oh, and you can record all of this and Ring stores everything!

Is it Easy To Install the Ring® Floodlight Cam?

Yes, it's very easy to install the Ring Floodlight cam.

I've installed plenty of outdoor light fixtures in my career. Ring decided they wanted no hassles so the developed their own base or backplate for the floodlight. The rubber seal ensures everything to be watertight as long as you read the red sticker and put that at the 6-o'clock position!

ring floodlight cam

This is the base or backplate installed on my house. The slots are made for any size electrical box. Just pay attention to the red sticker! Copyright 2017 Tim Carter

ring floodlight cam

Here it is installed. See those gold squares in the spotlight? Those are the BRIGHT LEDs! Copyright 2017 Tim Carter

Is The Ring® Floodlight Cam App Easy To Use?

Yes, the app is very easy and very intuitive.

The first thing to remember after you install the floodlight on the wall is to turn on the power to the fixture.

You'll see a light start to blink inside the motion detector under the black camera box. The fixture even talks to you!

The instructions tell you to then install the Ring® app on your smartphone and follow the easy steps to activate the floodlight.

It took less than two minutes for this all to happen on my phone.

Here are some screenshots of what I saw on the app. It was SO VERY INTUITIVE!

ring floodlight cam app

Here's what you see after all is well. You'll note I also have the Ring Video Doorbell too. This is a very powerful app. Copyright 2017 Tim Carter

ring floodlight cam app

Here's just one of the screens. This is part of how you adjust the motion detection aspect. Copyright 2017 Tim Carter

ring floodlight cam app

Here's a fascinating screen on the app. This is where you create the part of the camera view where you want motion REPORTED to you and where the lights turn on and the video starts to record. You can drag and drop blue dots to create the polygon area you want. I wanted to know if someone is trying to get into my shed up on the hill. VERY COOL! Copyright 2017 Tim Carter

Summary

The Ring® Floodlight Cam is very very nice. It was easy to install, it works and the floodlights are BRIGHT!

My wife will still call me a creeper, but I don't care.

I love my Ring® Floodlight Cam, but not as much as I love She Who Must Be Obeyed!

Garage Plans 2 Car

garage plans 2 car

You might think this garage plans 2 car looks okay. You're right if the owner of the house is going to park a small sports car in the left bay and a motorcycle in the right bay. See that door into the house? They've yet to build the platform and steps to get from the garage up into the house. Both are going to extend INTO the right side parking bay! IDIOTS! Copyright 2017 Tim Carter

Garage Plans 2 Car - BEWARE Common Mistakes!

The 2-car garage in the above photo was built about five miles from my home. It's going to be a disaster.

Can you see why? Be sure to look down at the simple floor plan I drew up to show you the biggest mistake!

It's important to realize that a vast majority of two-car garages are too small. Here's a partial list of mistakes to avoid:

  • garage doors too narrow and short
  • distance from edge of doors to side walls of garage too narrow
  • distance between single doors too narrow
  • lack of floor drains to catch snow and ice melt
  • front to back distance too short
  • lack of attic or storage trusses above garage

Garage Door Width and Height

Garage doors are often too narrow for full-size pickup trucks. These vehicles are extremely popular and require a single-door width of 10 feet and the doors need to be 8-feet tall.

I didn't build the house I live in now in central New Hampshire and the single garage doors here are 9 feet wide. I own a Ford F-250 Super Duty 4x4 and my sideview mirrors are wider than the door jamb width.

Even with a 10-foot-wide door, I'd only have about 4 inches to spare on either side of the mirrors as I back into the bay.

Door height should be no less than 8 feet. Period.

Free & Fast Garage Bids

CLICK HERE to get FREE & FAST BIDS from local contractors that can build your dream garage.

Related Columns

Build A Dream Garage - Invaluable Tips Here!

Garage Door Insulation - It Helps But It's Not Perfect

Attic and Storage Trusses - A MUST-HAVE For Your Garage!

Sidewall Distance From Doors

garage plans 2 car

See the short foundation wall just above my ASK THE BUILDER logo? That wall is just under 30 inches wide. The building code requires a platform that's at the same height as the first floor of the house. Steps come from the platform down to the garage floor. The MINIMUM size for the platform is 3 feet by 3 feet. The platform and steps will extend INTO the bay where the car is supposed to be. Copyright 2017 Tim Carter

The distance from the edges of the garage doors to the side walls of the garage are the biggest mistake of all.

Often the distance from the car or truck, once in the bay, to the the side wall is less than 4 feet!

You can't open the car door completely and if anything is stored on the wall like garbage cans or bikes, the driver or passenger gets trapped in the car.

This distance should be a minimum of 6 feet.

Floor Drains Are A Must

Floor drains should be under each parked car. The concrete slab should slope so water dripping from a car or truck flows to the floor drain.

In many garages the concrete slopes to the garage doors. The meltwater freezes to the door weatherstripping in cold climates.

Total Garage Depth

garage plans 2 car

See the short stub of a foundation wall? The inside distance from the edge of the garage door to the side wall of the garage will be just about 2 feet, maybe 28 inches. It should have been a minimum of 5 to 6 feet. Copyright 2017 Tim Carter

The distance from the garage door to the back of the garage should be no less than 24 feet. Often it's just 20 feet. It's best to have 30 feet.

This may seem extreme, but if you have lots of bikes, a motorcycle, wheelbarrows, etc. to store, you'll need this space.

Speaking of motorcycles, that's about the only thing the homeowner is going to park in the right bay of this attached garage.

Look at my drawing below to see why. It's not to scale, but you get the idea if you read all the photo captions above.

garage plans 2 car

What idiot thought it was a good idea to make the garage this size? Copyright 2017 Tim Carter

Summary

When you go to look for garage plans 2 car be sure you READ my Dream Garage column above. You can't have enough space in a garage. You don't want to be banging your car doors against garbage cans or bikes CURSING each time you scratch the door.

The extra space you call for will not be that expensive and you'll be very happy in the future.

CLICK HERE to get FREE & FAST BIDS from local contractors that can build your dream garage.

Ring Video Doorbell Review

ring video doorbell

Here's my Ring Video Doorbell. The ivory cover plate is the one that's the best match for the paint. It came with three other ones and I may switch it out for a more sleek look. The moment you power it up, the Ring talks to you. Super Cool! CLICK THE PHOTO NOW to have one delivered to your home in days. Buy the Ring Floodlight Cam at the same time. Copyright 2017 Tim Carter

Before getting into this review, check out Tim's November 23, 2018 and  November 24, 2018 Newsletter and the story behind how this Doorbell solved the mystery of Tim's open front door.

Ring® Video Doorbell Is Easy and Fast

I installed my new Ring® Video Doorbell on a rare fair-weather December morning here in central New Hampshire. Christmas was just days away and I was filled with excitement as I opened up my Ring® box.

Snow meltwater was dripping on me, but I didn't care. I was so excited to try this product that marries technology with traditional doorbells.

It's important to realize a month before I had a terrible experience with a similar product, the Nutone Knock.

Ring Camera View

Here's what the Ring sees as you approach my front door. You can tell it's Christmas in New Hampshire. Once the holiday passes, the tiny Christmas tree and lights will disappear and the view will be unobstructed. Remember, you can HEAR what's going on at your door as well as see. See that round green button? Push it and you can talk to your visitor or another person of interest! Copyright 2017 Tim Carter

Email Exchange With The Ring® Inventor and Founder

Two weeks prior to installing the Ring®, I had an astounding back-and-forth email exchange with Jamie Siminoff the inventor and founder of Ring®.

Another key point is in all my years of reviewing products I NEVER had such a pleasant and rapid response. My wife Kathy had given me Jamie's private email address a few days prior as she had an exchange with him about a different matter.

I was STUNNED that he got back with me and in no time he had sent both the doorbell and the Floodlight Cam.

My gut told me right away that my experience with the Ring® was going to be unlike any other product I've tested and reviewed over the years.

Exquisite Ring® Packaging


ring video doorbell

Here's the box the Ring Video Doorbell Pro comes in. Jamie must be related to Steve Jobs. The only other products to have such a gorgeous box and clever packaging that I've seen are Apple goodies. The INSTANT I saw this box and opened it I knew this was going to be a dream installation. Copyright 2017 Tim Carter

ring video doorbell

After you unpack everything, here's what you have. All sorts of other very helpful literature, quick-start guide, stickers, etc. came too. Copyright 2017 Tim Carter

Everything - I Mean EVERYTHING - Included for the Ring® Install

The Ring® comes with everything you need to do the install. I had the Pro version of the doorbell because I wanted my Ring® to activate my 20-year-old traditional"ding dong" doorbell when someone pushed the outdoor button.

Here's a partial list of what's included:

  • Ring® doorbell
  • backplate
  • 4 trim cover plates
  • interior doorbell snazzy diode connector kit
  • handy screwdriver with Phillips and reversible Torx bit
  • 1/4-inch masonry bit for stucco
  • anchors
  • push-in wire connectors
  • quick-start guide and other helpful paperwork

Jamie even included extra screws in case you drop and lose one. What a nice touch!

Ring Pro Diode Accessory Kit

You need to install a handy little diode kit, if you want your new Ring to make your old "ding dong" doorbell to still work,.

This part of the install is so simple a caveman could do it. Jamie thought this through even down to the tiny patch of 3M two-sided adhesive on the diode box.

To put it another way, I've NEVER seen such attention to detail in my life. Thank you so much Jamie!

ring video doorbell pro

Here's the fancy little wire connector you need to use to make the interior "ding dong" doorbell work. It took seconds to install. What a dream! CLICK THE PHOTO NOW to have one delivered to your home. Copyright 2017 Tim Carter

ring video doorbell

Within two minutes, I had the entire accessory kit installed. The little white box that contains the electronics to make the old-fashioned *ding dong* doorbell work even came with its own small square of 3M two-sided adhesive. Incredible attention to detail. Copyright 2017 Tim Carter

The Ring® App - Seamless Install and Powerful

You use the Ring app to guide you through the installation. It's beyond perfect. I was prepared for frustration.

All I got was happiness. There were NO hiccups in downloading or using the app on my Moto G5+ phone.

I really appreciated Jamie's humor. Look at it below:

Ring connects to your WiFi network

Here's what you see as your Ring connects to your WiFi network. Pretty funny! When was the last time you saw such humor as you installed something? Copyright 2017 Tim Carter


ring app

Here's the front page of the app once you have everything working - which won't take you long! You can see I have two Ring devices - the doorbell and the spotlight cam. Copyright 2017 Tim Carter

Ring Pro® Video Doorbell Review Summary

I love my Ring. I've installed lots of products in my career, but NEVER have I had so much fun doing it.

Often instructions are incomplete - not so with the Ring®.

It's not uncommon you have to go find tools - not so with the Ring®.

All too often you might need an extra part - not so with the Ring®.

Usually, the apps are confusing - not so with the Ring®.

I guarantee you'll be THRILLED with your Ring®. If not, Jamie will make it right.

His email address is right on the side of the box!

CLICK HERE NOW to have the Ring Doorbell delivered to your home.

December 20, 2017 AsktheBuilder Newsletter

First and foremost, Merry Christmas!

If you celebrate some other holiday this time of year, I hope it's wonderful for you.

Here at my house, we celebrate a Christian Christmas.

After all, the day is named after Christ!

Kathy and I will be attending mass on Sunday afternoon at 4:30 pm.

St. Joseph Church is going to be decorated to the hilt.

A Strange End of Year

This has been a strange year all around. You may or may not know it, but I published my long-awaited Roofing Ripoff book in late April, 2017.

It's an expose' book about the deplorable state of the USA asphalt shingle industry.

CLICK HERE to read the first three chapters for FREE.

The amount of suffering the industry has caused tens - perhaps HUNDREDS - of thousands of consumers and businesses is mind numbing.

As I did research for the book, you may have been one of the hundreds of homeowners that took my survey. You may be one who drained their savings late in life to put on a new roof that's possibly going to go bad in just ten years.

Remember, my own 30-year asphalt roof FAILED in just a little over ten years.

A few weeks ago, I had another product failure in my home. I installed something just nine months ago that should have lasted about fifty years. I know as I'm a master plumber.

But the item failed in seven months.

I can list off a bunch of products that are failing far too early. It's maddening.

It's bothering me.

It's sucked the Christmas spirit right out of me and I've got just four days to get it back.

I'm headed to the Builders Show in Orlando, FL, in just three weeks. I'm going to have some discussions with top leaders in the manufacturing process to see if I can try to convince them to go back to the old standards.

I'm thinking of doing a survey just after the New Year to take with me to Orlando.

I need you to participate. I need you to tell the manufacturers of products what you want.

I'd love for you to tell them how upset you are - assuming you are upset.

Oh, and I'll end on this note. A month ago, I reviewed the Nutone Knock video doorbell. I gave it a thumbs up. You may have bought one for a gift.

I've got BAD NEWS for you. TAKE IT BACK.

My Knock stopped working, I contacted the PR firm, then the Nutone product manager and they simply left me hanging. They've gone dark on me now for two weeks.

I can only imagine how they'd treat you.

I ripped out my Nutone Knock today and installed a Ring video doorbell.

I'm writing the review of the Ring tomorrow. The Ring was a delight to install and it's working perfectly.

I think you can understand why I'm in a humbug mood.

Don't worry, I'll get over it like a bad cold.

Merry Christmas to you and to all your loved ones!

Tim Carter
Founder - Humbugs Anonymous and AsktheBuilder.com

Do It Right, Not Over and Get That Rant On Brother!

IRWIN 117 Piece Tap and Die Review

irwin 117 piece tap and die set

Here's all the taps and dies in the 117-piece IRWIN set. The drill bits for the taps are in the lid of the case out of frame. Copyright 2017 Tim Carter

IRWIN 117-Piece Tap and Die Set

I've used taps and dies for years. A machinist uses them all the time as he makes things from metal.

The IRWIN 117-Piece Tap and Die set is a beauty. You'll lust after this wonderful assortment of tools.

I'm a contractor and I use them primarily to clean up threads on nuts and bolts. Nuts, bolts and internal threads on things that got damaged at the job site.

Keep IRWIN Taps and Dies Oiled

Each piece in the set was coated with oil upon opening it. Oil is good. You don't want the parts to rust.

Keep yours oiled all the time. If you need to get oil off your hands, use Lava hand soap. Use Stain Solver to get oil out of your clothes.

IRWIN Taps

Taps are used to cut threads on the inside of a drilled hole in an object. You use a specific-sized drill bit that matches the tap.

irwin taps

These are just a few of the precision taps in the IRWIN set. Copyright 2017 Tim Carter

IRWIN Dies

Dies are used to cut threads on a round rod made from just about any material - metal, plastic, wood or ???

irwin dies

These are just a few of the many dies in the set. Both metric and SAE threads are possible. Copyright 2017 Tim Carter

irwin tap and dies

Behind that big IRWIN lettering you'll discover all sorts of goodies including all the drill bits you need for the taps. Copyright 2017 Tim Carter

irwin tap drill bits

These are the high-speed cobalt steel drill bits matched to the IRWIN taps. Drill SLOW and use oil while drilling to keep the bits in great shape. Copyright 2017 Tim Carter

irwin tap drill bit selector

These two cards are your road maps. The one on the left tells you what drill bit is for what tap. The card on the right helps you find the different taps and dies - assuming you put them back where they belong! Copyright 2017 Tim Carter

irwin die

This is what a die does. You're looking at a 1/4-inch bolt that now has squeaky-clean threads! Copyright 2017 Tim Carter

irwin tap

This is an IRWIN tap doing it's job. It could also have been used to cut threads in a hole drilled in a piece of plate steel. You'll discover SO MANY uses for IRWIN taps and dies when you own your own set! Copyright 2017 Tim Carter

Summary

I love this IRWIN tap and die set. I can tell you that it's going to be proudly displayed in my workshop. The best part is I'm going to pass it down to my grandkids. Yes, the taps and dies will last for decades if you just care for them.

Attic Ventilation Of Old

Attic Ventilation

See these monster attic ventilation baffles? You can’t have too much attic ventilation. (C) Copyright 2017 Tim Carter

Attic Ventilation

DEAR TIM: I’m so confused. I’ve spent hours online reading all sorts of stuff about attic ventilation. There’s all sorts of conflicting information out there. Who am I to believe? I’m building a new home and want to get it right and not suffer mold in my attic, excessive heat, etc. The house I grew up in had a traditional stand-up attic and it never had any issues. It was cold in the winter up there and hot in the summer, but no mold. In your opinion, what’s the best attic ventilation? What would you do if you were building a new home? Melissa T., Calera, AL

DEAR MELISSA: I’m as discouraged as you are. Much of the information out there on the Internet about home improvement, home maintenance and the simple physics of houses is incorrect. You can’t imagine how many questions a day I get at my AsktheBuilder.com website just like yours. Other homeowners like you are frustrated and confused about what to do in all sorts of situations.

There are many reasons for the misinformation. First and foremost you don’t have to have any formal training to work within the building and remodeling industry.

A frightening growing trend are all the hobby bloggers you run into on the Internet. These are people with normal day jobs that have an interest in home improvement or they’ve painted a bedroom thinking that makes them an expert.

The true definition of a professional is a person that works for others for a fee and has done it for years accumulating lots of hands-on experience. Always look at the About Us page at a website and be sure the website owner is a professional.

Then you’ve got the workers out there that have been doing things the wrong way for thirty years and they’re polluting the minds of young workers. Some of these bad eggs leave comments at websites or have their own websites.

Finishing concrete is a perfect example. Some concrete finishers feel that you’re supposed to add water to concrete as you place and finish it. It does make it easier to trowel, I’ll grant you that!

But the added water dilutes the Portland cement at the surface causing the concrete to spall and fail long before its time. I could give you hundreds of examples of other incorrect building practices, but let’s talk attic ventilation.

If you want to see the best way to ventilate an attic in a new home, then just go take a drive in the country near where you live down South. I’m sure you’ll find a chicken farmer in a short amount of time.

Look at the gable ends of a giant chicken house where thousands of chickens are housed. The entire triangular ends at each end of the roof are almost always completely louvered. The farmers need as much air moving through the attic as possible to keep the chickens cool.

You can’t have too much attic ventilation is the simple answer. Air constantly moving through an attic will help prevent mold. Your old home never had mold because old homes were so drafty the water vapor was constantly being transported outdoors or it evaporated off the sheathing surfaces before mold could grow.

The continuous ridge vent rage continues to dominate the ventilation discussion. The only problem is that hot air doesn’t go down. All ridge vents are designed like a plumbing s trap causing hot air to go down before it goes up. This defies physics.

If your new home has gable ends, install large slanted louvers. You want excellent continuous soffit vents as well. Turbine vents that spin with a puff of breeze suck vast amounts of air out of attic spaces.

You’ll never solve the heat issue in attics because of the physics of infrared heat. When the sun strikes a roof, it heats up the shingles, the wood sheathing and the attic framing. The temperatures of these things easily approaches 160 F. I know as I took the temperature of my own roofing materials.

These building materials act like toaster coils. They radiate heat into the attic. You can’t stop it unless you use some sort of radiant barrier under the framing that bounces the heat back out to the outdoors.

The radiant barriers work great for a year or so, but once they become dusty their efficiency drops like a rock from a cliff. You can try to cool an attic using giant powered attic ventilation fans just like the chicken farmers use. Tens of thousands of cubic air a minute passing through your attic are needed to make a slight difference and this air will just be whatever the outdoor air temperature is.

Forget about the solar-powered attic fans. They simply don’t move enough air to lower the temperature in an attic. I know as I’ve tested several.

Column 1227

Build A Gravel Driveway

Build Gravel Drive

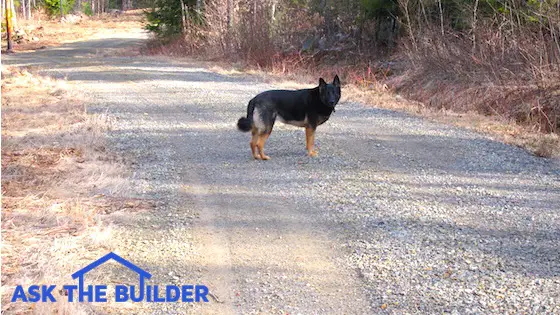
How to gravel driveway: This is a nice gravel drive on land I own. It's about 14-feet wide, it's got a deep ditch on the right side and slopes to the left. It's hard to see, but the drive has about a 5-inch crown. © 2017 Tim Carter

"It's important to realize a properly designed and constructed gravel driveway can function as a permanent driveway paving solution."

Build Gravel Drive TIPS

  • Large angular base stone  - 8 inches deep WATCH VIDEOS BELOW
  • Geotextile fabric under base stone keeps stone free of mud
  • Finish stone grape-sized with rock dust
  • 5-inch crown - SEE BELOW!
  • CLICK HERE to Get Tim's FREE & FUNNY Newsletter

DEAR TIM: I need to build a gravel driveway on some land I recently purchased. Is a gravel driveway going to hold up as a permanent driveway paving solution?

What types of gravel are used for a driveway? Do you think I can construct a build-it-yourself gravel driveway? Can a dump truck spread the gravel? Ed M., Basking Ridge, NJ

How To Gravel Driveway

Watch this short video to see how a professional dump truck driver can make short work of helping you install a gravel driveway.

DEAR ED: Congratulations on your new land purchase! Over a year ago, my wife and I did the same thing with the intention of building our retirement home.

Currently, there's a rough gravel driveway that extends to the top of our property. Just last week, I was on my land to start the process of extending this gravel driveway up to our new home site.

It's important to realize a properly designed and constructed gravel driveway can function as a permanent driveway paving solution. Rent some equipment and you probably can do the job. There are hundreds of thousands, if not millions, of gravel roadways and driveways in the USA.

The first thing to remember is gravel drives work well, but come with a small number of periodic maintenance issues. But the lower initial cost of the gravel driveway is often reason enough for most to deal with whatever needs to be done to keep the driveway in good shape over the years.

Related Links

Thinking of Asphalt? Best Ones Have a Deep Gravel Base

Tar & Chip Is My Personal Preference - What Color Do You Want?

Gravel Driveway Is Small Road

The first thing I would do, if I were you, is to research basic road-building techniques. College textbooks that deal with introductory civil engineering often cover this topic very well.

A long-lasting gravel driveway needs to have all of the same design characteristics one finds in a well-constructed major roadway. You can often find great information on the Internet if you can't locate a road-building textbook.

How Do You Spread the Gravel?

The dump truck delivering the gravel can spread it. An experienced driver can put on a uniform thickness.

Watch this pro drive do an excellent job of spreading gravel on a driveway.

How Wide Should the Drive Be?

The minimum width of a great gravel driveway is 14 feet. You can make it as narrow as 10 feet, but you'll regret that over time.

Early in the process, you should think about the width of the driveway. All too often I see gravel drives in wooded areas that are not only too narrow, they often have turns that are too sharp.

You should make the drive no less than 14 feet wide. If the drive is long, think about what happens if two cars meet each other going the opposite direction. You may want to widen the drive for 40 feet in places to 18 feet so two cars can pass without going off onto a soft shoulder.

Think ahead about delivery trucks and moving trucks. Don't make turns too tight. Gradual curves are best. Don't have trees next to the inside part of a curve as a long truck could scrape against it.

How Do You Create Great Drainage?

You create great drainage by including small ditches along the driveway to transport water away from the driveway.

A point often overlooked is the soil under the gravel driveway must be well-drained and strong. It also must be free of any organic material like sticks, tree roots and leaves or grass.

All topsoil must be stripped off the driveway location and stockpiled for use at some other place on your lot. It is a very bad practice to build a driveway on top of spongy topsoil filled with organic debris.

Water is the enemy of gravel driveways and any roadway. Surface water can erode the gravel off the surface of the driveway and subsurface water can turn strong subsoil into a quagmire.

Does the Gravel Need a Crown?

Yes, gravel driveways need a crown. A crown is a curved shape where the center of the driveway is higher than the edges. A crown promotes great drainage and prevents washouts.

John D. Rockefeller, Jr. constructed nearly 60 miles of stunning gravel carriage trails on Mt. Desert Island in the 1920s and 19030s. Not only was he a gifted road designer, but he also had enough practical knowledge to create an 8-inch crown on all his gravel trails.

A crown refers to the profile of the road. The center of each carriage trail was 8 inches higher than the edges of the road. Crowned roads deflect water to the edges thus preventing ruts and erosion on the roadbed.

Be sure you have at least a 6-inch crown in your gravel driveway.

Mr. Rockfeller's Roads

Here's a tiny section of the carriage trails on Mt. Desert Island. This is a great book. CLICK THE PHOTO NOW to have it delivered to your doorstep.

The weight of cars and trucks pressing down on a gravel driveway is not much different than the powerful hydraulic pressure used on construction machinery, car lifts and any other machine that uses the leveraged force of hydraulics.

Water that is forced under pressure under the gravel can transport silt from the subsoil into the gravel. As the silt squeezes between individual pieces of gravel, it causes the friction bonds between individual pieces of gravel to weaken. When this happens, your gravel driveway can fall apart in no time.

Do I Need Geotextile Fabrics For a Gravel Drive?

Yes, it's often a great idea to install a geotextile fabric on top of the subsoil before the first layer of gravel is installed. This fabric prevents the silt in the subsoil from fouling the gravel. These products come in wide rolls and can easily be installed by two people who just unroll the fabric allowing it to lay on the soil.

Geotextile Fabric

This is a giant roll of geotextile fabric. If the soil in your area is clay, you MUST INSTALL one. CLICK THE IMAGE TO ORDER THIS FABRIC NOW.

On windy days it needs to be covered quickly with a 4 or 6-inch-thick layer of crushed gravel. If you don't do this, the fabric might end up on your neighbor's lot.

What Type of Gravel Should Be Used?

A gravel driveway requires several different types of gravel.

The first layer of crushed gravel needs to be a larger-sized gravel. Try to locate stones that are the size of baseballs or even softballs.

Watch this short video to see the size of the first layer of stone that goes down first then the size of the gravel that goes down on top of the larger stones:

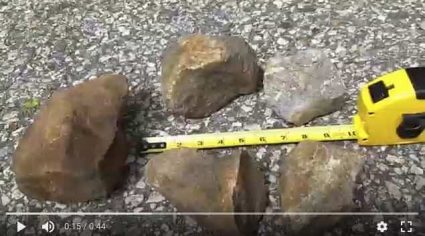
CLICK THE IMAGE to watch a short video of the correct-sized stones to use in a gravel driveway. Copyright 2018 Tim Carter

NEVER use pea gravel or rounded river rock gravel. These stones are like ball bearings and will easily roll and move as tires start to spin. A car or truck can never stand a chance going up a hill with rounded gravel as the wheels would spin like a top. Angular gravel interlocks with adjacent pieces and the combined mass can act as one larger piece of rock.

Driveways get their strength from the base layer of stone. If you want a driveway that will stand up to large heavy trucks, then this first layer of stone needs to be 8 inches thick. Two 4-inch layers with each one compacted would be good.

What is the Best Gravel for the Top of the Driveway?

The top layer of gravel should be crushed gravel that has a mixture of pieces in these sizes:

  • 3/4 inch
  • 1/2-inch
  • 1/4-inch
  • crushed fines (looks like sand)

The top finish layer should be about 4 inches thick.

Compact each layer with a mechanical roller or tamping machine. The final layer of gravel should have pieces of angular stone no larger than a golf ball, with many of the stones being the size of marbles or grapes.

If you can install 10 - 12 inches of gravel on top of the geotextile fabric, you should have a gravel driveway that will last decades.

Will a Crowned Gravel Drive Prevent Washouts?

Yes, a crowned drive will prevent washouts. The crown directs surface water to the edges.

Drives without crowns tend to channel water in the drive. Soon a rut or channel erondes the gravel.

Be sure the gravel driveway has a crown in it. This means the center of the driveway is always higher than the two edges. The crown allows water to flow off to the sides of the driveway preventing any ponding of water on the gravel surface. A 5-inch crown is one where the center of the driveway is 5 inches higher than the edges. It will do a superb job of getting water to the edges of the road quickly.

A crowned driveway also helps prevent washouts. The worst profile of a driveway on a slope is one where the center is lower than the edges. If your drive is shaped like this in a heavy rain you'll have a wild river racing down the center of your driveway washing away all your expensive gravel.

Gravel Drive - Heavy Rain

This is a gravel drive just down the street from where I live. The center of the drive has always been lower than the edges. Each time there's a heavy rain, this is what it looks like when the sun comes out. The owner then has a tractor take the gravel back up the hill to create the same problem again. © 2017 Tim Carter

How Do you Smooth a Gravel Drive?

You use a york rake attachment on the back of a tractor to smooth gravel driveways.

Gravel driveways need some periodic care in the form of grading or dressing. Low spots need to be filled with gravel scraped from any high spots. If your driveway has curves, you will discover that car and truck traffic tends to push loose gravel to the outer edges of the curves. This gravel needs to be brought back to the center and inner part of the curves.

Farmers have an attachment for their tractors that comb gravel drives. It's called a york rake. They work great. You can also use a similar tow-behind grader that has carbide teeth.

Watch both short videos below.

Do you Need Culverts & Ditches?

Gravel driveways built on hillsides need ditches on the high side of the driveway. These ditches capture surface water that runs down the hill and otherwise would run across the driveway.

Larger angular rocks should be placed in the ditch to slow down the speed of the running water in the ditch. Monitor the ditch to ensure the running water is not cutting too deep a channel or eroding the ditch causing failure of the gravel driveway.

Check the May 19, 2011 AsktheBuilder Newsletter for a great tip when making your gravel driveway.


Author's Notes:

Leo Kudej of Haymarket, Virginia, offers these comments from his years of experience.

"Tim,

I think you need to tell the readers just what they need to apply to the roadbed layers. This way they can just call into their local quarry exactly the type of stone they want.

The build-up should go as follows - the first layer will be #3 stone (fist size); the second will be #57 (a little less than ping pong ball); and the final will be #21-A, or called crusher run (thumbnail sized stone with stone dust mixed in with it).

With a layered setup like this, you will have a driveway that will last many, many years. I am a carpenter, but living up on Bull Run Mountain for 20 years taught me a little about gravel roads." Leo K.

Column 698

Heated Driveway Cost

heated driveway cost

This heated driveway cost nothing. All it took to look like this was some sand, a little salt, and some free sunshine! What many installers fail to tell you is it costs a fortune to heat this much blacktop for each storm. Copyright 2017 Tim Carter

Heated Driveway Cost - Wait For The Surprise!

You may wonder what a heated driveway cost to install. The first thing to remember is it's very expensive.

Not only are the actual systems expensive, but the labor to install them is also very pricey.

The surprise comes after the workers have gone to the next job. Your electric or fuel bill is going to be sky high when you turn on the heated driveway system.

Vast amounts of heat are required to melt snow and ice from hundreds and thousands of square feet of driveway and sidewalk.


Related Links

How Much Does It Cost To Heat Water?

Great Deicing Salts and Sand Alternative - Don't Discount This!

Free & Fast Bids

CLICK HERE to get FREE & FAST BIDS from local companies that install heated driveway systems.

What are the Types of Heated Driveway Systems?

There are several types of heated driveway systems. Heavy-duty electric resistance cables can be installed under asphalt paving, concrete pavers or even poured concrete.

Systems that employ circulating hot liquids are filled with an anti-freeze solution. This liquid is heated by a boiler or giant water heater.

heated driveway cost

Here's my V70-XC Volvo covered with about 10 inches of fresh snow. I used a snowblower to get rid of all the snow in just minutes. Watch the snowblower video below to see how fast it works. Copyright 2018 Tim Carter

How Do You Install a Heated Driveway?

Watch these videos to get an idea of a few different systems:

What Happens When Cables Or Pipes Break?

Another key point is the potential failure of the system if the electric cables or hot water pipes break or rupture.

It's impossible to repair them. Extra care needs to be taken during the installation of the pavement to ensure the paving process doesn't harm the heating system.

Be sure the contractor is following the installation instructions provided by the heating system manufacturer.

Will Insulation Help Lower Driveway Heating Cost?

Yes, closed-cell foam insulation will help lower the cost of heating the driveway. The insulation stops the heat from penetrating into the soil.

You can install 2 or 4 inches of closed cell foam insulation under the driveway heating systems. Many cold-storage warehouses across the USA have high-efficiency foam insulation under the poured concrete in the warehouses.

Be sure to consult with the heating system manufacturer and get a schematic drawing and written specifications showing the best way to install insulation under the driveway so you don't lose so much heat into the ground.

Is There an Alternative Cost-Saving Choice?

With attention to the installation and operating costs, why not take a few minutes to do the math about alternative methods to remove the ice and snow from your driveway?

You can purchase a high-quality snowblower for well under $1,000 at 2017 prices.

heated driveway cost

This snowblower costs about $700 in 2017. Maintain it and it will easily last 10 years or more. Pay a local high school kid to operate it and give him $20 per hour. Copyright 2017 Tim Carter

By all means, think about hiring a local landscape company or even a local high school kid who needs spending money. It may only cost you, in 2017 dollars, about $20 to clean your driveway.

When the sun comes out after the storm, the driveway will be dry just like you see in the top photo.

You can save thousands of dollars over the years if you just use a snowblower and pay someone else to get rid of the snow and ice.


CLICK HERE to get FREE & FAST BIDS from local companies that install heated driveway systems.

December 12, 2017 AsktheBuilder Newsletter

Christmas is now less than two weeks away.

I know you're busy this time of year. I use this time to catch my breath and to do some strategic planning for the next year.

2018 is beginning to look like it's going to be spectacular. I had a phone call this past Friday I wish I could share with you.

If what was discussed comes to fruition, you're going to be the beneficiary of some amazing content. You know that I'll share more when I can, so please be patient.

Long Island & NYC Meet Up?

I have to be in lower Manhattan on February 8, 2018 to attend a one-day Internet conference. I'm thinking of staying on Long Island for the trip.

If you live on Long Island and want to do a meet up, now's the time to speak up so I can start to see how best to make it happen.

I could do a fast NYC meet up in lower Manhattan late afternoon on the 8th if you live in the city. Once again, SPEAK UP if you want me to try to make it happen.

Christmas Shopping at Amazon?

If you still have more shopping to do at Amazon.com, you can help this newsletter keep going.

CLICK HERE and use my affiliate link to shop.

Thanks!

New Format Columns

Here are a few new format columns for you:

Roof Cap Shingles - Unique But Easy!

Glass Shower Walls - Crystal Clear & Clean

Bathroom Privacy Window Film - Cool Stuff Indeed!

That Pesky Word 'Assume'

Yesterday I awoke to a blistering email. I'm going to share it with you for several simple reasons.

I think you'll understand what they are after you read the eat-hot-death email:

"I received your non-answer to my question about using Stain Solver to clean a hummingbird feeder. I can't imagine a simpler question. In fact, if Stain Solver could indeed be used to clean a hummingbird feeder, I would think it would be to your advantage to let it be known. You say you need pictures? Why? I can only conclude from your stock email that you didn't read the question or you don't know the answer. I would say that it's your loss, not mine. I will continue using Stain Solver as I have for several years but I have to say I'm disappointed in your non-answer to such a simple question."

Here's some background. I've been doing email since the late 1980's. I wish I knew when I sent my first one now that I think of it!

Regular mail in paper forms sometimes gets mis-delivered. You and I think the postal employees lose it. Nope, 98 times out of 100 your mail ends up at someone's home and they THROW IT AWAY.

Email can also get *mis-delivered*. Electronic postmasters might think your email is SPAM and decide NOT to deliver it. Your email could end up in some weird tab in a person's HTML email software. The possibilities are as many as flavors at Paradis ice cream in Montrose, CA.

The gentleman that sent the above email to me made a huge assumption. He assumed I received his question about how to clean the hummingbird feeder.

I didn't.

There are perhaps ten, or more, reasons why I didn't.

What's more, let's assume it did make it into my email Inbox.

How many emails a day do you think I get? What happens if I'm sick? What happens if I go on vacation and completely unplug?

What could this man have done after 24 hours of not hearing from me?

He could have picked up his phone and called the Stain Solver hotline. The phone number is at the bottom of every page of the Stain Solver website.

I could go on and on and on.

Here's all I'd like you to take away from this.

If you send an email, submit a complaint using an online form, or ????, don't assume the other party got the message.

Don't take it personally. Just try some other form of communication and see what happens.

That's quite enough for today.

Tim Carter
Founder - www.AsktheBuilder.com

Do It Right, Not Over!

Acrylic Fiberglass Tub Care and Maintenance

repair acrylic and fiberglass tubs

This appears to be a PERFECT product to repair acrylic and fiberglass tubs. When you read the product description, you'll agree. I'd absolutely try this one first. CLICK THE IMAGE TO ORDER IT NOW.

Acrylic Fiberglass Tub Care TIPS

The care of acrylic, fiberglass and gel-coated plumbing fixtures is not difficult. The thing that causes the most problems is that people do not clean soon enough.

Often a person will wait until a heavy soap buildup or mineral deposit has occurred. When this happens, cleaning with the recommended cleaners becomes a difficult, if not impossible, task.

Related Links

Remove Mildew From Showers, Tubs & Grout

Low Water Flow in Showers - Fix it Fast

One of the biggest issues is impatience. People want instant results and they act on impulse. They'll grab just about any cleaner and start to work. Make a mistake and you can permanently scratch your acrylic or fiberglass tub.

CLICK HERE to get FREE & FAST BIDS from local cleaners that will clean and polish your tub.

Some very popular major brand cleaners contain abrasives. These will scratch your tub. You must read the label. It's often in fine print about the abrasives!

Oxygen Bleach

Stain Solver is MADE in the USA with USA ingredients that are food-grade quality. CLICK THE IMAGE to order some NOW.

A Safe Organic Cleaner!

To safely remove soap scum, body oils, mildew and other grim, I recommend Stain Solver. Stain Solver is a certified organic oxygen bleach Made in the USA with USA ingredients. It's a pure powder you mix with hot tap water.

It takes just a minute or two of stirring to dissolve the powder. Once dissolved, you add this to a spray bottle and spritz the surfaces of the acrylic, fiberglass, or gel-coated fixture. Keep the surface wet with the solution for about fifteen minutes. The longer you allow the Stain Solver to work, the less you have to scrub.

Use a new 3M Dobie pad to clean the surfaces. Be careful about what you use to clean with because some scouring pads can scratch the finish!

Clean the Tub Weekly

The solution for a gleaming tub is really very simple. Why not decide to clean the tub or shower area every other Saturday (or other "off" day) while you are showering? Make it a routine item on your to-do list.

If you commit to this, you will find that it takes no more than 3 - 5 minutes to completely clean a tub or shower area. The reason tubs and showers are HARD to clean is because you may wait too long to do it.

Here's a great cleaner and polish that you should try as soon as possible. Click the image and order some immediately.


Kitchen & Bath Cleaner & Polish

This is a great acrylic and fiberglass cleaner and polish. CLICK THE IMAGE TO ORDER IT NOW.

Acrylic Fiberglass Tub Repair Videos

Watch these videos. You can do your own acrylic fiberglass tub care and repair.


Repairing Scratches and Nicks

If you get a deep scratch, a nick or a divot in your acrylic or fiberglass tub it can often be repaired. There are professionals who do this and there are DIY products.

CLICK HERE to get FREE & FAST BIDS from professionals who can repair tile, acrylic and fiberglass.

Here are some common DIY repair kits:

Fiberglass, Porcelain & Plastic Repair Kit

This product may solve your problem. CLICK THE IMAGE TO ORDER IT NOW.


CLICK HERE to get FREE & FAST BIDS from local cleaners that will clean and polish your tub.

Column B65