Inselbric Asphalt Siding

Inselbric panels insulbrick

This giant apartment building in Newport, NH is covered with Inselbric panels. It's possible they were installed before 1940. This wall faces south and the sun has damaged some of the surface. But the other three sides of the building look brand new! Copyright 2017 Tim Carter

Inselbric Asphalt Panel Siding

Inselbric is a discontinued siding product. You can no longer buy it. It was made in a similar manner as today's asphalt shingles. Click to see pictures of a house in Cincinnati, OH, that has withstood the test of time.

The product name is often misspelled. A few other common misspellings are:

  • Insulbrick
  • Inselbrick
  • Insulbric

It's important to realize this fascinating product still protects tens of thousands of homes, sheds, barns and business all over the USA and possibly Canada.

It must be remembered it first came to market in October of 1931 and soon dominated the marketplace because it was easy to install, attractive, and was truly maintenance-free. Gone were the days of scraping peeling alkyd paint from wood siding.

Inselbric Trademark

Here's the official US Patent and Trademark Office record of the Inselbric trademark.

For this reason, homeowners and businessmen bought millions of square feet of this magic material.

Related Links

Fiber Cement Siding Lasts as Long or Longer!

Miracle Liquid Siding - BWAHAHAHAHAHAAHA Don't Fall for the Claims!

Free & Fast Bids

CLICK HERE to get FREE & FAST BIDS from local siding contractors. Ask one about wonder siding.

Interlocking Asphalt-Saturated Wood Fiber Panels

This asphalt siding is an ingenious product. It's about 1/2-inch thick wood fiber panels with interlocking male and female grooves an tongues.

inselbric insulbrick inselbrick

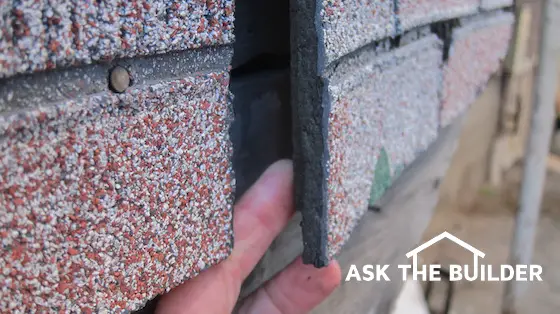
Here's a closeup shot of the side of an Inselbric panel. You can see it's about 1/2-inch thick. Note the asphalt and ceramic granules. Copyright 2017 Tim Carter

Another key point is it goes together exactly like traditional hardwood flooring interlocks. This interlock feature stopped wind-driven rain from harming the structure.

A point often overlooked is the wood fibers were saturated with hot asphalt and colored mineral granules were carefully placed on the panels. This asphalt made it waterproof.

Using lost technology it could be made to look like brick, stone or even wood.

Inselbric Styles and Types

There were five primary styles:

  • 3D-INSELUM
  • INSELSTONE
  • INSELSYDE
  • INSELBRIC
  • INSELWOOD

By far the most popular was the INSELBRIC and INSELSTONE.

Aluminum Siding Kicked It To The Curb

Most building products have their day in the sun. Sunset for this magic siding product happened in the 1960s. Aluminum siding took the marketplace by storm and the returning veterans from WWII didn't want their new houses covered with the material they grew up with.

The demand for all the Insel products dropped off quickly and it was all over.

I wish I could go back in time to see how they distributed the colored ceramic granules as they made the INSELSTONE panels. The 3D effect created by the shadow lines is unbelievable.

advertisement for Inselbric

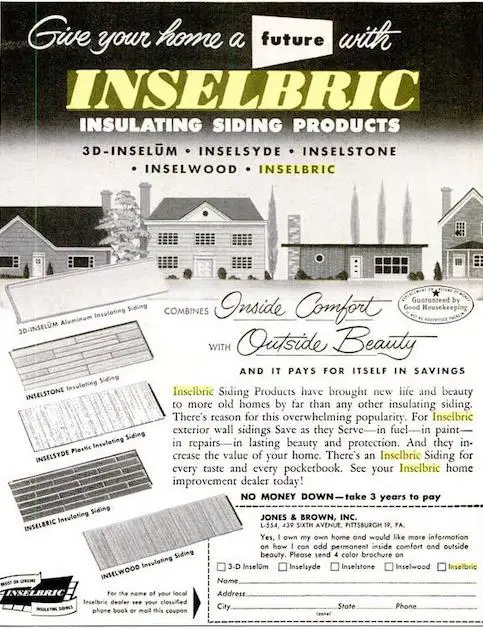
Here's an advertisement for Inselbric from a May 1954 edition of LIFE magazine. The product was pushed aside in the 1960s by the insane aluminum siding craze. Inselbric had a great 30-year run. Copyright LIFE magazine - Fair Use Doctrine usage

Inselstone Meredith, NH

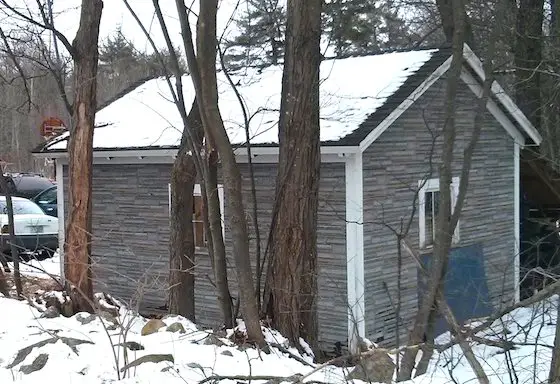
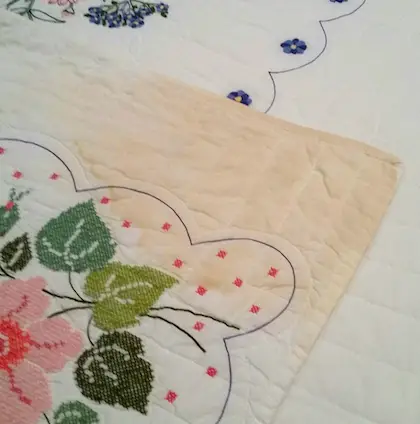
This is a detached one-car garage covered with INSELSTONE. There's a good chance this material was put on in the 1930s based on its location on Parade Road in Laconia, NH. The material up away from the splatter zone is in brand new condition. Copyright 2017 Tim Carter

inselbric inselbrick inselstone

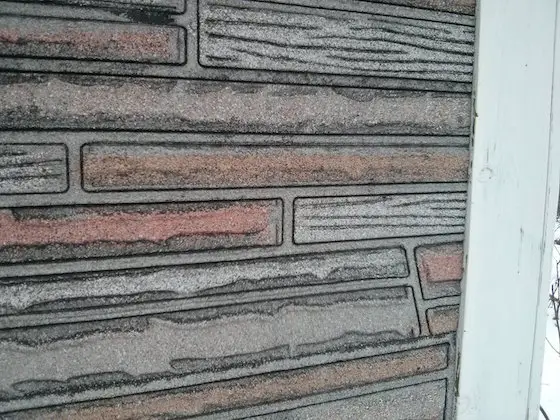
This is a close up of the INSELSTONE on the Parade Road garage. Pay attention to the striking detail that create shadows as if the panel is 3D. Wouldn't you love to see the manufacturing process that so carefully scattered the colored ceramic granules? I know I would. Copyright 2017 Tim Carter


inselbric insulbrick insulbric inselbrick

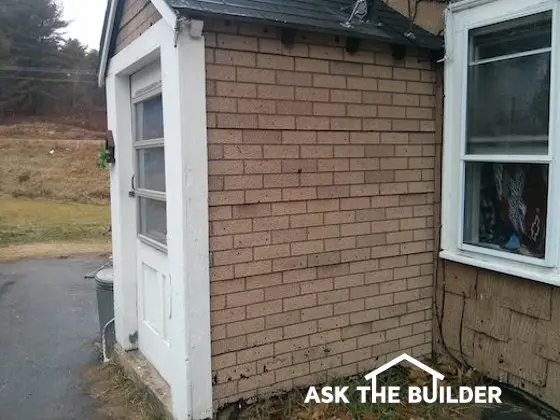
Here's some of the magic material on a tired home in Meredith, NH on Dow Road. This is a unique photo because the small entryway is covered in the brick pattern yet the main house is covered with a different asphalt siding product. Copyright 2017 Tim Carter

CLICK HERE to get FREE & FAST BIDS from local siding contractors. Ask one about this historic siding.


Trex Transcend Railing Installation

Trex Transcend Deck

Here's my own Trex Transcend deck. There's lots of railing. It didn't take long to understand how to do it with professional results. Copyright 2017 Tim Carter

I completed a somewhat complex Trex Transcend railing installation the summer of 2016. This railing system is well engineered and a pleasure to work with. This column was SO GOOD that I shared with the 31,000 subscribers who read my June 21, 2020 newsletter.

Trex Transcend Railing Installation - #WOOT!

It's important to note the Trex Railing Installation manual is a great document. To begin with, you need to read it cover to cover.

I'm just going to share some extra tips here that made my installation go faster. I'm also going to share a few things I wish I would have done differently.

Related Links

Cleaning Mold and Mildew From Trex Decking

Trex RainEscape Water Capture Video

Railing Post Spacing

I used the post sleeves that are engineered to slide down over 4x4 posts. The pre-cut railings are made for 8-foot-on-center and 6-foot-on-center spacing.

For this reason I laid out most of my deck posts for the 8-foot spacing. If I could do this over, I would have put them at 95 and 1/2-inch or even 95-inch spacing.

On the negative side, you'll have difficulty getting perfect fits of the railing sections if your posts are even slightly out of plumb. A point often overlooked is if the 4x4s have the slightest amount of twist. The 96-inch center-to-center post spacing will have you cursing for sure.

Another key point is be sure the 4x4 posts you use are carefully selected. To avoid warping and twisting, only use posts that have been cut from the center of the tree. You want to see the sapling core in the center of the post for ultimate long-term stability.

Free & Fast Bids

CLICK HERE to get FREE & FAST BIDS from local deck contractors in case you feel you'll mess this job up.

Rail Post Height & Low-Voltage Cable

My precut post sleeves were 40 inches tall. It's a perfect height.

I installed my rough 4x4 posts so they were 40 inches above the treated floor joists. This created a 1-inch dead space on top of the post after the sleeve was installed.

trex transcend railing installation

You can see the dead space on top of the 4x4 post. You'll be glad it's there if you're putting in post caps that have the soft low-voltage lights. Copyright 2017 Tim Carter

As a result this dead space was perfect to house the extra low-voltage wire tail that comes with the lighted post caps.

The post sleeves have friction ribs on the inside so they fit snug on a 4x4. I wish I would have taken the time to create a 1/4 x 1/4-inch routed recess groove on the post for the low-voltage cable to fit inside.

Instead I just put the cable near one of the corners to completely avoid the friction ribs.

Cutting Railings - Go Sloooooooow

The railings seem to be made from fiberglass. This gives them great strength. The Vintage Lantern brown color is some sort of coating on top of the fiberglass.

trex transcend railing installation

The red arrows point to small chips in the dark brown coating on the railings. Cut slowly to avoid this. Copyright 2017 Tim Carter

I noticed chips on some of the cut edges. These happened because I cut too fast.

Code Compliant Stair Railings

The building code is a dynamic document. It changes every three years.

You need to be very precise with your post placement on stairs for the railing height to meet the code minimum.

This placement, in my opinion, conflicts with the BEST place to put the posts for maximum strength and stability.

I put my stair railing posts on the inside corner of the rough stair stringer and riser. Recessed through bolts through the stringer lock the post in place.

CLICK HERE to get FREE & FAST BIDS from local deck contractors in case you feel you'll mess this job up.

Concrete Drive vs Pavers

concrete drive vs pavers

This concrete driveway is in good shape albeit the cracks. The owners are debating whether to redo it with concrete or match the paver sidewalk. (C) Copyright 2017 Tim Carter

Concrete Drive vs Pavers TIPS

DEAR TIM: We'd like to replace our driveway. My wife and are debating whether to replace the concrete driveway with another concrete driveway or a concrete paver driveway. I've concerns about the concrete pavers heaving and moving about due to the winter weather in central Ohio.

I also think shoveling the snow on a paver driveway could be frustrating given the number of spaces between pavers. We’ve talked to local contractors and received different opinions. Some say pavers are a problematic choice for our climate. Others say the pitch of our driveway makes concrete a poor option.

What’s your advice to get a great long-lasting job no matter which choice we make? Scott J., Westerville, OH

Concrete Drive vs Pavers Half Truths

DEAR SCOTT: I’m not a betting man, but let me guess. The concrete paver contractor said that the pitch of your driveway would make poured concrete fail. The poured concrete contractor said that pavers are problematic even though he walked across your concrete paver sidewalk to your front door. Am I close?

Related Links

DIY Driveway & Patio Paver Install

Concrete Installation Top Guidelines

It’s hard to make an informed choice when you’re doled out biased information, isn’t it? Your simple driveway decision reminds me of a meeting I attended years ago. It’s relevant and I feel you’ll enjoy it.

I was elected as a councilman in my small village fifteen years ago. Three other new members were swept into office one of them a brilliant attorney I became friends with. He was an expert litigator and somehow we began discussing a situation at a committee meeting.

“A half truth is a whole lie,” he said at one point. That simple statement hit me like a bucket of ice water. The contractors you’re talking to are telling you half truths. I’ve done expert witness work for over fifteen years in construction lawsuits and have been sworn in countless times. When you take an oath before a deposition or in a courtroom there’s a reason you swear to “ ... tell the truth, the WHOLE truth, and nothing but the truth.”

Free & Fast Bids

CLICK HERE  to get FREE & FAST BIDS from local contractors for a new CONCRETE driveway.

CLICK HERE to get FREE & FAST BIDS from local contractors for a new PAVER driveway.

Whole Truth About Poured Concrete & Pavers

For this reason let’s talk about the whole truth concerning poured concrete vs concrete pavers when used as a driveway. It’s important to realize both systems are relying on Portland cement. That’s a good thing. Portland cement is the glue that holds together the sand and gravel in the poured concrete and the concrete pavers. I’ve walked across concrete sidewalks and driveways in Cincinnati, Ohio that look fantastic after seventy, or more, years of exposure to the elements

Another key point is the concrete pavers are made in a controlled environment where they gain maximum strength. Poured concrete ordered from a ready mix plant might not have enough cement in the mix because the contractor wants to save money.

Easy To Ruin Poured Concrete

A point often overlooked is poured concrete can be ruined not only as it’s being installed, but also after the contractor drives away. He may add water to the mix as he’s finishing it and he may not apply a curing compound to slow or stop the evaporation of water from the mix.

concrete drive vs pavers

The surface of the existing concrete is not that bad. There are some pop outs, but this drive might last another 30 years! (C) Copyright 2017 Tim Carter

In other words, if you decide to install poured concrete, you need to make sure the contractor knows exactly how to order, place, finish and cure it. If you want a super-strong poured driveway I’d order it with a 5,000 pound-per-square-inch (PSI) compressive strength. This exceeds the minimum standard of 4,000 PSI.

CLICK HERE  to get FREE & FAST BIDS from local contractors for a new CONCRETE driveway.

CLICK HERE to get FREE & FAST BIDS from local contractors for a new PAVER driveway.

Be sure the slump is no more than 5 inches, don’t allow any water to be added at the job site and apply a curing compound after the concrete is finished. I’d also pour the slab 6 inches thick and have 1/2-inch reinforcing steel in the slab 2 feet on center both directions. Before the pour the steel would look like an empty sheet of graph paper.

Concrete Paver Must-Do List

Concrete pavers can be installed with ease and will not be a problem at all with your cold weather. The most compelling evidence is your front sidewalk. The photo you sent me shows it’s made with concrete pavers and they look in excellent shape. They’re smooth from what I can tell.

On the negative side precast concrete paving bricks fade over time. The ultra-thin coating of colored cement paste wears off exposing the true gray and white color of the sand and stone used to make the pavers. Many homeowners are distressed when this happens.

Compacted Gravel Base Is Key

The key to a smooth strong driveway made with concrete pavers is the compacted gravel base under the pavers. Not only does the soil beneath the drive need to be solid and compacted, but the crushed gravel under the pavers also needs to be well compacted. The gravel is what prevents the pavers from sinking when concentrated loads are placed on the driveway.

Shoveling snow from the driveway will never be an issue if the pavers are installed according to all the written guidelines produced by the Interlocking Concrete Pavement Institute.

Given these points I’d also reach out to the Portland Cement Association. They’re the touchstone for trustworthy information about how concrete driveways should be installed that can last for well over seventy years.

Column 1224

November 26, 2017 AsktheBuilder Newsletter

BURP! Kathy outdid herself on Thanksgiving. I didn't think it was possible, but once again she didn't disappoint.

Thanksgiving is my favorite meal of the year. The brined turkey was so juicy when I carved it, I thought a water line was somehow connected to it.

Then there were the Mistake Muffins.

For years, Kathy has made mouth-watering pumpkin muffins and then a batch of sweet potato muffins.

On Wednesday, she was on the phone talking with our oldest daughter Meghan, who lives in California. Being a woman, Kathy was able to multitask making the pumpkin muffins at the same time she was on the phone.

She got distracted and after adding the pumpkin in the bowl, she proceeded to then put in some sweet potatoes.

Moments later she called me in my man cave telling me about the mistake. She asked me to run to the store to get more yams.

"Did you throw out the batter?" I asked.

"No, why?"

"For goodness sake DON'T THROW IT OUT. We'll bake them and see how they taste."

OMG!!!! They were the BEST MUFFINS I've ever put past my lips.

I know, you want the recipe. I'll ask Kathy.

I hope you had a great Thanksgiving meal too. If you live outside the USA, I hope you have a holiday like Thanksgiving so you can experience a once-a-year food coma.

Laura Needs Your Plate

Speaking of plates - you need them to eat food - my friend Laura needs your help.

She wants to make her fiance's upcoming birthday the best ever.

You can help. I helped Laura a few days ago.

Tis the season of GIVING, so please consider helping Laura surprise Jack!

CLICK HERE to see what this is all about.

Shopping at Amazon?

If you're shopping today at Amazon.com for gifts, you can really help this newsletter.

Amazon pays affiliates like me a tiny percentage of their profit when I send them business.

This revenue HELPS make this newsletter and the AsktheBuilder.com website possible. I use it to help pay the salaries of my staff.

CLICK HERE to get started shopping at Amazon.com and I THANK YOU for using the link.

Saving a Quilt

Are you a quilter? You may think this is not home improvement, but it's related.

Hang in there.

Late in the day on Wednesday, just before I was ready to shut down for the holiday, I got an email from Jani in Oregon.

She was sharing her JOY about saving a quilt she had created.

quilt stain removal

My Stain Solver transformed an ugly yellow stain into pure white without harming the quilt or fading the colors.

CLICK HERE to see the After photo. WOW!!!!!

You can use Stain Solver to clean ANYTHING water washable around your home: carpet, tile grout, couches, chairs, etc.

If you're hosting family for Christmas, NOW IS THE TIME to ORDER Stain Solver and clean up.

You can get 10% off and FREE SHIPPING to any of the lower 48 contiguous USA states using this promo code:

THANKS17

The sale ENDS in just 16 hours - yes, midnight November 26, 2017 ET.

CLICK HERE TO ORDER STAIN SOLVER

Finally, if you're a quilter and are active on any Facebook, Instagram or other social media pages, can you help Kathy and me?

Please SHARE THIS LINK and story so other quilters don't FREAK when their quilt gets stained.

New & Revised Columns

Here's a few new & revised columns for you.

STOP Woodpeckers From Eating Your House!!!

How to Use a Spade Bit

Pesky 4-Way Switches - WATCH THE VIDEO!

Loretto Chapel Staircase - Demystifying the Myth

That's enough for a Sunday.

Many many new revised columns are coming your way.

Amazon Reminder: Please use this link to shop.

Tim Carter
Founder - www.AsktheBuilder.com
Eater of Mistake Muffins

Do It Right, Not Over!

Laura Steinberger Needs Plates

Laura Steinberger is an amateur radio operator in northern Michigan.

I've not met Laura in person, but have interacted with her and many other radio operators as part of National Parks on the Air.

Laura wants to make an upcoming birthday the best ever for her soulmate Jack.

Jack is in the process of decorating their basement game room with license plates.

nh license plate

Here's my ham radio vanity license plate. I sent Laura my Ohio plate with the same call sign. Don't ask me why it's on my wall instead of my truck. Copyright 2017 Tim Carter

Here's what Laura sent me:

"Jack’s birthday very special. A little back story, Jack has been collecting license plates since he was 9 years old.

They've lived in a milk crate, getting heavier and heavier over the years. When we moved in together, he brought his collection, still in the milk crate with him. They were stored in the garage for the last year, and just a month ago he told me how much he would like to display them.

I told him “Lets do it” I took him to our finished basement and pointed to a wall and said “display them there!” He didn’t believe me at first, but I know how much his collection meant to him. So one Sunday recently we put them up.

He has quite the collection, but I noticed quickly that he only had Michigan.

He said “I would love to have plates from all 50 states. How cool would that be?” A light went off in my head, I had to try and make this happen! So with your help, I can. Thank you so much for helping me make a dream come true."

Laura knew I might be able to help with my large newsletter list.

Please help Laura make Jack's dream come true.

A week ago, I sent her three license plates that I had: Ohio, Rhode Island and New Hampshire.

Laura is willing to pay for the shipping to get your license plate to her.

Here's the list of states she still needs.

  • Arizona
  • Arkansas
  • Idaho
  • New Jersey
  • Florida
  • South Dakota
  • Georgia
  • Connecticut
  • Utah
  • West Virginia
  • Louisiana
  • South Carolina
  • Wyoming
  • Hawaii
  • North Dakota
  • Virginia
  • Vermont
  • Delaware
  • Wisconsin
  • Indiana
  • Massachusetts
  • Oregon
  • Kentucky
  • Montana
  • Mississippi
CLICK HERE if you have a plate from one of these states. Fill out the form and I'll then put you in direct contact with Laura to work out all the details.
Featured in Tim's November 26, 2017 Newsletter.

Thanksgiving 2017 AsktheBuilder Greeting

I'm going to make this as short as possible. Hang in there if you can - especially if you want a great deal on Stain Solver - BLACK FRIDAY SALE today baby!

Thanks to You

I don't say this as often as I should - I'm so very thankful for you.

You may not realize it, but you're directly responsible for my continued passion about all things home improvement.

Just when things are going off the rails and I've received ten nasty or hateful comments on my YouTube videos, you may send me a delightful email about how I've helped you in some way.

Or perhaps you leave a great comment at the bottom of one of my articles at the website.

You may have sent me an old-fashioned letter - yes, I do get them from time to time - and they're a special treat!

When you play the fun games in this newsletter, you help AsktheBuilder.com.

When you shop at Amazon using my affiliate link to get to Amazon.com, you help AsktheBuilder.com. CLICK HERE if shopping at Amazon.com today.

When you write a letter to the editor of your local paper where you see my column telling her / him how you like my column, you help me.

I could go on and on, but I'm sure you get the idea. Your FEEDBACK to me or to things that connect to me all HELP keep AsktheBuilder.com going.

I've got news for you. Next year, 2018, is very likely going to be the BEST YEAR EVER for AsktheBuilder.com. I can't share just yet why, but stay tuned!

Stain Solver Black Friday SALE

Many stains are black. It only seems natural that we should have a sale on the monster BLACK FRIDAY along with everyone else.

It's happening NOW! Yes, CLICK HERE for the Stain Solver Black Friday SALE.

Promo Code: THANKS17

10% off any order over $28.00 + FREE SHIPPING to anywhere in the contiguous 48 USA states.

This sale ENDS Sunday night at midnight. I'll send out a reminder, but just act NOW before you forget or are too tired to do it on Sunday.

Stain Solver Oxygen Bleach

Stain Solver

New Columns & VIDEOS

Here are some great new columns for you many with VIDEOS!!!

Magic Dust Patches Patio Crack - Amazing Video!!!

How to Cut Mexican Tile - Super Grinder Video!!

Strong Wood Epoxy Fixes Wood Rot Fast

That's quite enough for the insane day before Thanksgiving!

Once again, THANKS SO MUCH for being part of my family here at AsktheBuilder.com!

Tim Carter
Founder - www.AsktheBuilder.com

Do It Right, Not Over!

P.S. I want to thank Jim and Maryrose who reached out to me three days ago after I sent out my "Oooops" email.

Maryrose said, "I love the fact that you forget. You are still a lot younger than I. In February, I will be just 4 years short of 100."

Jim was very pithy saying, "You're the real deal."

Notes like that paste a huge smile on my face for hours......

Maryrose, I'm planning on going that far too on the journey. Happy early birthday!!!

How to Repair Wood Rot

How to Repair Wood Rot Video

Repair wood rot is what your significant other asks you to do. But you don't know the best way.

To put it differently, you don't know what's product to use and what will last.

Repair Wood Rot Using Epoxy & Hardener

The first thing to remember is you need to use a material that's not going to fail again. Wood epoxy should be your go-to choice. You should use the liquid wood hardener before mixing up the epoxy.

PC Woody epoxy

This is the milky liquid you brush onto the rotted wood. Allow it to harden for 24 hours before using the PC Woody epoxy. CLICK THE BOTTLE to have this delivered to your home in days.

I've had the best luck so far with a product called PC Woody.

PC Woody Epoxy

This is PC Woody. It's a fantastic two-part epoxy that's very sticky. It's easy to sand once hard. CLICK THE PHOTO NOW to have it delivered to your door.

This epoxy is two distinct colors. You mix it using a putty knife until the color is consistent. I prefer to mix it on a piece of sturdy cardboard.

Related Links

Wood Repair Tips - Rotted Wood Sucks

Treated Lumber Rots Too - Crazy Photos!

Free & Fast Bids

CLICK HERE to get FREE & FAST BIDS from local handymen who can install the PC Woody for you.

Use Hardener First

Wood rot attacks the cells of wood. Severe wood rot creates a stringy mess. You can stiffen this summer wood that remains by saturating the remaining wood with a liquid hardener. The people that make PC Woody make PC Petrifier that does a great job.

The hardener is a milky liquid that dries clear. It usually takes 24 hours to dry, then you can apply the PC Woody.

Sandable, Stainable & Paintable

Another key point is the wood epoxy can be sanded smooth. You can paint or stain the epoxy and the repair should be invisible.

The first thing to remember is the epoxy needs to be hard before you start to sand it. It's best to wait at least 48 hours before you sand it.

CLICK HERE to get FREE & FAST BIDS from local handymen who can install the PC Woody for you.

How to Cut Mexican Tile

How to Cut Mexican Tile Video

It's very easy to cut Mexican tile. To put it another way, it's one of the easiest tiles you'll ever cut in your career.

Soft and Absorbent

Mexican tile is not hard because it was fired at a lower temperature and for a shorter amount of time while it was in the kiln.

The tile starts out as a wet clay and heat transforms it into a soft stone.

The softness of the tile allows it to soak up water. On the negative side, you'd never want to use Mexican tile where the temperature drops below 32F. Water in the tile will freeze, expand and cause the tile to surface spall.

Related Links

How to Install Mexican Tile

How to Grout Mexican Tile

Free & Fast Bids

CLICK HERE to get FREE & FAST BIDS from local tile contractors if you want to avoid the hassle yourself.

Cut Mexican Tile With an Angle Grinder

An inexpensive angle grinder is the best tool to cut Mexican tile. You can use a wet saw if you have access to one, but they are very expensive to rent.

Be sure the grinder has a dry diamond blade. This blade will cut through the tile like a hot knife through butter.

Angle Grinder

This is a great but inexpensive angle grinder. Put in a dry diamond blade and you can cut away grout in seconds. CLICK THE PHOTO NOW to have this grinder delivered to your door.

Cutting Circles In Tile

It's very easy to cut a curve with the angle grinder. A small-diameter blade allows you to cut a curve. 

To cut tighter curves, don't bury the blade into the tile. Make shallow passes and enlarge the cut line on the outside of the curve where it doesn't matter.

Dust Control Is Important!

It's important to realize you'll be creating lots of dust if you use the angle grinder and dry-diamond blade. Stay upwind of the cutting area if it's windy. If no wind, consider using a large fan to blow dust away from you and the grinder.

The Mexican tile will probably have silica in it and it's not a great idea to breath lots and lots of dust that contains silica.

Here's a dust mask that works quite well:

Silica Dust Mask

Be sure any dust mask you get says it's approved for silica. CLICK THIS PHOTO NOW to have this mask and filters delivered to your door.

CLICK HERE to get FREE & FAST BIDS from local tile contractors if you want to avoid the hassle yourself.

How to Fix a Cracked Patio

How to Fix a Cracked Patio Video

"Fix cracked patio" is probably the last item on your honey-do list you want to see. You don't think it's possible to hide the crack and you think it will take all day.

Fix Cracked Patio Fast

The first thing to remember is it's easier and faster to repair the crack than rip out the tile or patio and start over. It's much cheaper too.

All you need to do this job is some painters tape, super-strong concrete epoxy and a hammer or drill.

Podcast 3

CLICK this image and listen to the first story - Vic has a gorgeous patio on the back of his house. One part of the patio has sunken down. I've got the fix.

Related Links

Magic Concrete Epoxy Repair Video

How to Repair Chipped Tile

Free & Fast Bids

CLICK HERE to get FREE & FAST BIDS from local handymen that can do this patio crack repair.

Epoxy In a Tube

The best epoxy in my opinion to fill the crack is one that squirts out of a regular caulking tube. I've used the PC products epoxy now for years and it has great open or work time.

PC-Concrete Epoxy

This is the magic epoxy that fits into a regular caulk gun. I've used it with great success. CLICK THE PHOTO NOW TO HAVE IT DELIVERED TO YOUR HOME.

This epoxy comes with two clever nozzles. They have an internal helix insert that blends the two-part epoxy so when it comes out at the tip it's already mixed.

Tape The Crack Edges

Use normal painters tape to carefully tape the sides of the crack. Taping prevents epoxy smears on the tile. You will have to small short pieces along the jagged crack.

The Magic Dust

It's important to realize the epoxy is gray in color. This is fine if your tile matches that color, but most don't.  You may need to create fine dust that's the same color to match the color of the patio.

Use a hammer drill on the edges of a concrete patio to create dust and grit that will match the top surface of the concrete.

Use a regular hammer and create matching dust and grit using broken or discarded pieces of the tile used to cover the patio.

A point often overlooked is paint. In order to disguise the epoxy you may have to paint it a flat color that matches the patio.

CLICK HERE to get FREE & FAST BIDS from local handymen that can do this patio crack repair.

How to Remove Patio Tiles

How to Remove Patio Tiles Video

You can remove patio tiles in a flash using a cordless rotary chipping hammer. For one thing, your back is going to love you.

A power tool with a 3/4-inch flat chipping chisel can remove full tiles in seconds if you get under the tile.

Related Links

Demolition Gloves That Fit

Great Sweat-Equity Jobs - Save Big Bucks!

Remove Patio Tiles Requires Minimal Skill

You don't have to have years of experience to remove tiles. I taught a friend of mine to do it in less than two minutes.

The key is chipping pieces of tile away from you if you're trying to preserve nearby tiles.

Free & Fast Bids

CLICK HERE to get FREE & FAST BIDS from local tile contractors if you don't want to do this job.

remove patio tiles - chipping hammer

Use a cordless chipping hammer like this to remove tiles in seconds. You must have the right chisel bit!

Sometimes you can remove an entire tile by chiseling at a low angle getting the bit under the tile so it pops up.

Safety First

Be sure to wear safety glasses, heavy gloves and slow down. Shards of tile can be very sharp and cuts are a constant threat.

Grind Out Grout

You need to grind out the grout around tile that are being replaced. If you bash the tile with a hammer without removing the grout, the force of the hammer blow will transfer to adjacent tile and possibly crack them.

Remove Patio Tiles - Angle Grinder

This is a great but inexpensive angle grinder. Put in a dry diamond blade and you can cut away grout in seconds. CLICK THE PHOTO NOW to have this grinder delivered to your door.

Remove Thinset Too

The old thinset that is under the tile needs to be removed. This cement material can get in the way when you go to install the new tile.

A wide chisel tapping towards the thinset is the only way to remove it fast.

Rub the concrete slab with your bare hand to make sure its smooth. All dust must be swept away before installing new tile.

CLICK HERE to get FREE & FAST BIDS from local tile contractors if you don't want to do this job.