This past week I've been struggling working on a remodel job here at my own home because I've been lame.
Not lazy lame, physically lame.
I'm installing a new three-piece American Standard corner shower and a new vanity and sink in our master bathroom.
Last Sunday, I was on my knees all day - yes, I was using knee pads - tearing out the concrete mud tile base and the old shower threshold.
When on your knees, you may have a tendency to bend your toes like I do. The next day I had no soreness or issues at all.
I woke up on Tuesday morning and my right foot was hurting. It was pain near the base of my big toe. It got worse as the day went on and by dinner, I was in severe pain and could barely walk.
I'm pretty much convinced, based on the symptoms, it was gout. What's odd is I don't fit the profile of the primary causes of this condition.
I don't drink alcohol. I don't smoke. I don't eat the crazy meats like liver, kidney, etc. that are high in the chemical compound that trigger gout. Finally, we rarely have red meat here at the Carter Casa. Eating lots of red meat can trigger gout so the experts say.
I iced my foot, I did all sorts of stuff and made no progress as the days wore on. It was so tender that the weight of a thin top sheet felt like my foot was being stabbed by fifty knives.
Finally, I decided yesterday to try to treat the symptoms with pineapple juice. My good friend Jim Cluett said to soak my foot in Epsom salts.
I did both yesterday and woke up this morning in great shape! I have minor discomfort but the swelling is gone and I can walk normally!
Here's to pineapple juice and Epsom salt!
My mom was one of the first women pharmacists in the state of Ohio back in the early 1950s. She swore that Epsom salt is the universal healing soaking solution. She also swore swabbing sore throats with some red lava solution was a smart thing to do, but that's a story for another day.
I remember her making me soak my feet in a warm solution of Epsom salts for all sorts of problems. I hadn't done it in years.
DEAR TIM:Well, now I've done it. My newlywed wife has lost all confidence in my home improvement skills.
She wanted me to install a dimmer switch in our dining room and now the chandelier only works half the time. There are two switches in the room that control the light.
They worked fined before I started the job. But now, you can only get the lights to come on at one switch. Can you use your super powers and help me out of this mess so she lets me touch a putty knife in the future?
What did I do wrong and how in the world do these crazy 3-way switches work? Brad G., Hamilton, OH
DEAR BRAD: I'll never forget the day I almost lost all my home improvement privileges from my new wife.
Sparks A Flyin' - Many From My Wife!
We'd been married about three years and I was replacing an ivory wall receptacle in our kitchen with a white one. Kathy said, "Shouldn't you turn off the circuit breaker before you do this?" I responded, "No, that's only if you don't know what you're doing."
Seconds later, there was a flash and small droplets of molten copper and steel made burn marks in our new gleaming white laminate tops. Kathy was furious and has never let me live that mistake down.
I was too lazy - and cocky - to go down to turn off the breaker. Believe me, you make that mistake just once. I was very lucky to avoid electrocution and serious burns.
If it's any consolation, you're not the first person to goof up the wiring a set of 3-way switches. It's easy to do if they're not marked and most electricians never mark the wires. What a shame, because it would only take a few moments to do this.
What's more, I routinely get emails from rookie electricians who tell me they don't understand 3-way switches. They LOVE my 3-way switch video as it explains exactly how to wire them flawlessly.
3-Way Switch Video
Watch this video to see how easy it is to wire up two 3-way switches.
Railroad Track Switches
I had an interesting thing happen this past summer to me that really helps me explain how 3-way switches work. I became a certified train conductor working part time on a scenic train in New Hampshire.
Part of my training included being a fireman on the train. When you're a fireman, you have to throw the switches to allow the train to go on different tracks.
When the train approaches a switch, it's going to go down one track or the other depending which way the switch is oriented. The same is true inside a 3-way switch.
Send Current Down One Wire
If you look at the first 3-way switch that's connected to the wire that leads back to your electric panel, you can see why the light goes on or off. If you flip the switch one direction, you stop the electricity from entering the rest of the switch circuit.
If you flip that first switch so the light comes on and then walk over to the second 3-way switch and flip it, the light goes off because you have oriented the switch so the electricity can't travel down the wire that's connected to the chandelier. It's caveman simple when you think about it.
Here's what you need to know to get back in your wife's favor and to get the chandelier working perfectly. First, turn off the circuit breaker that powers this circuit. Don't be bold like I was all those years ago.
Four Wires
Inside each box you should discover four wires that connect to each 3-way switch. One wire at one of the switches is the continuous hot wire that is getting electricity from your circuit breaker panel. At the other switch box there's a wire that goes to the chandelier.
At each switch box you now have three remaining wires. One wire might be bare copper or have green insulation on it. This one is the ground wire and connects to the green screw on the 3-way switch. The remaining two wires are called travelers and simply extend to the other 3-way switch.
Compare Dimmer To Old Switch
Look at your new dimmer switch or a new 3-way switch. You should notice four screws, two on each side.
One is green, that's the ground screw. One screw is black and the other two are brass colored.
Magic Black Screw
The black screw is the important one. You connect the continuous power wire to this screw in the one box and in the other box you connect the wire that goes to the chandelier to the other black screw of the second 3-way switch.
The Travelers
The leftover wires in the box connect to the two brass screws. These are called travelers by electricians.
It doesn't matter which of the wires connects to each of the brass screws. Do this and your chandelier will work perfectly again.
Find The Hot Wire
The issue you'll have is determining which of the wires at each box is the one to connect to the black screw. If you use a simple multimeter that can tell you voltage and continuity, this will be child's play. You also need a voltage pen. This is a cool device you point at a hot wire and it tells you it's HOT! Save sparks!!!
I own this multimeter. It's PERFECT for a homeowner. It will do all you ever need. This kit comes with a voltage pen too!! WOOT! CLICK THE PHOTO NOW TO HAVE THIS DELIVERED TO YOUR HOME NEXT WEEK! MAGIC!
Using the multimeter at the one box will allow you to discover which of the wires is the continuous hot wire that has power when the circuit breaker is on. Mark this wire once you determine this.
Continuity Testing
You can then use the multimeter's continuity tester along with a scrap piece of wire that stretches between the two switch boxes to determine the two traveler wires. By connecting the scrap piece of wire to one of the wires at the other switch the tester will tell you if you have continuity. Once again, mark the wires with a T1 or T2 telling you they're the travelers. Do this in each box. The remaining wire in the second box is the one that leads to the chandelier. It's easy!
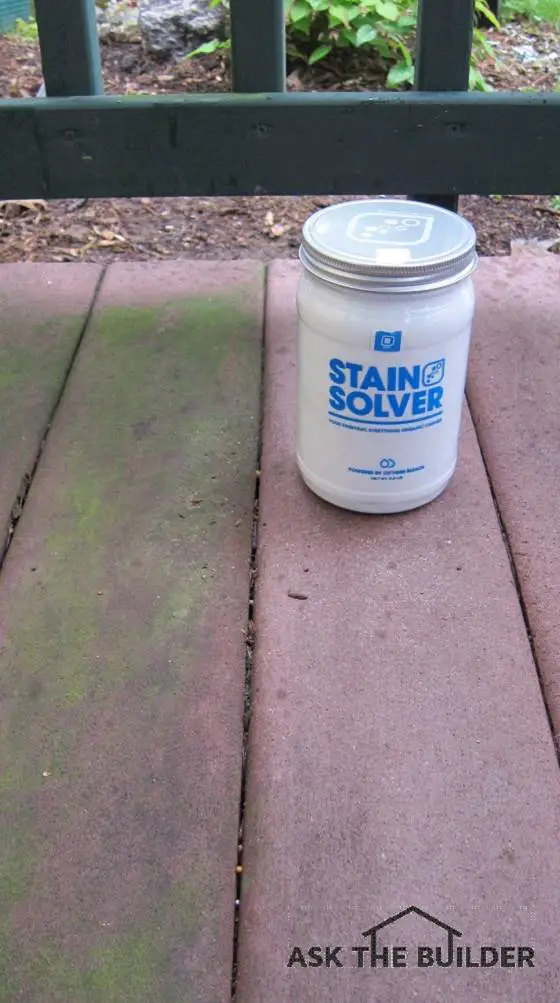
Oxygen bleach was used to remove the algae from the decking boards on the right. Photo Credit: Tim Carter
"The good news is that it's easy to remove algae. The better news is that once you have your patio, deck or roof free of algae, you can do something to STOP algae from coming back."
DEAR TIM:My house must be a magnet for algae. I have green algae on the shaded parts of my deck, it's on my patio and on my vinyl siding. Furthermore, I believe there's black mildew on my siding.
Then there's the roof. I have black streaks of algae up there. How can I safely remove the algae from all these surfaces without harming me, my pets and my plants? I've heard I should use bleach, but something tells me that this is not the right approach. What would you do? Caroline B., Jackson, MS
How to Remove Algae at My Own Home
DEAR CAROLINE: I have some algae issues at my own home.
I have two decks, one on top of another. The lower deck has lots of shade which is a perfect place for algae to grow.
I also have algae coating stone steps on my property. I work at keeping them clean because when wet, the algae-covered steps are like walking on wet ice. They are so slippery! You, I, and millions of others suffer from algae around our homes.
The good news is I developed a non-toxic certified organic cleaner that's SAFE to use on all exteriors surfaces. It gets rid of algae in no time and will NOT HARM any vegetation, fish in ponds, or our earthworm allies in the soil!
This algae cleaner is called Stain Solver. I've got much more about it below.
The good news is that it's easy to remove algae. The better news is that once you have your patio, deck or roof free of algae, you can do something to STOP algae from coming back.
More on that far below. Keep reading, because you have to clean the algae first.
What is the Best Algae Cleaner?
Certified organic oxygen bleach is the best algae cleaner if you care about the environment and your plants and trees.
Do NOT use chlorine bleach or any product that says on the label it contains sodium hypochlorite. That's the fancy name for chlorine bleach. Chlorine bleach will KILL all the vegetation around your home.
The first thing you might find interesting is there's more than one type of bleach. For many years growing up, I thought bleach was bleach.
My mom used to buy those white plastic bottles of smelly chlorine bleach for years to use in our laundry. She would save the bottles, rinse them out and then fill them with water in case the water main broke outside our house. It was a big joke around our home, but my mom always was prepared!
Much to my surprise I discovered, about seventeen years ago, there's at least one other bleach - oxygen bleach. It does many of the same things chlorine bleach does, but it's not toxic.
Where Can I Get Oxygen Bleach?
Oxygen bleach is the preferred bleach to use on the exterior, and interior, of your home because it will not harm you, your pets or your plants. My favorite oxygen bleach is Stain Solver. It's made in the USA with USA ingredients.
IMPORTANT TIP: Stain Solver is certified organic. Most of the other oxygen bleach products out there are NOT certified organic.
Chlorine bleach, on the other hand, is highly toxic to plants, humans and animals. It's so powerful that it will remove the color from wood decking and it can discolor painted exterior surfaces much like it takes out the color from fabrics.
Is Stain Solver Safe for Plants, Wood & Color-Safe?
Stain Solver is MADE in the USA with USA ingredients that are food-grade quality. CLICK THE IMAGE to order some NOW.
Stain Solver will not take the color out of your wood decking, your vinyl siding, your painted surfaces, or your roof. Stain Solver is a powder you mix with water.
Once mixed with warm or hot tap water, all you get is more water, oxygen ions that do the cleaning and some harmless organic soda ash. Not all oxygen bleaches are the same. Many contain fragrances, dyes, color crystals, and excessive fillers.
The popular oxygen bleach that you see on TV commercials is made with offshore ingredients that are of dubious quality. It also contains far more filler than active ingredient.
Do You Dissolve It in Warm Water?
This past weekend, I mixed up some Stain Solver to clean algae from my lower deck and from the deck railing. I simply dissolved the powder in warm water, poured it into a simple garden hand-pump sprayer and squirted it on the algae-coated surfaces.
I allowed it to soak for about ten minutes, then used a scrub brush to remove the green algae. After rinsing with a garden hose, the surfaces looked brand new! You can see the results in the photo above.
That's my own Trex decking. You can see the board on the left still has the algae coating.
You can clean roofs with oxygen bleach, but it can be challenging. The biggest problem is that it's dangerous working up on a roof. The algae-covered roof, once wet with the oxygen bleach solution, can be very slippery. You need to make sure you do not fall from the roof.
Watch this video to see how to clean algae from a roof using Stain Solver.
It's imperative the roof surface, or any surface you're cleaning, does not dry out before you get to scrub it. You must keep the surface wet with the solution at all times. This is hard to do on a roof on a sunny day. It's best to clean roofs on overcast days when air and roof temperatures are cool.
Do You Need to Scrub the Surface?
You need to scrub the surface after the oxygen bleach solution soaks. Don't ever think that you can just spray on any magical cleaner and get perfectly clean surfaces.
When you take a shower, you don't just stand under the water stream. You rub your skin. The rubbing with soap is what gets you clean. Rubbing is mechanical agitation.
The same is true for clothes. If you spray your clothes with a cleaner and let them dry, they won't be clean. You must let them AGITATE with soap in the washing machine.
You need to agitate the Stain Solver on the roof. Period.
IMPORTANT SCAM TIP: Some companies try to ply a product that you just spray on and then walk away. They say you have to do no more.
Marketers that make that claim are yanking on your lazy heartstrings that want the easy way out. Don't believe the spray-and-rinse claims for a second.
As I pointed out above, you already know that you have to mechanically agitate ANYTHING to get it clean.
Once you have the surfaces clean, you can inhibit the growth of algae if you coat the surfaces with a biocide.
Copper is a natural biocide as is zinc to a lesser degree. If you have an exposed copper or zinc strip about 6 inches wide along the top of your roof, each time it rains tiny metal atoms are deposited on the roof. Copper stops algae from growing. PERIOD.
Watch this video for PROOF!
Do I Use Copper Sulfate to Prevent Algae for Patios and Decks?
It's hard to get copper to coat siding, decking or patios. But if you periodically spray your patio and decks with a copper sulfate solution, it will inhibit algae growth.
Please CLICK the following image of copper sulfate crystals to buy some. You mix 1.25 pounds per gallon of HOT tap water. Stir until dissolved. Apply to DRY patio, deck, siding, etc. using a garden hand-pump sprayer.
IMPORTANT REMINDER TIP:You need to CLEAN the algae off first before using the copper sulfate. Copper sulfate is NOT A CLEANER. CLEAN the algae with Stain Solver oxygen bleach for BEST RESULTS.
This is copper sulfate. It dissolves easily in water. Spray it on with a hand-pump sprayer. CLICK THE IMAGE TO ORDER THE COPPER SULFATE NOW.
You can see why you'll just have to suck it up and do periodic cleaning to keep your home looking great.
4-way switch - It has four screws plus the green grounding screw. You can discover other tips about 3 and 4-way switches here. PHOTO CREDIT: Tim Carter
"The first thing you need to know is that the 4-way switch is indeed a very special switch. It's got a total of FIVE screws on it!"
4-Way Switch TIPS
Complex switch requiring great skill to install
Has five total screws on it vs. a standard single-pole switch with just three
DEAR TIM:I'm pulling my hair out wiring a 4-way switch. What's the secret to 4-way switch wiring?
Do you need a special 4-way electrical switch or a 4-way light switch? At this point, my new wife thinks she married a dunce.
If you can teach me how to wire a 4-way switch, I'll be eternally grateful. If you can't help, I will be forced to admit defeat and will call an electrician. Robert M., Ft. Collins, CO
DEAR ROBERT: Listen, don't beat yourself up too badly.
Is a Four-Way Switch Hard?
There are many people who are flummoxed by the mysterious 4-way, or four-way, switch. I liken the 4-way switch, and its first cousin the 3-way switch, to the famous movie Wizard of Oz.
It's easy to get confused how to wire a 4-way or 3-way switch. This is why I created videos to show how it's done.
The first thing you need to know is that the 4-way switch is indeed a very special switch. It's got a total of FIVE screws on it! (See photo above.)
A normal simple single-pole switch that you have to turn on a bedroom, closet or front-porch light only has three screws on it.
The two screws are for the incoming (line) and outgoing (load) power wire and the third screw is for the ground or earth wire.
Watch the following video to see a simple single-pole switch.
You need to really understand how current flows and is interrupted by a simple single-pole switch before you start to tackle a 4-way switch!
Single Pole Switch Video
This is what most of the switches in your home look like. You need to understand this before you graduate to a 3-way switch, much less a 4-way switch!
How is a 4-Way Switch Different from a 3-Way Switch?
A 3-way switch has three screws plus the green grounding screw. A 4-way switch has four screws plus the green grounding screw.
Multiple On & Off Locations
You use 4-way switches in situations where you want to control a light or other fixture from more than two locations. For example, the second-floor hallway lights in my own home are controlled at four different locations. To accomplish this, you must have two 3-way switches and two 4-way switches.
Where Does the 4-Way Switch Go?
A 4-way switch must always be in between two 3-way switches. I know this sounds confusing, but let's see how it is done in the real world if you were to remove the drywall or plaster from your walls and ceilings.
The easiest way to understand how to wire a 4-way switch is to watch this video:
The traveler wires from the two 3-way switches attach to the screws on the four-way switch.
Connect the two travelers from one 3-way switch to the bottom two screws on the 4-way switch. It doesn't matter which traveler wire goes on which bottom screw.
Then connect the two travelers from the other 3-way switch to the top screws on the 4-way switch. Another key point is it doesn't matter which traveler wire you attach to which screw.
What Happens to the White Neutral Wires?
In all three boxes, you connect the white wires to each other with a wire nut. The white neutral wire that enters the first 3-way switch needs to travel through all the switch boxes until it eventually gets to the light fixture.
The white neutral wires NEVER get attached to any of the screws on the 3-way or 4-way switches.
You do the same with the bare copper wires and create a tailpiece of bare copper that connects to the green grounding screw on each switch. In each box, you are left with black and red wires. These connect to the terminal screws on the switches.
How Many 4-Way Switches Can You Use?
You can have many 4-way switches in a circuit as you want. As crazy as this sounds, you could have 10 switches control one light. This circuit would have the mandatory two 3-way switches and eight 4-way switches.
It's important to realize that all the 4-way switches fall in between the two 3 way switches. This is the only way the circuit will work.
How Do You Wire a 3-Way Switch?
To make any of these circuits work correctly, you must connect the wires to the right screws on the 3-way switches. WATCH my 3-way switch video now.
Look closely at the 3-way switches. They'll have a black screw and two brass ones.
Connect the black continuous-hot wire in box number 1 and the black wire that goes up to the light fixture in box number 3 to the special black screw on each 3-way switch.
The remaining two wires at each box connect to the brass screws on the 3-way switch.
Home or construction plans are the heart and sole of any project I have ever done. This is especially true of large scale room addition work or new home construction.
Without detailed plans, a project is doomed to failure. Mistakes will happen.
Cost overruns will almost always occur. Change orders will be a weekly event.
All of these things take the fun out of construction for both the homeowner and the contractor.
Change Orders - Death On A Stick
Take change orders for instance. I hated change orders! I never made any money on change orders.
They disrupted the flow of the job. It seems that you can never recapture the cost of the time spent discussing the change, calculating the change and administering the change. They were nightmares as far as I was concerned.
Watch this video to see a great set of plans for a room addition. Wait until you see the interior elevations that show light switch locations!
Lumber Yards Know Best
Here's another trick for you. Most lumber yards have salesmen that call on builders.
Some of these same companies may be large enough to have an in-house estimator. I used to deal with a lumber company like this.
I'd take plans that I was bidding to this individual. He'd do a complete computerized lumber takeoff. It was wonderful!
Well, as you might imagine, this estimator or salesperson would see plan after plan. He knows who draws a complete set of plans and who doesn't.
So, why not talk with this individual? Ask him/her which architect seems to consistently draw the clearest, most complete set of drawings.
Hopefully you will walk away with the names of 2 - 3 architects whom you can interview. Not many people know of this approach.
Selecting an Architect
Remember, you are looking for an architect who specializes in residential construction. You want one who can show you various completed projects.
Discuss how mistakes will be handled. Everyone makes mistakes. If the architect goofs somehow, ask how this mistake will be paid for.
As a general rule of thumb, most mistakes come to the surface after all of the rough framing is completed. Suggest that a portion of the fee is withheld until the rough framing is complete. Simply develop a plan to deal with this circumstance.
Ask about written specifications. Generally, most architects who have computerized have these written project guidelines already sitting in their word processors.
Written specifications are an important part of a project. They're similar to assembly instructions you might receive with a bicycle.
They tell the builder what things to use where and how to put certain things together. These specifications can prevent substitutions of products.
In other words, if the plan calls for baseboard in a room, just what type does that mean? You might think a nice tall baseboard. Your builder might think it means a piece of #3 pine! Specifications can clear up problems like this.
I've sold a set of decent new home specifications that cover lots of items you'd probably forget to think about. Just ONE thing in my set could save you thousands of dollars.
Look for schedules on plans. Schedules are simple spreadsheets of information. For example, good plans come with Door and Window Schedules.
This is usually a table which lists each opening, what type of window or door goes there, the make, model, options, rough opening size, size of structural header, type of interior and exterior finish, etc.
These schedules are loaded with valuable information that is useful to everyone involved in the project. They leave nothing to speculation.
Types Of Schedule Spreadsheets
Your plans MUST HAVE a schedule for:
appliances
plumbing fixtures
lighting fixtures
room finish
cabinets
Elevations
Great plans also have lots of exterior and interior elevations. This is a two-dimensional drawing of what a finished wall will look like.
These are invaluable in kitchens and bathrooms as they show the exact location of electrical outlets, fixtures, toilet-paper holders, towel bars, etc. There's no guessing where something goes!
DEAR TIM: Recently, I received a summons to appear in civil court. The contractor who walked off my job is suing me for the remainder of the unpaid money stated in the contract.
Because he avoided repeated calls and letters, I hired other workers to finish the job. What do you think is the best evidence I can produce to prove to the court system that I was a victim?
In my opinion he deserves no money. Sue D., Sedona, AZ
DEAR SUE: Let me begin by telling you that I am not an attorney and can offer no legal advice.
Documents Win The Day
I can tell you, based upon my many years of being involved in differences of opinion with homeowners, what has saved me from having to work for free. The items that eventually become supporting evidence can be a thorn in one's side as the job progresses, but they'e worth their weight in gold if a dispute arises at a later date. Hopefully you have many of the following things.
CLICK HERE to get FREE & FAST BIDS from contractors who'll come in and FINISH THE WORK the loser contractor has not done.
Excellent Plans & Specs
Perhaps the most powerful weapon a homeowner can possess when the going gets rough is an excellent set of plans and specifications. All too often standard plans have far too little detail.
Too much is left to interpretation. For example, if the plans say you are to get crown molding, does this mean a small thin piece of molding or a large combination crown molding? Detailed plans and specifications make these issues black and white not various shades of gray.
Written Notes & Follow-Up Letters
Almost every job requires multiple face-to-face meetings where many issues are discussed. It can be hard to take notes during these meetings, but this written record of the discussions can help jog the memory of a participant when the wrong light fixtures or floor tile are delivered or installed.
These notes become iron clad if you write a letter summarizing the key points and send a copy to all who participated in the meeting. To make the notes armor plated, consider including a sentence stating that if a participant disagrees with anything in the letter they must respond in writing in a timely manner.
Digital Voice Recorders
Technology has advanced that it's now possible to record what's said at meetings. I'd absolutely record each planning meeting or any discussion where you and the contractor are making decisions and agreeing to something. Be sure you ask the permission of everyone who's attending the meeting and get them saying "Yes, it's okay to record" on the digital recorder. CLICK HERE to see a best-selling digital voice recorder.
Some states require this for the recording to be used in a future legal proceeding.
Here's a best selling affordable digital voice recorder. One saved conversation may save you THOUSANDS of dollars. CLICK THE IMAGE NOW TO HAVE THIS DELIVERED TO YOUR HOME NEXT WEEK.
Photos & Video
Photograph or video tape the progression of the job. Be sure the camera is set to record the date and time the photo is taken. This is automatic on most digital cameras today, but it requires that you be sure the date and time is set correctly in the camera.
Take a few test photos and look at the info settings on the digital file to ensure you have the date and time set correctly.
Hundreds, No Thousands, Of Photos
Take many photographs, including close up photos, of things that will be hidden at a later date. Photos of structural connections where things are nailed or bolted together are often critical.
Try to photograph concrete forms just before the concrete is poured. Imagine how difficult it is to guess the thickness of a concrete slab without doing destructive testing or using an expensive diagnostic device. A digital photograph may come to your rescue.
CLICK HERE to get FREE & FAST BIDS from contractors who'll come in and FINISH THE WORK the loser contractor has not done.
Keep A Journal Or Diary
A detailed diary of the events that happened each day can be very helpful. Long delays or periods of time when no one showed up to work are cast in stone with written daily notes kept in a journal.
It's very hard to reconstruct events if they are taken from memories that are six or nine months old. Write down who showed up and what was accomplished. Photographs can be added to the diary that show daily progress.
In certain instances weather data may help support your arguments. If you're not a trained meteorologist, data that you keep may not be considered accurate or true. Fortunately you can obtain vast amounts of weather data at little or no cost from your local National Weather Service office.
They keep hourly logs of temperature, humidity, precipitation etc. On more than one occasion this precise data has won a court case for me. Many websites track and curate historical weather data for every city and town, including wind speeds for each hour!
Change Orders In Writing - NO Exceptions!
Almost all jobs have changes as the work progresses. These change orders must always be in writing.
In addition to the description of what's changing and the cost of the change, each change order must contain a section that states how much extra time the change will add or detract from the job. You can see the value of this added feature when it is used in conjunction with the start and completion dates that are contained in the original contract.
Written Communication Is The Best
Finally, if all communications break down, then all contact with the contractor must be in writing. All letters must be sent certified mail with a signed receipt request. You want to be able to prove that you tried your best to keep the lines of communication open at all times.
How would you like me to build your new home? It's probably impossible for me to fit your job into my schedule, but I will gladly share hundreds of my tricks and building secrets with you and your builder. Check out my New House Specifications.
CLICK HERE to get FREE & FAST BIDS from contractors who'll come in and FINISH THE WORK the loser contractor has not done.
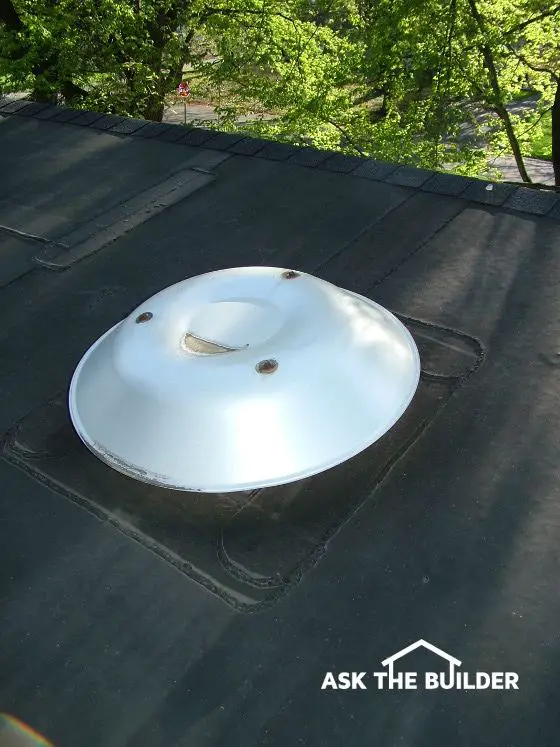
DEAR TIM: I have a nearly flat roof that is driving me crazy. The asphalt rolled roofing products I use only seem to last five years before they begin to leak.
What other alternatives do I have? There seem to be hundreds of commercial buildings near me that have similar roofs.
When I go into these businesses during a rainstorm I don't see leaks. Can I put a similar roof on my house? Mark G., Defiance, OH
DEAR MARK: Many homeowners share your frustration.
Flat Roofs Are Common & Problematic
There are literally thousands of houses in my own city that have low pitched or flat roofs. Traditional asphalt roofing materials are susceptible to failure because of the method of application and material quality issues.
The roofing industry has known about this problem for many years. During the 1950's and 1960's, new membrane roofing materials started to appear that solved many of the asphalt roofing problems.
Miracle TV Spray-On Leak Fix Products
Forget about the miracle spray-on leak products you may see in the cheesy TV commercials. These almost always fail in a short amount of time.
Flashings are the most common source of leaks and they require more than a spray to solve the problem.
Traditional asphalt shingle systems do not work on flat or nearly flat roofs. Shingles work in conjunction with gravity to keep the inside of your house dry.
A roof needs, in my opinion, a 4:12 pitch MINIMUM for traditional shingles. Shingle manufacturers will tell you a lower slope will work, but don't do it.
Water runs down the roof and over the top of shingles. Strong wind and ice dams can defeat these gravity based systems.
Gravity Is Your Enemy
Flat roofs and extremely low slope roofs need a gravity-proof roofing solution. It appears that the new single-ply membrane roofing materials may be just the thing. The commercial buildings you mention very likely are covered with one of the many different types of single ply membrane roofs.
Single-Ply Membranes
The new single ply membranes are actually synthetic compounds that can be mechanically fastened or glued down to your roof deck. Some of the materials are synthetic rubbers while others are special PVC plastics.
Long Warranties
There are several other types as well. All seem to have very respectable life spans. Warranties of twenty or more years are not uncommon.
Minimal Seams
One distinct advantage these new membranes offer is the possibility of seam elimination. Seams in the traditional asphalt systems were usually the first place water might enter.
If your low-slope roof has no chimney or plumbing / heating vent pipe penetrations, it's possible to cover the roof with one giant piece of roofing material.
It is like "shrink-wrapping" your roof! Believe it or not, some of the membrane materials come in 50-foot widths. Twenty-foot-wide rolls are the most common size.
Smaller width pieces are often used for residential work. They're easier to handle and there are special adhesives, solvents, and tapes that assure leak-free performance at the seams.
These membrane roofing systems also permit you to upgrade your house insulation. You can install high performance insulations on the roof deck before the membranes are applied.
Often a thin one-half-inch thick fiberboard sheet is placed on the insulation or roof deck before the single ply membrane is attached. The fiber board helps to protect the underside of the membrane from defects in the roofing deck.
The cost of the single ply membranes is not too bad. A typical job that requires no removal of old roofing might cost hundreds of dollars per square.
One square of roofing equals 100 square feet of roofing area. This cost will vary depending upon how many obstacles are in or near your roof, whether you decide to upgrade your insulation, and the overall quality of the roofing membrane you choose to use. For sake of comparison, a standard asphalt-shingle roof on a house might cost 40 percent per square what a modern membrane will cost you.
Flat-Locked Copper
If you happen to play the lottery there is another time tested roofing material that works well on flat or nearly flat roofs. You can install a flat locked fully soldered seamed copper roof. These roofs are extremely labor intensive to install.
The use of hidden clips allows these roofs to float on the wood deck below. Copper roofs of this type will cost you approximately $2,000 for each square. If you could still find tin-coated steel, you can lower the cost to 75 percent of that of copper.
The issue is some idiots have worked to eliminate tin-coated steel for roofing products. It's a time-tested material that's worked well for almost 200 years.
A tin roof will require periodic painting. But heck, if you win the lottery, who's counting!
Flat roof materials like this keep rain out of your home. This is a traditional rubber roof material. Note how you can see the solvent welds at the seams where one piece of roofing overlaps another. Copyright 2018 Tim Carter
Flat Roof Materials Checklist
Hot-mopped asphalt is ancient technology and prone to leaks
STOP asphalt oxidation with copper on your roof
Synthetic rubber roof membranes like EPDM are best
Take photos of seams and flashings of new roof to help diagnose future leaks
What is Rock and Gravel on Flat Roofing Materials?
The gravel is used to hold down the roofing materials in high winds and it also protects the roofing material from ultraviolet (UV) light from the sun. UV rays will destroy any roofing material.
The sun's UV rays break apart the molecules of the roofing material. This happens because about five percent of the sun's UV rays contain active photons.
Watch this video to understand why you need to protect your roofing materials from UV light:
What Happens When Photons Hit a Roof?
The photons break apart the roofing material molecules. The molecules then are unstable.
In the case of asphalt, it wants to get comfortable so it grabs oxygen out of the air.
This is called oxidation. When this happens, the asphalt molecules cross link. If too many molecules cross link, the asphalt gets stiff and hard.
You can significantly SLOW the oxidation of asphalt by introducing copper onto the roof. The copper ions go where the oxygen goes but it doesn't allow the asphalt to cross link.
Are Leaks Hard To Find?
If you have one of these roof systems and a leak(s), forget about locating them. It will be virtually impossible! The gravel does a fantastic job of hiding leak locations.
What are the Best Flat Roof Materials?
The best flat roof materials, in my opinion, are the vulcanized rubber roofing membranes. The rubber contains ingredients that make it quite resistant to UV damage.
Do You Need Gravel on All Flat Roofs?
No, you don't need gravel on all flat roofs. The use of synthetic membranes has just about eliminated the need for gravel on roofs.
Why?
Many of these new roof membranes are glued down to the roof sheathing. Not only that, the new membranes contain materials that resist UV degradation. If you can install a new flat roof without gravel, DO IT! It will make future leak finding much easier.
What Are the Benefits of the Rubber Flat Roof Materials?
The rubber membranes have many other benefits. Imagine being able to cover your house with just one giant piece of roofing material? No seams to worry about! It is possible if you find the right roofer and get the right membrane. Some of the membranes come in widths up to 50 feet!
Chemicals are used that soften the rubber membrane. When the two pieces are put together and rolled, the molecules weld themselves together as if the rubber were one piece.
Have you ever seen how a flat tire is fixed on a tubeless tire? The rubber patch is actually vulcanized to the tire's inner surface or wall with special solvents.
The patch and the tire basically become one in the same. This is how some of the new membranes work. As a roofer seams pieces together or makes cuts for flashings, they can actually weld pieces of material together.
Is Synthetic Rubber Roofing the Best?
Some of the top performing materials, in my opinion, are the synthetic rubber roofing compounds. These are commonly referred to as EPDM and CSPE materials.
I have installed these materials on many of my jobs where low-slope roofs have caused leak problems using conventional materials. These membranes work very well where old rolled asphalt materials, hot mopped asphalt, or even shingles were used before.
Are the Rubber Roofing Membranes DIY Friendly?
The rubber roofing membranes are not DIY friendly. In other words, you will probably need to locate a professional to install them.
You must remember that this technology is not really used much in residential work. Commercial roofers use these materials most frequently.
There are many residential roofers in large cities and small towns all over the USA that have experience with these materials.
Yes, you should perform an annual inspection on a flat or low-slope roof. Since the roof is flat or nearly so, it will be easy to walk around.
Should I Take Photos BEFORE Leaks Happen?
I urge you to inspect the roof for the first time immediately after it is installed. Take photos of the roof and close up photos of all flashing locations and seams.
Keep these photos in a safe place and make sure they are clear. As you perform your annual inspection, you can refer to the photos to see if an area, seam, or flashing has begun to change. Photos are wonderful tools. As they say, "The lens doesn't lie."
Should I Mop on More Asphalt?
Don't be tempted by the lower price (possibly!) to do a quick mop over of your existing asphalt roof. Asphalt is simply old technology and is prone to failure.
The system is dependent upon expert workmanship for long-term high performance. Excellent workmanship is harder and harder to find these days.
Are There Great Membrane Warranties?
Yes, many of the rubber membrane roofs come with remarkable warranties.
You'll be surprised at the warranties you can get with the membrane materials. When you sit down and analyze the cost versus the benefits, you'll do well by upgrading to the membranes.
So far, every membrane roof I have installed has been leak free. Some have been on for more than twenty years. If I had a low-slope on my own house I can tell you that I would put an EPDM or CSPE membrane on it so fast your head would spin.
Leaks cause anxiety. Don't get cheap when it comes to your roof. Buy the best and relax.
Out in nature when it rains on soil, most of the water goes into the ground. Yeah, this column is about drainage paving stones, but you need to know something first.
I say this assuming:
it's not a downpour
the soil is not saturated from days of rain
the soil isn't frozen
or some other condition
DISCLAIMER:My college degree is in geology, so I can talk about this with a fair amount of authority. 😉
This rain water eventually might flow into the bedrock to help recharge and maintain the groundwater supply.
It can also flow across the top of a dense layer of deep-clay subsoil or where the bedrock comes close to the surface and then pop back out of the ground. This is how a natural spring works.
Blacktop, concrete, old-style paving brick house roofs, etc. disrupt this natural process. These surfaces can cause rainwater to bypass the soil and travel directly to storm sewers.
When this happens, the ground water gets starved for moisture.
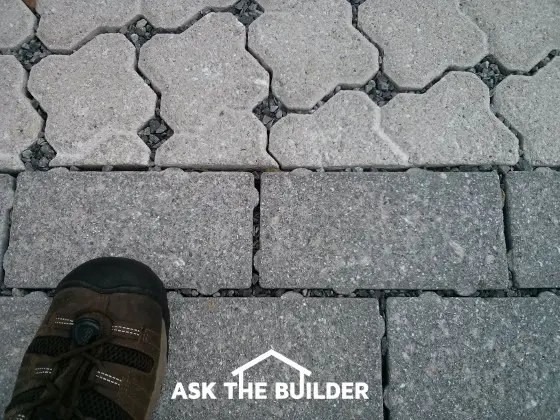
New Drainage Paving Stones
New style paving stones are now available that have gaps between the stones that allow water to get back into the soil. Brilliant!
The gaps are filled with tiny pieces of crushed or rounded gravel. Smart!
I took this photo at the WW II museum in New Orleans in April, 2017. Look at how the water can get into the soil. CLICK THE PHOTO NOW TO GET FREE & FAST BIDS FROM LOCAL PATIO CONTRACTORS THAT CAN INSTALL THIS EARTH-FRIENDLY PAVING STONE AT YOUR HOME.
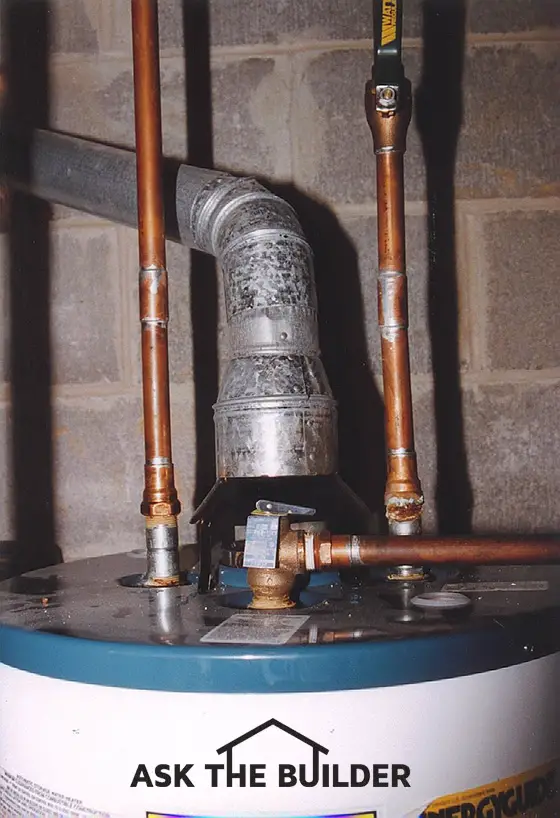
Gravity hot water system | This is the top of a gas water heater. The hot water leaves the tank on the left side. The recirculating loop pipe re-enters the tank down at the drain valve below.
Gravity Hot Water System TIPS
Easy to install in ranch homes with a basement or crawl space
Works using the magic of convection - no electricity or pump needed
"A gravity hot water system works because the heated water, which is lighter, rises through the loop. As the water cools at the end of the loop where the last part of the loop is not insulated, it is thermo-siphoned back into the hot water heater."
DEAR TIM: I am not a big fan of cold showers. I have to wait 15 - 20 seconds each morning for hot water to arrive in my shower.
It seems like a terrible waste of water and money. Is there a way to avoid this?
Can something be done to my ranch house? Is it possible for a DIY'r to accomplish the remedy? H. O.
DEAR H.O.: Brrrrrr! I know the feeling.
Cold Showers Not Acceptable
Cold showers are a bummer. Guess what? We can solve your problem with a simple gravity hot water recirculating loop. They're effective, inexpensive and easy to install.
Do You Waste Water?
First, however, I want to put into perspective the waste situation. Clean water is a natural resource and should not be wasted if you're getting it from a municipal water system.
Until your loop is operational, why not capture the shower water with a bucket? Use it to water plants or to fill your washing machine.
Free & Fast BIDS
What is the Actual Cost of Wasted Water?
The cost of the wasted water is minuscule. Let's assume you pay only 1.5 cents for each cubic foot of water (that was my rate when I wrote this column).
If you have 25 feet of 3/4 inch water pipe between your hot water heater and the shower, you waste .076 cubic feet of water each morning or $0.001178.
It would take 849 showers for you to waste $1.00 worth of water. Keep that in mind if you choose a fancy way to solve your problem.
Recirculating Pump Alternative
If you don't want to install the actual loop and want hot water at your plumbing fixtures instantly, you can install a nice pump that does what a gravity loop will do.
These pumps work on timers and move hot water through the system when you think you'll need it. They have a special valve that connects under a sink so there's NO WATER WASTE.
The cooled water in the hot water line is pumped back into the cold water line as soon as the pump fires up. When hot water reaches the special bypass valve the valve shuts off so hot water is not wasted.
This is a reliable recirculating pump you can install on top of your water heater. The weird threaded fitting goes under the sink that's farthest away from the pump. CLICK THE IMAGE NOW TO ORDER THIS PUMP.
Recirculating Pump Video
Watch this short video to show where the pump is installed and the special bypass valve.
Customer Reviews About My Gravity Loop
"I phoned you about my gravity loop that I recently installed. You clearly indicated what I did wrong. I had the theory and connections right, but the wrong pipe size. I used 1/4 inch copper tubing for the return loop. As you know, it did not work. Per your information, I increased it to 3/4 inch pipe. You said 1/2 inch might work, but I didn't want to take the chance. Bingo! - It works beyond what I had hoped for - Instant Hot Water." Bob Chartier, Westland, MI
"I remodeled about a year ago and read this column on gravity loops. We installed the loop and it works fantastically. There is instant, well almost, hot water on the far end of the house. I would not have believed something so simple could work so well....." Paul Wiegert
Are Recirculating Loops a New Idea?
Hospitals, hotels, motels, and other large buildings have used hot water recirculating loops for years. Some of these loops use electrical recirculating pumps while others use gravity.
Based upon the fact that your water heater is in the basement of your home, Mother Nature is going to do the work for free!
How Does the Gravity Hot Water System Work?
A gravity hot water system works because the heated water, which is lighter, rises through the loop. As the water cools at the end of the loop where the last part of the loop is not insulated, it is thermo-siphoned back into the hot water heater.
The water enters the bottom of the heater at the drain valve inlet. This flow of water is slow but constant.
Where Must the Water Heater Be Located?
The water heater must be located at the bottom of the loop. Ranch houses and two-story houses with basements are perfect candidates. Houses built on slabs or that have hot water lines below the water heater must use a simple in-line recirculating pump.
Finish The Loop
All you need to complete your loop is a return water line from the far end of your hot water line. Locate the end of your existing hot water line.
Cut into the pipe at this location where the pipe in the basement turns up to go into the fixture on the first floor. Install a tee fitting in place of the 90-degree fitting.
One part of the tee will allow you to reconnect to the hot water line. The other portion of the tee fitting will be the start of the return loop back to the water heater.
IMPORTANT TIP:Do not decrease the size of the return loop pipe. The system will work best if you use 3/4-inch diameter pipe. One-half-inch tubing may work, but don't take the chance.
Drain Water Heater
Turn off your water heater's power supply before you start this project. This is especially true if you heat water with electricity. If a heating element is on and not surrounded by water in the tank, it immediately burns up.
Then turn off the water leading to the water heater. Drain the hot water heater and remove the drain valve by turning counterclockwise.
Remove Drain Valve - Install Tee and Boiler Drain
Install a dielectric union or insulating nipple in place of the valve. This will to reduce corrosion possibilities if you are working with copper or galvanized iron water lines.
The next step is to install a tee fitting at the base of the heater. The loop pipe connects to one part of the tee and you'll install a new boiler drain out of the other part so you can drain the heater in the future.
Insulate 98% Of The Loop
To save energy and have the loop function, you must insulate the loop as it leaves the top of the water heater. The insulation must start inches above where the hot water line leaves the water heater and must continue along the entire loop as it makes its way through the house and starts its trip back to the water heater.
In new construction, insulate all of the hot water supply pipe up to each fixture.
Last 15 Feet - NO INSULATION
Do not insulate the last 15 feet of pipe as it gets near the heater. This pipe must be uncovered so the water cools. This cooling of the water is what powers the gravity convection engine that makes the hot water flow slowly towards through the loop.
Foam insulation is available which will slide over the pipe as you install it. You can also choose to use pre-molded fiberglass with a protective coating. The foam insulation is much more user friendly. Remember, to ensure good performance leave insulation off of the last 15 feet of loop piping as it returns to the heater.
Flapper Check Valve
If the loop fails to work, water may be flowing backward through the system from the water heater. You can stop this with a check valve. Install a check valve in the uninsulated part of the loop about 5 feet away from the bottom of the water heater.
You MUST use a flapper-type check valve, not a spring-loaded one. Spring-loaded check valves will not work and block the slow trickle of water through the loop.
Drill a 1/8-Inch Hole
Drill a 1/8 inch hole through the flapper so that a small amount of water can flow back to the heater to maintain circulation of the water within the loop. If the loop doesn't seem to work well, slowly increase the diameter of this hole but do not exceed 1/4 inch diameter. It's important to realize this hole must be drilled or there's a very good chance your loop line will rattle and clank. The rattle happens because the flapper starts to vibrate back and forth in response to the demand for hot water. The pressurized water in the loop is trying to flow backwards but the flapper springs shut.
The small hole stops the chatter because water can flow both ways through the loop. However, the volume of water flowing backward through the loop is not enough to satisfy the demand called for by the open valve in the loop.
Modern Heater Heat Traps!
If you're installing a new water heater, you need to remove a pesky device installed to keep heat in a heater. Many modern heaters have a heat trap device at the top of the hot water outlet. These are small flapper check valves that stop hot water from drifting up the hot water line when the hot water is not being used. Remove the heat trap device to get the gravity loop to work.
Column 147
Expert Advice For Your Home
Subscribe to the FREE Ask the Builder newsletter to receive professional advice for your home. Complete the form below and each week you'll get:
DIY Tips
Tool Reviews
Project Guides
Product Discounts, Giveaways & more.
Unsubscribe at any time. We respect your email privacy.