Composite Decking Mushrooms

Composite Decking Mushrooms

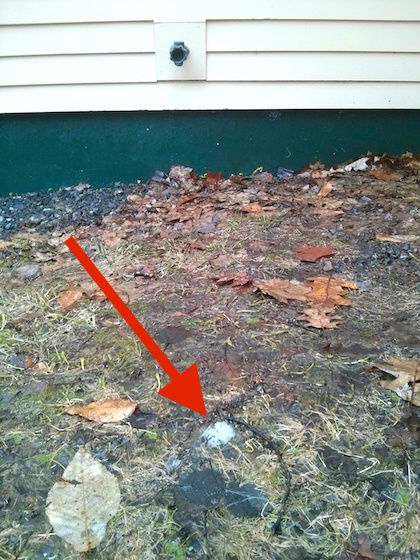
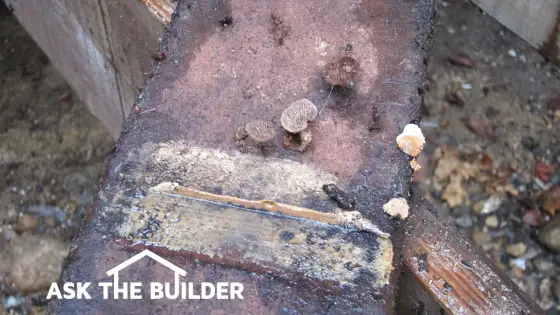
Composite Decking Mushroom | Mushrooms growing out of the bottom of Trex composite decking can’t possibly be a good thing. Decaying wood inside the Trex is fueling the mushroom growth. PHOTO CREDIT: Tim Carter

Composite Decking Mushrooms TIPS

  • Some composite decking materials are made with wood fibers
  • Many deck problems are caused by FAILURE of installer to follow instructions
  • Read updated author's notes at bottom of column
  • Ventilation is very important as is spacing between decking boards
  • CLICK HERE to Get Tim's FREE & FUNNY Newsletter!

DEAR TIM: I had to replace a damaged Trex decking board on my ground-level deck and was shocked at what I discovered. On the underside of the decking, mushrooms and fungus were growing out of the decking!

I thought that composite decking materials were problem-free. I thought the reason to purchase these products was so that you’d never have to replace them.

What’s going on? What can I do to stop the growth of the mushrooms? Patti L., Woodinville, WA

DEAR PATTI: Oh my goodness! I’m not really surprised by this, especially since I’ve had firsthand experience with this myself.

How Did You Discover the Mushrooms?

Recently, I had to repair a poorly designed front porch that was covered with Trex decking. It was important to salvage the decking material, and as I carefully removed each board, I was stunned to discover large patches of white fungus and different species of mushrooms growing on the underside of the decking.

IMPORTANT NOTE: The mushroom growth problem was caused by the home builder, not a defect in the Trex decking. I didn't build the house I currently live in.

The builder didn't:

  • provide any spacing between the decking boards
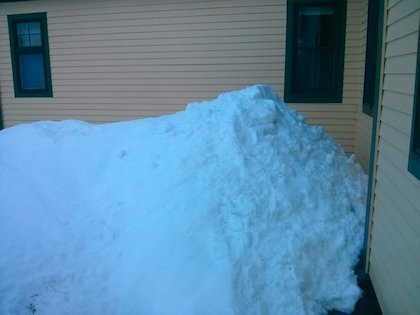
  • it was too close to the ground
  • it was enclosed on THREE SIDES

Because the deck was enclosed on the three sides, it was impossible to get air moving under the decking. You need air moving to evaporate any water that will fuel the growth of mold and mushrooms.

Free and Fast BIDS

Get FREE and FAST BIDS from local deck contractors who know how to follow instructions.

Author's Note: Would you like to see three High-Resolution photos of the mushrooms that were growing out of the Trex Decking? If so, click here.

Is Decking Spacing Important?

The first thing I did once I got inside and cleaned up was to go to the latest written installation instructions published by the manufacturer. I immediately discovered that part of the problem in my case was the boards had not been spaced properly to provide some ventilation.

How Big Should the Space Between Boards Be?

The current written instructions show that there should be a 1/4-inch gap between the boards to provide for both expansion and air circulation. However, I was shocked to discover there was no real minimum clearance distance referenced with respect to how close the bottom of the decking should be to moist and dark soil. These are the conditions that mushrooms, mold and fungus seem to thrive in.

Was the Marketing Message Misleading?

Clever marketing has for years set up an unrealistic expectation, in my opinion, that composite decks are maintenance-free. I can remember years ago that this absolutely was the case with Trex. After it was in the marketplace for several years and problems started to happen, it became clear you had to maintain the decks.

Can you Re-Stain Faded Composite Decking?

I was shocked to discover in the installation and maintenance instructions the manufacturer even talks about how to stain the deck to restore the decking to its original color. That communicates to me they know the decking is going to fade and will need to be cared for if you want it to look good for years to come. So much for maintenance-free.

What Do the Mushrooms Eat?

EB015 Cleaning & Sealing Deck Cover

The mushrooms are growing because they are feeding on the wood fibers inside the Trex decking. The literature from the manufacturer says the decking does absorb moisture.

I’m reasonably confident the wood fibers that are used in the decking are not treated to prevent wood rot or decay. I can’t find any information in the Trex literature that says they do treat the wood to prevent rot.

If this is the case, that the wood fibers are not treated, then it makes perfect sense why you, I and perhaps tens of thousands of others are experiencing hidden mushroom growth.

What Fuels the Mushroom Growth?

The wood fibers inside the decking are getting wet, rotting, and fueling the growth of mushrooms. That’s what happens to logs that fall in the forest and get wet. It makes sense rot could happen with composite decking that uses wood fibers or wood flour that’s not treated to prevent rot.

CLICK HERE to get FREE and FAST BIDS from local deck contractors who know how to follow instructions.

How Do You Prevent Mushrooms?

To prevent the growth of mushrooms, fungus and mold on the underside of your decking, you may want to consider implementing what I’m doing. The front porch I’m rebuilding is going to have new and vastly improved ventilation.

Not only will I be spacing the decking boards so that there is a minimum of 1/4 inch between the boards, I’m creating a minimum of a 1 and 1/2-inch gap around three sides of the decking where it used to connect directly to the house.

This air gap should be plenty to help keep the relative humidity on the underside of the decking to a point where the growth of the organisms will be stopped or significantly slowed.

Should I Regrade the Soil?

I’m also going to try to regrade the soil so there are at least 16 inches of air space between the soil and the underside of the decking. It helps that I have well-drained soil under the porch I’m working on.

If you have poor-draining soil, I suggest you take whatever measures are necessary to prevent the ponding of water under the decking.

Why is Airflow Under the Decking Important?

Airflow is perhaps the best way to ensure there’s no or minimal growth of mushrooms and fungus. The goal is to keep the moisture content of the wood fibers inside the Trex as dry as possible. Air movement absolutely accelerates drying.

Since the manufacturer admits the decking does absorb moisture, anyone with Trex decking needs it to dry as soon as possible when it gets wet. This does become problematic in areas that experience lots of rain over months of time.

In these locations, it’s probably best to avoid the use of composite decking materials that contain wood fibers that have not been treated with chemicals that prevent wood rot.

Author's UPDATE:

In the summer of 2016, I replaced all of the generation-one Trex decking at my home with Trex Transcend. The Transcend product has the same, or similar, core of wood fibers that are encapsulated by plastic.

deck over water

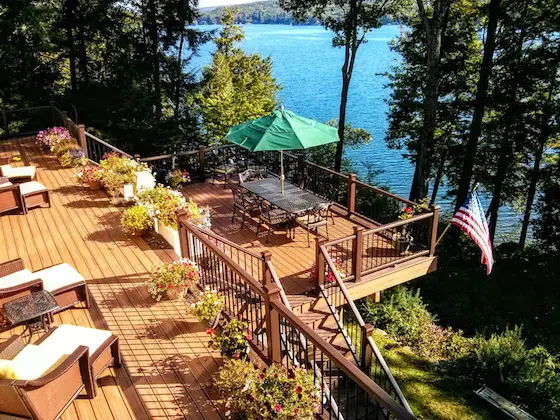
Here's my own Trex Transcend deck. There's lots of railing. It didn't take long to understand how to do it with professional results. Copyright 2021 Tim Carter

But the big difference is the top of each plank and the top third of each side is capped with a solid plastic that's embossed with wood grain. The capping material also has some extra coloration to simulate the real look of wood. My wife is a very tough critic of all things that are made to simulate wood. She feels this is the closest she's ever seen of any product to replicate real wood.

The small samples you get to hold in your hand look odd and unrealistic. But when the planks are down on the entire deck and you look out across it from a distance, it looks like real wood.

Here are some photos of my new Trex Transcend deck:

trex deck

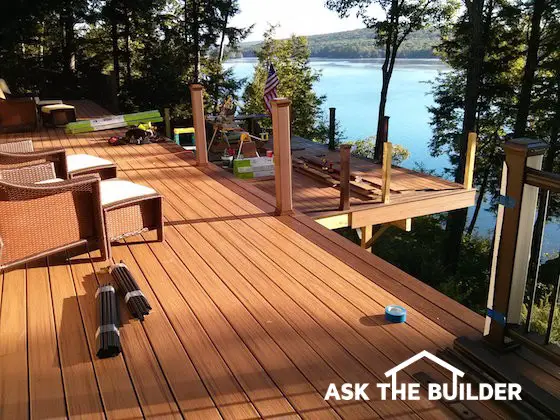
This is a photo of the decks under construction. The long deck with the furniture on them is the original 10 x 60-foot deck. The lower deck is new and is 24 feet wide and extends out 16 feet from the original deck. Copyright 2017 Tim Carter

trex deck

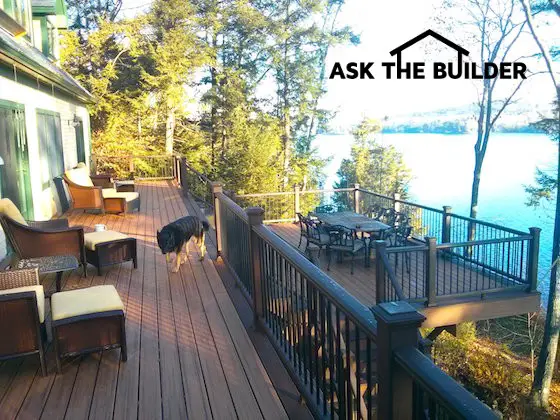
The deck is complete with the Trex Transcend railing system. It was a pleasure working with this new material. It's engineered for easy installation and has all hidden fasteners for the decking and railing system. Lady the Dog loved laying on it. RIP Lady! Copyright 2017 Tim Carter


trek deck

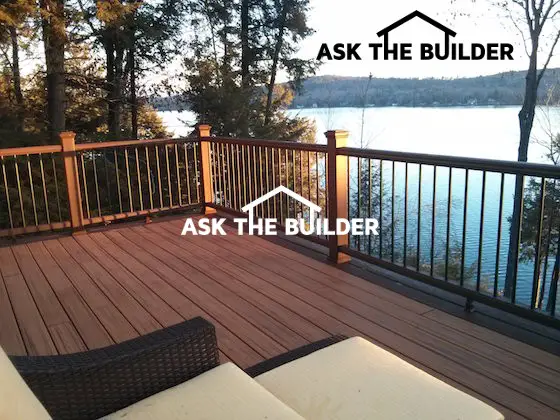
You can get a feel of the coloration in the medium-brown colored decking. The deck has a picture frame of darker material - Lava Rock - and the main decking is Tiki Torch. Copyright 2017 Tim Carter

Get FREE and FAST BIDS from local deck contractors who know how to follow instructions.

Column 903

April 25, 2017 AsktheBuilder Newsletter

AsktheBuilder Newsletter

If you're a new subscriber, welcome to the family!

Spring is here in central New Hampshire. It's a long time coming to the Northeast for the most part.

When it finally decides to stick around, it makes up for lost time. Perhaps the best part is what I call the second fall.

CLICK HERE to see a bunch of fall color photos I took on the day of peak color last October.

In the spring, the deciduous trees treat us again with eye candy. There are multiple shades of green as the leaves mature.

I'm talking VIBRANT shades of green. Not one or two, but several. It's stunning and very hard to capture with a camera. The leaves will be in their spring glory in about three weeks.

Snow Be Gone WINNER!

A few months ago, I asked you to have some fun and play my Snow-Be-Gone 2017 Contest. You may have been one of the 200+ people who decided to see if you'd be the proud winner of a 4.5-pound container of my certified organic Stain Solver oxygen bleach.

Here's what the snow pile looked like the last week of March, 2017.
snow be gone
That pile above is just under six-feet tall and the highest part of the pile was in the shade all the time.

We had some warm days in early April and quite a bit of rain.

Last Friday night, April 21, 2017, I took the below photo. The red arrow points to the tiny spot of snow remaining. It was just starting to rain and by 9 p.m. it was all gone.
snow be gone
You may be one of the five contestants that picked April 21st. I used the random number generator at random.org to pick the winner.

Jay Kenty of nearby Wolfboro, NH is the winner! Congratulations Jay!

If you didn't win, don't fret. More games are coming your way and thank you for playing.

Coast FDX302 Knife Review

I just tested the Coast FDX302 pocketknife. It's a little dandy.

Are you sitting down? It costs LESS than $20!!!

This knife really surprised me.

I was convinced I'd have a ho-hum feeling about it.

CLICK HERE to see what I thought of this knife I'm quite sure will be in your pocket in about a week.

My Master Bath Remodel

On Saturday I started to remodel my own master bathroom.

The biggest part of the job is installing a new American Standard acrylic shower unit.

I ripped out the old ceramic tile corner shower over the weekend.

Today I'm installing the American Standard faucet and the shower base.

Today's Tip is about the shower base.

Frequently rookie DIYrs and bad contractors install the acrylic base units WRONG.

The instructions that come with most acrylic tubs and showers - not all of them! - clearly show that the units must be installed in a wet bed of a solid compound that will FILL THE VOID SPACE under the acrylic.

If you skip this important step, the bottom will flex and oil can when you stand in the shower. Eventually the bottom will crack and leak.

I happen to like to use dry-setting joint compound for this job. USG has one that sets up in 90 minutes and that's plenty of time to mix the material with water, set the base and have the material squish around under the unit filling all the void spaces.

CLICK HERE to see the Durabond 90.

Are you thinking of remodeling your bathroom? How would you like to get FREE & FAST BIDS from local bathroom remodeling contractors???

CLICK HERE to get the FREE & FAST BIDS now.

Roofing Ripoff Paperback Book

I believe I'm about two weeks away from having my Roofing Ripoff book ready as a paperback.

WOO HOO!

It's going to be GORGEOUS. Sheridan Stancliff is a professional book designer that's working on this aspect of my book. She's doing an amazing job on the interior of the book.

Mary Beth Wilker, the wife of my close friend Nick Motz, did the front and back cover. Mary Beth is also a close friend too!

CLICK HERE to see what the book is all about.

Over the past two weeks, the sales of the PDF and Kindle versions have been STRONG. CLICK HERE to order one of these versions NOW.

Less than two weeks ago, I shared a conversation I had with my wife Kathy and she asked me if I was happy with the sales of the book in the first 36 hours.

My response was, "Not really." Just because I wasn't happy didn't mean it wasn't selling well!!!

The number of sales required to make me happy may be much larger than what would make some other publisher happy. Get it? Insert smiley face.

You may have contacted me with great feedback. I received COUNTLESS emails about what I could do to boost sales of the book.

Guess what the common message was in each and every suggestion? I was taken aback.

"Tim, reading an entire book is HARD."

You may have been one that asked for a condensed version because you don't want to slog through my long-winded adventure.

It's too expensive to offer this condensed version in a paperback, so I'm only going to offer it as a PDF file you can download.

You may have emailed me saying you have NO INTEREST IN THE BOOK and you just want me to cut to the chase and tell you HOW TO SAVE your asphalt shingle roof.

Yes, I made a discovery how you can extend the life of your asphalt shingle roof by decades. It works for any new asphalt roof or one that's showing no curling or granule loss.

I'm going to do that too, but not just yet. Hang in there.

FREE Basic New Home Quality Control Checklist

CLICK HERE to see a very basic quality checklist if you're about to build a new home or do a major room addition.

That's enough for today.

Have questions? Ask me.

Tim Carter
Founder - www.AsktheBuilder.com

Do It Right, Not Over!

Coast FDX302 Knife Review

coast knife

Here it is. It's quite the knife. Each time I hold it, I like it more and more. CLICK THE PHOTO NOW TO HAVE THIS KNIFE DELIVERED TO YOUR HOME.

Coast FDX302 Knife

I've lost count of the pocket knives I've had in my lifetime.

Years ago I used to marvel at those with the carved and shaped wood handles. Go back sixty years and pocket knives were very basic - a blade, maybe two.

In the 1970s, the Swiss Army knife was the rage. As the fad exploded, so did the knife as some had so many gadgets you needed a backpack to carry the knife.

Forget about putting it in your pocket. Click here to see how nutso the Swiss knives are. 

Slim & Stainless

When I saw the Coast FDX302 in the hard-plastic packaging, I immediately had a negative thought.

I thought it would be heavy. I've come to really appreciate lightweight pocket knives. Just a month ago, I received a Klein electrician's pocketknife to review and it was HEAVY - too heavy.

The Coast FDX302 is light. It's sleek. It's handsome. It's stainless steel so it won't rust. I love that.

It may soon become one of my favorite knives.

I can tell you for sure it will accompany me on all my hiking and Summits on the Air adventures. I'm a ham radio buff and love to talk with other operators while on top of a mountain.

Quick Specs:

  • Stainless Steel
  • Blade: 3 inches
  • Closed Length: 4.375 inches
  • Belt Clip
  • Lanyard Hole
  • Guaranteed to Deliver Pride
  • Guaranteed to Produce Envy Among Close Friends
  • Life-saving Potential

CLICK HERE NOW TO HAVE ONE IN YOUR POCKET

Coast Knife

Here it is. It's quite the knife. Each time I hold it, I like it more and more. CLICK THE PHOTO NOW TO HAVE THIS KNIFE DELIVERED TO YOUR HOME.

Coast Knife

Here's the handle. You can see the belt clip and the tiny lanyard hole at the end. CLICK THE PHOTO NOW TO HAVE THIS KNIFE DELIVERED TO YOUR HOME.

Coast Knife

The round knurled knob is a secondary lock when the blade is open. It's a great safety feature. Note the lint on the knife from my pocket. CLICK THE PHOTO NOW TO HAVE THIS KNIFE IN YOUR POCKET IN JUST DAYS!


Coast Knife

It's not a huge knife. It fits my hand perfectly. I have a normal man-sized hand. Not a giant hand, a normal one. It's stainless steel and won't rust. CLICK THE PHOTO NOW TO OWN ONE. YOU CAN'T BELIEVE HOW AFFORDABLE THIS KNIFE IS!

New Home Quality Control Checklist

New Home Quality Control

I didn’t ask permission from my editor to depart from my normal question and answer format, but I’m sure he’ll agree this is a long overdue column.

I’ve been writing this column now for over twenty-three years. Ask the Builder was first published October 2, 1993. It was my original goal to help you get the most for your money when you hire a remodeling contractor or a builder to make your building dreams come true.

Over the years, this goal has been reduced to a simple sentence that’s at the bottom of each issue of my free newsletter: Do It Right, Not Over! Sadly as each week passes, I feel like I’m pushing a large boulder up a mountain.

I say this based on what I see with my own eyes and the vast amount of email and comments I receive each day at my AsktheBuilder.com website and on my hundreds of YouTube videos.

It’s painfully obvious that you and millions of other homeowners need a quality control checklist before you start a project. This checklist would allow you to understand what needs to be done so you don’t have to do things over wasting your valuable money and time.

Here in New Hampshire, a new house is being constructed in my town. I pass it all the time going to and from town. I decided to stop by as often as possible to get photos for you and to monitor the progress. What I see each time I stop shocks me.

The day the subcontractor poured the footing I was there. The footing of a home is perhaps the most critical aspect of the construction of a new home. The foundation of a home rests on the footing. The footing is in direct contact with the soil under your home and it must be strong. It needs to have reinforcing steel in it. Period.

Not wanting to bother the workers as the concrete flowed down the chute into the trenches I marveled at the lack of reinforcing steel in the footing. I was taking photos and at one point one of the workers asked who I was and what I was doing. Once he discovered I was not a threat, I asked him why there was no steel in the footing. “Oh, the builder didn’t want to spend the money for it.”

As the weeks have progressed, more and more mistakes and poor quality issues have blossomed at the house. One of the biggest poor quality issues was allowing the insulation and drywall contractors to proceed with their work while the outside of the house was not weatherproof.

This simple photo shows four low-quality workmanship errors. The overarching error is a builder not supervising his subcontractors. (C) Copyright 2017 Tim Carter

Here in the Northeast we can get howling Nor’easters in the winter. Most are usually blowing snow, but it’s possible to have a violent wind-driven rain in the late winter. It happened here just weeks ago. All winter long the house sat with no siding on it.

The house had a patchwork of air and water infiltration barrier fabric on it. The rough carpenter put a piece of it on each wall as he built them on the floor and tilted them up. He never took the time to apply the special tape to seal the seams. There were some places where bare oriented strand board sheathing (OSB) was exposed with no waterproof covering.

His actual method of installing it was wrong as the air and water-barrier product is meant to be applied as one full piece as you’d wrap a birthday present. You end up with just one seam on the underside of a gift box so you should just end up with one seam on the wall on the side least exposed to the prevailing wind.

I have no idea how much wind-driven rain penetrated into the walls soaking the insulation, but I’m sure some did. It’s unacceptable to allow this to happen. I’d debate that to my dying breath with any other builder.

Last week, the siding contractor finally started to work on this house. It was my hope he’d fix the rough carpenter’s mistakes. Alas, he didn’t. He started to put up his vinyl siding right over the bare OSB and untaped air and water barrier.

Here’s my rhetorical question of the day: Did the siding contractor even know he was covering up bad workmanship, or did he know and not care? Both answers are egregious and are representative of an epidemic of poor quality that appears to be the new normal.

Oh, I hear you, you’re saying to me, “But Tim, what about the building inspectors and the building code? Won’t those two things protect me and my investment?” No. In many locations, including many towns in New Hampshire, there are NO building inspections.

It gets worse. The building code is a set of minimum standards. If you build a house to code, it’s like getting seventy percent on a test. It means you pass by the skin of your teeth. You can build many things with little additional cost and greatly exceed the standards in the building code.

I’ve put together a basic new home quality control checklist you can get at my website for free. It can be used on room addition projects and many other projects around your home. I hope it helps you.

CLICK HERE to access the FREE new home quality-control checklist.

Do It Right, Not Over!

Column 1193

Basic New Home Quality Control Checklist

The following checklist is a FREE sample of some very important things you need to make sure happen as you build your new home or room addition.

There are MANY OTHER THINGS that are important and they're included in a comprehensive checklist I created years ago.

Don't count on the building code to protect you. It's a set of MINIMUM STANDARDS.

You can build a house that's far better than the building code and it often doesn't cost too much more.

If you use the free basic checklist below and click "I don't know ..." many times, USE the search engine here on my website and read my past columns and watch my videos about that exact topic.

Basic FREE Checklist

The following is a very basic checklist that will allow you to make sure some of the most important things on your project are done right.

If you desire to have a comprehensive checklist that's an INSTANT DOWNLOAD product, you might want to look at it.

CLICK HERE to look at the comprehensive checklist.

Vinyl Siding Installation

vinyl siding installation tyvek home wrap

Vinyl Siding Installation TIPS

DEAR TIM: What can you tell me about vinyl siding installation? I like the no-maintenance aspect of vinyl siding, and it looks easy enough to install.

What important vinyl siding installation instructions can you share with me? What tools will I need to get professional results on my one-story house? Patty S., Scranton, PA

DEAR PATTY: The installation of vinyl siding is not as hard as it may seem, but there are indeed plenty of tricks that one needs to know to get really professional results.

Single Story Vinyl Siding Can Be DIY

This happens to be one task a determined homeowner can tackle if she/he really can follow directions, think ahead and pay attention to details. I would have probably advised you to hire a professional had you told me you have a two-story home.

Start On No-Window Wall

The best way, in my opinion, to see if you're up to the challenge and if you're satisfied with the results, is to start the job on a side of your home that has the least amount of windows, doors, or other things that are attached to the existing siding. All of these things represent obstacles when you do vinyl-siding installation.

Related Links

Painting Old Faded Vinyl Siding - You Can Do It!

Cleaning Mildew, Mold and Grime From Vinyl Siding

Free & Fast BIDS

CLICK HERE to get FREE & FAST BIDS from local vinyl siding contractors.

Download Installation Manual

Before you purchase the vinyl siding, do some investigation at the manufacturers' websites. Download their installation manuals.

You'll quickly discover that vinyl siding has some basic components with respect to how inside and outside corners are treated and how different trim pieces are used to terminate the vinyl siding around doors and windows.

Expansion & Contraction

You can get into trouble faster than an speeding bullet if you don't take into account how vinyl siding expands and contracts. Vinyl siding really grows as it's heated by the sun.

If you cut pieces too tight, or you nail pieces of vinyl siding too tightly to a wall, the siding will buckle and look horrible. Vinyl siding needs to float on a wall.

No TIGHT Nailing

It's a concept that goes against anything you have ever done before. My guess is that every time in your life you have pounded a nail with a hammer, you have driven the nail tightly. Don't ever do that with vinyl siding.

Special Tools

You'd be surprised at the specialized tools you'll find in a professional siding installer's tool belt and truck. There are tools that punch slots and notches in siding.

These are needed to interlock the siding in special trim pieces.

CLICK HERE to get FREE & FAST BIDS from local vinyl siding contractors.

Cut Vinyl Siding With Backwards Blade On Saw

You may discover a circular saw that has its blade on backwards. Some installers cut vinyl siding this way as it doesn't chew up the siding. Laser levels, ladders, stand-off scaffolding, etc. are all nice tools to have as well.

Aluminum Coil Stock

There are some issues that you may want to consider before you start the job. Some vinyl-siding jobs incorporate aluminum coil stock to cover parts of the house that are flat pieces of wood that you currently are painting.

Examples of these might be fascia boards, gutter boards, and wood molding around windows and doors. If your house has these, you are adding a layer of complexity to the job.

Metal-Bending Brake

You need special skills and a metal-bending brake to work with the aluminum coil stock. You can see these special tools at businesses that sell vinyl siding and the aluminum coil stock.

Extra Closed-Cell Foam Insulation

You should also consider upgrading your exterior insulation, air infiltration and weather barriers at this time. To get the best bang for all this effort, you may discover it's best to remove your existing siding.

Don't Bury Window & Door Trim

This allows you to add the needed components and not ruin the look of your home by burying the windows and doors. You can frequently see houses where vinyl siding has been installed over existing siding. The doors and windows appear to be unnaturally deep in the walls.

Volunteer To Learn

One last suggestion would be to get some on-the-job training. There are any number of great organizations that build homes for those in need. Perhaps one of these is active in your community. Habitat for Humanity is one.

These houses often have vinyl-siding exteriors. Perhaps you can volunteer to help build this house asking to be on the exterior crew that is doing the siding.

Cave Man Simple

The actual process of installing vinyl siding is not that complicated. It's just a matter of knowing a few tricks with respect to the initial layout and installation of the starter strips.

The first piece of siding installed determines how the job will look and how the siding goes up the walls. Keep in mind that the siding needs to be level and must overlap the foundation to keep the house weathertight.

Accessory Materials

There are always new inventions and accessories that can enhance the installation of vinyl siding. One of these happens to be metal strips that are installed on the walls of a house that help prevent buckling and spacing issues.

When installed with care, these strips also can ensure the siding looks flat and not wavy. Check for these strips at businesses that specialize in the sale of vinyl siding, roofing and other exterior products.

Side Your Shed

You should also try to experiment on a small structure to hone your skills. If you have an outdoor storage shed, maybe it's time for it to get a new look. After all, you would want it to match your home, so now is a good time to install siding on it. Make your mistakes here, not on the front wall of your home!

CLICK HERE to get FREE & FAST BIDS from local vinyl siding contractors.

Column 750

Cleaning Vinyl Siding

vinyl siding on new construction

Cleaning Vinyl Siding | This new house is being covered with vinyl siding. It's not dirty now, but it will have to be cleaned at some future date. The young homeowners don’t want any maintenance other than this periodic cleaning. Copyright 2020 Tim Carter

Cleaning Vinyl Siding TIPS

Do Trees Produce Food for Mildew on Siding?

Trees and bushes produce airborne sugars that drift through the wind and stick to vinyl siding. This nearly invisible layer of sugar is a food source for mold and some algae. Dust and dirt can also stick to the vertical sides of vinyl siding, and these are also food sources for some mildews and algae.

How Do You Clean Vinyl Siding?

The best way to clean vinyl siding and vinyl siding trim is to rinse it down with a regular garden hose equipped with a nozzle. Set the nozzle to a medium misting spray.

Never use a forceful direct stream of water, as it can penetrate behind the vinyl siding. This means do NOT use a pressure washer.

Can You Call Me on the Phone If I Need Advice?

Yes, I can call you on the phone if you need help cleaning your vinyl siding. You don't want to make a costly error.

Most recent customers to order a phone consult: Manu, Alexandria, VA | Patti, Ft. Worth, TX | Warren, Hamilton, OH | Sandra, Bend, OR | Brandon, Rapid City, SD | Alice, Plant City, FL | Loreli, Worcester, MA

Are There Waterproof Membranes Under Vinyl Siding?

There are many homes covered with vinyl siding that do not have waterproof membranes that cover the frame walls. The wood sheathing and framing lumber can get wet easily if you direct water at the edges of vinyl siding, seams where two pieces of siding overlap, at inside and outside corners and next to windows and doors.

Related Links

Paint Faded Vinyl Siding - Make It Look New!

DIY Vinyl Siding Installation - Easy & Fast

Free & Fast BIDS

CLICK HERE to get FREE & FAST BIDS from local cleaning services that will NOT use a pressure washer.

How Does Vinyl Siding Repel Water?

Vinyl siding is designed to shed water falling from the sky, not water that is shot up from the ground. Always rinse off the siding pointing the hose down towards the ground.

Never aim a hose up at vinyl siding as it can cause massive amounts of water to seep behind the siding.

What is the Best Vinyl Siding Cleaner?

Oxygen Bleach

Stain Solver is MADE in the USA with USA ingredients that are food-grade quality. CLICK THE IMAGE to order some NOW.

If you want to remove algae, mildew, dirt, diesel exhaust soot, etc. from vinyl siding, then use Stain Solver - a certified organic oxygen bleach.

You mix it with warm tap water, stir until the powder is dissolved and apply to the siding with a garden hand-pump sprayer. A great professional sprayer can shoot a stream of this solution nearly 25 feet in the air. I know as I own one and used to use it to clean the exterior of my own home.

You can mix regular Dawn liquid dish soap in with the solution to get extra cleaning power.

Will Regular Soap Work to Clean Vinyl Siding?

Regular dishwashing soap will do a very good job of cleaning vinyl siding, but if you mix it with the Stain Solver, you'll end up working much less.

Squeeze a generous amount in a bucket, and add warm water to make a frothy mix of soapy water. I like to pour this water into a hand-pump garden sprayer to apply it onto the vinyl siding once it has been rinsed with clear water.

vinyl siding cleaner

Here's a handy hand-pump sprayer. I have one almost identical and when the nozzle is adjusted to a stream, it will shoot about 30 feet up in the air! CLICK THE PHOTO NOW to have this sprayer delivered to your doorstep in days.

Work in the Shade To Clean Vinyl Siding

Always work on a section of siding from bottom to top, and always work in the shade. You never want the soapy water to dry on the siding before it can be rinsed off. I prefer to clean an area about six to seven feet wide at a time.

Cleaning Vinyl Siding Video

Watch this video. I like this man, but not a fan of his cigarette. Just be sure you use Stain Solver in the sprayer and NOT any other product that contains chlorine bleach or sodium hypochlorite - that's the chemical name for chlorine bleach.


CLICK HERE to get FREE & FAST BIDS from local cleaning services that will NOT use a pressure washer.

What is the Best Brush to Clean Vinyl Siding?

The best brush to clean vinyl siding is one used to wash a recreational vehicle (RV). These special brushes are used on long poles to clean the sides of RVs.

vinyl siding cleaner

This is a perfect brush to clean vinyl siding. It's got an adjustable handle and the perfect bristles that remove dirt loosened by using Stain Solver oxygen bleach. CLICK THE IMAGE NOW TO HAVE THIS BRUSH DELIVERED TO YOUR HOME.

These brushes are superb tools to use on dirty vinyl siding. Once the vinyl siding has been coated with soapy water, dip the brush in the soapy water and use side-to-side motions to remove dirt.

What Direction Should I Clean?

Start cleaning from the bottom and go up as far as you can reach. Immediately rinse the area you cleaned. Proceed up the wall until you get to the top alternately washing and rinsing. As you get higher, always make sure you rinse all dirt all the way down the siding to the ground.

IMPORTANT TIP:

Never use chlorine bleach as an additive to your soapy water solution. Chlorine bleach is a deadly toxin for any and all vegetation around your home. The chlorine ions soak into the ground and kill the roots of the plants, grass, trees and bushes.

If you feel compelled to use a bleach to help kill the mildew, use oxygen bleach. Oxygen bleach is non-toxic, has no odor and it injects oxygen into the soil.

CLICK HERE to get FREE & FAST BIDS from local cleaning services that will NOT use a pressure washer.

Message from Tim:

Years ago while researching a column about cleaning decks, I discovered the wonders of Oxygen Bleach. It is perhaps the 'greenest' cleaner I know of as it uses oxygen ions to break apart stains, dirt and odor molecules. There are no harsh chemicals, and it works on just about anything that is water washable.

I decided to create my own special blend using ingredients made in the USA. In fact, the raw materials in the active ingredient are food-grade quality registered with the FDA. I call my product Stain Solver. I urge you to use it to help with cleaning your vinyl siding. You will be amazed at the results!


Best Vinyl Windows

Best Vinyl Window TIPS

Vinyl windows are very popular. Their clean lines, no maintenance characteristics, and energy efficiency make them a natural for both new homes and older homes that need a facelift.

Big Differences

However, not all vinyl windows are created equal. In fact, there can be vast differences in quality between windows that look identical.

Vinyl Can Sag

Wood and aluminum windows have an advantage over vinyl windows in one respect. Wood and aluminum are stiffer and they don't bend quite as easily as vinyl. This is just one reason why it is important to really do your homework when deciding which vinyl window to purchase.

Many homeowners who installed the first-generation of vinyl windows were disappointed. Large windows or windows that faced direct, hot afternoon sunlight sometimes were the victims of sag.

The vinyl would sag under the weight of large, heavy pieces of glass and/or would sag because the vinyl softened because of heat. The results were not pretty, as the vinyl would sometimes retain this new shape after the vinyl had cooled.

Free & Fast BIDS

CLICK HERE  to get FREE & FAST BIDS from local window companies that can install AAMA Gold Label windows.

Ugly Color Change

Other homeowners became disenchanted with vinyl windows because they would mysteriously change color after several years. Poor quality vinyl windows had a tendency to turn yellow. This color change was a result of poor quality ingredients in the vinyl.

What Makes Good Vinyl?

Vinyl windows are made using polyvinyl chloride (PVC). This is the same plastic that is used in plumbing pipes, electrical pipes and many other household items.

PVC is made by combining several chemicals, fillers, plasticizers and pigments. As you might imagine, each of these ingredients is available in different levels of quality.

Those manufacturers who choose to make a quality product almost always purchase the highest quality ingredients. These, of course, are more costly. This, in turn, makes the cost of the materials higher than those being used by a competitor who wants to offer you a low price.

AAMA Gold Label

If you want the best vinyl windows, buy ones that have the AAMA Gold Label. CLICK HERE to discover why this label is worth its weight in gold!

Color Change

Let's talk about color change as an example. The ingredients which make PVC stay pure white for many years are basically two ingredients: titanium dioxide (TiO2) and an organic form of tin. TiO2 is a pure white chemical used to tint the vinyl white. It is also used heavily by the paint industry to make pure white paints.

Anyway, these two ingredients are costly and they need to be used in certain minimum quantities to produce a high quality vinyl. Also, the grade of TiO2 must be a non-chalking grade, so that your windows don't begin to dust after so many years.

Window manufacturers who do not use sufficient amounts or high quality forms of these two ingredients often must tint their windows a light blue color to buy time before they begin to yellow. If you see vinyl windows that are a polar blue shade of white, BEWARE! If in doubt, ask for a sample of the vinyl material and take it to another showroom.

Hold it against the windows in the highest priced showroom in your town. Compare the colors of different samples. When seen by itself, a polar blue vinyl doesn't really look blue. But, when held against pure white samples, the blue coloration is dramatic.

It is important to note that some certified manufacturers do manufacture a high quality vinyl which does have the blue shading. They have chosen to do this on their own accord, as some of them think the blue coloration is attractive. Your assurance of high quality is the presence of the American Architectural Manufacturers Association (AAMA) certification label on the frame of the window.

CLICK HERE  to get FREE & FAST BIDS from local window companies that can install AAMA Gold Label windows.

The Chambers

When you visit a window store, be sure to ask to see a cross section of the window frame material. Ask for a sample that you can take with you. You will notice that the frame is constructed of various sized chambers. Not only will the chambers be different sizes, there will be different numbers of chambers depending upon the quality of the manufacturer. The highest quality windows usually have the highest number of chambers.

The number of the chambers is important. The strength of the window and frame are a function of where the walls of each chamber connect to the walls of the other chambers. Yes, this sounds confusing, but it is important.

We already discussed that heat can make the vinyl soft. This softening can lead to deformation. The high quality vinyl windows have frames and sashes (that part of the window which frames the glass) that have been engineered to withstand the heat that causes the deformation.

During research and design testing, the stress points on a window frame or sash are identified. The good manufacturers then design the sashes and frames to have extra chambers to hold in shape those chambers exposed to the sun. These chambers are generally shaded and remain cooler. High quality window frames can have as many as fifteen different chambers!

Assembly

How the windows and frames are assembled should be of great importance to you. After all, all joints need to be weathertight and the windows shouldn't fall apart after five or 10 years.

There are two main ways that vinyl windows are assembled: mechanically fastened (screws), or heat welded. There can be, in some cases, a big difference between these two methods.

Mechanically fastened windows use screws, brackets and caulk to hold together the individual pieces of the window sash and frame. This method does work, as long as everything goes right from the time the windows are made until they are installed in your house. Should a window be dropped, twisted or racked during shipment or installation, the caulked seams may break and leaks could develop. If a screw is slightly over-tightened it may strip out the vinyl. The caulk may not last the life of the window.

Welded frames, on the other hand, take advantage of the chemistry of PVC. PVC is really neat. The welding process actually creates one piece of vinyl.

There are advantages and disadvantages to using this process. Welded corners on frames and sashes usually look better. However, welded windows sometimes have hidden drainage chambers that allow rain water to drain to the exterior. Sometimes it is difficult to block air movement in these channels and small amounts of cold air can drift into your home. The strength of the connection between individual pieces can be stronger. Leaks at the corners are practically non-existent.

The strength of a welded connection is a function of how much PVC from one piece is touching the PVC of another piece. This is often measured in square inches. The chambers we discussed earlier play a significant role in this area.

The more chambers that you have in a sash or a frame means that more PVC is available for the welding process. Manufacturers know this and many actually will tell you how many square inches of PVC are in contact at each corner. Look for a window that has the highest total.

CLICK HERE  to get FREE & FAST BIDS from local window companies that can install AAMA Gold Label windows.

Column B73

Replacement Window Cost Payback

Tim replacing front window

Replacement Window Cost Payback TIPS

Are you thinking about purchasing replacement windows and doors for your home simply because you feel you’ll save lots of money on your energy bills? Some salespeople count on this fuzzy emotion when they try to get you to sign a contract that commits you to spending thousands and thousands of dollars on this major home improvement.

This is the column I mentioned in the Labor Day 2016 Newsletter that can save you money.

Do Some Simple Math

I love numbers and used to spend my lunch break on job sites doing all sorts of calculations. One day I produced a very accurate estimation of how many 2 x 4s a lumber company sold in a year.

I did this because I knew how many delivery trucks they had, how many trips the trucks could make in a day and how many 2 x 4’s were on each load. The general manager of the company was shocked at how close my estimate was.

Years ago I decided to use these same skills to see just how long it takes to see if you really save money when buying replacement windows and doors. The fun part is it only takes a few minutes to do this calculation.

Free & Fast BIDS

CLICK HERE to get FREE & FAST BIDS from local replacement window contractors. Ask about AAMA Gold Label windows.

To get accurate numbers for you, I decided to survey all of my subscribers who get my free AsktheBuilder.com newsletter and who live on Long Island. I asked them to provide their actual natural gas cost figures for different months of the year. The results of the survey were astonishing.

Before I go any further, I want you to realize this column only applies to buying replacement windows and doors based on the sole reason that you think it will make financial sense because of the energy you’ll save. If you need replacement windows to make your home look better, or because your existing windows are falling apart and don’t work, your motivation to purchase is quite different.

AAMA Gold Label

You also need to realize that there’s a vast difference in quality in replacement windows. If you want the absolute best ones, you need to buy windows and doors that come with the American Architectural Manufacturers Association (AAMA) Gold Label. These windows and doors, and the components used to make the them, have passed stringent testing for resistance to air leakage, water penetration, and wind pressure. The only windows I’d ever put in my home would have the AAMA Gold Label.

Savings Start AFTER Payback

Before we do the simple calculations, here’s what you need to think about. You only start to save money on an energy-based home improvement after you’ve paid yourself back, in actual energy savings, the amount of money you spent on the improvement.

Get Out Utility Bills

There are sophisticated software programs that can estimate the actual energy savings, but gathering the data can be a burden. To get a real number that’s very accurate you can look at your monthly utility bills.

Let’s me show you how simple it is. My method that follows assumes you use natural gas to heat your home. If you use fuel oil, you already know how much you spend each year for heating by adding up your oil bills.

CLICK HERE to get FREE & FAST BIDS from local replacement window contractors. Ask about AAMA Gold Label windows.

Break Out Gas & Electric Cost

If you study your monthly utility bills and look at the breakdown between the gas and electricity, you’ll be amazed at what you can determine. What you’re trying to determine is just how much money you spend on natural gas for heating only. I know this seems hard to do, especially if you cook, dry clothes and heat water using natural gas.

Look At Summer Use

Here’s the easy part. You use hot water, you cook and dry clothes year round. But your furnace only operates, on average, for about six or seven months per year. The first thing to look at are your gas bills for June, July and August. Your furnace is not on then and the gas you’re using represents what you spend for all the other gas-fueled appliances.

Using the data from my survey of Long Island homeowners like you, I determined that the average gas bill for these three months is about $60 per month. This is what the homeowners are spending, per month, to heat water, cook and dry clothes.

Average Winter Months

I then asked the homeowners in the survey to tell me what they spend on gas for the months of November, December, January, February and March. After subtracting the average of $60 per month, I determined that the average Long Island subscriber of mine was spending about $600 per year on heating costs. Since some may also use central air conditioning in the summer, let’s add about $200 extra for the electricity used to power the AC units.

Average ANNUAL Savings = 19%

I then spent some time looking at different Long Island replacement window company websites. I discovered that some talk about a range of energy savings you may experience by installing new replacement windows. The range is 12 to 27 percent.

Let’s be bold and go with the 27 percent savings. Do the math, $800 X .27, and you’ll see that you may save $216 per year on energy. Now it’s time to see if it’s worth it to buy the replacement windows based on energy savings.

Thousands Of Dollars To Payback!

If you get estimates for AAMA-approved windows, remember these are the best ones, you may discover it will cost you about $600-700 per window. The average home on Long Island may have about ten windows so let’s estimate that the total cost will be $6,500.00. If this is the case, it’s going to take you 30 years before you break even and start to save money on the replacement windows. The payback term is much longer if you finance the improvement and are paying interest on the $6,500.00.

The calculations are more complex because you can factor in the savings from maintaining new windows, the cost of natural gas may go up, and several other things. But you also need to consider what would happen if you kept the $6,500 and invested it.

If you got a modest return on your investment of just five percent, you’d make $325 a year which is more money than you’d save on the energy costs. You’d also still have the $6,500 in your savings account, not that of the window company.

The bottom line is it really pays to run a few simple numbers to see at what point you really start to save money. Often it takes a decade or two before you break even. Be smart when you make large energy-savings decisions.

CLICK HERE to get FREE & FAST BIDS from local replacement window contractors. Ask about AAMA Gold Label windows.

Window Condensation

window condensation green framed wet window

This glass has condensation on it that can peel the paint and cause both wood rot and mold if it is not stopped! Copyright 2017 Tim Carter

Window Condensation TIPS

  • Condensation can form on new windows with insulated glass
  • Glass gets cool or cold, even insulated glass
  • Water vapor changes to liquid when it touches a cool or cold surface
  • Lower indoor humidity or aim fans at surfaces that get condensation
  • CLICK HERE to Get Tim's FREE & FUNNY Newsletter!

DEAR TIM: I have massive amounts of window condensation forming on expensive name-brand windows in my new home. My sister has condensation on some pricey vinyl-replacement windows.

The window people say it is our fault stating that the humidity is too high in our homes. I even have condensation on a storm door.

What is cure for condensation, and how can I stop the water damage and mold that is forming? Patty S.

DEAR PATTY: Window condensation plagues many a homeowner each winter.

Condensation Forms On All Cool / Cold Surfaces

Condensation can form on windows, skylights, walls, ceilings, the underside of roofs, inside closets, etc.

The source of condensation is invisible water vapor that is a component of the air inside your home. Condensation on windows, even new ones, has become an increasingly more-common problem because we are building new homes better and sealing up existing homes so they are more energy-efficient.

CLICK HERE to get FREE & FAST BIDS from local window companies that can install new windows that might not have condensation. Ask for AAMA gold-label windows.

Condensation = Gas Water Into Liquid Water

I have people ask me frequently what is condensation. Condensation is a physical process that happens when water changes from the gaseous state to the liquid state.

The air we breath and that surrounds our planet holds vast amounts of water - billions of tons. Some of this water is invisible while much of it is liquid. You can see liquid water in the sky each time you look at a cloud.

Cool Causes Magic

The water vapor turns to liquid water when it comes into contact with a cool or cold surface. For condensation to form, the temperature of the surface must be at or below the dew point of the air that is touching up against the cool surface.

This dew point is a moving target, and this is why the window companies are saying you and your sister might be the cause of the window condensation.

Warm Air Holds More Water

A given volume of air can only hold so much water vapor at a given temperature. The warmer the air, the more water vapor it can hold.

Certainly you have experienced stifling air in the summer months where the air seems so thick you can cut it. If you had an instrument to measure relative humidity with you, you would have discovered the dew point of that air might have been as high as 72 F or even higher.

This means that if there was an object outdoors whose surface was 72 F or lower, you would see water droplets forming on that relatively warm surface!

Inside Air Dew Point

The air inside your home or that of your sister might have a dew point of 50 F. This means that if the surface temperature of the glass drops to 50 F or below, you are going to see condensation.

Even though you and your sister have state-of-the-art windows that might have Low-E insulated glass with Argon or some other inert gas between the panes of glass, you can still get window condensation. Here is why.

Glass Gets Cold

If you keep the temperature and humidity constant inside your home as many do, condensation will form on windows as the outside temperature plummets in bitter-cold weather. The temperature of the surface of the inside pane of glass is not constant as the outdoor temperature drops!

Your furnace is fighting to keep the temperature up, but it will always lose that battle if it is sized properly for your home.

Window Condensation Products

CLICK HERE to see all sorts of products that can help STOP condensation damage to the window sashes and drywall / plaster around your windows.

How To Stop Condensation

You can stop or minimize condensation by monitoring the amount of water vapor in your home. As the outdoor temperature drops you must lower the amount of water in you air.

CLICK HERE to get FREE & FAST BIDS from local window companies that can install new windows that might not have condensation. Ask for AAMA gold-label windows.

Modern humidifiers have controls with outdoor sensors that can do this automatically. You should also use exhaust fans in your kitchen and bathrooms that exhaust air outdoors, not into an attic space.

Indoor plants, laundry that is drying indoors, interior painting, cooking, crawl spaces that have no vapor barriers, etc. all can aggravate window condensation.

Drafty Homes = Less Condensation

Older homes had window-condensation issues, but they were not always as bad. The reason was simple. Old homes like the one I grew up in were often very drafty. The influx of cold air mixing with the interior air made the relative humidity of the air lower.

Cold air is dry by nature, and when it is mixed with warm air, the humidity drops as does the dew point! This means you would not see condensation form in an old drafty house but might see it in a new home that could be built next door.

Storm Door Condensation

Condensation on a storm door is very common. Storm doors are installed to act as a water and wind barrier.

They often have single-pane glass and the temperature of that glass is frequently equal to the actual outdoor temperature. Moist warmer air from inside your home leaks past your primary door and contacts the cold storm-door glass.

Condensation starts to form in seconds if the storm door is sealed well as it should be.

Fans Evaporate Invisible Condensation

Fans that blow air on window condensation can help evaporate the liquid water putting it back into the gaseous state. But always remember that the light fog you see in the first phase of window condensation is doing the same thing a blaring smoke detector does; it is screaming at you warning that you have too much water in your air.

CLICK HERE to get FREE & FAST BIDS from local window companies that can install new windows that might not have condensation. Ask for AAMA gold-label windows.

Column 711