April 7, 2017 AsktheBuilder Newsletter

Happy Friday!

I've got a boatload of new tips to share and great news about my Roofing Ripoff book below.

I also need your input on a very important four-question survey.

The weather forecasters say Spring is going to show up here in New Hampshire. Sunny days and warm temperatures are supposed to start happening next Monday.

Not a day too soon!!!

Let's get into some good stuff, enough about snow, ice and chilly weather!

Roofing Ripoff Book News

Two hours ago, I sent the final copy of my book to my high-priced libel attorney for his final review.

Today all of the components you need to get to PROTECT your existing asphalt shingle roof, or the new one you're about to install, should be at the fulfillment center.

I've not been able to release the book until I had ready for you WHAT YOU NEED to protect your investment.

This means early next week you should be able to get the book in electronic format. It will be available in paperback, but that's a few weeks out.

If the attorney gives me a thumbs up today, and it's possible, I will have a few FREE sample chapters for you on Sunday.

I thought this day would never come, but it's been worth the wait.

If you're a new subscriber and wonder what this is all about, go to the official Roofing Ripoff website. CLICK HERE.

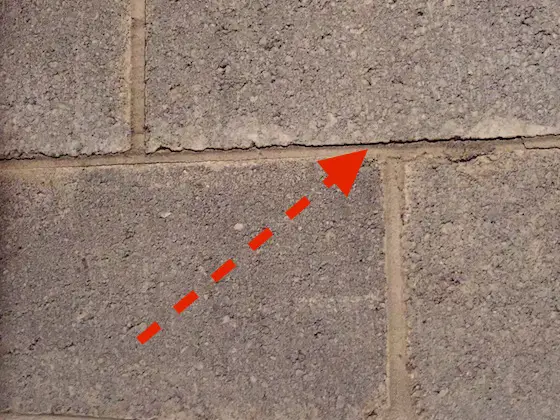
Cracked Concrete Block Foundation Repair

Do you know someone who has a concrete block foundation?

They often develop a horizontal crack about halfway up the wall.


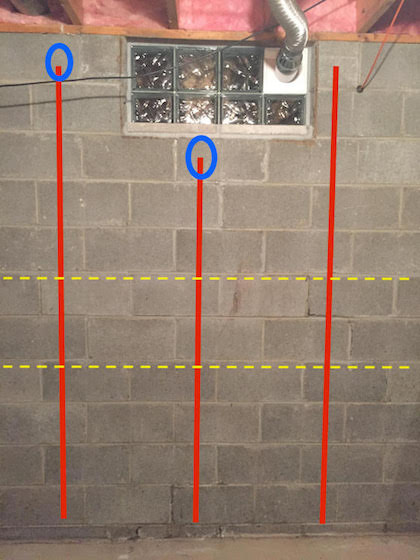
Do you want to know what all the colored lines and ovals represent? I thought so!

CLICK HERE now and I'll bet you discover something new.

Guest Post Request

Yesterday afternoon I received an email from Ms. Sarah Walsh who works for a company I've never heard of - Web Talent Marketing. They say they're in Lancaster, PA.

I get an email like Sarah's about once or twice a month.

Sarah was probing to see if I accepted guest posts from companies.

A guest or sponsored post is one where the content is created by someone other than the owner of the website. In this case, Armstrong Flooring was going to create some column about flooring. They just wanted me to place it on my website HOPING that you'd see it.

Websites like AsktheBuilder.com often charge money to do this. Think of it as charging rent for space in a shopping mall.

MY POLICY at AsktheBuilder.com has always been that I DO NOT accept guest posts.

I entered into a back-and-forth discussion probing with Sarah as to what Armstrong was trying to accomplish.

Here was Sarah's reply about ninety minutes ago:

"I reach out to publications on behalf of Armstrong Flooring, but they create the guest content for publications like yours. As for a post buried deep in web search, our main goal of this relationship and post is to connect with your readers, not the entirety of the internet at once. Please let me know if you have additional questions!"

I responded back to Sarah telling her I felt that very few people have the time to just wander around to websites to see what's new.

What's more, I shared with Sarah that I felt folks like you discounted this content.

Let's see if I'm right. If not, I'll GLADLY admit my error.

Please take this SHORT four-question survey and let's see how you feel about surfing the web and this new trend of guest and sponsored posts at websites!

CLICK HERE to take the survey.

I'll SHARE THE RESULTS in a few days.
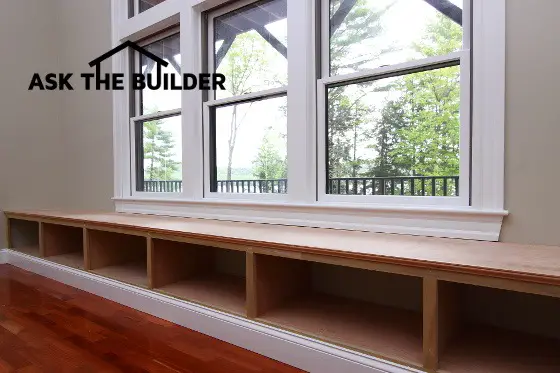
Window Seats

Have you ever wanted a window seat? They can be very comfortable and they add a very neat cool factor to most homes.

If you're building new, you should absolutely consider adding alcoves where you can put one or two in.

CLICK HERE to see a window seat I created here at my house in just TWO DAYS with a few simple tools.

The best part is I share HOW to create a window seat with virtually NO CARPENTRY SKILLS. You can buy the parts already preassembled!!!

DIY Wood Rot Treatment - Preventative Liquid!

How would you like to treat lumber to prevent wood rot?

You can't always get treated lumber like you want it.

Guess what? I share a magic liquid you can buy that will work really really well!!

CLUE: Cutty Sark and Thermopylae

CLICK HERE to see what it is.

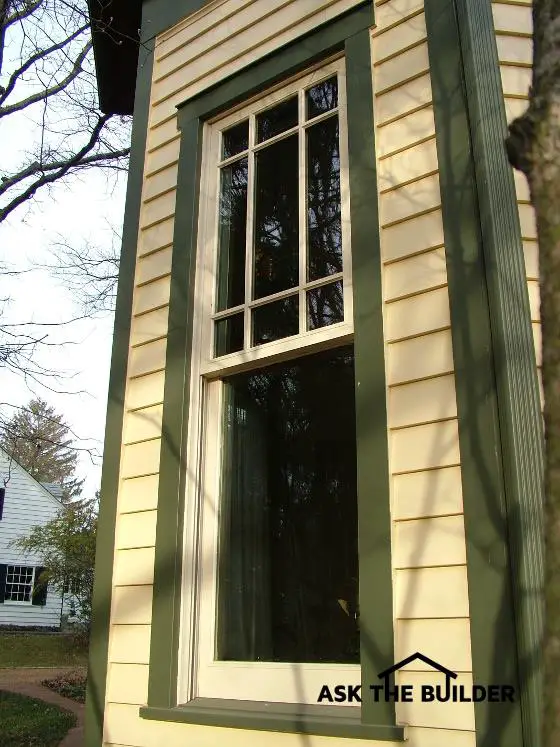
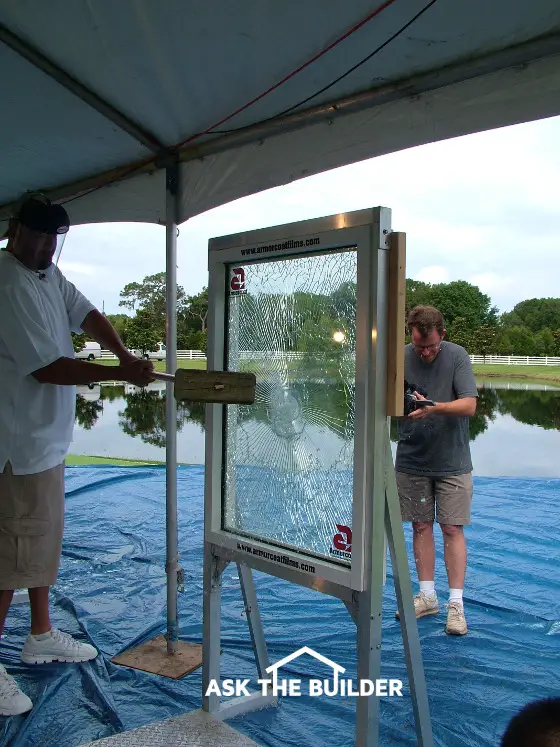
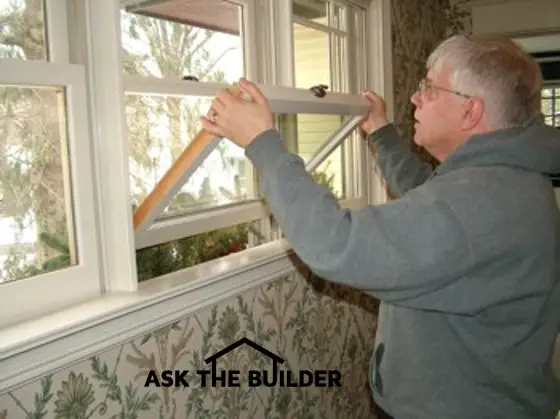
Replacement Window Time?

Have you decided this is the year you're going to bite the bullet and get new windows?

If so, you REALLY can get taken by a salesperson.

Would you like to know what the BEST WINDOWS are? I thought so.

CLICK HERE to see what replacement windows I'd buy.

P.S. I give you links in the column so you can get FREE & FAST BIDS from local window companies that can get you the best windows!!
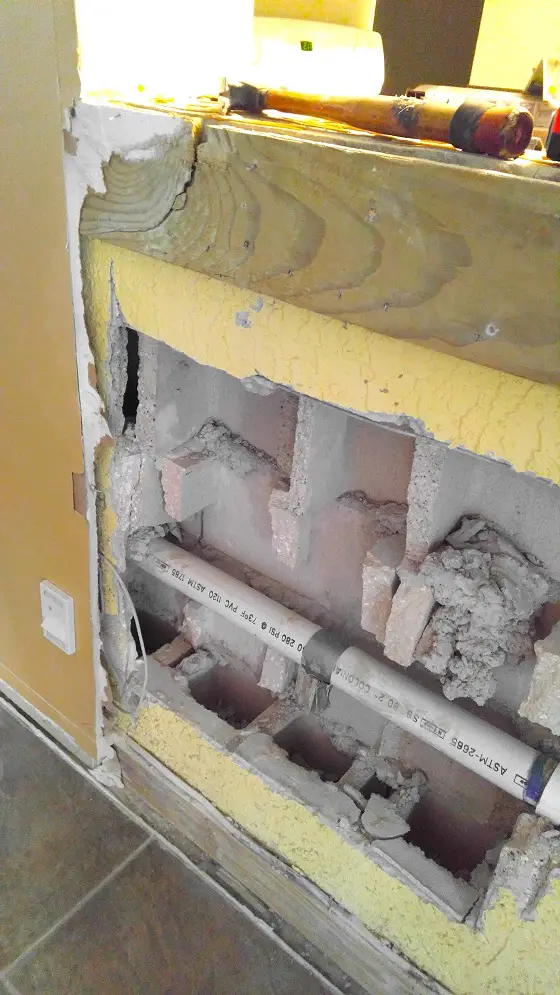
Maggie's Fireplace

Maggie is a long-time subscriber to this newsletter. I hope to meet her one day. She lives in North Carolina.

About two weeks ago, she reached out to me asking the best way to clean her interior fireplace.

She was sick of the way it looked and wanted to really brighten the room.

What do you think she was going to do?

Wait until you see the AMAZING PHOTOS she took of the before, during and after!!

CLICK HERE to see what Maggie did and then consider doing a project of your own.

I'd really appreciate it if you'd then SEND me your photos and comments!

That's enough for today.

Are you as excited as I am about the Roofing Ripoff book?

Tim Carter
Founder - www.AsktheBuilder.com

Do It Right, Not Over!

Cracked Block Foundation Repair

Block foundation repair is more common than most people realize. Concrete block foundations that are about 8-feet tall have a history of developing horizontal cracks about 4 feet up from the floor. You rarely see this happen in cast or poured concrete foundation walls.

Concrete Block = Hollow Walls

It's important to realize the reason the cracks develop. Rarely are concrete block walls filled solid. 

The average concrete block that measures 8 inches high, 8 inches thick and 16 inches long has two giant void spaces inside the block. There's a center web that connects the two flat faces you see on either side of the block. Two additional webs are at each end with ears that end up creating a narrow void space between two touching blocks.

block foundation repair

You can see the hollow cores of concrete block under the horizontal PVC drain pipe. It's a far cry from a poured concrete wall! Copyright 2017 Tim Carter

Another key point is the only thing holding the block together is a thin 3/8-inch mortar joint.

Mortar Has Strength Issues

While the concrete block may have been made well and is very strong if cured and there's enough Portland cement in the mix, you can't say the same thing for the mortar the block masons used.

The mortar could have these defects:

  • too much sand was used in the mix
  • mortar partially set up before being used
  • mortar was re-tempered by adding water weakening it
  • mortar froze before it cured

The bottom line is the mortar is the weakest link and you only have a narrow 1-inch strip of it to resist horizontal pressure from the soil pressing against the wall.

If you’re interested in learning more about cost estimates for foundation repair I have an article here.

Related Links

Concrete Block Basics

Repair Crumbling Concrete Block

Free & Fast Bids

CLICK HERE to get FREE & FAST BIDS from local concrete block contractors who can do the repair I show in this column.

Stronger Poured Walls

A cast or poured concrete foundation wall is solid. It's usually 8 inches thick. It takes far more horizontal pressure to crack or snap a wall like this.

To repair a hollow concrete block foundation, one of your options is to transform it into a solid wall every 24 inches on center.

block foundation repair

Here's a typical block foundation wall in the early stages of failure. The red arrow is pointing at a crack in the horizontal bed mortar joint between two courses of block. Pressure on the other side of the wall from the soil is pushing the wall inwards. The result is a bending force much as you'd snap a twig or thin saltine cracker in two. Copyright 2017 Tim Carter

Block Foundation Repair Using Peas

The easiest thing to do is to fill the void spaces with  concrete when a new block foundation is being built. In addition the concrete must contain small stones no bigger than a green pea.

This gravel is commonly called pea gravel for the obvious reason. It could have been called jaw breaker concrete too as that hard candy I remember as a kid was about the size of a larger green pea. But I digress.

It's easy to fill the voids and it doesn't take long if you can spot a ready mix concrete truck around the foundation. If you can do this building new, you want to fill all the void spaces with the pea gravel concrete.

Doing this, your concrete block wall now is as close as possible to a poured or cast concrete wall.

Steel Rebar In The Block Cores

Insert a 1/2-inch piece of rebar down into the wet concrete every 24 inches on center to get the strongest possible wall. It's best if this steel has a connection to the poured concrete footing. This would require steel rods being installed in the footing when it was poured.

It takes great skill to put these steel rods exactly where they'll end up in the center of the concrete block void spaces. The steel rods project up about 2 feet from the top of the footing. The rods that are installed in the block overlap these shorter rods.

CLICK HERE to get FREE & FAST BIDS from local concrete block contractors who can do the repair I show in this column.

Repairing an Existing Block Wall

Do the same thing to repair an existing concrete block wall. The problem is it's much harder to accomplish because the top of the block is covered by the house structure.

Block foundation repair starts on the outside. Every 24 inches you have to break into the concrete block to expose the void spaces between the webbing.

You then create some sort of funnel to pour the pea gravel concrete into this hole. It's not easy. You should also install the steel rod, but you may find it far easier to use a #3 bar that's only 3/8-inch in diameter. It will be easier to push down into the void spaces at an angle.


block foundation repair

There's lots going on in this photo. The red lines represent where you'll find the hollow cores in regular block. The blue ovals are where you'd break into the block on the outside so you can fill the voids with the pea-gravel concrete. I only put in two ovals. You'd need to crack into the block every 24 inches. The dashed yellow lines are the most common locations where you'd see the foundation start to fail - the horizontal bed mortar joints between 3 and 4-feet up from the basement floor. Copyright 2017 Tim Carter

Junior Steel Beams

There's another method engineers use to repair bowed block foundation walls. You can install vertical small I-beams that support the bowed block walls.

You need to break into the concrete slab in the basement to hold the bottom of the beam. The top of the beam is held in place by a small angle iron that's bolted to the underside of the floor joists.

Soil Anchors

A point often overlooked are giant steel plates inside the foundation. This system resembles a massive washer you might put behind the head of a bolt.

A giant steel rod passes through the wall and is buried in the soil outside. The end of the steel rod indoors has threads on it.

The long massive bolt connects to a massive steel anchor in the ground. Tighten the nut on the end of the rod to pull the block tighter against the soil outdoors

Watch this video to see how soil anchors are installed.


These work best if you excavate the soil outside the foundation wall and put in the anchors. There's less pressure against the anchors and plates if you do this.

If you go to all this work, you may as well clean off the block wall, put in excellent waterproofing like Tuf-n-Dri as well as a great foundation drain tile.

CLICK HERE to get FREE & FAST BIDS from local concrete block contractors who can do the repair I show in this column.

Low E Glass Benefits

Low-E Glass Benefits TIPS

DEAR TIM: My husband and I will be building a new home soon. Our windows are available with optional low-E glass. Just what is low E glass? Does it really work?

Are there different types? Will it block ultraviolet (UV) light? Is the argon gas necessary? Do you think it is worth the extra money? E. R.

DEAR E. R.: Window glass was revolutionized in the 1970's.

Single Became Double

Insulated glass (two or more pieces of glass with a dead air space between) made its debut in the early 70's. Prior to this almost all window glass was a single pane.

Low-E Glass Next In Line

Low E glass was introduced in 1979. The E stands for emissivity. Low E glass works by reflecting heat back to its source. It does this by utilizing an ultra thin metallic coating on or in the glass.

Among other things, sunlight contains visible light, UV light, and infrared (IR) light. Visible light enables us to see things. Ultraviolet light damages your skin, wood, fabrics, and causes colors to fade.

Free & Fast Bids

CLICK HERE to get FREE & FAST BIDS from local window companies that can install the BEST Low-E glass windows in your home.

IR = Infrared Bouncing Is Good

Infrared light is basically heat. Low E glass has the ability to allow visible light to pass while blocking certain amounts of UV light and IR light.

The infrared light in sunlight is powerful. When it strikes an object it heats it up. These objects can be your tile floors, furniture, sidewalks, patio furniture, etc. As these objects cool off, they emit a low powered form of IR light.

Cooler House In Summer / Warmer In Winter

Low E glass reflects this form of energy. In the summer this helps to keep your house cooler, as the heat from objects outside is kept outside. In the winter, all objects in your home are heated (by either the sun or your furnace). This heat is also bounced back into your house by the low E glass.

Hard & Soft Coat

There are two types of low E glass: hard coat and soft coat. Tin is applied directly to the molten glass to make hard coat low E glass. It is hard to scratch the tin off the glass. The soft coat process commonly involves the application of a thin layer of silver while the glass is in a vacuum.

This coating is delicate. Soft coat low E glass is always sandwiched with another piece of glass. It can also oxidize if exposed to air. Argon gas is sometimes used to prevent this oxidation. This gas also acts as an additional insulator.

CLICK HERE to get FREE & FAST BIDS from local window companies that can install the BEST Low-E glass windows in your home.

Low-E Glass Detector

If you need to test a window to see if it does have low-e glass, you're in luck. There are high-tech low-e glass detector tools that do this. Here's one:

Here's a low-e glass detector. CLICK THE IMAGE TO LEARN MORE OR BUY IT.

Helps Reduce Condensation

Low E glass helps to reduce condensation on glass. The inside surface temperature of the glass is warmer.

The differences can be dramatic. Imagine a cold night with an outside temperature of 0 degrees and a 15 mph wind.

The inside temperature of a single pane window would be approximately 26 degrees. Regular double pane glass might register 35 degrees. Hard coat low E glass would be very near 49 degrees. And weighing in at champ would be soft coat low E glass at 62 degrees.

Low-E Film

Some glass manufacturers have gone even farther. They have suspended thin, low E transparent films in between pieces of glass. This system has excellent performance characteristics. Some of these films can block 99.5 percent of UV light. Some boast an insulating value twice that of soft coat low E glass.

Low E glass is worth the price, especially since houses tend to lose 25 percent of their heat through windows. Purchase the highest quality low-E glass you can afford.

CLICK HERE to get FREE & FAST BIDS from local window companies that can install the BEST Low-E glass windows in your home.

Column 097

Window Sashes

Window Sash TIPS

  • Installing just wood window sashes instead of an entire window is possible
  • Major window companies make replacement sash kits
  • WATCH sash install video below
  • Measurements must be precise - have window dealer help
  • CLICK HERE to Get Tim's FREE & FUNNY Newsletter!

DEAR TIM: Some window sashes in my home are in good shape while others are falling apart. Can I purchase window sash replacement kits that will allow me to maintain the character of my older home?

Will the replacement window sash still use the old rope and cast-iron weight? I would love to get a replacement tilt-in window-sash kit to make washing windows easier.

Do you think I can do window sash repair, or is it a better idea to buy a new one? Melissa D., North Andover, MA

DEAR MELISSA: Window sashes can absolutely be replaced in many instances without having to alter the actual window frame.

New Window Sashes That Look Old

The best part is you can buy new window sashes that look old. A window sash consists of the frame that holds the window glass, and the actual glass you look through.

Typically the window sash moves while the window frame that surrounds the sash is stationary. The best analogy is to compare a window sash to a door.

window with vintage look

These window sashes have a vintage look, but they are less than six years old. PHOTO CREDIT: Tim Carter

Sash Kits From Major Mfrs

Window sash replacement kits have been available for years. These marvelous products allowed me to replace broken or rotted window sashes with new sashes, while the window frame and all interior and exterior woodwork trim was left untouched.

The homeowners who I worked for were amazed at how quickly they could enjoy functioning and energy-efficient windows with minimal mess and disruption to their homes. The new window sashes were able to be ordered to fit the existing openings like a glove fits a hand.

Free & Fast Bids

CLICK HERE to get FREE & FAST BIDS from local companies that can install new windows or sashes for you.

Architectural Salvage Shops

You may be able to find a new window sash that will have the groove to accommodate the rope that attaches to the cast-iron weight, but I would not do that unless this is a specialized historic preservation project where you want the windows to be exactly like the old ones. You'd find this at a business that salvages old building parts.

New Vinyl Spring-Loaded Jambs

The new window sash replacement kits come with sleek spring-loaded jambs that connect to the window sashes. These sleek jambs are highly efficient, and keep air infiltration to an absolute minimum.

Window Installation Video

Here's a video that shows you the sashes and how easy they install. In this video, I'm installing a new FRAME at the same time, but doing just sashes is way easier!

Remove Old Weights

I feel it is best to remove the old window weights, and fill the void space with special expanding foam insulation that stays flexible. This foam insulation will do a great job of stopping air leaks, and will also help to make the inside of your home quieter.

Touch-n-Foam

This is a brand-name foam that's meant to be sprayed around the frames of windows and doors. CLICK THE IMAGE NOW TO BUY IT.

Air leaks around windows are a common source of noise pollution. Sirens, irritating road noise, train whistles, urban din, etc. will disappear when you stop air leaks around windows.

CLICK HERE to get FREE & FAST BIDS from local companies that can install new windows or sashes for you.

Easy To Wash Windows

You will love your new replacement tilt-in window-sash kit after it is installed. Cleaning windows has never been easier. I have these type of windows at my own home, and really appreciate not having to use ladders to clean second-story window sashes.

The tilt-in feature allows you to readily remove the entire sash from the frame if you prefer to clean windows or repaint the exterior of them on a work stand within the room. Widow maintenance couldn't be easier with the tilt-in option.

Special Repair Epoxy

Repairing window sashes may be possible depending upon the degree of damage. If serious rot has caused the window sash frame to be loose or distorted, it may be better to buy a new sash. But if you have some spots of rot, you can buy special epoxies and injectable wood fortifiers that will make the old window sash like new. The epoxies are sandable and paintable once cured.

wood epoxy

This is a great wood epoxy that will fill larger cracks in wood decking and outdoor wood. If the wood is starting to rot, get the kit that has the PC Petrifier component. CLICK THE IMAGE NOW TO HAVE THIS PRODUCT DELIVERED TO YOUR HOME.

Some Energy Savings

The decision to repair or replace should also focus around your fuel bills. Window sash replacement kits can make a considerable difference on your heating and cooling bills as the glass within the sash can be ordered with a Low-E coating and special inert gases between the glass panes.

This glass option coupled with the air-tight jambs makes for a highly efficient window. You will be more comfortable inside your home, and the upgraded windows will be more attractive to a future buyer.

DIY Friendly

One of the great features of window sash replacement kits is that they are do-it-yourself friendly, and they can be done one or two windows at a time. You can save thousands of dollars in installation fees if you try to install the new window sashes by yourself. It is possible to build installation confidence by starting with a smaller window on the rear of your home or some other window that can't be seen from the road.

Get Brand Name

Be sure you select a window sash replacement kit from a name-brand window company that has made this line of products for years. This will be vitally important if you choose to replace only so many window sashes a year. I happened to use Marvin Windows for all my jobs. I'm not worried about them going out of business.

This may be your plan, if you have a tight budget. If at all possible, try to replace all window sashes at the same time so the job gets completed. At the very least, always replace all of the sashes on any given side of your home at the same time for a more uniform look.

Measurements Are Critical

Keep in mind that measurements are very critical. If at all possible, get the window dealer to come to your home to take the actual measurements. If you supply the measurements and make an error, you will have to purchase new window sashes to replace the ones that don't fit.

CLICK HERE to get FREE & FAST BIDS from local companies that can install new windows or sashes for you.

Column 649

Glass Block Installation

glass block installation

Glass block installation like this requires skill. I doubt you'll do a job like this your first time. Copyright 2018 Tim Carter

"Now for the fun part. I hope you bought several bundles of cedar shims, as we are going to need them."

Glass Block Window Installation Tips

  • Take great measurements - mortar gap on sides and top can be up to 3/4 inch
  • Use ingenuity to remove the old window frame
  • WATCH glass block videos below
  • Wood shims hold new pre-made glass block window in place
  • CLICK HERE to Get Tim's FREE & FUNNY Newsletter!

Can You Buy Pre-made Glass Block Windows?

Yes, that's the easiest way to install glass block windows. Don't try to lay glass block like a bricklayer lays brick. It's very easy to install a pre-made glass block window, but hard to install individual glass blocks.

Glass block windows are a fun project to tackle. Minimal tools are needed. If all goes well even a "newbie" DIY'r can install four pre-fabricated glass-block windows in a day. Here is what I have learned over the years about installing these neat windows.

Related Links

 Glass & Acrylic Blocks Do Many Things

Glass Block

Glass Block Manufacturers

Glass Block Greenhouse

Should I Make a Drawing of the Existing Opening?

Make a simple sketch of each window opening you intend to transform into the glass block. Measure the narrowest point side to side and up and down to the masonry or where you "think" the masonry will be once you remove the frame.

If you're in doubt, take a photo of different windows. You will need to show these to the company that will make your glass block panels. Check your measurements.

Go to the fabricator and ask if everything is in order. Show him/her using your photos and drawings where the measurements were taken. Getting the right size is the most critical aspect of the ENTIRE job. Let's take our time and do this right.

Free & Fast BIDS

CLICK HERE to get FREE & FAST BIDS from local glass-block window installers. Ask about venting windows.

How Big Will the Glass Block Window Be?

When the windows are built, they will be a giant slab of glass. Some fabricators put a band clamp around the windows so they can't break apart. If you don't have a clamp, be CAREFUL! If you bump a corner, you can pop a glass block off. Ask the fabricators to wrap the windows with a band clamp if possible.

Glass Block Videos

Watch these two videos to give you an idea of how easy it can be to work with glass block. In these, I put together panels with a single block.

You can BUY pre-made windows so you don't have to do what I did in the videos.

How Heavy are Glass Block Windows?

The glass block windows are very heavy. Glass block is just clear rock believe it or not. It's pure silica in most instances. Just one square glass block can weigh three or four pounds.

If you're doing a glass block window installation, one complete window can weigh 60, or more, pounds,

What is the Hardest Part of Glass Block Installation?

Removing the old window and frame is the hardest part of the job. If you get the frame out easily, celebrate!

If your window frame is a full-width metal frame that was cast with the concrete, then you better ask the fabricator for his recommendation. I always leave those frames in place. It is a NIGHTMARE to remove them.

Once the old frame is out, use a brush to clean away dust and debris. I also recommend that you sweep up the floor and get all unnecessary stuff out of the way.

How Many Old Windows Should I Remove in a Day?

Remove as many frames and old windows as you think you can deal with in a day. I prefer to get all the demo work done and do things in stages. I don't like to do these windows one at a time. It really breaks up your momentum.

WARNING TIP: Do not remove an old window unless you're sure the new glass block panel is going to fit inside the opening.

glass block window installation

A large window like this needs to be installed one glass block at a time. It's a huge window. Copyright 2018 Tim Carter

How Much Mortar is on the Sides of the Window?

I also assume that there will be a 1/2 inch gap of mortar around the window. If so, then place several shims on the bottom frame that extend up 1/2 inch. Place these in from the corners about 3 inches or so. Slightly dampen the exposed masonry jambs with a spray bottle of water.

Now for the fun part. I hope you bought several bundles of cedar shims, as we are going to need them.

Where Do You Apply the Mortar?

Trowel some of the cement mortar onto the sill. Don't use bricklayers' mortar. Use Portland cement and sand. It will be stronger and more waterproof. If mortar is your only alternative, it will work, but I prefer cement.

Do You Install the Glass Block Panel on Shims?

Now tilt or slide the window onto the shims. Take two other shims and place them between the top of the window and the jamb. Slide them until they are just snug.

Check the window for plumb and square. You are also looking for equal reveal side to side. You want the window parallel with the inside and outside walls, not twisted.

CLICK HERE to get FREE & FAST BIDS from local glass-block window installers. Ask about venting windows.

How Do You Install the Mortar?

Use rubber gloves, small trowels, sticks, whatever it takes to pack the cement mortar around the window. Fill any pesky gaps at the bottom.

Should I Put Mortar On Top of the Glass Block?

Don't put any mortar on the top of the window. Downward pressure or stress over time can crack these windows. The top gap can be successfully filled with caulking tomorrow.

Your mortar may be too wet to tool as soon as you install it. Don't worry. Within a short period of time, the mortar will begin to harden. You can tool it with an old spoon, a stick, or with your fingers. Use a damp sponge to remove mortar smears from the glass.

When Can I Remove the Shims?

Usually within about two hours, you can gently remove the shims. Apply pressure against the glass as you pull the shims. Immediately, fill the bottom holes with cement mortar. Blend it in to match the texture and tooling of the rest of the joint.

When Do I Caulk the Top?

Don't try to caulk the glass on the same day it is installed. I get the best results waiting 24 hours. Don't try to fill the entire space with caulk!

Use a foam caulking backer rod to get within 1/2 inch of where the caulk joint will finish out. Use 100 percent silicone caulk. Wipe up smears immediately with lacquer thinner.


"Dear Tim,

I was looking at info about building glass block windows and you were talking about using lacquer thinner to clean up silicone residue. I thought I'd e-mail you to offer the suggestion that the next time you are using silicone you try denatured alcohol. My tile man taught me this and it works really really good! Probably less toxic too! I share your interest in building...I live in what was the Hartwell fire department at the turn of the last century and remodeled it into something a little more modern. " - John Figueras, Cincinnati, OH

Dear John,

Thanks for this tip.

Author's Note: We've received other questions with similar problems or questions. Here's one from Lena K. of Rockville, MD, regarding basement replacement windows.

"Our basement windows leak air as well as water when the snow melts. The house was built in 1965 and the windows seem to be from that time. They are below the ground level with wells dug out around them. They are set directly into concrete blocks. I looked at different replacement window manufacturers and installers, and none of the ones I saw offer specific windows for basements. Do you have any suggestions? (We aren't planning on doing the replacement ourselves). Thank you."


Companion Articles:  Glass & Acrylic Blocks Do Many Things, Glass Block, Glass Block Manufacturers, Glass Block Greenhouse

Column B395

Window Seats

Window Seat

Window Seat TIPS

DEAR TIM: I have to have a window seat. I’ve searched everywhere and can’t find any kits, so I’m beginning to believe I’ll end up with a custom window seat for my family room.

How hard is it to build a storage window seat? What special tools and materials do I need?

How do I compute the size when I know I want window-seat cushions to sit on? What else do I need to know to end up with spectacular window seating? Beth P., Westerly, RI

DEAR BETH: If you have moderate building skills and a few common tools, you’ll have a completed window seat bench in just a couple of days.

Window Seats In Hours

I can say this with confidence as I just completed the largest window seat of my career this past weekend. It’s over 15-feet long, and it’s going to get all kinds of compliments once it’s painted and is stocked with books, a window-seat cushion or two or three and other decorative items.

The inspiration came from my daughter Meghan who envisioned the built-in window seat that would allow her to cozy up and read a book while gazing out upon the lake.

Free & Fast Bids

CLICK HERE to get FREE & FAST BIDS from local carpenters that specialize in built-in furniture like window seats. 

Box Design Is DIY Easy

The easiest window seat to construct is just one that looks like a box. It would have a vertical wall or face and then a flat top. But a window seat with storage is really the thing to have, as you’ll not only get the function of the seat, but the space beneath the seat will not go to waste.

You can have hidden or open storage. A window seat with hidden storage that’s concealed with doors or a flip-top seat adds significantly to the cost and complexity of the project.

Step-by-Step Photos

Fortunately, I had my helper take hundreds of window-seat pictures that show the project from start to finish. I intend to produce window-seat instructions and window-seat plans from the photos he took.

Kitchen Cabinets Sans Doors

If you need inspiration as to what kind of window seat you want, all you have to do is look at open bookcases, or small kitchen cabinets that typically can be found over a refrigerator. The wood window seat I just built resembles an open bookshelf or a not-so-tall kitchen cabinet that has no doors.

Keep in mind that the total height of a window seat can’t be much more than 18 or 19 inches. You can’t have too much open space when you consider the top, face frame, bottom shelf and a space for some baseboard.

Use Kitchen Cabinets

If you want the look of cabinetry with doors that conceal the things under your seat, all you have to do is buy some 15-inch-high kitchen cabinets! If you put these on top of a 3-inch-tall recessed toe-kick and then add a 3/4-inch plywood top, you're at the perfect 19-inch height.

If you've already built your own frame as I did in the photo above, then locate tiny cabinet doors similar to the ones you find over a refrigerator. You may want to locate the cabinet doors first and then build a frame that will fit the doors.

This can be problematic from a scale perspective, as you should make sure the doors are in proportion to the overall height and width of the seat. This is best left to a real finish carpenter. If I were you, I’d start with just an open-shelf window seat for your first project.

CLICK HERE to get FREE & FAST BIDS from local carpenters that specialize in built-in furniture like window seats. 

Birch Plywood Is Best

I used sheets of three-quarter-inch-thick birch plywood, 1x2 paint-grade solid poplar and a few pieces of common molding to construct my window seat. Go to a real lumber yard for these materials, not a home center. I doubt you’ll ever find 7-ply birch plywood at a big-box store!

Simple Tools

Believe it or not, I constructed the entire window seat with a circular saw, drill, framing square, measuring tape, hammer, a few squeeze clamps, a screwdriver and my trusty pocket-hole jig. The pocket-hole jig is an amazing tool that allows you to drill perfect concealed low-angle holes in finish lumber so that you can assemble them without glue.

kreg pocket hole jig

This is the EXACT pocket hole jig I used. It's probably the best on the market and it's affordable. CLICK THE IMAGE NOW TO HAVE IT DELIVERED TO YOUR HOME.

The entire face frame of my window seat looks like a finish piece of custom furniture that I assembled in less than 30 minutes with screws and a screwdriver! Pocket-hole jigs are affordable and should be on every person’s workbench.

Test Existing Chairs

To ensure you end up with a comfortable window seat, you need to look at and sit in many of the pieces of furniture in your home. Find the most comfortable chair in your home and measure it. Note it’s height and the depth of the seat.

You’ll quickly discover that for maximum comfort your legs shouldn’t dangle off the edge of the seat not touching the floor. What’s more, if a seat is too low, your knees will uncomfortably point to the ceiling.

Build a seat that’s too deep and you won’t be able to relax using a wall as a backrest. Lots of thought went into creating the perfect chair in your home. Copy its dimensions.

Birch Loves Paint

Birch plywood makes for a perfect material for any number of reasons. First, the birch veneer makes for a magnificent surface for painting. Its fine grain makes for a silky smooth finish. You can stain birch plywood, but be sure the face-frame lumber has similar grain and coloration so the stain or clear finish matches.

Trim It Out

For a very custom look and feel, be sure all the trim that surrounds your window seat matches the trim and moldings in the room. If you have an older home, you can take a piece of your existing baseboard to a woodworking shop or mill. They have equipment that allows them to match the profile exactly.

Think About Flip Tops

Before you make the final decision on a flip-top window seat, understand that it makes storage of items a bit of a hassle. Things get stored on top of one another much like a chest freezer. If you’ve ever owned a chest freezer versus one that opens like a regular refrigerator, I believe you’ll agree that a chest freezer is not the best design. You’ll love the look of an open shelf on your new window seat!

CLICK HERE to get FREE & FAST BIDS from local carpenters that specialize in built-in furniture like window seats. 

Column 779

DIY Wood Rot Treatment

copper treatment

Here's an excellent oil-based DIY copper liquid you can use to treat your own lumber. CLICK or TAP HERE NOW TO HAVE IT DELIVERED TO YOUR HOME.

DIY Wood Rot Treatment TIPS

DIY wood rot treatment to prevent wood rot is easy.  You just have to think back to your high school chemistry or history class.

It's all about copper.

What Preserved the Wood on Old Ironsides & The Cutty Sark?

Two hundred years ago ships were the fastest way to travel great distances. Christopher Columbus and other early explorers sailed across the deep blue seas in wood ships.

Businessmen soon discovered they could make lots of money bringing new products like tea and spices back to their countries. They used clipper ships like the historic Cutty Sark and Thermopylae to allow them to ply their wares back in Europe.

Old Ironsides or the USS Constitution needed to be protected so she could sail fast in the water. 

The issue is that organic growth on the wood hulls below the water line would slow the ships in the water. These barnacles could be prevented if the ships had copper plating attached to the hulls.

Was it an Accidental Discovery?

No doubt at some point hundreds of years ago someone place a piece of copper onto a piece of wood. They then put it into some water for whatever reason. After a while stuff grew on the wood in the water, but the copper plate had no growth on it. Eureka!

This person was the first to notice that copper is a natural biocide. Organic things like wood rot fungi, termites, carpenter ants, algae, moss, etc. do not like copper. They think it's a poison. 

This is why modern treated lumber contains COPPER. The copper is dissolved in water and the solution is injected into the lumber in pressure cylinders. The pressure forces the liquid deep into the wood.

What is the Magic DIY Wood Rot Treatment?

You can treat lumber of any liquid form of copper. It comes in a solution your brush onto the wood.

copper treatment

Here's an excellent oil-based DIY copper liquid you can use to treat your own lumber. CLICK or TAP HERE NOW TO HAVE IT DELIVERED TO YOUR HOME.

To get it to soak up into the inside of the wood since you don't have a pressure vessel, you can put the liquid into a bucket and stand up the ends of the lumber much like you might a Christmas tree in water in your home.

It's important to cut off about an inch of the wood to expose fresh end grain for this to work. Some lumber is sealed at the lumber mill with paint or a clear liquid to prevent water from getting into the end of the lumber.

CLICK HERE to buy the amazing DIY wood rot treatment liquid.

Wash Windows Without Streaks

Wash Windows Without Streaks TIPS

You may think it's too cold to wash windows, but it's probably not. Professionals wash windows in the winter unless it's bitter cold outdoors. There's no reason why you can't be outside if you just dress for the weather.

You may not need to go outdoors if you have some modern windows that tilt inside for easy cleaning or are hinged so you can reach the outside glass with little effort.

While we're at it, it's time to dispel some of the many myths out there about how to get sparkling clean glass. You may swear on a stack of bibles that vinegar and water is the way to go. Or maybe you love using that blue liquid in a spray bottle. Or are you one who would bet their life on using newspapers to clean glass? If you use newspapers, you're leaving all sorts of ink behind on the glass.

Guess what? I reached out to the top management of huge companies that clean hundreds of thousands of square feet of glass in giant office buildings to see how the professionals do it. You're not going to believe how simple it is to get glass clean like the pros and you have just about everything you need in your kitchen right now!

Fast & Free BIDS

CLICK HERE to get FREE & FAST BIDS from local window cleaning contractors.

Degree of Difficulty: wash windows without streaks

Step One: You're going to need a bucket, some clean dry rags, a bottle of liquid dish soap, a sponge and a great squeegee. If you want to work fast like a pro, then you'll maybe want to invest in a lambs-wool cleaning tool that's shaped like a squeegee.

Step Two: Let's step back and understand the window cleaning process before you get to work. If you were to take a spray bottle of water and go out and spray it on your dirty car and then rub your car with some paper towels or a clean rag do you think it would be really clean? The answer is no. For the most part, you're just spreading the dirt around. Some dirt will come off the car on the paper towels or rags, but not all of it.

To get glass clean, you need to saturate the glass with a film of water that has a small amount of soap in it and swab the glass with a micro-fiber cleaning tool to remove the dirt. Most professionals use the lambs-wool cleaning pad tool for this part of the job.

microfiber window washing tool

The microfiber tool on the right is what you should use to clean your windows. CLICK or TAP HERE or the photo to order one and have it at your home in days.

Step Three: Fill your bucket with two gallons of water. Add ten drops of liquid dish soap to this water. The soap acts as a lubricant on the glass and helps to cut down on the surface tension of the water.

Step Four: Dip your sponge or lambs-wool tool into the cleaning water and get it wet. Squeeze some of the water from whatever you're using, but not all of it. You want enough water to be present that the glass surface will get wet and the dirt on the glass will easily transfer to your sponge or lambs-wool tool as it glides across the surface. This is the step where the glass gets clean.

CLICK HERE to get FREE & FAST BIDS from local window cleaning contractors.

Step Five: Flip the sponge if necessary to the other side if the glass is exceptionally dirty. Your goal is to transfer all of the dirt from the glass to the sponge or lambs-wool tool in a matter of seconds by floating it across the glass. Professionals can swab a standard-sized house window in seconds and achieve this result.

Step Six: It's now time to use the squeegee. The purpose of the squeegee is to just remove the excess water beads that are on the glass. The squeegee is NOT cleaning the glass. You've already done this in steps four and five.

Step Seven: It's best to go sideways when using the squeegee starting at the top of the window. You may make clumsy strokes at first, so be patient. Hold the squeegee at a slight angle much like a snowplow so the excess water is pushed down the window and doesn't go beyond the tip of the squeegee that's pointing to the sky.

Step Eight: After you have squeegeed the entire pane of glass, you may have some water droplets where the glass meets the edge of the window frame. Use your dry rags to wipe this off never allowing the rag to drift back onto the main part of the glass.

Summary: The next time you see a professional window cleaner stop and watch how he works. You'll be amazed at the process and how fluid he is with his hand and arm motions. It will take you a while to get as good as they are, but that's okay, you're working on your dime.

Window Washing Videos

Watch these two videos to see how pros get glass perfectly clean. It's SUPER EASY.

CLICK HERE to get FREE & FAST BIDS from local window cleaning contractors.

Column HT032

Hurricane Window Film

Hurricane Window Film

The glass was shattered an instant before this photo was taken. But the crystal-clear security window film is holding it in place. The film prevents any wind and water from entering a home. PHOTO CREDIT: Tim Carter

Hurricane Window Film

DEAR TIM: My parents own a home in Florida. As you know, that seems to be ground zero for hurricanes. What is the best and most cost-effective way for them to protect their home from hurricane damage?

They told me about hurricane window film, but I have never heard of it. What is it and is it a good product?

I also get bad storms where I live, so I often wonder if I should consider some of this window film for my own home. Is this a do-it-yourself product? Jennifer T., Joplin, MO

DEAR JENNIFER: Hurricanes are really front and center in the news lately, since our southern states have been pummeled by many serious storms in the very recent past.

Big Storms = Huge Damage

The damage to both lives and property is almost beyond comprehension. The fierce winds of a hurricane can pick up large objects with ease, and throw them like you or I might toss a tennis ball. But the difference is, the objects carried about in devastating hurricane winds are often traveling at 120 to 175 miles per hour (mph).

Free & Fast Bids

CLICK HERE to get FREE & FAST BIDS from local contractors who can install hurricane window film to protect you and your home.

Flying Missiles

When small objects, like pieces of wood, rocks or sea shells, get transported toward glass widows or large patio doors, they can break them with relative ease. Imagine what happens when a mailbox or patio table is hurtling toward a window or door at 175 mph.

Not only will regular glass and even tempered glass shatter, but anyone behind the glass could also be seriously injured or possibly killed.

Lashing Rain Enters Hole

But that is not all that can happen. The torrential rains that are part of hurricanes can then be driven indoors once the windows and patio doors have been breached. The inside of a home can be seriously damaged as furnishings, fixtures and building materials get saturated by water.

Blow Roofs Off

The winds from the storm can also wreak havoc with homes once they are allowed inside. In the event windows are broken and the glass has fallen from the frame, the howling winds can pressurize the inside of the house, and in some cases, blow the roof off a home. If this happens, the walls of the house lose a critical means of support and they can blow down with ease.

Clear Film Protection

The fantastic hurricane window films can prevent all of this from happening. These passive protection products are crystal-clear sheets of high-strength plastic that adhere to the inside of window and patio-door glass.

If an object strikes the glass, the glass will, in all likelihood, break. But the destruction stops at that point. The durable window film keeps the glass in place and does not allow the glass to pop out of the frame.

The horizontal sheets of rain stay outdoors, and the winds are not allowed to blast the inside of the home.

Filter & Block UV and IR Light

Some hurricane window films also offer other cost-savings benefits. They can block massive amounts of ultraviolet light that send rugs, fabric upholstery and drapes to any early grave. The best hurricane window films also block tremendous amounts of direct solar radiation that tries to stream into windows on sunny days.

The light enters the house, but the heat stays outdoors. This lowers air-conditioning bills.

Films Are Less Than Shutters

When your parents start to do comparative shopping for window protection, they are going to be pleasantly surprised when it comes to cost. The hurricane window films are not nearly as costly as many of the hurricane shutters and other exterior products that cover over the windows to keep objects from breaking the glass.

CLICK HERE to get FREE & FAST BIDS from local contractors who can install hurricane window film to protect you and your home.

Many of these other protective products are thought, by some homeowners, to be unattractive. Some require work to secure them in place before the storm hits. Once a hurricane window film has been applied, the homeowner never has to do anything more to protect the windows before a hurricane arrives.

Film Is Not DIY

These films would be a smart choice for your own home, if you live in an area where you are worried about flying objects striking glass. But they are by no means a do-it-yourself project.

To achieve professional results, the hurricane window films must be installed by highly trained individuals. Anyone who tells you that the films are just peel-and-stick, is not telling you the entire story. Once you have been trained you might be able to get fantastic results, but I would suggest you simply have a professional installer take care of the job for you.

Special Wet-Anchor Caulk

A critical component of the hurricane window film is the wet-glaze anchoring system. These are highly-specialized caulks that bond the clear window film to the interior window sash frame. If this anchoring system is not used, the shattered glass can pop out of the frame along with the window film. If this happens, the rain and wind are allowed to damage the home.

The specialized caulks come in several different colors to match the interior look of just about any window, and any type of painted or stained wood trim one might find in a home. When installed by a professional, the anchoring systems look like a wide bead of caulk.

Do not call a hurricane window film company a week before a storm is expected to strike. Some of the window films and the wet-glaze anchoring caulks need a curing time of 30-90 days before they can offer full protection. Not only that, many of the installers have a significant backlog of work since the window films are so affordable.

CLICK HERE to get FREE & FAST BIDS from local contractors who can install hurricane window film to protect you and your home.

Column EM0031 - 624

Window Replacement

Window Replacement

Window replacement starts with taking out the old windows. PHOTO CREDIT: Kathy Carter

Window Replacement Project

DEAR TIM: I'm about to start a window-replacement project. My husband wants replacement vinyl windows because of the easy maintenance, but I'm not a big fan of those.

There seem to be many home-replacement windows, which is making it hard for me to decide which to install. What do you feel are the best replacement windows?

What should I know about how to replace windows? Laura B., Orlando, FL

DEAR LAURA: Window replacement is a huge industry.

Windows Steal Energy & Time

Not only do windows tend to be one of the largest energy thieves in the average home, but they also can be a time sink with respect to care and cleaning. New technology is available that can make you spend more time enjoying life than painting windows or caring for them.

It's easy to see why replacement vinyl windows are so popular. They never require painting, and with minimal care, they look like new for many years.

Many houses have white windows and trim, so a standard white-vinyl window replacement project can be completed with minimal work required to make the windows match the existing house. Installation costs can be kept to a minimum.

Free & Fast Bids

CLICK HERE to get FREE & FAST BIDS from local replacement window companies and contractors. Ask them about AAMA Gold Label windows.

Visit Local Lumberyard

Visit a local home show where businesses display their goods and services and you'll discover there are indeed many home-replacement windows. It's possible to get them in aluminum, wood, fiberglass and vinyl. What's more, you can get hybrid window replacements where different materials are used for the interior and exterior of your home. For example, you may want the warmth of wood for the inside of your home, but your husband desires vinyl outdoors. You can get those replacement windows with little effort.

AAMA Gold Label Are BEST

Regarding the best replacement windows, that question will most certainly cause lots of debate among replacement-window manufacturers. Years of my own research lead me to believe that windows that have been independently tested and certified are the best.

One of the top organizations that does this is the American Architectural Manufacturers Association (AAMA). They have a certification process where they test windows for air and water infiltration, structural integrity and how well windows resist forced entry by bad people.

A window-replacement manufacturer can have their windows tested to see if they meet these rigorous AAMA standards. If they do, they get to apply a special gold AAMA label to each window. This label tells you that the window is a top performer.

NFRC Next Step Down

You can also get windows that carry a different certification from the National Fennestration Rating Council (NFRC). This label tells you all about the energy characteristics of the window. The NFRC also tests for resistance to interior condensation.

The closer that number is to 100, the better job the window does at preventing condensation. In my personal opinion, the best replacement window you can get will have both labels on it.

Flashings & Water

When you or a pro gets ready to install replacement windows, there are certain things you should do. Water is one of the primary arch enemies of homes. Water leaks are common when installing replacement windows.

Pay attention to voids at the base of the window frame when the old window is removed. It may be a smart idea to fill any voids with caulk before the new window is installed. If the window frame happens to be wood, it's a great idea to paint any unsealed wood that was hidden by the old window.

CLICK HERE to get FREE & FAST BIDS from local replacement window companies and contractors. Ask them about AAMA Gold Label windows.

Expanding Foam Insulation

Air leaks that happen as part of a window-replacement job are very common. Both homeowners and rookie installers think that just caulking the exterior will stop air infiltration. This is not always true. Air can be moving through the wall cavity behind siding, brick and stucco in many instances.

This air can be stopped from coming indoors by installing an expanding foam sealant around the window after it's been installed. Be sure to use a foam that's rated for use around windows. You want one that will stay flexible.

Touch-n-Foam

This is a brand-name foam that's meant to be sprayed around the frames of windows and doors. CLICK THE IMAGE NOW TO BUY IT.

Expensive Caulk

Excellent caulking should also be on your replacement windows how-to checklist. Caulking needs to be installed where the window touches up against the window frame both outside and inside your home. The exterior caulking is a mission-critical component to prevent water leaks. Be sure to use an approved caulk that's mentioned in the written instructions that come with the replacement windows.

Home window replacement doesn't have to be stressful. The most important part is to take your time and do the necessary research. If you plan on being in the house for a long time, it really pays to buy the best replacement windows. Windows are a major component in a home, and it's one of the last places you should try to cut corners.

New Old Wood Window Kits

Wood replacement windows are available that will allow you to match the look and feel of an historic home that could be over 100-years old. These amazing kits allow you to do window replacement without removing the interior casing trim or the exterior trim. Once you get the hang of installing these, you can install a new wood window set in less than an hour start to finish.

Need to shrinking a window opening to accommodate your new replacement window! CLICK HERE to my Shrinking a Window Opening column.

CLICK HERE to get FREE & FAST BIDS from local replacement window companies and contractors. Ask them about AAMA Gold Label windows.

Related Column:

Window Glass Replacement

Column 761