Window Flashing Tape

Window Flashing Tape

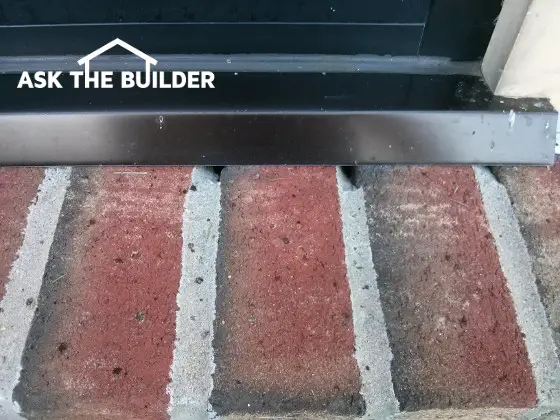
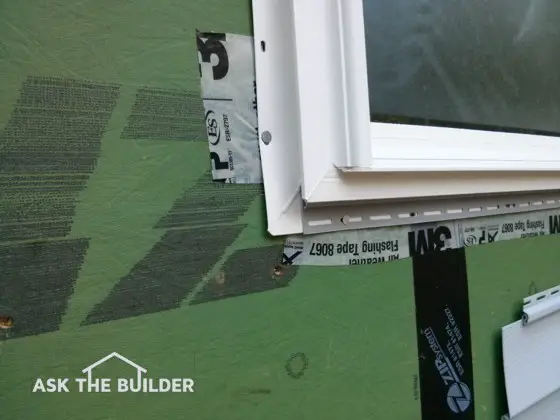
See the white tape that says Flashing Tape? It’s installed incorrectly. Copyright 2017 Tim Carter

Window Flashing Tape Installation

DEAR TIM: I've been a subscriber of your free newsletter for years and am finally building a new home. I decided to follow your advice and stop by the job site as often as possible and take photos.

The contractor just installed my windows and has started to install the vinyl siding. It appears to me that any water or air that might get behind the siding will flow inside my home because of gaps between the window nailing flange and the wall sheathing.

What's the proper way to install windows and doors so that water will not rot my house? Loreli S., Hanover, PA

DEAR LORELI: Congratulations on your new home adventure.

Dreams Do Come True

It's so exciting to build a new home and watch your dreams become reality. Unfortunately, some new home projects become nightmares because of poor plans, workmanship and/or a combination of both. Let's hope you're following much of my advice and you're on the right track.

Free & Fast Bids

CLICK HERE to get FREE & FAST BIDS from local contractors who know the right way to install window flashing tape.

Take Thousands Of Photos

Capturing the entire building process with hundreds and thousands of photos is one of the best things you can do. Better yet, try to shoot some video with you talking in the background explaining what you're taping.

Modern digital cameras and smart phones take stunning photos and video footage. Storing the images has never been cheaper as hard drives, flash drives, and other memory chips continue to fall in price. You can store all the images in the cloud on distant servers as well.

You may not realize what's in the photo because you're not a building expert. That's okay. If there's a problem at a later date, an expert can look through your photos and often discover what's causing the problem. I've been able to do successful long-distance autopsies on severe problems with houses because folks like you took the time to take great photos and videos.

Nailing Fin Gap

That was a good catch of you to notice the gap between the nailing flange of the window and the wall sheathing. I see that sort of mistake on many jobs. There should be no gap and there are any number of ways to insure that air and water never leak behind or around a window or a door.

Time Tests New Products - Some Fail

As time marches on there are always new products and methods that attempt to improve quality and efficiency in building. Go back over one hundred years and builders used tar paper to cover the exterior wood walls of homes to help prevent wood rot from water that might get behind siding or stucco.

They didn't have magic tape so some became quite creative in how they overlapped the tar paper over the windows and doors to create an effective waterproof barrier.
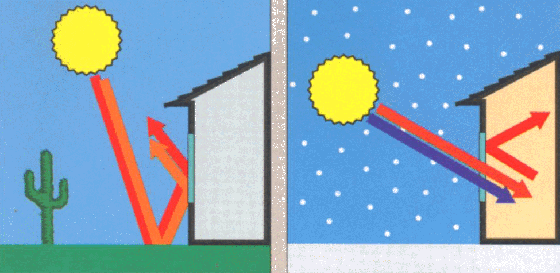
Gravity and Overlap

You need to treat the side walls of a house much like you do a roof. Stop and think how simple roofing materials work. Standard shingles create a waterproof barrier because each row of shingles overlaps the row below it. Mother Nature perfected this methodology on animals and birds long ago. Study the overlapping nature of the fur on dogs, cats and any other mammal as well as feathers on a bird and you'll see why they can be out in the rain and stay fairly dry.

Waterproof Sheathing

First and foremost, your exterior wall sheathing must be waterproofed. Some newer products come from the factory with a plastic coating that repels liquid water but allows water vapor to pass through it. If you use the special tape made for this sheathing to waterproof the seams, you've accomplished step one.

If you use traditional oriented strand board (OSB) with no coating, then you'll have to install some other air and water barrier over the OSB.

CLICK HERE to get FREE & FAST BIDS from local contractors who know the right way to install window flashing tape.

Nailing Fin Design

Almost all modern new windows and doors come with a nailing fin that's built into the window or door. These fins are part of a channel that collects and redirects water around the window or door. If you seal this fin correctly to the waterproof exterior surface covering the OSB, you can force any water or air that gets behind your siding down to the ground or stop it from infiltrating into your home.

Flashing Tape

The first step is to use a high-quality flashing tape. Read the instructions that come with the product. It's mission critical that these are applied to clean, dry and oil-free surfaces because you're counting on the bond of the tape to provide the long-term protection.

Since water is pulled down by gravity, you start installing the flashing tape on the bottom of the window or door. The first piece of flashing tape is applied across the bottom nailing fin and extends about 4 inches either side of the fins on the side of the window.

window tape

This is a bad photo, but it's a great tape. Why? Because the adhesive is butyl rubber. That's the BEST adhesive to have inside a wall. CLICK THE IMAGE NOW TO HAVE THIS DELIVERED TO YOUR HOME.

The next pieces of tape start at the bottom of the first piece of tape, go up the sides and extend past the top nailing fin four inches. The last piece of tape goes across the top nailing fin extending over the side pieces. I'm sure you can see how this tape mimics roofing shingles in the way it overlaps.

Each building system has a weak link. In the case of the flashing tapes, it's the adhesive. I've remodeled old houses that had felt paper behind the siding and although it was brittle it still repelled water. The system was still in perfect working order after decades.

Will the flashing tapes, hidden behind the house siding, still be adhering well in the next century? As Kenny Chesney said in his hit song, "Only time will tell, but it ain't talkin'."

CLICK HERE to get FREE & FAST BIDS from local contractors who know the right way to install window flashing tape.

Column 1109

Window Glass

Window Glass Low-E

DEAR TIM: We're buying new windows for our home. My husband and I are getting confused about all of the different glass options.

There are different types of Low E glass, heat films, and gasses that are used in windows. What type of glass is the best to buy and will save money on heating and cooling costs? Paulene D., Plant City, FL

DEAR PAULENE: Low E glass was introduced in 1979.

Low-E Reflects Heat

The E stands for emissivity. Low E glass works by reflecting heat back to its source. It does this by utilizing an ultra thin metallic coating on or in the glass.

Among other things, sunlight contains visible light, UV light, and infrared (IR) light. Visible light enables us to see things.

UV light damages your skin, wood, fabrics, and causes colors to fade. Infrared light is simply heat energy. Low E glass has the ability to allow visible light to pass while blocking and reflecting certain amounts of UV light and IR light.

Free & Fast BIDS

CLICK HERE to get FREE & FAST BIDS from local window companies that can give you great advice.

Window Glass

Low-E glass allows the direct warming rays of the sun to enter your home. But once that heat energy is absorbed by other things, starts to radiate from them and tries to get back through the glass, it bounces back towards its source.

The infrared light in sunlight is powerful. When it strikes an object it heats it up. These objects can be your tile floors, furniture, sidewalks, patio furniture, etc. As these objects cool off, they emit a low powered form of IR light. Low E glass reflects this lower form of heat energy. In the summer this helps to keep your house cooler, as the heat from objects outside is kept outside. In the winter, all objects in your home are heated by sunlight or your heating system. As this heat is radiated by the objects towards the windows it is reflected back into your house by the low E glass.

Best Glass? Get AAMA Gold Label Windows

Ask your window contractor about the AAMA Gold-Label window program. These windows have the best ratings and BEST GLASS.

Click here to read another column of mine about the AAMA Gold-Label program.

There are two types of low E glass: hard coat and soft coat. Tin is applied directly to the molten glass to make hard coat low E glass. Hard coat low E glass has one minor flaw. During summer months, it has a tendency to trap heat that can come into your windows. This can actually drive up room temperatures which in turn increases the amount of air conditioning you must use to cool your home. This flaw turns into a positive during winter months if you happen to live in a cold climate where lots of direct sunlight streams through your windows.

The soft coat process commonly involves the application of a thin layer of silver while the glass is in a vacuum. This coating is delicate. Soft coat low E glass is always sandwiched with another piece of glass. It can oxidize if exposed to air. Argon or krypton gas is often used to prevent this oxidation. These gases also act as an additional insulator and sound deadening material.

CLICK HERE to get FREE & FAST BIDS from local window companies that can give you great advice.

Soft coat low E glass performs much better during summer months. It does not trap heat inside your house as does hard coat low E glass. The soft coat low E glass actually performs slightly better than the hard coat low-E glass during winter months. Soft coat low-E glass is an absolute must if you live in a sunny, hot climate.

Some glass manufacturers have gone even further. They have suspended thin, low-E transparent films in between pieces of glass. This Low-E film has excellent performance characteristics. Some of these films can block 99.5 percent of UV light. It is a known fact that UV rays cause damage to carpets, furniture, wallpaper and window coverings. Some Low-E films boast an insulating value more than twice that of soft coat low-E glass. The heat films vastly increase the insulating properties of insulated glass. In fact, windows that contain the invisible heat films are among the most energy efficient you can buy.

The best heat films also do a great job of noise reduction. The films can absorb vibrations that try to travel through the glass. If you choose windows that contain these invisible heat films your utility costs are guaranteed to drop. The efficiency of the windows is simply that good. These invisible suspended films are on the cutting edge of window technology.

Heat produced by the sun can travel through glass. If you air condition your home, this extra, unwanted heat has a negative effect on your bank balance. Manufacturers and different window associations test windows for this summer heat gain. The results of the test produce a number called the Solar Heat Gain Coefficient (SHGC). Low SHGC numbers mean the window glass blocks lots of the solar energy that is trying to enter your house during hot summer days. Look for stickers on the windows and compare these SHGC numbers when you comparison shop.

CLICK HERE to get FREE & FAST BIDS from local window companies that can give you great advice.

Column 291

Window Condensation – Causes / Prevention

Window Glass Condensation - Causes / Prevention

Condensation is normal. When warm air that contains water vapor touches a cool surface, condensation happens.

The water in the air transforms into a liquid from the gas state. You should have paid attention in that high school physics class!

It's a visible example of thermodynamics. You can see the battle between cold things and warm things. Take a can of soda or beer. A room temperature can doesn't sweat. A cold can does. Until the cold can becomes warm, you will have condensation.

Free & Fast BIDS

CLICK HERE to get FREE & FAST BIDS from local replacement window companies if you're tired of your old wet windows.

Condensation occurs when warm, moist air comes into contact with a cold surface. As the temperature of the colder object gets colder, it takes less humidity in the air to produce condensation.

This is why you need to manually regulate your indoor humidifier during the winter. As the outside temperature drops you can mysteriously get frosted windows even though your humidifier is set at the same relative humidity.

Notice that you never get condensation on the inside of your house widows during the summer! Although I have been able to get my car windows to fog if I really crank the A/C down on a humid day.

Get AAMA Gold-Label Windows

If you're going to get new replacement windows, be sure to price out AAMA Gold-Label windows. They're the BEST ONES made.

Click here to read more about the AAMA Gold-Label program.

Prevention of Condensation

Once your new vinyl windows are installed, you can only stop condensation by watching your indoor humidity. The trace of a fog at the corner of a window is the signal that your indoor humidity is at the danger stage. There is very likely NOTHING wrong with your new windows.

If fogging persists, check for moisture sources. Do you have a crawl space? If so, does it have a high performance vapor barrier? Do you have lots of indoor plants? Do you have a high powered bath exhaust fan? Do you do lots of steamy cooking? How about an aquarium? The numbers on the humidistat are meaningless. Crank it down slightly once the fog develops.

CLICK HERE to get FREE & FAST BIDS from local replacement window companies if you're tired of your old wet windows.

Column B196

Repair Broken Double Pane Window Glass

Repairing a Broken Double Pane Window Glass

Rich Sinclair who lives in Hainesport, New Jersey emailed me asking the following question:

"Can you replace only one broken pane of a double pane window?"

The answer is simply: No

Double pane, or insulated glass, is made by taking two pieces of glass and separating them with a special spacer that has an adhesive on it. The space between the two panes of glass is filled with argon gas at the factory.

It's virtually impossible to peel off the broken glass from the seal spacer and then install a new piece of glass.

Free & Fast BIDS

CLICK HERE to get FREE & FAST BIDS from local glass companies that can make a NEW insulated glass panel for your window.

You ruin the spacer in the process.

You can't apply a new piece of glass to the special spacer.

CLICK HERE to get FREE & FAST BIDS from local glass companies that can make a NEW insulated glass panel for your window.

What is Smokey Film on Car Windshields and Windows

Smokey Film on Car Windows TIPS

You might think that smokey film on car glass comes from all the bacon and eggs you have in your house. Not true!

Vicki Mead, who resides in Jonesboro, Arkansas, asked me with a tinge of smoker's guilt this question:

"First of all:  I don't smoke, so that is not an issue.  But there is a film that develops on the INSIDE of the car window.

I live in the sunny south and when the sun strikes that film, it is blinding!  Do you have a solution for that? I don't think the ideas given in your window cleaning videos (which are great for outside windows) would be good for the inside of a car window."

Free & Fast Bids

CLICK HERE  to get FREE & FAST BIDS from local window cleaning companies - seriously - that can get your car windows perfectly CLEAN!

Here's my response to Vicki:

Vicki, maybe someone is borrowing your car and they're smoking. Just kidding!

The film you see is created by all the plastic that's inside your car.

When your car is out in the sun, the sun heats up the interior to 130-145F or so. This heat creates off-gassing of the plastic dashboard and all other components.

The plastic molecules get into the air and then settle on the glass surfaces.

It's easy to remove it with just a soap and water solution. I use any decent liquid dish soap and water.

It's important to wash the glass when it's cool and in the shade. I prefer to wash my truck glass in the morning when I know the glass is cool.

I wash it twice with soapy water made from Stain Solver and a regular liquid dish soap. Rinse out the sponge well in the soapy solution as you wash.

Stain Solver black background yellow scoop

Stain Solver is formulated to RAPIDLY CLEAN the smokey film on auto glass.  It's MADE in the USA with USA ingredients that are food-grade quality.

Then you need to rinse well with clear water. Rinse twice using fresh water each time.

Dry the glass with an old, but a decent, bath towel.

The glass will look like new. If you get streaks, that means you don't have all the plastic crap off the glass yet. Repeat the cleaning process.

IMPORTANT TIP:  NEVER get into your car if it's been sitting in the sun without opening both doors and allowing fresh outdoor air to replace the polluted air in the car. Inhaling that plastic could cause lung cancer or cause you to grow a tail, fins or something!!!!

CLICK HERE  to get FREE & FAST BIDS from local window cleaning companies - seriously - that can get your car windows perfectly CLEAN!

Replacing A Window Video

Replacing a Window

Before you start to take out an old window, be sure you have the correct new window ready to go. Double check the measurements to ensure it will fit. At the very least, have a piece of plywood or OSB to cover the opening in case something goes wrong.

1/2-Inch Gap

When a window is placed in a rough opening, it should sit level on the sill and there should be a 1/2-inch gap on the sides and top of the window frame. This gap is filled with a special expanding foam after the window has been fastened properly according to the written installation instructions.

Free & Fast BIDS

CLICK HERE to get FREE & FAST BIDS from local replacement window contractors. Be sure to ask about AAMA gold-label windows. They're the BEST.

AAMA Gold Label

Click here to read a past column I've written about the benefits of getting an AAMA-approved window.

Great Foam Sealant

After the window is installed, use this foam to stop air leaks around the new window.

Touch-n-Foam

This is a brand-name foam that's meant to be sprayed around the frames of windows and doors. CLICK THE IMAGE NOW TO BUY IT.

After removing that old window, you have to replace that opening with a new window. The new window with the glass in place will be very heavy. It is best to remove the windowpanes from the frame. This will make handling the frame a lot easier.

Take the frame and gently tilt it into place and stay the process of leveling and squaring it up. Using levels, get the frame level and plumb in the opening. Use shims to hold the frame in place. Put the window panes back in. This will help in squaring up the window frame. Once back in place, check along the bottom of the windows to be sure the reveal is the same. Now, start nailing the window in place.

Use 10 or 12 penny finish nails in the sides of the frame. Check the window manufacturer's recommendations for the number and placement of the nails. The next step is to place installation around the window frame and cover the outside with special tape to stop air infiltration. Replace the window trim and you are done.

Follow these steps, and take your time. The window replacement project will go quickly and easily.

CLICK HERE to get FREE & FAST BIDS from local replacement window contractors. Be sure to ask about AAMA gold-label windows. They're the BEST.

Condensation on New Windows

590 tim installing window on ladder

Installing new windows does not guarantee that your condensation problems will disappear. PHOTO CREDIT: Kathy Carter

Condensation on New Windows TIPS

  • New windows cause indoor humidity to go UP - SEE BELOW
  • AAMA gold-label windows are best and have least condensation
  • Trace cause of high indoor humidity - could be houseplants or cooking
  • Check humidity with high-quality hygrometer - see below link
  • CLICK HERE to Get Tim's FREE & FUNNY Newsletter!

DEAR TIM: I'm at my wits end. The new replacement windows in our home are fogging up and some have dripping water on the inside pane of glass.

I thought by buying new windows I would eliminate condensation forever. Are the windows defective?

What's happening and what, if anything, can be done to minimize the problem? Pamela S., Gatlinburg, TN

DEAR PAMELA: The condensation on your new windows is very unfortunate.

Multiple Moisture Sources

The source of the problem is not easy to trace and to make matters worse, there can be multiple things that are happening that can contribute to the problem. It's my opinion that you will solve the problem using old-fashioned detective work that employs the process of elimination.


Related Links

Window Condensation is Common

Simple Science of Condensation

Free & Fast BIDS

CLICK HERE to get FREE & FAST BIDS from local window replacement contractors. Ask about AAMA windows. See below.

Water Vapor + Cool Glass = Condensation

Let's start the investigation by reviewing what causes condensation on windows, in crawlspaces, on air conditioning ducts and even in attics. The air inside your home contains moisture. It is invisible water vapor, but it is there.

You and all of the people in your family contribute to this moisture each time you exhale. Try fogging a mirror with your breath and you will see what I mean.

condensation new windows

This is condensation that's turned to frost on new windows. It's a piece of high quality insulated glass in my man cave. The outdoor temperature was minus 6 F and there's NO humidifier in this building! The same frost on nails could be happening in my attic! Copyright 2018 Tim Carter

Sources of Water Vapor

Lots of other things around your home also contribute to the addition of water vapor in the air. Uncovered ground in crawlspaces, indoor plants, laundry hung out to dry, cooking activities, aquariums, humidifiers, etc. all add water vapor to the air.

Add to this the natural humidity that Mother Nature contributes to the air all around us and you can see that humidity is a very common thing.

Warm Air Holds More Water

The amount of humidity in the air can rise and fall depending upon the temperature of the air. Warm or hot air has the ability to hold much more water vapor than cool or cold air.

So the humidity in air is relative. Relative humidity is defined as the percentage of water vapor in a given amount of air at a given temperature.

Dew Point

When this percentage gets to 100 percent, the water vapor, a gas, changes from a gas to a liquid. Meteorologists refer to this complete saturation as the dew point.

Cool Glass

Water is forming on your new windows because one of several things is happening. The temperature of the inner glass surface is at or below the dew point for the amount of humidity in your inside air.

New Windows Cause Humidity To RISE

The humidity of your indoor air is quite possibly much higher now with your new windows because the air leaks around your old windows were eliminated once the new windows were installed. Cold, drier air that leaks into homes from the outdoors lowers the relative humidity indoors.

This is one reason people have static electricity problems in drafty homes during the winter months. Dry air makes it very easy for the static sparks to transfer from your hands to grounded objects.

CLICK HERE to get FREE & FAST BIDS from local window replacement contractors. Ask about AAMA windows. See below.

Test Humidity With Hygrometer

I suggest you purchase a decent hygrometer for under $50.00. This tool will allow you to get accurate readings of indoor humidity.

Start to take daily readings and then look around to see if you have things that add too much water to the air. Make sure crawlspace soil is covered with high-performance vapor retarders.

This is a fantastic high-quality hygrometer. It says Psychrometer on it, but that's the fancy name for hygrometer. CLICK THE IMAGE NOW TO HAVE THIS DELIVERED TO YOUR HOME.

Eliminate Humidity Sources

Minimize the number of indoor plants you might have. Run kitchen exhaust fans if you boil lots of water when you cook. If you have a vent-free fireplace, limit its use as it produces vast amounts of water vapor when it burns natural gas.

Be sure to operate bathroom exhaust fans during bathing activities and pipe this humid air directly to the outdoors.

Blow Air Across Windows

If you discover that your indoor humidity is not too high using your hygrometer, then you can minimize or eliminate the condensation by creating air movement around the windows. Just as blowing air dries say laundry things outdoors, air blowing over the interior glass will act just like the defroster does in your automobile.

Dangers Of Stopping Air Infiltration

Efforts to stop air leakage into homes can create all sorts of secondary effects. One of them is potential increases in indoor relative humidity levels. Indoor air pollution levels can also rise.

Tightly-constructed new homes or older homes where energy-savings measures are employed create situations where little fresh air enters a home to equalize humidity and freshness.

AAMA Windows Have Least Condensation

Not all windows are made to the same standards. Some new windows may use poor-quality parts and poor construction methods that allow the glass temperature of the inner pane of glass to be much cooler than a well-built window. The best windows are those that come with the AAMA Gold Label on the frame.

The cooler pane of glass will show condensation before a warmer pane of glass. This is why an empty drinking glass on a kitchen counter or a piece of glass in a picture frame has no condensation while a window two feet away is fogged up or dripping with water.

CLICK HERE to get FREE & FAST BIDS from local window replacement contractors. Ask about AAMA windows.

Column 590

Brick Window Sill Leaking

Brick Window Sill Leaking

Water will obviously pour into the holes in the mortar joints in this brick window sill. It will also seep through where the mortar touches the brick. Look below for the best brick mortar. Photo Credit: © Copyright 2020 Tim Carter

Brick Window Sill Leaking TIPS

  • Leak-proof brick sills are ones that have flashings under them
  • Hard to retrofit existing brick sills
  • Use thin bendable stainless steel for best flashings - SEE BELOW
  • Solvent-based silane siloxane sealer could help stop leaks
  • CLICK HERE to Get Tim's FREE & FUNNY Newsletter!

DEAR TIM: After noticing some bubbled paint inside my home under a few windows, I did an inspection of the outside of my home and discovered holes in the mortar of my brick window sills.

It’s obvious water is getting into the walls at these entry points. If I just caulk these will my water leak problem be solved?

I’m beginning to wonder if the brick sills were installed correctly for this to happen. What’s the best practice for installing brick and door windows sills so there’s no water leakage? Maria S., Parma Heights, OH

DEAR MARIA: I commend you on noticing the problem in your home and then taking action to determine what might be the cause. All too often people ignore warning signs about things happening to their homes that might eventually turn into serious problems.

Free & Fast BIDS

CLICK HERE to get FREE & FAST BIDS from local brick masons who specialize in tuckpointing brick sills and walls.

How Do You Build Sills That Don't Leak?

I’d like to start by saying it’s going to be impossible for me in this limited space to provide you with the step-by-step process to create leak-proof brick window and door sills. One could easily write a book about the topic. But I’ll provide you with plenty of information so you have a crystal-clear understanding of what’s involved.

Do All Brick Buildings Leak?

Let’s start by discussing the water-resistance of brick buildings. I often find that most homeowners and business people consider brick structures to be waterproof. The truth is water enters into brick walls with relative ease.

In your case, with the holes in the mortar, it’s quite obvious water will pour into the cavity behind the brick.

Is Brick Veneer The Worst Leaker?

Yes, a brick veneer building is the worst leaker if not built correctly. Many modern brick homes and some commercial buildings are constructed with a brick veneer. This means the brick is just one wythe thick. The brick is just a facade and not offering any structural support whatsoever.

Older brick homes and multi-family structures you might find in just about any older city or town were often two, or even three, wythes thick. These thicker walls were not only structural in nature, they were designed to be highly water resistant.

Where Does the Water Leak?

While the brick itself is very resistant to water passing through it, and to a degree the mortar between the brick, the interface where the mortar touches up against the brick provides a pathway for water to enter into a brick wall. You can’t see this crack because it’s often very small, but it exists.

Why Don't Old Brick Buildings Leak?

Years ago, builders and brick masons observed what was happening and they used different brick in an exterior wall to help stop water from getting inside the structure. The brick that you’d see on the outside of the building was harder and denser than the brick hidden inside the walls.

This softer brick acted like a sponge to absorb water during a rainstorm. After the storm passed, it the water would be sucked from the inner brick by wind and sunlight that washed over the exterior brick facing.

Why Is Brick Veneer Bad?

Brick veneer buildings lack this soft inner brick and the water can flow down the back of the single layer of brick. If the structural wood-frame walls are not covered with a waterproof membrane, or this membrane has a leak in it, then water can get into the wall. This can cause wood rot, mold, mildew and bubbling paint as you know all about.

CLICK HERE to get FREE & FAST BIDS from local brick masons who specialize in tuckpointing brick sills and walls.

What is the Best Silane Siloxane Sealer?

You may be able to stop brick sill leaks by ensuring all cracks and holes are filled. Then you can apply multiple coats of the below solvent-based silane / siloxane sealer. Read the instructions to ensure you're doing the job right.

silane - siloxane water repellent

This is a magnificent silane - siloxane water repellent that soaks into concrete. CLICK THIS IMAGE NOW TO ORDER IT.

What are the Best Practices Flashings?

The best practices published by the Brick Industry Association call for flashings under window and door sills. These flashings collect the water that leaks through the mortar joints and redirects it to the outside of the wall.

stainless steel flashings

This is a fantastic stainless steel flashing you can mold yourself to fit any brick sill opening. CLICK THE IMAGE NOW TO ORDER THIS AMAZING NO-RUST PRODUCT.

Base flashings are also required under the first course of brick as well as at other locations on brick veneer walls. NEVER use aluminum for flashing with brick. The alkali chemicals in the brick and mortar will cause the aluminum to corrode over time.

It's better to use stainless steel as it will never corrode in most locations. The only place you need special stainless steel is brick that's exposed to direct salt spray or salt fog near the ocean or a sea.

Water Channel Products

Other materials are often placed behind the brick veneer to ensure that wet mortar falling behind the brick doesn’t block the flashings and any weep holes at the base of the brick walls. These weep holes are installed on purposes and allow the water to flow out of the wall.

It requires a significant amount of skill and attention to detail to do all the things needed to ensure a brick veneer wall does not leak.

Should I Caulk Holes?

I’d not caulk the holes. I’d fill the holes with mortar that matches what you have. To match mortar, you need to get sand that matches the sand the original bricklayer used.

Look closely at the mortar joints paying attention to the size and color of the individual grains of sand. Realize when you mix up the new mortar the cement paste in the mortar mix will coat all the sand making the color of the mortar all the same shade.

Over time, natural weathering washes away the thin mortar film revealing the sand. If you wait thirty days, you can do a mild acid wash of the new mortar patches so you see the sand without having to wait decades.

Apply the acid/water solution very carefully to just the new mortar using a small brush. You’ll see the acid start to bubble as it reacts with the alkaline mortar paste. Rinse well with clear water.

What is the Best Mortar?

If you ever build a brick veneer home again, you can help minimize water leaking into the wall cavity by using the same mortar masons used well over a hundred years ago. Modern mortars have a high Portland cement content. Old mortars had minor amounts of Portland cement and much more hydrated lime.

The best mix for a lime mortar is to blend 8 parts hydrated lime with 2 parts of fine volcanic sand that has a high silica content. Light-colored volcanic ash usually has a high silica content. You then add this blend to the normal amount of sand you'd use to create traditional mortar.

Hydrated lime is a magical ingredient because if a small tiny crack develops after the brick is installed, water reacting with the lime causes new microscopic crystals to grow filling the crack in many cases. I urge you to find a mason that’s familiar with hydrated lime mortars.

hydrated lime

This is excellent hydrated lime. It's a fine white powder and it's going to look great on your home. CLICK THE IMAGE TO ORDER SOME RIGHT NOW.

CLICK HERE to get FREE & FAST BIDS from local brick masons who specialize in tuckpointing brick sills and walls.

Column 1165


Remove An Old Window Video

Remove An Old Window

Not all windows are easy to remove. Perhaps the hardest ones are old steel casement windows set in a masonry wall.

These steel windows have fins that fit in a groove between the layers of brick and block. You need to cut the bottom and top of the window frame with a sawzall, pry up the frame, continue to cut the fin and then try to pry the window out of the opening.

Wood Windows Easier

Removing a wood window is far easier. Watch the video to see how easy it is.

Free & Fast BIDS

CLICK HERE to get FREE & FAST BIDS from local replacement window contractors.

Thinking about replacing the windows in your house? Is it a tough project? Well... It can and it can't be. You have to be sure you have everything ready so you can do the job right away.

First step is to remove the old window from the house. On a wood house, you start by removing the wood trim on the outside of the house. Use a wide pry bar to gently pry off the wood trim. Once the outside trim has been removed, go inside the house and remove all the trim inside.

Next, take a sawzall with a metal cutting blade and place it between the wall studs and the window frame. Use the saw to cut the nails holding the window frame in place. After all the nails have been cut, remove the window sashes from the frame. Use the sawzall to cut the bottom of the window sill. This will allow you to pull the frame out of the window opening.

Now that the old window has been removed, it is time to install the new window. You did order the new window?

CLICK HERE to get FREE & FAST BIDS from local replacement window contractors.

Patio Pavers

Patio Pavers

This is a patio at my last home that was built with traditional clay brick pavers. They could have been set in sand, but laying them in mortar creates a traditional look and feel. You can see how my wife has continued the tradition of potted flowers on the edges of the patio. She knows my favorite ones are the small red flowers. Copyright 2017 Tim Carter

Patio Pavers TIPS

  • Concrete paving brick will fade in time looking ugly
  • Clay paving brick have solid color through and through
  • Set brick on concrete or a sand/cement blend base - SEE BELOW
  • Mortaring brick to concrete is hard work but gorgeous
  • CLICK HERE to Get Tim's FREE & FUNNY Newsletter!

DEAR TIM: I've decided to use patio pavers to build a nice outdoor space. Installing patio pavers seems easy enough.

I don't want to make a mistake, so can you tell me how to install patio pavers? What method would you use?

What should I be concerned about if I want a patio that looks good and is as maintenance free as possible? Kay H., Rochester, NY

DEAR KAY: Just before I was married, I got my first taste of patios made with paver brick.

Future Mother-In-Law Project

My future mother-in-law wanted a red-brick patio and discovered some used paving brick for the job. I installed them using some common sense and lots of luck and sweat. The full-sized brick were set on a compacted base of dry sand mixed with cement. Believe it or not, that patio looks like the day I finished it, and that was decades ago!

I built this patio in 1973 a year before I got married. We had our wedding reception at the house and many sat on this patio. The photos below were taken in September of 2016 when I visited the house to help close out the estate of my in-laws. You can see the patio is still in fantastic condition considering the simple base of coarse sand and Portland cement.

wide shot of patio with Patio Pavers

This is a wide shot of the patio. My mother-in-law at the time didn't want all the brick to be perfectly flat. She wanted a weathered look as if the patio had been down for a hundred years. When she was alive and had her potted flowers around it, it was gorgeous. Copyright 2017 Tim Carter RIP Mary Jane!

close-up shot of the paving brick

This is a close-up shot of the paving brick made with clay. These were salvaged from some other job and I chipped off the excess mortar from all of them. My mother-in-law used to sit on this patio each spring, summer and fall morning in good weather drinking her steaming hot coffee. Copyright 2017 Tim Carter RIP Mary Jane

Free & Fast BIDS

CLICK HERE to get FREE & FAST BIDS from local patio contractors.

Concrete Patio Brick - Not The Same

Since then, the concrete industry got involved in the patio business. I distinctly remember when colored concrete interlocking paving brick became the belle of the ball.

They were the rage, and are still quite popular. But I feel the mortarless concrete products do not have the character of a real paving brick made from clay. When you go the next step and add mortar in between red-clay paving brick, you really have a classic look. Refer to the picture at the top of this column.

Concrete Brick Patio Video

Here's a video I taped back in 2009 with a horrible Flip video camera. The camera is moving too much and it's hard on your eyes. But you can see a version of concrete paving brick and how it might fade over time.

Onions and Watermelons

What's more, you can't really compare traditional clay brick with the newer colored concrete interlocking pavers. The concrete brick start to lose their color as the colored cement paste begins to wear off the surface of the brick revealing the sand and gravel in the brick.

To me, traditional clay brick reminds me of watermelon because it's red through to the core. If you chip a traditional clay brick, the color is the same. I don't want my patio brick to change color over time.

Traditional Brick Requires Skill

But constructing a brick patio in such a way as to create a traditional look takes skill and lots of time. I know, as my wife had me do this on our two patios as well as our front sidewalk at two different homes!

First Attempt - Big #FAIL

The first time I did a paving-brick job at my own home, I tried a new method of setting the brick in sand. It was a dismal failure.

Weeds grew in between the brick and each time it rained, the water would bring sand up to the surface from between the small cracks. This sand got tracked inside our home making a mess of things. When the moles showed up and pushed up the brick, that was the final straw.

Redo

I tore up that sidewalk and taught myself how to install patio pavers over concrete. The sidewalk and patio I did at my second home are still in fantastic shape today, and get all sorts of compliments from the present owners as well as the neighbors.

Field Trip - Look At Patios

My suggestion to you is to talk with friends and go see if you can visit different patios that have been down for twenty or more years. See what they look like after Mother Nature has had her way.

As I said above,  I don't like about the colored concrete paver patios because the brick change color.

The pigmented cement paste does wear off the sand and gravel in the concrete, and when this happens the color appears to fade. This color change is actually caused by you seeing the true color of the aggregate in the concrete.

CLICK HERE to get FREE & FAST BIDS from local patio contractors.

Fade-Free Clay

This is but one reason why I prefer traditional clay-brick pavers. The color never fades, as the clay is the same color through the entire brick. When you purchase paver brick that have been fired to resist weather, the color is locked in and does not change.

The clay in the brick actually becomes like rock, and weather and oxidation seem to have no effect on the appearance of the brick.

Mortar Brick to Concrete

To achieve a traditional look for your patio that will not produce loose sand and is mole-proof, you mortar the brick to a concrete slab. This process is time consuming and expensive, but it produces a stunning look that can last decades with no maintenance other than an annual cleaning to remove dirt and any algae.

Look At Old Patios

The key thing to remember is that all new patios look really good once they are complete. But I feel you should think about what will it look like in 10, 15 and even 25 years.

Why not invest in a patio surface that will have a rich and traditional appeal and be one that requires virtually no work once it is installed? That is what I have at my home and you could never convince me to install anything other than traditional clay paving brick.

Hard & Heavy Work

Installing any hard patio surface will be lots of hard work. There are new tiny excavating machines that allow you to dig with ease. Be sure to visit a tool rental store to see what kind of machinery will allow you to do the work with a minimum of effort.

Concrete With Steel Rods

If you decide to pour a concrete slab that will serve as the foundation for your patio, be sure the concrete is at least 4-inches thick and has steel rods in it. The steel minimizes cracks and holds the concrete together in one giant piece.

The half-inch-diameter steel rods need to be in the center of the concrete and spaced at 2-foot on center both directions. The steel mat should resemble an empty crossword puzzle.

Slope For Drainage

Be sure to slope the patio away from your house. The slope should be about one-eighth inch per foot. This slight slope will give the appearance that the patio is level, but is enough that water readily will flow out into the yard.

Plan For Utilities

Before you pour the concrete, think about installing any underground utilities. Now is the time to run conduit or new downspout drain lines.

CLICK HERE to get FREE & FAST BIDS from local patio contractors.

Column 727