March 19, 2017 AsktheBuilder Newsletter

If you're a new subscriber in the past week or so, this is a slightly different newsletter, so hang in there. This issue is dedicated to two things that are near and dear to many seasoned subscribers, so that's why it's slightly quirky.

Welcome by the way!

Providence RI Meet Up?

In just five days, I'm making a one-day trip from central New Hampshire down to Providence, Rhode Island. I'll be there just about 12 hours this coming Friday, March 24, 2017.

I'm attending the JLC Live trade show. I'm going there to scout new building products and tools to share with you.

CLICK HERE to see a list of all the exhibitors.

When I travel, I try to carve out some time to get to meet you. We can have a meet up at the convention center lobby in downtown where the show is or have it within a block or two at some quieter place such as a sit-down coffee shop.

I'm thinking we could hang out after 5 p.m. because it doesn't make sense for me to try to battle rush-hour traffic going back up to New Hampshire.

I might as well sit with you than sit alone in the dark in my Volvo V 70-XC in the 1-95 parking lot south of Waltham, MA or in between Lowell, MA and Nashua, NH.

If you're interested in hanging out to chit chat, REPLY to this message and change the subject line to: Providence Meet Up.

I'll then get in touch with you about the exact time and place.

Spring Stain Solver Sale

The first day of spring is officially tomorrow, March 20, 2017. It starts at 12:30 a.m.

If you're a new subscriber this means that it's time for the Stain Solver Spring Sale!

What is Stain Solver?

It's a magical certified organic oxygen bleach my wife, Kathy, and I have been making and selling since 1996.

On Monday, the factory begins packaging a FRESH NEW batch for you. Twenty-thousand pounds of the powder has already been blended.

Tomorrow, they start to put it in the different sized containers.

I don't want to have the sale start until they make all the new sizes so you won't get the secret discount PROMO CODE for a few more days.

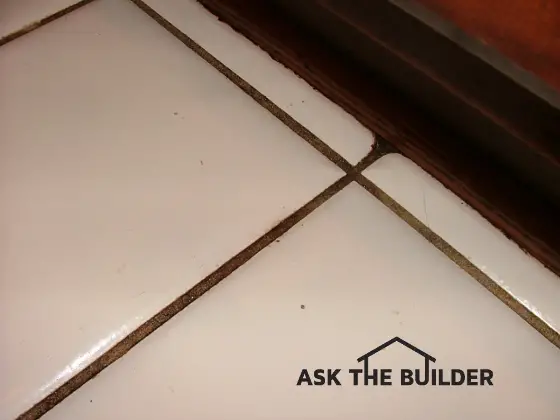
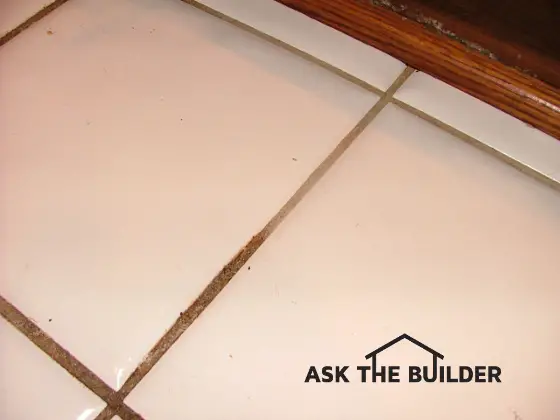
If you've never tried Stain Solver, this is your time. I wanted to share some of my FAVORITE Before and After photos sent in by customers just like you.

I don't need to try to sell you. Your fellow customers will do it for me with their photos.

Stain Solver cleans just about ANYTHING.

If it's water washable, then Stain Solver will clean it. The only things you shouldn't use it on are new redwood, and natural wool or silk that's never been dyed.

But everything else is fair game!

Click the following links to see how well Stain Solver performed:

Muddy White T-Shirt Restored to NEW!

Dark Cedar Siding Now RESTORED!

Stunning Before / After Wood Deck Cleaning

Blackberry Stained T-Shirt - Unbelievable

SCORCHED Coffee Roaster Bin - CLICK HERE FOR SURE

Outdoor Textured Ceramic Tile STUNNING CHANGE

RED WINE on WHITE PANTS - No Problem!

Remove Roof, Deck, Patio, Siding Algae

My ALL TIME FAVORITE BEFORE AND AFTER PHOTO

Drum Roll Please.........

Baseball Hat Transformation - You'll NOT BELIEVE THIS

Here's my recommendation:

If you've NOT YET TRIED Stain Solver, perhaps start with one of our small sample sizes.

I can SHIP THE SAMPLE SIZE IMMEDIATELY - like tomorrow morning.

It comes in an 8-ounce jar and has enough powder to mix 2 gallons of solution for indoor jobs and 1 gallon for an outdoor test.

The price of this sample size, including FREE SHIPPING to any US town or territory - yes, it ships to Guam or the Virgin Islands!!!! - is just $9.97.

CLICK HERE now to order this small sample size TODAY. It's the top radio button in the upper right corner. CLICK that button.

Roofing Ripoff Book COMPLETE!

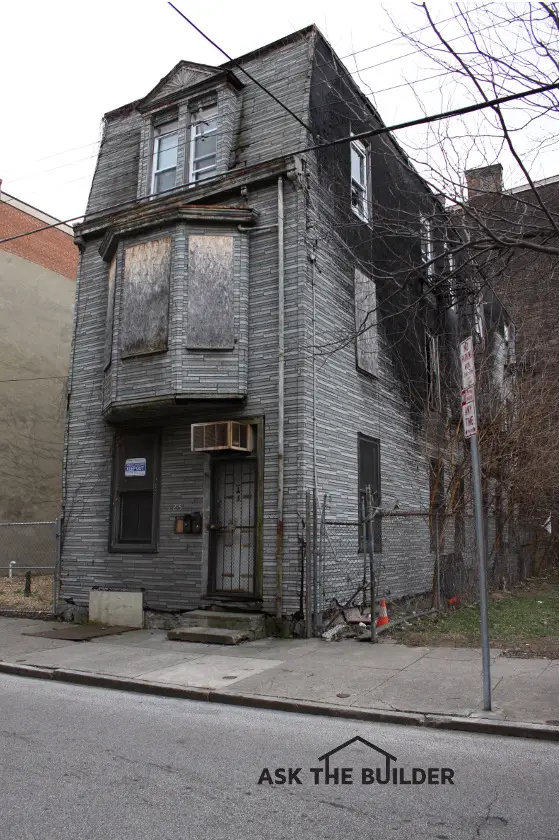
I've been working for over a year on a special expose' book that discloses why your asphalt shingles are falling apart.

Years ago, asphalt shingles would last 25 or 30 years before they started to look shabby. Now many people are seeing degradation after just 5 or 7 years.

It happened to me!!!! I had an asphalt shingle roof with a 30-year warranty and after 15 years it looked like it was 50 years old.

I finished the book yesterday. Currently, it's been looked at by a professional proofreader for grammar and typos.

I expect you'll be able to get an electronic PDF version by the end of this coming week. I'll possibly have the Kindle version available a few days after that.

The final formatting for the paperback version is going to take just a little longer, so if you want a paperback copy, you'll get it last.

I'll be releasing FREE sample chapters for you within days. I can't do that until I'm sure the book has no tiny flaws in it.

Here's the great news.

In the book, I share the product I discovered that will allow you to get your asphalt shingle roof to last 30, 40 or who-knows-how long!!!!

That's what caused the delay in the book. I was trying to get this discovery of mine patented. You'll read all about it in the book.

I'm going to tape a video for you about the book tomorrow or Tuesday. When you see the video, I think you'll go nuts.

The book is not terribly long, perhaps it will take you just an hour to read.

It's loaded with some great photographs and I believe when you see them and read what's going on, you're going to be none too happy.

If you happen to work for a US Congressman or Senator, you may even be contacting me. This is serious business and millions of USA, and Canadian, homeowners are suffering financial hardship because shingles are falling apart TOO FAST.

I've appeared and testified in front of Congress three times over the past eleven years and am prepared to do it now on your behalf.

Do you remember how Ralph Nader took on the US auto industry back in 1965? Who knows, maybe I'll get into the spotlight like he did.

Watch this video ..... CLICK HERE.

If you work for any news outlet (local/national TV and radio, newspapers, magazines, etc.) that covers consumer news, you may want to start to get in touch with me.

I can tell you the US Asphalt Roofing industry thinks I'm public enemy Numero Uno right now. You'll see why within 30 minutes of reading the book.

LATEST REVISED COLUMNS

If you're a new subscriber, you're unaware of a huge project I've started.

I'm revising just about every page of content at AsktheBuilder.com. It's going to take many months.

Here's the EASY way to see all the revised columns.

Just go to the Q & A section of my website and start moving down the list. As each column gets revised, it gets put at the TOP of that list.

CLICK HERE to get to the Q & A category.

You can always identify a revised column because it will have a bullet-point list at the top of the TOP POINTS in the column.

CLICK HERE to see an example of a revised column with the bullet-point list.

Okay, that's enough for today.

You'll be hearing from me this week about the book and the Stain Solver promo code.

You'll have to act FAST on the Stain Solver because there's only a LIMITED AMOUNT that's being made.

You may feel 20,000 pounds is a lot, well not when just 2,000 orders come in.

We could sell out of smaller sizes in just a few days.

Tim Carter
Founder - www.AsktheBuilder.com

Do It Right, Not Over!

Roof Popping Noise

Roof Popping Noise TIPS

  • Roof popping in the wind is flexing the rafters or trusses
  • Popping in the morning and evening is thermal expansion
  • Diagonal braces almost always stop the noise
  • Residential structural engineer is the pro to get for a consult
  • CLICK HERE to Get Tim's FREE & FUNNY Newsletter!

DEAR TIM: I need your opinion about my roof. I’m afraid it’s going to collapse because when the wind blows it makes a scary popping noise.

When the wind gusts, it actually sounds like the roof could rip off the house. I’ve also noticed similar noises on calm days in the morning and later in the day after the sun goes down.

Should I be concerned? Is there someone I can call to get a professional opinion so I can sleep on windy nights? Billie A. Lawton, OK

DEAR BILLIE: I believe that I can give you some comfort right away.

Roof Framing Needs To Be Substantial

Based on the photos you sent, it appears your roof framing is quite substantial. The only way for me to have full confidence would be for me to be in your attic and inspect all the locations where one piece of lumber is connected to another.

Fortunately, it appears it’s pretty easy to get around up in your attic because it’s a steeper roof and it was common framed instead of using prefabricated trusses.

Roof Popping Noise

This roof framing looks normal but it makes noise when the wind blows. ©2017 Tim Carter

Common Complaint

Your complaint is fairly common and it reminds me of a house I looked at here in New Hampshire not too long ago. The wife complained about the same issues you’re having but the popping noises happened each sunny day in the morning. All would then be quiet until after the sun went down.

Wind Pressure Enormous

The wind pressure against a roof, or entire home, can be enormous. You can demonstrate this to yourself quite easily by trying to carry something large and flat on a windy day. Years ago as a young builder, I almost got blown off a roof while trying to carry a sheet of 4 x 8 plywood. A sudden wind gust knocked me down and the plywood sheet went sailing out of my hands off the roof. Luckily no one was hurt except for the plywood.

Gable Roof Ends = Giant Sails

I can see from your photo (above) that you’ve got a standard gable roof where at least one end of your home has a flat gable wall that takes the full brunt force of the wind. Imagine the pounds of pressure against the entire side wall when a strong wind hits it. The entire roof system, if not solidly braced, can and will flex to absorb this force. This flexing is what’s causing the popping noise.

CLICK HERE to get FREE & FAST BIDS from local rough carpenters who can install the bracing in your roof.

Solar Expansion & Contraction

As for the popping noise in the morning and evening, that’s a different mechanism. It’s thermal expansion and contraction. The sun hits your roof and heats it up. As the lumber expands, it moves and it will rub against other pieces of wood that aren’t moving at the same rate. This movement creates the popping noise. When the wood cools down after sunset the same thing happens in reverse.

Diagonal Bracing

I’ve stopped these noises from happening in homes by adding diagonal bracing to the roof rafters or trusses. It’s best if you can incorporate 2 x 6 material and use large timber screws instead of nails. You want to place at least two 4-inch-long timber screws through the 2 x 6 where it passes over the underside of the roof rafter or truss.

Simpson Strong-Tie Timber screw

This is a Simpson Strong-Tie Timber screw. I've used them on my own home. CLICK THE IMAGE NOW TO ORDER THEM.

The diagonal bracing transfers the concentrated wind load to other parts of the structure all at once and this helps dampen the movement.

It’s best to place the diagonal braces so they run different directions creating the letter V or W on the underside of the rafters. You want to start as low as possible near where the rafters cross over the bearing exterior walls and run the wood up as high as possible to the roof ridge.

You can see the two diagonal braces on the underside of the deck floor joists. Both extend to the outer beam on the left and the ledger board hidden by the white rain gutter. The brownish-orange troughs are Trex Rain-Escape keeping the lower deck dry each time it rains. (C) Copyright 2017 Tim Carter

Rigid Box

The diagonal bracing creates an extremely rigid box so the roof framing lumber moves as one giant unit instead of each piece of lumber moving on its own. You may have great success just installing one set of diagonal bracing on each side of the roof. I’d do that before I’d put it across all the rafters.

Call In A Pro

If you want to get a professional opinion before you start any of this work, you need to call in a residential structural engineer. These skilled pros are well versed in wind loads and how to resist them. It’s a core part of their training.

CLICK HERE NOW to get FREE & FAST BIDS from local structural engineers.

I prefer to work with engineers that specialize in residential work because they‘re in touch with the best practices and the nuances of wood framing. Many other structural engineers work primarily with structural steel and concrete and may not give you the absolute best advice to get excellent results for the lowest investment of time and money.

Be sure you have the engineer look at the connection of the roof rafters where they sit upon the exterior load-bearing walls. If your roof ever wants to detach from the house, this is where it’s going to happen.

The engineer may recommend you install simple metal connectors. Be sure to use the approved structural screws that are made especially for these connectors. Screws may cost a little more, but they hold so much better than a nail.

If you use a cordless impact driver, you’ll have no issues installing the screws. I had to do this same thing to stabilize my outdoor deck. The person who built my deck before i moved into my home did a horrible job and there were no structural connectors at all. The impact driver did a superb job and saved me lots of time, money and my wrist!

CLICK HERE NOW to get FREE & FAST BIDS from local structural engineers.

Column 1187

March 12, 2017 AsktheBuilder Newsletter

If you're a new, or newer, subscriber I want to welcome you!

This is going to be a slightly unusual newsletter because I've been absent for about two weeks.

Here's why.

Trip to Cincinnati, OH

Two weeks ago, I was packing and making last-minute preparations to drive to Cincinnati, OH, tugging my enclosed trailer behind my Ford F-250 Super Duty truck.

The trip was multi-purpose with the primary focus helping liquidate my in-laws estate. My truck and trailer was packed to the gills on the return trip bringing back some furniture and other heirloom items that used to belong to my mother and father-in-law.

I was also there on business that's directly related to you.

The Tornado

The first night I arrived, there was a huge cold-weather front passing through the Midwest. It spawned a small tornado as dawn was breaking. The twister churned and skipped across the ground just one-half mile from where I was asleep.

It passed just 500 feet from the brother of the person I was staying with. Many were fortunate and no one was injured.

The weather in Cincinnati went from balmy to bitter. I thought I was in New Hampshire as it was cold, rainy and windy for quite a few days.

The Old Building

I spent quite a bit of time with a close friend Nick Motz and his darling wife Mary Beth Wilker. Kathy and I attended their wedding years ago as I've known Nick since he was in high school.

Nick's an accomplished real estate broker and contractor. He's a key player in the revitalization of the East End along Riverside Drive.

Two days after arriving, he and I went on an adventure to the booming Over the Rhine district north of the core of downtown Cincinnati.

As we were driving around looking at all the progress, I spotted a building.

It wasn't just any old building.

"Nick, turn around. I need to get a photo of that building."

Within minutes, he went around the block and parked. I got out and started shooting with my Canon EOS 50D.

©2017 Tim Carter

You can see where the building next door had caught on fire and scorched the side of this relic.

But I didn't care so much about that. I was keenly interested on the outer covering of this row house.

It was covered with Inselbric and it was in fantastic condition.

When I say fantastic condition, I mean as if it was just installed last month.

But it wasn't installed last month.

There's a very good chance it was installed eight years before the Japanese bombed Pearl Harbor.

Look at the original trademark filing information below. Yes, that's October 15, 1931.


The above photo is a close up of the material.

What does it resemble to you? Can you see the different colored granules?

Did you guess asphalt shingles? Good for you.

Inselbric was made using the same materials as what's probably up on your own roof.

My Roofing Ripoff Book

I've been on a quest for the past year to get my hands on some of this material because it plays a key part in my Roofing Ripoff book that's now just days away from being ready for you.

Twenty-one months ago, my own asphalt shingle roof was falling apart in front of my eyes.

My fifteen-year-old shingles that had a thirty-year warranty looked like they were fifty years old. They were delaminating and bare wood was exposed to the weather.

For the record, I didn't build or install the first roof on the house I live in here in central New Hampshire.

You may be wondering, "Tim, what in the world does Inselbric have to do with your old roof?"

Everything.

How is it that the Inselbric siding can look so good after being exposed to the elements for over eighty years and my asphalt shingles couldn't last ten years before they started to curl and loose granules faster than gravel tumbling from a dump truck?

Cracked the Code

I decided to find out why my asphalt shingles, and those of just about everyone else in the USA, were falling apart at such an alarming rate.

Not only did I expose what's going on in my upcoming book, I did one better.

I was the first person in the world to discover something very very simple you can do to make your asphalt roof last for decades and decades.

It's Just About Ready

Here's the cover for the book. If all goes well, you'll be reading an electronic version in just fourteen days or less.

Have you noticed that your own asphalt shingles are loosing granules?

Are your shingles starting to curl just a few years after they've been installed?

Then you'll want to read this book for sure.

Watch upcoming issues of this newsletter for the announcement when you can purchase a PDF version or one you can read on your Kindle.

I guarantee you'll be shocked at what I discovered.

New Revised Columns For You

While I was in Cincinnati, I was able to revise some of my old columns. I don't think any of the following are repeats that I've shared two weeks ago.

Remember, the columns contain:

  • New content
  • Videos when available
  • Great product links
  • Enlarged photos
  • Links to contractors in your town you can hire

I'd scan all these just to see what's in them:

How to Dissolve PVC Glue

Truss Uplift and Ceiling Cracks

Cracked Treated Wood

Remove Grout From Ceramic Tile

GREAT Outdoor Wood Furniture Sealer

How to CLEAN GROUT

Hardwood Floor Installation

Okay, that's enough for today. I need to put the final touches on the Roofing Ripoff book. I'll be very busy this week.

Tim Carter
Founder - www.AsktheBuilder.com

Do It Right, Not Over!

Dissolve PVC Glue

Dissolve PVC Glue TIPS

Roger Hull is working in a tight spot trying to dissolve some PVC glue. He's in Denham Springs, Louisiana. Here's what he asked me:

"I'm in a tight spot between floor joists. I'm trying to take apart some 4" PVC. Is there anything that will help dissolve the PVC cement?"

It's Permanent

Here's my answer:

Roger, I've been a master plumber since 1980. PVC pipe and fittings was really starting to take off and become widespread about that time.

Tight Joints

The chemistry of PVC primer and the glue or cement is such that it attempts to create both a chemical and mechanical bond between the two pieces of PVC. When you apply primer to the PVC surfaces, it softens the hard plastic at the surface.

CLICK HERE to get FREE & FAST BIDS from local plumbers who can get you out of trouble.

PVC Glue

This is a can of standard PVC primer. It has the consistency of water. PVC cement or glue is like warm maple syrup. CLICK THE IMAGE NOW TO HAVE THIS PVC PRIMER AND GLUE DELIVERED TO YOUR HOME.

As soon as you apply the PVC cement or glue, the softened molecules of the PVC then interlock with one another with the slightly melted PVC on the pipe and fitting.

It's very similar to how two pieces of steel join once they're melted and welded together. But be aware the contact zone where the pipe touches the fitting surface is not as strong as the actual pipe itself.

PVC Videos

Watch these two videos to get an idea of how PVC works and why it's so hard to get the pipe and fittings apart once glued.


No Magic Liquid

I'm not aware of any liquid that will dissolve the cement that makes up a PVC joint. What's more, I can't even imagine how you'd get it into that tight space between the pipe and the fitting.

Not A Real Weld

You'll hear the term that the PVC will weld to each other, but don't confuse that with welding steel where the weld is often stronger than the individual pieces of steel.

In the case of PVC, the bond is pretty strong, but it's able to be defeated with heat, not a liquid. If you cut the piece out, you can sometimes get the male piece of pipe out of the female hub.

Repair Coupling Solution

If you can, it may just be easier to cut out the fitting(s), install new ones and use a repair coupling to make your final connection. The issue is as you increase pipe size up to 4 inches, you have VERY little working time to slide the repair coupling into position.

A repair coupling is one that doesn't have a center ridge inside and you can slide the entire coupling over a piece of pipe.

pvc glue

This is a PVC repair coupling. It doesn't have a center ridge inside. CLICK THE IMAGE NOW TO HAVE THIS DELIVERED TO YOUR HOME.

Heat makes it worse. Higher air temperatures decrease the working time.

I wish you the best of luck.

This column was updated and featured in the March 15, 2015 AsktheBuilder Weekend Newsletter.

CLICK HERE to get FREE & FAST BIDS from local plumbers who can get you out of trouble.

Truss Uplift and Ceiling Cracks

Truss Uplift and Ceiling Crack TIPS

DEAR TIM: Cracks have begun to appear where the walls meet the ceiling in the top floor of my home. These cracks are most prominent along the walls in the center of the house.

I've also noticed that the baseboard has lifted up from the floor in other places. These cracks seem to close up on a seasonal basis.

Sturdy, prefabricated wood trusses were used to build my roof. What's happening? What if anything can be done to prevent the unsightly cracks? Ben - Traverse City, MI

DEAR BEN: There are a multitude of things that can be causing these cracks.

Trusses Move

The first thing that comes to my mind is a phenomenon called "truss uplift". Although truss uplift causes approximately 20 percent of problems like yours, it's something you should consider.

Undersized beams, expansive clay soils, wet floor joist lumber that shrinks, and other structural problems also can cause the cracks you see.

CLICK HERE to get FREE & FAST BIDS from local rough carpenters that can crawl around your attic to fix truss uplift issues.

Flat Bottom Chord Curves

Most simple roof trusses consist of a flat horizontal member called a bottom chord. The sloped portions of the truss that form the roof surface are called the top chords.

However, the bottom chord can develop an upwards curve as the seasons change.

Temperature & Humidity Battle

The bottom chord in your house and many others like yours is probably buried in insulation. Because the truss is touching the warm ceiling drywall below and the temperature of the insulation close to the ceiling is far warmer than the attic air temperature, the wood truss is none too happy. 

Meanwhile, the upper portion of the truss is exposed to cool and drier attic air. Since wood is a hygroscopic material, any of the wood that makes up the truss that's exposed to the air in the attic releases moisture in the winter months.

The bottom chord that's buried in the insulation tends to have a higher moisture content because it thinks it's much warmer in the attic than it actually is.

Bottom Chord Bends

The differences in moisture content cause the truss to bend. The lumber of the truss exposed to the cold, dry air shrinks and pulls up on the flat bottom chord causing it to lift and curve upwards.

The greatest amount of upwards movement is in the center of the truss. As the truss moves upwards, it takes the drywall ceiling with it.

This might explain why your cracks are larger as you get closer to the center of the house.

Up Go The Walls

If, for some reason, the interior walls are nailed more securely to the truss than the floor, the truss will actually lift the entire wall. This will account for gaps you might see at your baseboard trim.

Preventing Truss Uplift

There's a way to prevent this problem. If you're building a new house, don't allow the carpenter to nail the roof trusses directly to any interior walls

Instruct him to use handy metal L-shaped truss clips. These simple, inexpensive devices attach directly to the top of interior walls.

This simple clip is all that's needed to prevent truss uplift. The bottom is nailed to the top wall plates. A nail is driven through the slot into the side of the bottom chord of the truss. Be sure this nail is NOT driven tight. You want the truss to be able to flex up and down without pulling up the wall with it. CLICK THE IMAGE NOW TO HAVE THESE CLIPS DELIVERED TO YOUR HOME WITHIN DAYS.

The long leg of the clip contains a slot. A nail is driven through the slot into the side of the truss. The head of the nail is driven so it is just short of touching the metal clip.

This allows the truss to move up and down independently of the wall.

CLICK HERE to get FREE & FAST BIDS from local rough carpenters that can crawl around your attic to fix truss uplift issues.

Drywall Hanger ALERT!

The drywall hangers must cooperate as well. Don't allow them to nail or screw the drywall directly to the trusses within 16 inches of an interior wall.

They can fasten the drywall to pieces of wood that fit between the trusses or metal clips that attach to the top of the interior walls.

Because the upward truss movement occurs over a period of weeks or months, the drywall will flex at the corners. Cracks should become a thing of the past.

Repair Existing Homes

If you have an existing home that suffers from truss uplift, it can be corrected with some effort. You need to climb into the attic area and get to work before it gets too hot.

Use a cat's paw tool to remove nails which connect trusses to interior walls. Install the L shaped clips in their place.

After the truss clips are in place, nail a board on top of each interior wall which overhangs the wall by at least 1 inch on each edge. This will act as a bumper when the truss attempts to lift the drywall next year.

Fix The Nail Pops

When this occurs, you will probably see nail pops develop near the interior partitions. Take a large nail punch and drive these nails completely through the drywall.

This will release the drywall from the trusses at each partition. Patch these holes with regular joint compound and hope that the problem disappears.

CLICK HERE to get FREE & FAST BIDS from local rough carpenters that can crawl around your attic to fix truss uplift issues.

Column 169

How To Get Started Flipping Houses

flipping houses

Here's an old inner-city house that might be a flipping candidate. It might also be better put into a landfill. ©2017 Tim Carter

How To Flip Houses TIPS

  • Cable TV shows are NOT realistic - don't believe them
  • Hard, dangerous and risky work filled with surprises
  • Plan for cost overruns - at least 50 percent
  • Landslides a real danger in certain areas
  • CLICK HERE to Get Tim's FREE & FUNNY Newsletter!

DEAR TIM: I’ve decided it’s time to take a chance and flip a house that was built in the 1890’s. I’ve watched plenty of shows on cable TV and feel it can’t be that hard.

Have you ever done this type of construction work? What did you experience and would you do it again? Are there unknown dangers and how risky do you feel it is?

It seems like it’s an easy way to make a sizable profit. Paul T., Erlanger, KY

DEAR PAUL: The first few years of my construction career were spent cutting my teeth, fingers, arms and legs rehabbing houses. Back years ago, that was the word used to describe what you’re thinking about doing. I could talk to you for hours about the challenges that lie ahead of you on this quest.

Cable TV Un-Reality Shows

Let’s talk about the cable TV shows since I’ve been doing professional home improvement video work for over twenty years. Most of the shows I’ve seen about flipping homes are produced as entertainment and not a tutorial or investment guide.

The shows are taped and edited so you feel happy after you watch them. The show producer wants you to watch a following episode.

CLICK HERE to get FREE & FAST BIDS from local Construction Managers who can help you flip a house for a profit.

Pandering & Sizzle

There’s an old saying that I feel comes into play here. “A half-truth is a whole lie.” If a cable TV show about flipping houses told you the entire truth and revealed all that really happened from the start until the end of the project, you might end up with a sour taste in your mouth.

But if a show woos you with lots of glamour shots and the exciting aspects of the construction, you might turn off the TV, stretch your arms and get up from the couch feeling empowered and confident. It's my personal opinion after working in the video news business for years that cable TV show producers pander to their audiences.

Hard, Dangerous & Risky

Flipping houses is hard, dirty, dangerous and risky work. It’s not unicorns, rainbows, juice boxes and fruit rollups. You might have better odds making a profit if you roam through the Bellagio casino placing bets every ten minutes at different $100 blackjack tables.

This is especially true if you’ve got no real construction experience and you’ve never put together a detailed cost estimate for a project of this magnitude.

My Experiences

Let’s saunter down memory lane and add in a few things I saw just a few days ago while on a trip to Cincinnati, OH. Doing this will give you a small taste of what may lie ahead in your future.

Toxic Lead Paint 

Old houses, especially those build prior to 1967, contain vast amounts of lead paint in them. This is a given for ancient houses built in the late 1800’s and early 1900’s. Any painted surface you disturb can create lead dust that can poison you or anyone working with the material. I had no idea about lead poisoning decades ago while I tore out plaster, sanded old paint and created clouds of dust wearing cheap fabric breathing masks that were next to useless.

CLICK HERE to get FREE & FAST BIDS from local Construction Managers who can help you flip a house for a profit.

Foundation Issues

I’ll never forget the house I built for Habitat for Humanity. Fortunately my money was not at risk, just eight hours of my time every Saturday for several months. It was the first house built on an old inner city lot in Cincinnati.

When we dug for the new foundation, we discovered a massive sub basement where the original house stood and it took 200 cubic yards of flash fill to provide enough solid support for the new house footers. The budget was blown for this job before we drove the first nail.

Active Termites

I’ll never forget the shock I felt at another old house when I opened up a wall to install a new window. I saw all these tiny white insects about the size of a grain of rice scurrying around. Lo and behold I was interrupting an extended family feast hosted by a giant nest of termites.

Clogged Full-Size Vent Pipe

Oh, and then there was the first old house I flipped for myself. I decided to replace the rotten cast-iron plumbing drain lines with new PVC plastic ones. Once I had the entire system put back together, I couldn’t understand why the toilet didn’t flush right. It turns out eighty years of scale and rust buildup at the bottom of the full-sized cast-iron vent stack was blocking air from getting into the plumbing system.

Landslide Danger!

As I write this column now, I’m less than ten miles from where you live. A few days ago I was touring a very vibrant community called the East End. It’s filled with old houses and small businesses that were built at the same time, or slightly before, the house you’re looking at.

Many of these structures are currently being pushed off their foundations by a massive landslide. The landslides you see on the news in California grab all the attention because they’re violent and come down the mountainsides like an avalanche of snow.

These Cincinnati landslides are not new. I was a geology student at the University of Cincinnati and had the good fortune to study the characteristics of the bedrock geology of the greater Cincinnati area. The hillsides around Cincinnati and the bottom of the hillsides in the river valleys are prone to landslides.

In Cincinnati, the unstable soil created when the weak shale in the Kope formation weathers moves like a sniper in a ghillie suit crawling through the weeds. Because of the slow movement, many in the community are blinded by the fog of complacency. This past week I saw tilted foundation walls, patio stones bulging up as the soil oozes upwards, and entire structures pushed off their foundation walls.

This is a copy of a United States Geologic Survey (USGS) geologic topographic map of the East End of Cincinnati, OH. The downtown area would be just to the left of what you see. The Kope and Lower Fairview formations are the light pink rock just above the magenta alluvium that's north of the Ohio River. (C) Copyright 2017 USGS and every US taxpayer that owns the maps. CLICK THE IMAGE TO BUY GEOLOGIC MAPS FOR YOUR AREA.

Foreclosure Looms?

Can you imagine what it might cost to stop or repair damage like this? If a lender discovers this is happening during construction or afterwards will he call the note requesting you pay in full your 30-year loan amount immediately? Will you be able to get new financing? Will you have to declare bankruptcy through a foreclosure?

Vandalism, thievery of building materials and tools, and tough code restrictions will great you as you jump into this project. Out-of-level floors, ancient sewer and water lines that may have reached the end of their useful lives and other money-sucking surprises await you. Just be sure you can handle delays, cost overruns and lots of stress.

CLICK HERE to get FREE & FAST BIDS from local Construction Managers who can help you flip a house for a profit.

Column 1186

Cracked Treated Wood

Cracked Treated Wood

Can you believe this piece of treated lumber is new? It looks like a 30-year-old fishing pier. Copyright 2017 Tim Carter

Cracked Treated Wood TIPS

  • Treatment chemicals evaporate causing cracks
  • Seal with synthetic-resin sealers - See my test results below
  • WATCH wood epoxy video series below
  • Apply sealer within days of installing treated lumber
  • CLICK HERE to Get Tim's FREE & FUNNY Newsletter!

DEAR TIM: Over the summer, I ripped up the old boards on my deck and replaced them with new pressure treated boards.

Now that they've had time to dry out, I'm about to stain the deck but I've discovered that a handful of boards are already splintering and cracking. This is really disappointing especially since I spent a little extra on the premium boards.

What's your advice on what I should do to remedy this? Would power washing help our just produce the same result?

Or should I replace the problem boards altogether? Should the warranty on pressure treated boards cover this? Adam W., Dallastown, PA

DEAR ADAM: Oh my, what a shame you had this happen.

Answers Abound At AsktheBuilder.com

It's so unfortunate because for years I've had the remedy at my AsktheBuilder.com website in past columns about wood deck maintenance and care.

If you would have visited my website and spent just thirty minutes researching how to care for new lumber, you'd not have this problem.

You Goofed Up

I hate to break this to you, but the entire issue was caused by you. It's very unfortunate the lumber suppliers and the store you purchased it from didn't tell you the best way to protect your investment as you left the store.

I assume they didn't.

CLICK HERE to get FREE & FAST BIDS from local companies that will seal your deck lumber.

Treated Lumber Can Be Very Wet

Here's what's going on. Treated lumber is injected with chemicals that are mixed with water.

Years ago, some of the treated lumber I worked with was so saturated with the water-based chemical brew that when you'd drive a nail into it, this liquid concoction would squirt out alongside the nail shaft as you drove the nail.

Sun & Wind Tear It Apart

As soon as you expose most treated lumber to the sun and wind by nailing it to deck joists, the liquid in the wood begins to exit to the air.

When the sun extracts this moisture out of the lumber, it creates significant tension stress within the wood fibers. Tension is the force that happens when you try to stretch, bend or pull something.

The lumber shrinks as the water leaves the wood leaving the chemicals behind that are intended to prevent the wood from rotting.

Cracks Replace The Water

This shrinkage usually causes tiny checking cracks to form. The cracks that are now filled with water take up the space previously occupied by the water that was in the wood.

These small check cracks are often about the width of a piece of paper and perhaps only an eighth of an inch long. In extreme case you can experience de-lamination along the boundaries of the summer and spring wood.

Summer wood is the dark ring you see in a log and the spring wood is the lighter-colored band.

Giant Splinters

When this de-lamination happens on flat-grained pieces of lumber, you end up with giant protruding splinters like I see in the photo you sent. There's no way to repair these.

Cracks Enlarge

Once you have cracks in the wood, you've got problems unless you stop the water from soaking into the wood. When the water soaks deeper into the wood by entering the cracks, as the sun and wind come back after the rain storm, the wood starts to shrink.

Each time this happens the tension forces usually cause the cracks to get bigger and bigger.

Pressure or Power Washing is BAD

Power washing lumber is the worst thing you can do. The high-pressure concentrated stream of water blasts away the less-dense spring wood.

What's more, it drives water deep into the cracks you already have. This is the last thing you want to happen.

Pressure Washing Video

Watch this video to see more damage caused by pressure washers.

Ground Water Vapor

To make matters worse, if your decking is close to the ground, say about 2 feet or less, water vapor coming up from the soil under the deck can damage the decking.

This water vapor causes the face of the decking on the underside of the deck to expand because water is entering the wood fibers.

On the other side, the sun and any wind is doing the opposite causing moisture to leave the wood. As we discussed, this causes the wood to shrink or get smaller.

CLICK HERE to get FREE & FAST BIDS from local companies that will seal your deck lumber.

Cupped Decking Boards

When this happens, the decking will almost always cup. This means the decking gets higher on the edges and lower in the center much like a valley between two mountains.

Seal Treated Wood Immediately

You could have avoided this costly nightmare by just staining and sealing the wood as soon as it was installed. You want the wood to be dry enough so the sealers soak in, but not so dry as the tiny checking cracks are starting to happen.

Deck Sealer Test Results

A few years ago I did an independent test on name-brand deck sealers. I took extensive before and after photos to show how well each sealer performed on treated lumber and on cedar decking.

wood sealer test

These are four pieces of wood that were part of my extended outdoor wood sealer test. The two pieces on the left are cedar and the two smaller pieces are treated lumber. The dark gray, nearly black, piece was only out in the weather for four months. The piece to the right is what it looked like BEFORE it was put out in the sun and water!!! CLICK THIS IMAGE to get access to the full test results. Copyright 2017 Tim Carter

High-quality sealers stop water from entering treated lumber. You can often see water beading on decking that's been treated with a great sealer. 

CLICK HERE to get access to my independent test of deck sealers. You'll be able to discover who won my test.

Edges & Ends

While it requires much more work and stain / sealer, it's not a bad idea to seal and stain all sides and edges of the decking before it's installed. This means you need to have a place to set out each piece to dry after you've applied the sealer.

It's best to create a drying rack in a carport or inside a garage. The last place you want to place the freshly sealed boards is out in the direct sun where they can twist and warp as they dry.

Salvage & Sand

PC Woody

This is a great wood epoxy that will fill larger cracks in wood decking and outdoor wood. If the wood is starting to rot, get the kit that has the PC Petrifier component. CLICK THE IMAGE NOW TO HAVE THIS PRODUCT DELIVERED TO YOUR HOME.

You may be able to salvage some of the boards that are not too bad. I'd use a belt sander with medium sandpaper to see if you can make them look presentable.

The great sealers and stains will stop water from entering tiny checking cracks so if that's all you see after sanding, I'd keep those boards.

You can use a great waterproof wood epoxy to fill large cracks. It's stainable and while it won't look exactly like the natural wood, you'll stop water from doing more damage once you seal the wood and coat the epoxy.

Any others that have large splinters or delamination will have to be replaced. Don't expect the lumber company to give you free replacements as they know you caused the issue.

You may be able to get a significant discount on your replacement boards if you talk to the lumberyard manager.

Mention that you feel they should have given you a small pamphlet about how to care for the wood. I wish you the best of luck and be sure to follow any and all directions on the labels of the sealer / stain you purchase.

Wood Epoxy Install Videos

Watch this video series to see how to use the magic wood epoxy. It's very easy and you can save lots of money and time using this product in many instances.


CLICK HERE to get FREE & FAST BIDS from local companies that will seal your deck lumber.

Column 1116

Remove Grout from Ceramic Tile

Remove Grout From Ceramic Tile TIPS

Not a month goes by that someone doesn't email me and ask how to remove excess grout from a wall or floor tile job. People have sent me photos that make me cringe.

In the photos one can see massive amounts of excess grout and a heavy grout film on the face of the tile. I've seen huge messes!

Grout Is Concrete

I think many people who work with ceramic tile for the first time are not aware of what grout really is. For the most part it's Portland cement.

Wall grout is almost always 100-percent Portland cement powder. Floor grout is a blend of Portland cement and fine grains of pure silica sand.

Silica sand is extremely durable and is very hard. It's an excellent addition to floor grout and it's needed to make the grout strong once a grout line exceeds 1/8-inch in width.

CLICK HERE to get FREE & FAST BIDS from local tile setters who are experts at cleaning off excess tile grout.

Sanded Grout Video

Watch this video to see what sanded grout looks like when mixed and properly installed.

Concrete Is Hard & Sticky

I can't imagine a person who doesn't respect how hard concrete or cement dries.

What's more, it's sticky. You should see how tenaciously cement sticks to smooth metal shovels and trowels. The microscopic crystals that grow as cement hardens lock onto objects like Velcro®.

Bad Advice

When people contact me about grout removal problems the common denominator is always, "...we were told the grout film would come right off."

Well, a very light haze will come off of glazed tiles with an old bath towel, but heavier deposits can be a nightmare to remove.

The light haze will almost always come off with ease because so much water has been used to strike the grout joints, there's not much Portland cement on the tile once the water evaporates.

Matte-Finish vs Glazed

Not all tile has the same finish. Glazed tile that has a smooth high-gloss surface is indeed the easiest to work with.

But quarry tile and some other tiles have a matte finish that makes them perfect targets for grouting nightmares. The rougher surfaces of these tiles are wonderful places for grout to attach itself.

Slate is no different. The cleft surfaces of natural slate can be a huge challenge when it comes to grouting.

If you look at a piece of slate under a magnifying glass it looks like the valley and ridge province of the Appalachian Mountains.

The grout can get trapped with ease in the tiny valleys and low spots in natural slate.

Secret Sugar Trick

I know this is going to sound crazy, but try it. Take one gallon of warm water and dissolve a cup of sugar into it.

Take this sweet solution and pour it onto excess grout on a floor. If you have wall tile with too much grout, then soak paper towels in the solution and place them on the tile.

Keep the tile wet with the sugar water for at least two hours. After this dwell time is complete, use a new Dobie nylon scrub pad and scrub a small area.

You should see instant results. It may take more than one application of sugar water to completely remove the grout film.

Release Agents

The matte finish tiles, slate, and other delicate ceramic products need to be pre-treated before they are grouted. Years ago different tile manufacturers recommend things like oil soap and other temporary coating products.

But a new industry sprouted as more and more matte finish tiles came to market.

You can buy an assortment of grout release agents. These are very cool liquid products that you wipe or brush onto tile after it has been installed.

grout release agent in bottle

Here's a wonderful grout release product that can save your bacon if you're a rookie DIY tile installer. CLICK THE IMAGE NOW TO BUY THIS GREAT PRODUCT.

The coating temporarily seals the porous tile surface. You then grout and as you remove the grout and film, the grout release agent comes off at the same time. They do a superb job of making grouting jobs virtually trouble free.

Be sure to read the label and match the grout release agent to the material you are working with. Certain tiles and stone products require special grout release agents!

CLICK HERE to get FREE & FAST BIDS from local tile setters who are experts at cleaning off excess tile grout.

Clean Up Tools

To remove a grout haze from tile you need to be careful. You don't want to damage the tile surface.

I've successfully done this using a generous amount of water that acts as a lubricant and synthetic fiber scouring pads.

Scotch Brite pads

These are common Scotch-Brite pads. But these happen to be HEAVY DUTY and are the best to use for cleaning up excess grout. CLICK THE IMAGE NOW TO HAVE THEM DELIVERED TO YOUR HOME.

I've had good results from the Scotch Brite pads. These are the deep green pads that are about 1/4 inch thick.

The ceramic tile specialty stores often sell a similar pad called a Doodlebug. These cleaning pads are also superb.

Do A Test

When you start to clean up excess grout, start in an out-of-the-way place and do a small 2-foot by 2-foot test area.

You'll hone your skills here.

Keep in mind that you must stop and check your progress from time to time. Rinse the slop water and use paper towels to dry the tile to see if you're making progress.

No Metal

Don't ever use a metal putty knife, or similar tool, to scrape hard grout deposits. The metal can permanently mar the surface of the tile.

It's much better to use a piece of wood that has a nice square cut on it. A paint stirring stick is not a bad tool to try. If you have access to oak cut a piece to use. Oak is the common wood used to make the slats of a shipping pallet.

Avoid Acid

Think hard before using acid to remove grout mistakes. If you do, always get the tile slightly wet before applying the acid solution. Acid can also affect tile color!

CLICK HERE to get FREE & FAST BIDS from local tile setters who are experts at cleaning off excess tile grout.

Column B390

Outdoor Wood Furniture Sealer

Caring for Outdoor Wood Furniture

This table was cleaned with Stain Solver oxygen bleach. The two end panels are bare wood while the center panel has two coats of a synthetic resin water repellent. CLICK HERE to get access to the BEST outdoor furniture sealer. Copyright 2017 Tim Carter

Outdoor Wood Furniture Sealer TIPS

DEAR TIM: My outdoor wood furniture has weathered to a mottled gray and there is mildew covering it. My wife has informed me that I must make it look like new.

If I do a good enough job, I've been told I can then refinish the kid's play set. What's the best way to get the wood looking like new?

How should I clean it? What's the best sealer to use?

If you were doing this job, what secret tips can you offer to get the best results in the shortest amount of time? Steve P., Mannassas, VA

DEAR STEVE: It's just as important to keep your better half happy as it is to clean and protect outdoor wood furniture.

Marriage Epoxy

I urge you to maintain a positive attitude through this entire project. I've been married since 1974 to the same wonderful woman and have discovered that keeping her happy completing projects is some of the glue that holds our marriage together.

CLICK HERE to get FREE & FAST BIDS from local contractors that clean and seal outdoor wood.

Outdoor Wood All The Same

Cleaning and sealing any outdoor wood is not much different than doing the same thing for a wood deck. Outdoor wood tables, chairs, fencing, wood play sets, arbors, etc. all take the same abuse from Mother Nature.

No Care = Cracks & Rot

If you fail to maintain outdoor wood it will eventually rot and crack to pieces. Chemically treated lumber used to be marketed saying it would resist rot for decades. It turns out this is not true.

treated lumber wood rot

This is a treated lumber post that's been well cared for. I know the homeowner. It's been regularly sealed yet it still rotted out! Copyright 2017 Tim Carter

Natural Preservatives

Some wood like redwood, cedar, teak and other hardwoods contain varying degrees of natural wood preservatives. But water that soaks into all these wood species will cause them to crack and rot over time.

Check Cracks

The cracks start out as tiny checking cracks. Water entering the wood causes it to expand. As it dries, it contracts.

This movement creates the tiny cracks. If water gets into the cracks, it soaks deeper into the wood causing even greater expansion and contraction forces that cause the cracks to get deeper and wider.

Stop Water - Stop Cracks

You can see why it's important to treat all wood with a water repellent on a regular basis to prevent water from getting into the wood. Do this every other year or so and your outdoor furniture and play set will look fantastic instead of resembling a 50-year-old fishing pier.

Clean With Stain Solver

Oxygen Bleach

Stain Solver is MADE in the USA with USA ingredients that are food-grade quality. CLICK THE IMAGE to order some NOW.

I prefer to clean outdoor wood with Stain Solver certified organic oxygen bleach.

Stain Solver is made in the USA with USA ingredients. The active ingredient, sodium percarbonate, is made with food-grade-quality ingredients.

You mix the pure powder with warm water, stir until its dissolved and then brush or spray it onto the outdoor wood. It will begin to bubble and foam as the oxygen ions attack mold, mildew, algae, sun-damage old sealers and dirt.

It's best to work in the shade and keep the wood wet with the solution for 15-30 minutes. After that lightly scrub, rinse with clear water and the wood will look like new.

Don't use oxygen bleach on redwood as it can darken this wood species. Use oxalic acid to clean redwood.

CLICK HERE to get FREE & FAST BIDS from local contractors that clean and seal outdoor wood.

Pressure Washers DESTROY Wood

Do not use a pressure washer to clean outdoor wood. It absolutely will damage the wood. The high-pressure stream of water erodes the softer lighter colored bands of spring wood that are found between the darker bands of summer wood grain.

Sand Raised Grain

Allow the wood to dry well after it's clean. The washing process almost always raises the grain of the wood.

This means you'll have to sand it to get it back to that smooth furniture finish. Don't skip this important step.

Palm Sander

A palm sander works great for this project. This is an affordable power tool that works similar to a vibrating hair trimmer a barber might use to cut your hair.

palm sander

This is a marvelous brand-name palm sander at a great price. It's made to take a 1/4 sheet of ordinary sandpaper so there's no waste. CLICK THE IMAGE NOW TO ORDER IT.

Use a medium aluminum oxide sandpaper. This paper self sharpens itself as it's being used.

sandpaper

Here's an assorted pack of aluminum oxide sandpaper that will do a great job on soft wood. CLICK THE IMAGE TO ORDER IT NOW.

Synthetic Resin Sealer

Once the wood is sanded, you should seal it with a pigmented synthetic resin water repellent. Don't use an oil-based product.

Most oil-based sealers are food for mildew and algae. The manufacturers place mildewcides and algecides in the products to slow down the growth, but water and sun break down these chemicals.

Outdoor Wood Sealer Test Results

I did an extended test on many outdoor wood sealers and water repellents. The results were shocking. CLICK HERE to get the results of the test showing which sealer performed the BEST.

wood sealer test results

These are four pieces of wood that were part of my extended outdoor wood sealer test. All four were coated with the same sealer. The two pieces on the left are cedar and the two smaller pieces are treated lumber. The dark gray, nearly black, piece was only out in the weather for four months. The piece to the right is what it looked like BEFORE it was put out in the sun and water!!! CLICK THE IMAGE above to get access to the full test results. Copyright 2017 Tim Carter

Colored Pigment = Sun Screen

The pigmented, or colored sealers, will keep the furniture looking spectacular. The pigment acts as a sun screen blocking the sun's ultraviolet (UV) light from turning the wood gray. Clear sealers will gray rapidly.

IMPORTANT TIP: I urge you to work in the shade when applying the sealers. Some sealers require you to apply two coats within 15 minutes of each other to get maximum protection.

Shade = Best Results

Working in direct sunlight can shorten this time dramatically leading to ugly spotting and overlaps.

Working in the shade is easier on you, the wood and the sealer. If you can move the furniture inside your garage or other covered work area, do so.

I realize this is impossible for the play set, so choose to work on an overcast day if possible.

Detailed Work

Staining and sealing outdoor furniture is quite different than sealing a deck. It requires a fine touch so your brush strokes are not seen and you don't create any overlap marks.

Wet Edge Is Everything

You have to maintain a wet edge with the sealer. This means you stain each individual piece of wood completely never stopping until you reach the end of that piece of wood or it intersects with another piece of wood.

Failure to do this can result in very unattractive overlaps where the color of the sealer seems darker at the overlap area. If you allow the sealer to dry and then coat over it with a second coat, you get double the color pigment in the overlap area.

Applying Wood Sealers Video

Watch this quick video to see how I applied different wood sealers to start my first independent test years ago. I did a second more detailed test a few years after making this video. I was working in the sun here, but it's okay because I knew I'd have different sealers on the same piece of wood.

CLICK HERE to get FREE & FAST BIDS from local contractors that clean and seal outdoor wood.

Column 937

How to Clean Grout

Dirty grout

Here is some gross tile grout in my own kitchen. My kids constantly spilled iced tea here. The actual grout color is a light gray. Look at the next photo to see the magic of oxygen bleach. ©2017 Tim Carter

How to Clean Grout TIPS

DEAR TIM: I've spent hours looking on the Internet for products to clean my floor tile grout. There seems to be lots of different answers at chat rooms and online forums about using chlorine bleach, baking soda, vinegar, peroxide, etc.

My grout is colored and I don't want to harm it. I also don't want to spend lots of time scrubbing.

Is there an easy way to clean floor tile grout? Is there a product that's non-toxic and doesn't produce fumes? Rose C., Dallas, TX

DEAR ROSE: Every now and then I lurk in some of the Internet home improvement forums and chat rooms to see what type of bad advice is floating to the surface at any given point in time.

Bad Advice Is Everywhere

I'm constantly amazed at how much bad advice is readily available. In fact, some of the advice is downright dangerous, especially when some people talk about blending household chemicals together to make a witch's brew of cleaning solution.

I often wonder if some of the advice posts are malicious in nature. There are people in this world who are pranksters and bullies and get great satisfaction from giving advice that can create mayhem and pain.

Toxic Harsh Chemicals

Some of the chemicals you discovered in your search will work, but not the way you want them to. Fumes can be released that choke you or your loved ones.

Other chemicals simply don't do a great job of cleaning and are a waste of time and money.

Chlorine Bleach = BAD

Chlorine bleach is a powerful oxidizer that can remove stains in floor tile grout. But it can also remove color.

Chlorine bleach can damage nearby fabrics and rugs if it is accidentally applied to them. As you know, the fumes from chlorine bleach are highly irritating to many people and any pets you might have around your home.

Bird-Killing Chemical

These fumes can be deadly to small birds as well. If you have canaries or parakeets in your home chirping away, you may find them motionless on the bottom of the cage if you release chlorine bleach fumes in your home.

Baking Soda + Vinegar = NOTHING

If you've stumbled across advice that tells you to mix baking soda and vinegar into a solution with water, you've found someone who skipped going to their high school chemistry class. Mixing those two together yields nothing. The baking soda neutralizes the weak acid in the vinegar.

Baking Soda = A Joke

I've never had any luck with baking soda. If you mix it with water you just have a solution that's a mild base. It's alkaline like regular soap and it just doesn't do much at all to blast apart stain molecules

Vinegar Is For Hard Water

Vinegar only works well to dissolve hard water deposits that might buildup around sinks and dishwashers. Vinegar is not an effective floor tile grout cleaner.

If you feel compelled to try vinegar, and it's a complete waste of time and money, only use white vinegar as its fumes are far less offensive that apple-cider vinegar.

Liquid Peroxide

The peroxide you mention is probably common liquid hydrogen peroxide. It can be an effective cleaner, but only if you can get the peroxide to release one of its extra oxygen ions. Plus, it's out-of-this-world EXPENSIVE.

IMPORTANT TIP: The 2017 price for a gallon of food-grade hydrogen peroxide was $52! CLICK HERE to check the current price.

This is not always easy to do. Hydrogen peroxide has two atoms of hydrogen and two atoms of oxygen. If you can get it to release one of the oxygen ions, you get a free oxygen ion and regular water.

Stain Solver - The Miracle Grout Cleaner!

Oxygen Bleach

Stain Solver is MADE in the USA with USA ingredients that are food-grade quality. CLICK THE IMAGE to order some NOW.

Stain Solver is a certified organic oxygen bleach powder.  Stain Solver is Made in the USA with USA ingredients.

It's a magic dried form of hydrogen peroxide that's very inexpensive when compared to liquid hydrogen peroxide.

A handy 4.5-pound container of powdered Stain Solver creates 20 gallons of floor-grout cleaning solution.

The current cost of 4.5 pounds of Stain Solver is less than one gallon of liquid hydrogen peroxide!

You spend less money and get over 20 TIMES the amount of cleaning liquid!

How Stain Solver Works

When you mix the Stain Solver powder with water, it releases billions of microscopic oxygen ions into the non-toxic no-odor cleaning solution.

The free oxygen ion is a powerful stain remover as it acts much like a torpedo or a cruise missile to attack and split apart stain molecules. Once a stain molecule is split apart, the stain disappears.

Stain Solver & Floor Grout Video

Watch how easy it is to use Stain Solver to clean dirty floor grout. CAUTION: I guarantee you'll order some immediately after watching the video.

Apply to Dry Grout

It's best to apply the Stain Solver to dry grout. As the solution is applied to the floor, it soaks deeply into the grout and starts to blast apart all of the stain molecules.

The best part is there are no fumes and the oxygen ions will not harm the color in the grout. The solution will not harm any adjacent carpets or fabrics.

Longer Dwell Time = Less Scrubbing

When you work with cleaning solutions, you often get the best results if you allow the chemical to work on its own. This is called dwell time because you want the chemical to linger or soak on the item being cleaned.

When cleaning floor grout, I'd allow the Stain Solver solution to dwell at least fifteen minutes, and maybe longer. The longer you allow the Stain Solver solution to soak into the grout the less you have to scrub. The countless oxygen ions are down in the grout working for you.

Stiff Scrub Brush

When cleaning floor grout, you just need to use a scrub brush that's got stiff bristles and the bristles need to contact the grout.

Some ceramic tile has grout joints that are recessed below the surface of the tile. If you don't press hard enough, the brush never contacts the grout. Don't allow that to happen.

Never Scrub Again!

Once your floor grout is clean, you can do a simple thing so you NEVER AGAIN have to be on your hands and knees scrubbing a floor!

All you have to do is add Stain Solver powder to your mop water each time you clean the floor. Throw away that useless pad cleaner that really doesn't work well.

Get an old fashioned string mop and mop your floor. Get the mop water to saturate the grout and allow it to dwell for about five minutes.

Come back and rinse the floor and the grout should look like new each week.

before & after grout cleaning

Here is a before and after of the same tile. I left some of the grout untouched by the solution of oxygen bleach. Look at the gray grout! It looks new and the entire process took ten minutes. ©2017 Tim Carter

Weak Oxygen Bleach

Not all oxygen bleach powders are the same. The best ones are:

  • certified organic
  • made in the USA with USA ingredients
  • highly concentrated with active ingredient
  • active ingredient is FDA registered food-grade quality
  • contains no fragrances or colored useless crystals

Stain Solver meets all those above specifications. Just about every other powdered oxygen bleach available in the USA contains ingredients that were sourced offshore.

Beware Made in the USA Label

I believe laws have been passed that allow some companies to trick you. You may see a label that says: Made in the USA.

What it really means is that the product may have been assembled or packaged in the USA, but the ingredients come from some other non-USA country.

Remember, Stain Solver is Made in the USA and the two ingredients are made in the USA as well. The active ingredient is made in Houston, TX and the pure, natural soda ash comes from a mine in Wyoming.

Homeowner Testimonial

"WOW, that's all I can say! I purchased your product last week to clean the grout on my 800 sq. ft. of tile, and it looks as clean as the day we moved in eight years ago. I must admit, I was a little skeptical when I ordered the Stain Solver, but after having used it, I know I will always have some on hand and look forward to cleaning my wood deck this spring. This is by far one of the best products I have purchased in many, many years. Thanks Tim!" - Ed, Macomb, Michigan

How Stain Solver Was Born

I discovered oxygen bleach in the mid 1990's. I was doing research for deck cleaners.

One night, I had dinner with Jef Morgan, a chemist of a company that distributed American-made oxygen bleach. We talked about how well it worked to clean wood.

I then asked, "Tell me, can you clean anything else with oxygen bleach?" Well, the flood gates opened.

For the next hour, Jef told me about everything it could clean; clothing, rugs, roof shingles, patio furniture, and tile grout.

CLICK HERE to see actual homeowner Before and After photos of all the things Stain Solver can clean.

Three Friend Testers

I was so intrigued I started to test this product. It did everything Jef said it would and more. I then gave some to three friends and had them try it.

It appeared to be a true miracle product. I was so impressed and felt so good about this wonder material I actually started to sell it under the registered name Stain Solver.

Full Transparency

This column is not meant to be self-serving. The woman who asked the question lives in Dallas and is not a friend or relative. There are other companies that sell very powerful and high-quality oxygen bleach. If you want the best product that indeed is the most powerful, then look for the one that costs the most per pound. These are the ones that have the most amount of active ingredient in them.

Column 531