Hardwood Floor Installation

Hardwood floor installation | It's complex and there are lots of things you need to know. A straight piece of hardwood flooring can be used as a straightedge to find low spots in the sub-flooring. ©2021 Tim Carter

Hardwood Floor Installation TIPS

DEAR TIM: I am thinking about hardwood floor installation. The hardwood flooring I want to use is the traditional tongue and groove 3/4-inch thick hardwood lumber

I own many different power saws and other carpentry tools. Do you think I can achieve nearly professional results as I try to install the hardwood flooring?

What tips can you share to help me get professional results at do-it-yourself prices? Bob K., St. John's, Newfoundland CA

DEAR BOB: Since I don't know the level of your carpentry skills, I am going to say maybe.

Is it Easy To Install Hardwood Flooring?

The truth is it's hard to install traditional strip hardwood flooring. Don't believe for a minute what you see on the false-flag cable or streaming-TV shows. If you want to discover more about hardwood floors, you should really read my other column.

The traditional hardwood floor installation process is not that difficult, but the many different tricks and tips are what separate professional installers from those who aspire to have their years of accumulated knowledge.

CLICK HERE to get FREE & FAST BIDS from local hardwood flooring contractors.

Do you Need Specialized Tools?

Your collection of saws and other carpentry tools will come in handy, but realize that professional hardwood flooring installers come to the job with an arsenal of assorted hand and power tools.

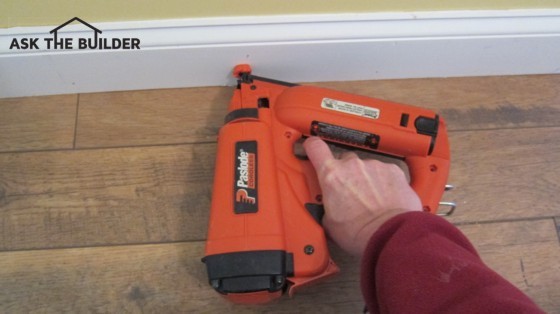
They have special nailing machines, some pneumatically powered, that drive special barbed nails at the precise angle and depth through the tongue of each strip of hardwood flooring.

You can hand nail hardwood flooring, but I'm sure you'll make a mistake or two, and your results will be less than professional. The special nail guns can be rented.

And if you’re interested in learning more about hardwood flooring costs I have an article here.

AsktheBuilder Podcast

CLICK this image and listen to the first call on the podcast. I talked to Jill about how to repair wood kitchen flooring, and possibly installing an inlay border as an option. Copyright 2018 Tim Carter

Can You Reverse the Direction of the Tongues?

Yes, you can reverse the run of the strip flooring. You can butt two groove ends together and interlock them with a special double-sided tongue insert.

You may also need a router equipped with a special bit. It is not uncommon for a professional to rip a piece of hardwood flooring to make it fit against an existing piece. To make the hardwood flooring pieces interlock, a new groove has to be created on the cut edge of hardwood.

Is it Necessary to Acclimate the Hardwood?

Yes, it's absolutely necessary to acclimate the hardwood. Failure to do this will lead to all sorts of severe issues including wide gaps, cracks, and edge-crushing.

The first thing you need to do before you start the job is get the hardwood flooring into your home and let it acclimate to the indoor humidity and temperature. Although this acclimation period can be achieved in three or four days, I recommend you bring the hardwood flooring into your home for a minimum of two weeks for the best results.

CLICK HERE to get FREE & FAST BIDS from local hardwood flooring contractors.

Can You Acclimate Any Time of Year?

Yes, it doesn't matter the time of year. What matters is that the inside of the house where the wood is being acclimated in the actual rooms where it's to be installed is the exact temperature and humidity it will be when you live there.

This means in the winter, you need the house warm and if it's summer, you have to have the air conditioner running if you will be using AC when you live in the house.

Where Do I Acclimate the Hardwood?

Put the wood into the actual room where it will be installed if at all possible. Be sure that room is at the temperature it will be at once the room is finished.

The longer you let the wood acclimate, the tighter the joints will be as it is installed, and, more importantly, after the hardwood is finished. Hardwood flooring is a hygroscopic material, and it changes shape and size with changes in temperature and humidity.

How Smooth Should the Subfloor Be?

The subfloor to which the hardwood flooring is attached should be clean, dust-free and securely attached to the floor joists. Now is the time to attack any pesky floor squeaks.

Most floor squeaks can be traced to loose sub-flooring that moves up and down as it's walked upon. The movement of the wood along the nail shafts creates the squeak.

Screw down the existing subfloor to the floor joists, especially in areas of the floor where you will walk once the hardwood is installed. Those areas covered with furniture may not be as important, but I would suggest you screw down the entire subfloor to the joists.

CLICK HERE to get FREE & FAST BIDS from local hardwood flooring contractors.

Eliminate Floor Squeak Video

Watch this video to see how to eliminate most floor squeaks.

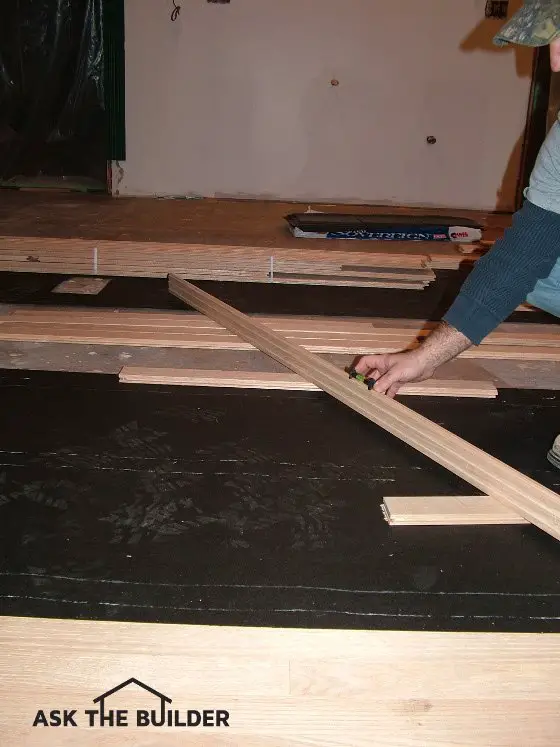
How Do I Locate Humps and Dips in the Subfloor?

Use a long metal straightedge to locate humps and low spots in the floor. The low spots should be filled in with floor leveling compound or better yet, asphalt shingles.

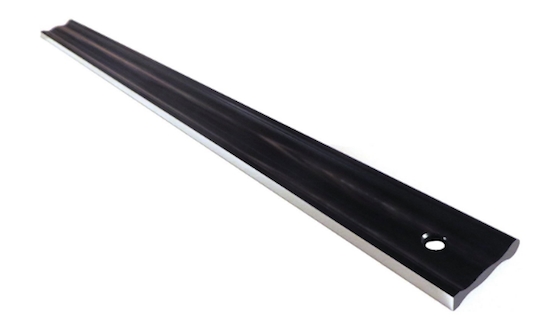
Here's a precision straightedge. Don't get a cheap one. You'll regret it. CLICK HERE TO HAVE IT DELIVERED TO YOUR HOME FAST.

A flashlight really helps here. If you shine the light at a low angle or put the flashlight on the floor aimed at the straightedge you can see where light leaks under the tool.

Do I Need Felt Paper Under the Hardwood?

If the low spots are very subtle, multiple layers of asphalt-saturated felt paper will work well. The entire subfloor should have a minimum of one layer of asphalt-saturated felt paper over it to protect the underside of the new hardwood flooring from water vapor that may try to work its way through the subfloor.

The felt paper also helps keep the new hardwood floor quiet.

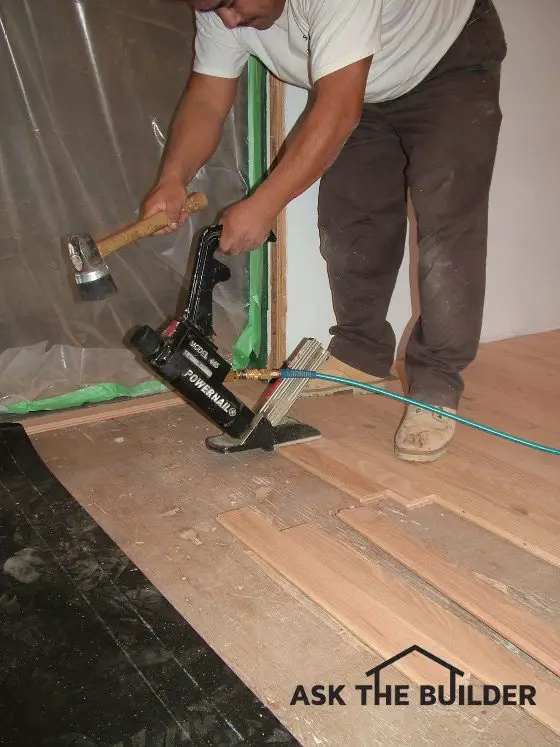
This air-powered nailer drives special nails through the tongue of the hardwood flooring. ©2021 Tim Carter

Should the Hardwood Flooring Run Perpendicular to Joists?

Whenever possible, the new hardwood flooring strips should be installed perpendicular to the run of the floor joists.

For a creative look, you can run the new hardwood flooring diagonally across the floor joists. Running the flooring diagonally is more work, and will require slightly more material.

Should the Butt Joints Be Random?

Be sure to install the strips of hardwood flooring in a random manner. Regular hardwood strip flooring has tongue and grooves on all four edges.

This means you don't have to worry about having a seam where two pieces of flooring meet break in the center of a floor joist below.

Don't try to get fancy with respect to how the different pieces look. The bundles of hardwood flooring come mixed with all sorts of long, short and medium lengths. The more random the pieces are installed, the better the finished hardwood floor will look.

How Do You Minimize Waste?

You minimize waste by using the cutoff end piece of one row to start the next new row. Whatever you cut off one piece up against a wall, the leftover piece is used to start the next row. There's usually very little waste wood flooring because of this clever trick.

Is a Rubber Mallet A Must?

A rubber mallet is used by professionals to pound the new strips of flooring into place against the flooring already nailed to the floor. Each strip of new flooring needs to be tight along the long edge and the short edge where it butts against the piece next to it.

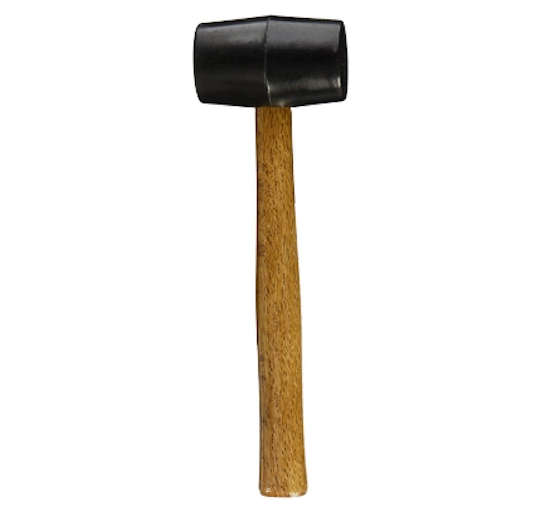
This is a standard rubber mallet. Nothing fancy here. CLICK on THE IMAGE NOW TO HAVE IT DELIVERED TO YOUR HOUSE.

You'll notice that the tongue and groove feature of each piece of hardwood flooring not only is along the long edges, but also on the short stubby ends of each strip.

Is it Easy to Reverse Direction?

Yes, it's easy to reverse the direction of hardwood flooring. One of the most secret tips is reversing the direction of the tongues and grooves. Professional installers don't always start laying a floor on one wall and work to the far wall. They may start in the middle of the room for any number of reasons.

When this happens, a special strip of wood that is the thickness of the tongue but twice as wide, is installed into the groove of the flooring.

This strip of wood allows the installer to start laying hardwood flooring going the opposite direction so the tongues of the strips are always exposed. The tongues of each strip of hardwood flooring must be exposed so you can nail the hardwood flooring to the subfloor.

CLICK HERE to get FREE & FAST BIDS from local hardwood flooring contractors.

Column 655

Exhaust Fans for Kitchen and Bath

Kitchen & Bath Exhaust Fan TIPS

Man-Made Indoor Pollution

Indoor air pollution is real! All you have to do is stand in my kitchen on a Sunday morning when I cook breakfast for my family.

There's smoke everywhere. What's worse is in the smoke is vaporized grease that coats everything in the kitchen.

In fact, the EPA has instructed me to install scrubbers on my kitchen exhaust stack. Evidently the people in my neighborhood downwind from me are complaining.

Pesky Problem

Seriously, cooking, bathing and sanitation activities create airborne pollutants that should be exhausted to the exterior of your home. This is especially true if you live in a modern airtight home.

CLICK HERE to get FREE & FAST BIDS from local fan contractors that can install great ventilation fans in your home.

Vegetable Soup

I'm reminded of how things linger in the air every winter when my wife cooks my favorite vegetable soup. When I open the door and walk into the house after being gone all day, I'm hit with a wave of aroma.

The tasty vapors of vegetable goodness are suspended in the air of the house. The furnace, each time it operates, spreads all of the aroma molecules throughout the house.

The aroma lingers in the house for days.

That's OK for vegetable soup, but not so good for the greasy bacon smoke I produce on Sundays!

Minimum Standards

Certain rooms of your home require different ventilation expectations. Kitchens need more ventilation than any room in the house. Bathrooms need about half the ventilation that kitchens require.

It's all about replacing the air inside a room so many times an hour.

15 & 8

The Home Ventilating Institute recommends that the air in your kitchen should be replaced fifteen times per hour. That means every four minutes all the air in the room needs to be replaced by new air.

Bathrooms require a minimum of eight air changes per hour. Other rooms, such as laundry, family room and basements require a minimum of six air changes per hour.

Minimum Standards

Note these recommendations are minimum standards. If you want to ventilate more, feel free to do so. Commercial buildings have much more aggressive standards than a home if you want to really go nuts with new air.

Replacement Air

All too often people install exhaust fan systems without any thought as to replacement air. Replacement or makeup air is the air which must enter your house to replace the air you are exhausting.

If you didn't do this, your house might implode. Just kidding! However, problems can arise, especially if you live in a modern airtight house.

Path Of Least Resistance

If you don't provide for adequate makeup air, your fan will satisfy the pressure difference by sucking air from unwanted locations.

For example, you may turn on that new high-powered exhaust fan and draw furnace or hot water fumes right back down your chimney! This is called backdrafting.

IMPORTANT TIP: This backdrafting can be a serious issue and you should be sure you're not creating a problem at your home. If you draw furnace or water heater exhaust air back down a chimney, you could cause serious carbon monoxide poisoning in your home.

CLICK HERE to get FREE & FAST BIDS from local fan contractors that can install great ventilation fans in your home.

Thanksgiving Ash Storm

Many many years ago, I made a fool of myself one Thanksgiving at my sister's house demonstrating this phenomenon by mistake. For some reason, I decided to turn on her whole house fan.

These are powerful exhaust fans. Since it was cold outside and all the windows were closed, the fan decided to get its makeup air from the path of least resistance. That happened to be the fireplace chimney.

It just so happened that a fire was in progress. Smoke and ashes were sucked into the dining room! What an idiot I was!

Air Duct Hood

You can provide for makeup air in many ways. Some companies make nifty devices that you can install in a side wall to provide for this purpose.

Here's a great example of a simple and affordable fresh-air vent:

fresh air intake

This fresh-air intake vent will do a great job. You may need several to get enough air indoors to satisfy all fuel-burning appliances. Pipe them with solid 4-inch metal pipe. CLICK THE IMAGE TO ORDER THIS VENT NOW.

You can also make your own like I did. I simply cut a slot in the side of my band board (floor rim joist on top of foundation) and covered it with a screened air register cover.

Fresh Air Vent Video

Watch this video to see a unique fresh-air supply vent.

Two Types of Systems

There are two basic types of ventilating systems: point of use and centralized or remote. Most people are familiar with the point-of-use fans. These fans ventilate a specific room or area.

Most kitchen range hoods or bath fans work this way. They have a motor in the fan housing (or it is sometimes in the wall or at the end of the duct run). This fan motor spins and exhausts that area.

Remote Fan

Other systems are available that work like my central vacuum cleaner. In these setups, there's a centralized exhaust motor and fan located in a remote location. When turned on, it sucks the air out of every room that's equipped with a suction duct.

Watch this video about a remote bathroom fan system I had in my last home:

I installed this type of bathroom exhaust fan in the last house I built for my family. One advantage with the remote fan is it's so much quieter.

bath exhaust fan

Here's a typical Fantech bath exhaust fan setup. The odd cone-shaped metal thing is the fan. The two boxes that have the round white covers are place up in the ceiling joists of the bathrooms. All you see are the sleek round white covers. They come with and without lights! I LOVED these in my last house. CLICK THE IMAGE TO BUY the SET NOW.

Exhaust Through Roof
I've found that it's often best to vent fans and dryers through the roof. The only places this doesn't make great sense are places where the snow buildup on roof could block the exhaust coming from the fan.

Roof Exhaust Flashing Video

Watch this video to see how to install a roof exhaust flashing and never have a leak.

Never In The Attic!

In many instances, the air from exhaust fans goes to the wrong place. I've seen both kitchen and bathroom exhaust fans that simply discharge the air into an attic space.

This is a huge mistake.

IMPORTANT TIP: In the case of a kitchen exhaust fan, this practice represents a major fire hazard. If you have a fire develop on your stove while the fan is on, the flames and fire are SUCKED UP into the attic BY THE FAN!

The moving air INCREASES THE INTENSITY of the fire. If the duct and the roof rafters, etc. are greasy the fire will spread quickly. The fan actually begins to operate like a blow torch.

Attic Mold & Mildew

Bathroom and kitchen exhaust fans also can transmit large volumes of moist humid air into the attic or other confined spaces. This can lead to wood rot, mold and mildew.

The trick is to simply exhaust this air from the fans directly to the exterior of your home. Every major fan manufacturer makes special termination "caps" that attach to the final piece of ductwork. These caps can be installed in a roof, sidewall or a soffit.

Correct Duct Size

The fan that you purchase has only so much power. It is often rated as so many cubic feet per minute (CFM) at a given static pressure. Static pressure is a concern.

Static pressure is a measurement of the power of the fan. In other words, if two fans are rated at the same CFM but list different static pressures, the fan with the higher static pressure rating will be more powerful.

Air Isn't Weightless

The concept of static pressure is really quite easy. Think of the fan and duct assembly just before the fan turns on.

Between the fan blades and the exterior of your home (end of the duct) lies a volume of air (the calm air in the exhaust duct). This duct may be short, long or have a number of bends.

The more air that is in this system, the greater the load (static pressure) on the fan. If there's too much air to push, the fan blade will simply sit there and spin.

Follow Instructions!

This is why you must follow the manufacturers instructions regarding duct size, total length of duct, number of bends in the duct pipe, etc.

If you decide to become an amateur mechanical engineer when installing your system and guess at how to install the duct piping, don't complain to me or the manufacturer if your fan doesn't seem to work.

Do It Right, Not Over!

Exhaust fans will help you to maintain a great indoor environment. You just need to select the proper sized fan, install it correctly and provide for some makeup air. Sounds too tough? Not really.

CLICK HERE to get FREE & FAST BIDS from local fan contractors that can install great ventilation fans in your home.

Column B98

Sizing an Exhaust Fan

Sizing an Exhaust Fan TIPS

Size Is Everything!

Can you imagine trying to cool yourself on a hot summer day with just the air that's allowed to pass through a tiny cocktail straw? Just a tiny stream of air would pass through and it would be virtually worthless.

Move The Air

To cool something or provide enough air to keep things fresh, you have to move air. The room you're trying to ventilate dictates the amount of air that needs to be moved in a given amount of time.

CLICK HERE to get FREE & FAST BIDS from local contractors that install ventilation fans.

Air Movement Guidelines

For years the Home Ventilating Institute said that all the air in a kitchen should be changed out for new at least fifteen times an hour. They felt that bathrooms should have a complete air change eight times an hour.

Shhhhhhhhsss! Quiet Fans

Are you upset with how loud some bathroom or kitchen exhaust fans are?

Did you know you can get wonderful fans for bathroom exhaust where the fan is way up in the attic and there's no noise in the bathroom while the air is being sucked out of the room?

It's possible! Look at the following fan I installed in my own home:

bath exhaust fan

Here's a typical Fantech bath exhaust fan setup. The odd cone-shaped metal thing is the fan. The two boxes that have the round white covers are place up in the ceiling joists of the bathrooms. All you see are the sleek round white covers. They come with and without lights! I LOVED these in my last house. CLICK THE IMAGE TO BUY the SET NOW.

A Fast Example

Let's take a small kitchen for an example. Say the kitchen measures 10 feet by 12 feet with an 8-foot ceiling. Remember how to compute cubic feet in a room?

You multiply length times width times height:  10 feet X 12 feet X 8 feet

That computes to 960 cubic feet of air in the room.

The minimum requirements say that this air should be changed 15 times an hour.

You now need to multiply 960 X 15.

This means that a fan must have the ability to move 14,400 cubic feet of air in an hour.

Exhaust Fan Videos

Watch these helpful videos about exhaust fans and how to vent them out of roofs.

The following video shows you how to prevent roof leaks around bathroom exhaust vents.

Fans Are Rated Cubic Feet Per Minute Not Hour

Since there are 60 minutes in an hour, we must divide the 14,400 by 60 to get CFM (cubic feet per minute).

Divid 14,400 by 60 and you get 240 CFM. Nothing to it!

CLICK HERE to get FREE & FAST BIDS from local contractors that install ventilation fans.

Handy Table For Fan Values

The following table does lots of the math for you. All you need to do is calculate the square feet of a room and the table tells you the CFM for either a kitchen or bathroom.

Square feet is easy. Just multiply the length of the room by the width. The table assumes a common 8-foot ceiling height.

The room area is listed in square feet. All values below the listed room size represent the fan's minimum capacity shown in cubic feet per minute.

Room Area in Square Feet Fan Capacity in CFM for a KITCHEN Fan Capacity in CFM for a BATHROOM Fan Capacity in CFM for Other Rooms
35 N/A 40 N/A
45 N/A 50 N/A
55 N/A 60 45
65 N/A 70 55
75 150 80 60
85 170 90 70
95 190 100 80
100 200 110 80
125 250 140 100
150 300 160 120
175 350 N/A 140
200 400 N/A 160
225 450 N/A 180
250 500 N/A 200
310 620 N/A 250
375 750 N/A 300
435 870 N/A 350
500 1,000 N/A 400
560 1,120 N/A 450
625 1,250 N/A 500
685 1,370 N/A -

Table Values courtesy of Nutone, Inc.

CLICK HERE to get FREE & FAST BIDS from local contractors that install ventilation fans.

Column B98

PVC Pipe vs. Cast Iron Pipe

pvc vs cast iron

This is a cast iron pipe fitting. It's been painted countless times and is over 100 years old. It's above a staircase in one of the oldest buildings in downtown Southwest Harbor, Maine. The pipe is pitch black when new from the foundry. Copyright 2018 Tim Carter

PVC vs Cast Iron TIPS

Cast Iron Pipe Is The Old Gold Standard

If you've not seen the guts of an old home, I'm talking about one built before 1920, you might not have ever seen cast iron drain pipes. It was the gold standard piping material used by plumbers for larger drain and vent lines for decades.

But the chemical industry explosion that happened in the 1960's changed the course of plumbing. Some may argue not for the better.

Related Links

Cast Iron Pipes are Easy To Install

Noisy PVC Pipe Complaints - Real Life!

Is Cast Iron Pipe Still Available?

Cast iron pipe is still made and it's better than ever. You purchase it at traditional plumbing supply houses, not big box retailers. New cast iron pipe uses rubber couplings and stainless-steel band clamps to make leak-proof connections. Watch this video to see how connections are made with ease:

Many homeowners associate cast iron piping with antiquated plumbing that's prone to developing leaks. Often people think that it clogs quite easily.

Conversely, many people think that modern plastic PVC plumbing piping is the miracle material. Well, both materials have advantages and disadvantages. Let's talk about both types of pipe and see what you think.

Free & Fast Bids

CLICK HERE to get FREE & FAST BIDS from local plumbers that can install PVC or cast-iron pipe in your home or business.

Is Cast Iron Pipe Durable?

Cast iron piping has been used successfully in plumbing systems for hundreds of years. In fact, in the year 1623 cast iron pipe was installed in the Fountains of Versailles in France.

That same piping is still functioning today. Thousands of miles of municipal water and sewer systems use cast iron pipe. The reason is long-term durability. Cast iron simply lasts.

Old cast iron pipe used to come in a regular wall thickness and an XH size. The XH meant Extra Heavy. It had thicker sidewalls and was much more durable. The XH lettering was cast into the side wall of the pipe and you can still see it if you look for it.

When Did PVC Pipe Start to Push Aside Cast Iron Pipe?

Virtually every residential home built prior to 1960 had some form of cast iron piping in its drainage system. The primary drainage stacks or pipes within the walls were constructed of cast iron.

The branches off of these stacks which connected to sinks, toilets, and tubs often used lead piping or galvanized-iron pipes.

Is Galvanized Iron Pipe Prone To Clogging?

Galvanized iron piping is especially prone to clogging. Within a decade or two of installation, the galvanized coating on the inside of the pipe wears aways or corrodes.

When this happens, the iron starts to rust and deposits start to form on the inside of the pipe causing the inner diameter of the pipe to constrict and get smaller and smaller. WATCH THIS SHORT VIDEO to show this exact problem with galvanized drain piping:

I've personally removed hundreds of these pipes which connected to kitchen or bathroom sinks. In virtually every instance, these pipes were clogged solid.

Do Cast Iron Stacks Clog Easily?

However, the cast iron vertical drain stacks only two to three feet away from the sinks were completely free of obstructions. Unfortunately, many homeowners and young plumbers don't realize this phenomenon falsely accuse the cast iron as a poorly performing product.

pvc vs cast iron

Here's a typical cast iron drain pipe. It's suspended from the ceiling in a stairwell in one of the oldest buildings in Southwest Harbor, Maine. You can see how the lettering is cast into the pipe. Copyright 2018 Tim Carter

Is It More Expensive To Install Cast Iron or PVC?

Years ago, residential construction labor costs were insignificant. Time was not always an issue with respect to how long a particular task took to complete.

For example, imagine how long it took to nail on those thin lath boards which allowed the plaster to be applied to the walls and ceilings of houses.

Think of the amount of time it took carpenters, using hand tools, to mortise hinges and locks into doors. The same is true for old style cast iron piping.

If you use modern cast iron pipe with no-hub rubber couplings, it takes just a few more minutes per joint to install than using PVC. One benefit of using cast iron is that you can make adjustments to the fitting angles after installation. You can't do that with PVC. Once you glue a PVC fitting onto a pipe, you only have seconds to get the adjustment perfect.

CLICK HERE to get FREE & FAST BIDS from local plumbers that can install PVC or cast-iron pipe in your home or business.

Do You Still Use Old Lead & Oakum?

You need to use lead and oakum if you're working with old cast iron. Old style cast iron piping was a chore to install. The plumbers had to pack oakum into each joint. Oakum was simply an oil-soaked rope that filled the 3/8-inch-wide gap where the male end of one cast-iron pipe mated up with the female hub of another piece of cast iron.

Once the oakum was taped tight into the joint and within a half-inch of the top of the hub, the plumbers would melt lead ingots and then pour this molten lead into the hub.

The lead solidified rapidly and the plumbers would use a flat tool to tamp and pack the lead in the hub so the joint became leak-free.

The job of installing cast iron was tough, time-consuming and dangerous.

Modern Cast Iron Pipe Is Easy To Install

The cast iron pipe available today looks somewhat similar to old cast iron. Old cast iron was indeed cast in molds. Modern cast iron is spun cast so the pipe wall thickness is much more consistent.

How Do You Connect Modern Cast Iron Pipe?

You connect modern cast iron using stainless-steel band clamps that squeeze full-sized rubber sleeves that surround the outer surface of the pipes.

cast iron band clamp

My hand is touching a modern cast iron band clamp that prevents leaks where two pieces of pipe connect to one another. Copyright 2018 Tim Carter

The methods of installing the material have changed drastically. Gone are the oakum and molten lead. In their place, you now find vulcanized rubber seals and stainless steel band clamps.

Cast iron piping systems can now be installed in a fraction of the time it took to install them fifty years ago. In fact, modern cast iron piping can be installed just as quickly as plastic PVC piping.

Can You Adjust Cast Iron Fittings After Installation?

One of the amazing aspects of the modern cast-iron pipe is the fact you can easily adjust the orientation of the fittings AFTER you install them. You can do this by just loosening the screws on the band clamps and then twisting the fitting.

It's IMPOSSIBLE to do this with PVC or old cast iron. Once you glue PVC together you have between five and two seconds, depending on the diameter of the pipe, to make any adjustments.

With old cast iron, once you poured in the molten lead, you're toast. You can't make any adjustments.

Cast Iron Is Super Quiet

Because cast iron is dense, it takes a lot to get it to vibrate. When water flows down a cast iron stack, you can only hear it if you put your ear up to it.

If you need to have a quiet home and don't want to hear a waterfall in your walls each time someone showers or flushes a toilet, then you want cast iron drain pipes.

PVC Pipes Are Acceptable But Noisy

I've been a master plumber since before I was thirty years old. I had the good fortune to work with both cast iron and modern PVC.

PVC pipe is lighter in weight than cast iron. It cuts faster with a regular saw you'd use to cut lumber. To cut cast iron, you need a cut-off saw with an abrasive blade that creates a shower of sparks.

To cut a 3-inch piece of PVC pipe, you might take three or four seconds. To make the same cut on cast iron with a cut-off saw, you'll spend at least 15 or 20 seconds.

PVC Pipe Videos

Watch this video to see how easy it is to glue PVC pipe together. Primer is mission critical!

Watch this video to see different PVC fittings you use with pipe.

PVC Is Noisy

PVC is not dense and water cascading down a vertical stack causes it to vibrate. This vibration creates lots of noise.

People who are not familiar with PVC pipe often think there's a leak inside a wall when they hear a toilet flushed for the first time. It's annoying in my opinion.

CLICK HERE to get FREE & FAST BIDS from local plumbers that can install PVC or cast-iron pipe in your home or business.

Column B380

How to Drive Finish Nails into Wood

impulse nail driver

This gas-powered impulse nail driver does a marvelous job of driving finish nails. Copyright 2017 Tim Carter

How To Drive Finish Nails TIPS

DEAR TIM: I was helping my boyfriend install some wood trim this weekend and had a disagreement with him. It was about how to drive finish nails into wood.

He's of the opinion you should drive them flush with the wood and then paint over them. I remember my dad using a small tool he tapped with a hammer to drive the nailhead below the surface of the wood.

Then he'd put spackle over the nail to hide it. Can you settle the dispute and offer any tips on how to install finish nails professionally? Becky S., Kissimmee FL

DEAR BECKY: Sometimes I don't like playing the part of Solomon when it comes to domestic squabbles. But in this case, I'll jump in feet first since it's a topic I feel I can offer sound advice.

Boyfriend's Reality

Your boyfriend may want the rustic look, in which case his method will just barely pass. Everyone has their own reality when it comes to a preferred and acceptable look. As crazy as this sounds, your boyfriend may feel that his method produces the most pleasing finished look of all.

Free & Fast Bids

CLICK HERE to get FREE & FAST BIDS from local finish carpenters who can install your interior trim moldings.

The Pro Look

Your dad, in my opinion, taught you the proper and time-tested way to countersink a finish nail. The tool your dad tapped with a hammer is called a nail set.

Nail Sets

Nail sets come in different sizes to match up with the head of the finish nail being driven or set. A nail set is a solid piece of tooled steel that has a square or round surface you tap with a hammer.

nail sets

These are standard nail sets. The yellow one has the smallest tip. These are very affordable and work well. CLICK THE PHOTO to have these nail sets delivered to your doorstep in days.

The tip of the nail set tapers so the tip is quite small, usually slightly smaller than the diameter of the head of the finish nail that's being set.

Match Tip To Nail Head

It's important the tip of the nail set toolis smaller than the nail head. You want the smallest hole possible in the wood to fill or disguise. This is especially true if the wood is to be stained and coated with a clear finish.

In these situations, you want small holes that can be filled with a wood filler that matches the finished color and grain of the wood.

Steady Hand

Using a nail set is not easy. Driving nails in finished wood trim is an art. To develop great skill, you must practice.

No Beauty Marks

The common mistakes rookie carpenters or homeowners make are large bruises or "beauty marks" made by a hammer head that strikes the wood. Believe me, I've done this on more than one occasion. These marks are very difficult to repair and hide.

Precise Hammer Blows

Driving finish nails requires deft hammer blows. The head of the hammer needs to hit the head of the finish nail squarely and the hammer must hit the nail so the head of the nail contacts the center of the hammer.

CLICK HERE to get FREE & FAST BIDS from local finish carpenters who can install your interior trim moldings.

IMPORTANT TIP: Drive the nail with authority, but not full hammer blows. Depending on the size and length of the finish nail, you'll discover you may only need 4 to 6 inches of hammer travel to develop enough force to drive the nail.

If the nail is driven just one-quarter inch with each hammer blow, that's sufficient. Remember, you can't have the hammer touch the wood.

Stop & Set

When the top of the nail head is about 1/4 to 3/8 of an inch away from the surface of the finished wood, stop hitting it with the hammer. It's now time to use the nail set.

Place the tip of the nail set in the center of the nail head and tap it lightly with the hammer. The nail may only move 1/16th inch with each hammer blow. This is fine. It's all about precision, not power.

Line It Up

If you don't have the nail set lined up directly with the nail, the nail set will jump off the head of the nail and make a new hole on the side of the finish nail. This is unacceptable if the wood will be stained.

If the wood will be painted, you can fill this extra hole with spackling compound.

Create The Recess

The trick is to drive the finish nail so the top of its head is about 1/16th inch below the surface of the finished wood. This is not as easy as you might think, and the degree of difficulty depends on the size of the finish nail.

Larger finish nails are much harder to countersink than small ones because the larger nails offer more resistance when you're driving them.

Practice On Scrap

If you've never done this before, you should practice using scrap finish lumber. I would create a simulation where you have a couple of pieces of framing lumber nailed together.

Nail a small piece of drywall to the pieces of rough lumber. Then try to nail a piece of finish trim to this assembly.

Twenty-Five Times

Drive and countersink at least 25 nails before you advance to a real piece of trim. When you do start to nail real pieces of trim, start in a closet or on baseboard you know will be hidden with furniture.

The last thing you should nail is a piece of door or window casing at eye level where the mistakes you make will be visible for all to see.

Power Finish Nailers

If you want to avoid the possibility of making a mistake, consider using a powered finish nailer. These tools have been around for decades and they drive and countersink finish nails with the squeeze of a trigger.

finish trim nailer

This is my favorite finish trim nailer. It is powered by propane and a lithium-ion battery. No air hoses or noisy compressor needed! CLICK THE IMAGE NOW TO BUY THIS GREAT NAIL GUN.

The tools drive all sizes of finish nails from 2.5 inches long and normal nail diameters down to tiny 1/2-inch long pins. These pin nails are so thin, they look just like a straight pin. They're made to attach small pieces of decorative trim.

Finish Nail Gun Video

Watch this video to see how to use a finish nail gun.

Different Power Sources

The nail guns can be powered by compressed air, electricity or propane. I've used all different types of these finish nail guns and they all work well. I prefer to use the guns that don't require compressed air as the air hoses and air compressors can be a problem to work around.

How to Remove Finish Nails Video

Here's a handy trick to help you remove finish nails when salvaging trim lumber.

CLICK HERE to get FREE & FAST BIDS from local finish carpenters who can install your interior trim moldings.

Column 1014

How to Tile Step Trim

These outdoor steps make a bold statement with small pieces of trim tile. ©2017 Tim Carter

How To Tile Step Trim TIPS

DEAR TIM: I’ve got an exciting outdoor patio project I’m about to start. But I need your help.

This is a multi-level patio that will be connected by several different sets of steps. I’m leaning towards a orange-red terra cotta clay tile for this project.

The issue is I just don’t want to end up with a big blob of orange/red in my backyard. I feel I need to incorporate extra accent color.

Do you have any ideas? I’m looking for something that will last for many years. Terry C., Cambria, CA

DEAR TERRY: I can relate to your dilemma.

Lot's Of Red

Years ago I built two red paver brick patios for my wife. They had steps that were part of the design. While the brick did come in subtle different shades, when it was all said and done it was a giant blob of red brick!

CLICK HERE to get FREE & FAST BIDS from local tile contractors that can dress up your patio.

Ponder The Possibilities

Years after I built the patios, I’d sit out there on summer evenings and think about how I could have done things differently, especially when it came to the step risers. I believe you’re going to like my suggestions. Let’s get started.

Break Up Color

You’re not the first person to have this low-level anxiety. The same thing can happen when a person paints a room. At first the walls are screaming color because nothing is on them and the room is empty.

But adding furniture, paintings and other things back into the room, tames the wild beast of wall color.

Patio Furniture

Think about how your patio furniture is going to offset the wide expanse of the tile. We had just traditional dark-green wrought-iron patio furniture on our red brick and I was amazed at how it toned down the brick.

Patio furniture with cushions, texture, and fabrics could go a long way to create the overall look you’re thinking about.

Risers Are Billboards

My first suggestion is to incorporated different tiles, and there are many types, as part of the stair cases. When you approach even a low set of steps, your eyes are almost always focused on the risers.

Your brain is doing the math so that you raise each foot just enough to clear the riser so it lands on the tread.

Decorative Tile On Risers

Take advantage of this and put some colored tile as the riser instead of the same terra cotta tile you’re using for all the flat patio surfaces and the treads. There are endless choices of glazed tile meant for outdoor use that will stand the test of time if installed correctly.

I can think of no less than ten colors and patterns that would go very well with a standard terra cotta tile.

accent tile

Here's an example of accent tile. Just imagine the possibilities! Ships, flowers, animals, geometric shapes, sea creatures, etc. CLICK THE IMAGE TO SEE UNLIMITED ACCENT TILES AND TO BUY THEM.

Tough Tile

Always be sure the accent tile you decide to use is made to withstand exposure to the outdoor elements where you live. While it doesn’t get bitter cold where you live, some people do have freezing conditions and the tile they use needs to be made to withstand freeze/thaw cycles without crumbling.

CLICK HERE to get FREE & FAST BIDS from local tile contractors that can dress up your patio.

Accent or Mood Tiles

You may even be able to locate an accent tile that speaks to something you like, the flavor of your setting, or it communicates a theme or feeling you’re trying to create with the patio setting.

For example, let’s say you like everything ocean. You might find tiles that have all sorts of sea creatures or other maritime scenes baked into the clay. Maybe you love flowers and the accent tiles are all sorts of different flowers that appeal to you. The possibilities are almost endless.

You can extend this accent tile idea into the flat surfaces of the patio. You may find tiles that can be used to outline different seating areas on the patio. Other tiles can be used that may tell a story. Some tiles can be used to create a pathway within the terra cotta tile.

©2017 Tim Carter

Potted Plants

Don’t forget you can use potted plants that rest in decorative pots to also help add different colors and textures to the patio. My wife would fill many pots of different sizes and in different groupings at spots on the patio.

My favorite annual flowers were ones that were a deep red in color.

Strong Base

To ensure all this hard work stands the test of time, you need to make sure the tile is put on a base that’s not going to fall apart or crack. This means you, or your contractor, need to install a poured concrete base that contains lots of steel reinforcing rods.

No-Rust Reinforcing Steel

I’d paint the steel with a special paint that resists rust and salt spray. Recently I was able to see accelerated salt-spray tests of metal paints and a paint called X-O Rust outperformed all other paints.

It’s available at your local True Value hardware store.

4,000 PSI

The concrete should be no less than 4,000 pounds per square inch in strength and at least 5 inches thick. I’d place the steel rods both directions at 2 feet on center making sure they end up in the middle of the concrete.

Crack Management

The steel holds the concrete together in the event it wants to crack and displace. You can’t afford any cracks to form and spread. These cracks would telegraph through the finished tile.

Crack Isolation Fabric

Modern techniques and materials might be in order for you too. Crack isolation fabrics and membranes are commonly used to help prevent cracks from telegraphing through to the finished tile. I’d look into these and make sure the manufacturer states they can be used in your setting.

crack-isolation fabric

This is a typical crack-isolation fabric that goes underneath ceramic tile. CLICK THE IMAGE NOW TO ORDER IT.

Best WX

Try to do all the tile work on overcast days with the temperatures in the 60 F range. Hot sunny weather is the worst to install patio tile. The cement mortar can dry too rapidly leading to poor bonding.

CLICK HERE to get FREE & FAST BIDS from local tile contractors that can dress up your patio.

Column 1184

Metal Pegboard Hooks

Metal Pegboard Hooks

Here's some of my metal pegboard in my garage. With thought, you can have all you need at your fingertips. Copyright 2017 Tim Carter

Metal Pegboard Hooks TIPS

DEAR TIM: I've tried and tried to get traditional wood-fiber pegboard to work. No matter what I do, over time the holes in the pegboard enlarge, the hooks and hangers get loose and everything is a mess.

What's more, I'd like a little color in my workshop other than brown. I've seen metal pegboard and wonder if it's really the answer.

What do you use in your workshop and garage? Have you tested a product for years or are you still in the honeymoon phase with something that may fail?

I want to know, “What would Tim do?”

Marsha C., California, MD

CLICK HERE to get FREE & FAST BIDS from local handymen that can install metal pegboard in one hour.

DEAR MARSHA: I can speak to your frustration.

Sawdust With Holes

For decades I struggled with the brown wood-fiber pegboard that undoubtedly exists in millions of garages and basements across the land. I tried every imaginable hook design only to be more frustrated than a major-league batting champion in a deep hitting slump.

I had the good fortune to actually see how the wood-fiber pegboard was made a few years back when I went on a factory tour of a plant that makes the product up on the western shores of Lake Huron in Michigan. I was impressed by the manufacturing process, but not by the end product.

Holes Get Bigger

Some hooks and pegs would work well, but if you grab or hang a tool on the hook frequently the wood fiber holes enlarge and the party's over. Each time you go to grab the tool, the hook might come with it.

Birth of Metal Pegboard

Fortunately, this happened to a man who lived in the South and no doubt he uttered one day, “There must be a better way.” That's when he decided to invent metal pegboard.

Saw It At A Show

I discovered this unique invention just after the year 2000. As you might suspect, I attend many building product and tool shows. The National Hardware show is one of them.

CLICK HERE to get FREE & FAST BIDS from local handymen that can install metal pegboard in one hour.

Secret Location Of Best Products

I discovered long ago after attending a few shows that if you want to discover some of the best new products, you have to go into the bowels of the show. You need to go to the areas where the tiny booths are because the start-up companies can't afford the giant booth spaces on the main show floor.

The tiny 10-foot by 10-foot booths are located off in the corners or in another hall depending on the show venue. These booths are were you find the new companies that often have very unique products.

My Head On A Swivel

Years ago, I was walking down aisle after aisle past countless small 10x10 booths and all of a sudden I saw a small display of metal pegboard. Not only did it have the traditional holes you see in wood fiber, but it also had narrow slots in it too.

It put my head on a swivel and I proceeded to back up and take a look. Thank goodness I did!

Rick The Man

There in the booth was the inventor, Rick Grove. The sign in the booth simply said, Wall Control. What a great name I thought as my tool storage walls were out of control.

My questions to the inventor focused on the narrow slots and the specialized hangers that fit into the these evenly spaced slots.

Metal Pegboard Video

Watch this video of just a small part of my metal pegboard collection.

Clever Hook Design

The special hooks, hangers, shelves, accessories, etc. all had a clever interlocking hook design that ensured the hooks would NEVER pull out of the metal pegboard. You inserted the hook by tilting it and lifting it up.

Super Strong Steel

When you put the rest of the hook into the pegboard and then slid it down ever so slightly, it interlocked into the pegboard. The strength of the metal hook and pegboard made sure it would never fail under the weight of ordinary tools.

Instant Sensation

I knew instantly, as soon as I saw how the hooks interlocked with the pegboard, it was one of those rare inventions that would be a game changer. I knew it would work, so I ordered some immediately and began testing it.

Just as I suspected, it's worked well.

New Colors and Accessories

As the years passed, Rick started to introduce colored panels, more accessories and hooks than you could ever imagine and his product is one of the favorite things in my workshop.

Anyone who comes to my workshop or garage is immediately taken by it.

metal pegboard

This is a great starter set of the metal pegboard, hooks and accessories. This is the brand I have in my home. CLICK THE IMAGE NOW TO BUY THIS PEGBOARD.

Use Your Old Hooks

One of the best aspects of the product are the traditional holes that you see in wood-fiber pegboard. If you have an investment in hooks and tool holders that work in your existing wood pegboard, they'll work in the metal pegboard.

You don't have to purchase new hooks and hangers, but once you see how well they do work, I'm willing to wager you'll switch over to the hooks, hangers and shelves that utilize the narrow slots.

Never-Ending Honeymoon

The honeymoon is far from over. Each day I grab or hang a tool on my pegboard, it's like the morning after my wedding day. My metal pegboard is now over fifteen years old and it looks like the day I installed it.

I've reorganized how tools, shelves and bins are stored on the metal pegboard numerous times. I really feel I now have an ideal layout where the things I use most frequently are exactly where I need them.

Constant Flow Of New Products

As you can imagine, I see hundreds of new products each year. Most are ho-hum and only every once in a while do I see a product that makes me wide-eyed like that day in the basement of the National Hardware show.

Get Your Color

If you decide to get the metal pegboard I have, take your time and think about the color you want. Realize you can mix and match the hooks, hangers, shelves and other accessories. You don't have to buy all the same color of everything.

Color coding sections of your pegboard may be a smart way to organize things.

Mix 'N Match

I've discovered it's best to make the hooks and hangers a completely different color than the metal pegboard. That way the hooks and hangers stand out and you can easily place tools on them when the light may be dim in your workshop.

Spring-Loaded Lamp

I've also discovered that spring-loaded desk lamps on articulating arms make fantastic workbench lighting. Although you may choose to use the weighed base that comes with the light, I tend to just drill a one-half-inch hole into the wood top of my work bench and drop the lamp into that hole so the base doesn't get pushed off the workbench.

adjustable lamp

This is just like the adjustable lamp I have at my workbench, but better. This particular lamp has a magnifying center lens that allows you to enlarge what you're working on. It can come in very handy on certain projects. CLICK THE IMAGE NOW TO BUY THIS LAMP.

This gives me great task lighting and I swing the light out of the way when I don't need it.

CLICK HERE to get FREE & FAST BIDS from local handymen that can install metal pegboard in one hour.

Column 1044

How To Repair Mortar With Caulk

The mortar in this brick wall can be repaired with caulk, but realize there will be color issues and it’s not permanent. ©2017 Tim Carter

How To Repair Mortar With Caulk

DEAR TIM: My ten-year-old house developed some cosmetic cracks in the mortar. I got some bids to have tuck-pointing work done and nearly gagged when I looked at the cost.

I’m wondering about using a special caulk I found that’s made to repair mortar joints. It contains fine sand so it’s textured and the color matches my mortar.

I did a test in a small area and am really satisfied with the appearance. It seems too good to be true.

Is this caulk the Holy Grail of mortar repair? What could possibly go wrong? Aaron W., Prosper, TX

DEAR AARON: I’m sorry to hear about this issue with your mortar.

CLICK HERE to get FREE & FAST BIDS from local handymen that can caulk your brick or apply a water repellent.

Cracks Since Day One

One wonders if these tiny cracks haven’t been there since the day the house was built, especially if the brick was laid during a blistering hot stretch of weather. Hot, windy weather is the worst time to do any masonry or concrete work as the water leaves the mortar and concrete too fast.

Rain & Wind = Bad JuJu

You should be concerned with the small cracks because wind-driven rain readily enters brick walls. It always has, even old brick buildings constructed decades ago.

Old builders and masons knew about this water infiltration and used different types of brick in solid masonry walls.

Soft Inner Brick

The inner layers of brick hidden by the outer face brick and the interior wall finishes were made with a softer brick that could absorb lots of water. These brick were not fired as long in the kiln and the kiln temperature was not as hot.

You can often recognize these softer brick by their color. They're almost always have a very orange cast and crack with ease.

Back & Forth

The water would enter the brick as the storm lashed the sides of the building with rain. Each raindrop smashed into the brick and mortar and the wind pressure shoved the water into the wall like football players try to shove a fellow team member over the goal line.

As each raindrop crashed into the wall, it pushed the water from the previous raindrop deeper into the brick wall.

This water would then go back outside as soon as the storm was over. The sunshine and breeze would suck the water out of the brick walls faster than a tumbleweed skitters across Texas rangeland in a windstorm.

Long-Lasting Mortar

Before we discuss your magic caulk discovery, let’s talk about the permanence of brick mortar. What would you say if I told you that your bricklayers could have used a mortar that’s been in use for over 4,000 years and is still in great condition?

What would you say if this mortar had the ability to heal itself and repair tiny cracks in some cases? I knew you’d be interested.

If your bricklayers had used hydrated lime mixed with the sand instead of regular mason’s mortar mix, you’d probably not need this caulk you discovered.

hydrated lime

This is excellent hydrated lime. It's a fine white powder and it's going to look great on your home. CLICK THE IMAGE TO ORDER SOME RIGHT NOW.

Hydrated lime is a building product that’s rapidly slipping from history to legend to myth, just like the golden ring in J.R.R. Tolkien’s book The Lord of the Rings. I’m doing my best to ensure the wonders of lime mortar continue to live on and on.

CLICK HERE to get FREE & FAST BIDS from local handymen that can caulk your brick or apply a water repellent.

Soft vs. Hard

Let’s talk about this caulk. I’ve not used it, but realize that no caulk, no matter what it contains, could ever equal the lifespan of a lime mortar. When you mix hydrated lime with water it transforms back into limestone.

Mor-Flex Caulk

This is the magic caulk that Aaron tested on his home. You can actually SEE this caulk in the photo above of Aaron's brick wall. He lucked out in that the mortar color and caulk color are nearly identical. But for how long? CLICK HERE NOW TO ORDER THIS CAULK IF YOU WANT TO TRY IT.

We all know how long-lasting limestone can be as many of our Federal buildings and monuments are faced with this durable stone. Sand, which is nothing more than tiny pieces of rock, make up the rest of the mortar.

Punishing UV Light

The chemicals used to make the caulk undoubtedly will succumb to the ultraviolet (UV) rays of the sun. It may take a decade or two, but the sun’s UV rays are so powerful they can break atomic bonds of metals.

The sun’s UV rays breaking apart a flexible caulk would be like you trying to tear apart a wet paper towel.

Color Fade

I’d also be concerned about the color fastness of the caulk. It may match your mortar now, but will the color pigments in the caulk be able to withstand the UV rays in two, four or ten years?

If the color does fade, then what do you do then?

One Color

Another issue with the caulk is it produces a monochromatic color. In other words the caulk, once dry, is one color. Fresh mortar has this same one-color appearance when it’s new because the cement or lime paste is coating the tiny pieces of sand in the mortar.

Mortar Multi Mini Color Blend

But Mother Nature wears off this ultra-thin paste from the sand in a few years and then you start to see the individual colors of the grains of sand. If the mortar you don’t coat with the caulk starts to weather more and more, will it soon not match the caulk? There are just so many unknowns.

Come Unglued?

What about long-term adhesion? The chemistry of caulk is that of glue. Caulks are in the glue and adhesive family.

The caulk may work really well now and develop a tenacious bond with the mortar. What kind of mess might you have on your hands five or ten years from now if the bond fails?

Some Great Caulks

In all fairness, I’ve seen some very high-quality commercial-grade caulks used to fill expansion joints on large exterior brick walls. Some still is looking good after a decade. Just realize that mortar that’s installed correctly can last hundreds and hundreds of years with no care.

Water Repellent Cure

There may be another solution to your problem. You may be able to spray onto the brick and mortar a clear water repellent that’s got a very high solids content. It’s possible the liquid may dry and do a great job of repelling most of the water that you’re worried about.

silane - siloxane water repellent

This is a magnificent silane - siloxane water repellent that soaks into concrete. CLICK THIS IMAGE NOW TO ORDER IT.

I can tell you that I’d spend hours and hours researching clear water repellents and doing your due diligence to see what other users have experienced.

It would be infinitely easier to spray on a liquid than to caulk the thousands of feet of mortar joints on your home. Here’s hoping you’re able to locate that magic liquid should it exist!

CLICK HERE to get FREE & FAST BIDS from local handymen that can caulk your brick or apply a water repellent.

Column 1185

Money Pit Deck Tips AsktheBuilder

Money Pit Deck Tips From AsktheBuilder.com

  • Pressure washers damage the soft light-colored spring wood
  • Stain Solver oxygen bleach is the safe way to clean wood decks
  • Deck sealers must have pigment and not be film formers
  • Composite decking needs to be cleaned on a regular basis
  • CLICK HERE to Get Tim's FREE & FUNNY Newsletter!

Watch the video below first to see how pressure washers can ruin wood.

Note how easy it is to use Stain Solver oxygen bleach.

Stain Solver Promo Code

Use this promo code to get a 10% discount on your first order of Stain Solver certified organic oxygen bleach.

MP10


Deck Stain Test Results Promo Code

Use the following promo code to get a 50% discount on my Deck Stain Test Results.

CLICK HERE to get free access to dramatic Before & After photos of the stains.

MPDS50


Step-by-Step Instructions to Clean a Wood Deck

CLICK HERE to see exactly how I'd clean a wood deck with Stain Solver oxygen bleach.

Deck Cleaning Instructions

Watch How Tim
Cleans a Deck!

Cincinnati, OH (March - 2017)
.
Getting Started

Cleaning a deck is simple if you have the right tools and don't mind getting a tad bit dirty. I prefer to clean wood decks using hand tools to eliminate the possibility of hurting the wood. Gather a bucket, a standard pump sprayer, a scrub brush on a pole, a toilet brush, bottle brush, or hand scrub brush, a measuring cup and some oxygen bleach and water.

Applying the Solution

I have just poured some oxygen bleach onto the deck. Look how it is beginning to foam up. In the center of the photo you can start to see the natural color of the wood appear. I made this happen by scrubbing the area very lightly with the brush just to show you how quickly the oxygen bleach can work.

Even though it works quickly, I still prefer to let the oxygen bleach work on its own for 10 - 15 minutes. The millions of oxygen ions really do a fantastic job of cleaning on their own.

Before I clean the deck surface, I like to spray down the railing system. To do this in a most efficient way, I use a traditional hand pump sprayer. The trick is to make sure you have waited the 5 or 10 minutes for the oxygen bleach powder to dissolve. If you don't the powder can clog the tip of the sprayer and cause you fits.

Spray Away!

Use the sprayer to apply the oxygen bleach solution. It doesn't make a difference where you start. The trick is to apply a generous amount. You do not want the solution to evaporate. If the deck or railing surface is hot, then you will have to pay attention. Windy conditions will also accelerate evaporation.

Note how the railings are not as grey as the deck surface. They will not require as much work as the decking. Be sure to adjust the sprayer tip so it creates a heavy mist, not a direct stream. Light hand pressure on the sprayer handle prevents waste.

The solution will readily run off the vertical railing system so you will need to make repeated passes to keep the wood wet. If you can get a person to help you, it would be ideal. One person can spray while the other person begins to scrub. The oxygen bleach will not hurt surrounding vegetation. If you do have tender plants and some overspray gets on them, just rinse the plants with water to give you additional peace of mind.

Time for the Decking!

Now it is time to apply the oxygen bleach to the decking. You can pour it onto the wood surface, use the pump sprayer, or dip the scrub brush into the bucket. The choice is yours. Do whatever it easier for you. Just make sure that the deck surface is really wet. If the wood is in bad shape, the solution may soak into the wood requiring you to add more solution.

As you can see, I have already dipped the brush into the solution several times and the previously snow white oxygen bleach solution is a yucky green. This is caused by the algae that has been transferred from the deck into the bucket by the brush.

Look at how the oxygen bleach foams up when it contacts the dirty, weather-beaten wood. This foaming action begins within seconds of contact. This tells you that the solution is doing its job.

I don't like to use pressure washers on wood decks. The intense pressure erodes the light colored spring wood that is in between the dark colored bands of summer wood. This deck was pressure washed last fall by the homeowner and he ruined the hand rail and several of the deck boards.

Scrub Lightly!

Once the oxygen bleach has worked its magic it is time to lightly scrub the wood surfaces. This mechanical action helps to lift wood fibers that have been blasted loose by the UV rays. The scrubbing also lifts all traces of dirt, algae and mildew.

I like to use a toilet brush for the wood railings. It fits nicely in between the pickets. Remember, you don't have to scrub hard. You just want to loosen dirt and grime.

A scrub brush on a pole does a swell job for the flat decking and any other surface where you can make it work. The top surface of the handrail can often be cleaned this way. There is no need to get on your hands and knees. If you own a push broom with stiff bristles, try it. Be sure to get in between decking boards. A small brush may be necessary here.

Rinsing the deck is simple. Grab your garden hose. If it has a good nozzle feel free to use it. Standard nozzle pressure will not harm wood like a pressure washer. It is important to rinse the deck and rail system thoroughly.

Look how green the oxygen bleach scum is! This deck was very dirty. It actually required two cleanings. Once it was rinsed the first time, I saw dirt and algae that was still left in some deep cracks. I also feel the homeowner might have sealed in some dirt and algae when the deck was sealed last fall. The second cleaning was much easier to do than the first one.

The completed job. The deck looks beautiful. Look at how the natural color of the wood has been restored. oxygen bleach is the only way to clean a deck in my opinion. The job took a total of four man hours from start to finish. Once the deck dries it will be time to put on the Defy deck sealer.

NOTE FROM TIM CARTER - Founder of AsktheBuilder.com - posted October, 2016: I no longer would apply Defy deck sealer to any exterior wood that I own at my own home.

EB015 Cleaning & Sealing Deck Cover

Column B354