How to Remove Brick Mortar

Remove Brick Mortar TIPS

DEAR TIM: How can I remove brick mortar from the sidewalk I just constructed with paver bricks? My husband and I got the mortar smeared on the brick, and it looks terrible.

What methods can I use so the brick is not damaged?

Is there a non-toxic way to do this repair? Sarah H., Kingsport, TN

DEAR SARAH: Smeared mortar on brick pavers, as well as brick walls, is a very common problem. It seems to be a growing problem as many masons don't seem to take pride in their work. It's understandable for DIYrs to make a mess.

Simple Maybe

Depending upon the type of brick, the job can be simple or a nightmare. It's my hope that you don't have a deeply grooved wire-cut brick, as these have many small crevices that can make cleaning a career choice.

CLICK HERE to get FREE & FAST BIDS from local bricklayers who specialize in repairs and mortar clean-up.

Don't Worry

Since you're concerned about the toxicity of different options, you may find it very hard to make a decision as to what chemical to use. You can use certain acids that are more aggressive than others, and the ones that work faster tend to be more toxic.

But don't panic as you may discover that an aggressive acid treatment may work for you if you work to control the amount of liquid used as you work. In fact, I'd recommend you use the acid just below, but do so in a conservative manner.

The acid will only harm you if you treat it with disrespect.

Muriatic Acid

Typically bricklayers will use muriatic acid to dissolve mortar from most brick. This is simply a form of hydrochloric acid.

muriatic acid

Muriatic acid is powerful and needs to be treated with lots of respect. CLICK THE IMAGE TO ORDER SOME NOW.

When you purchase this product it often has a skull and crossbones on the label. That's telling you it's a powerful chemical.

But these products can be neutralized. That's something all of us should have discovered in our high-school chemistry class.

The best part is the mortar does neutralize the acid as it works to dissolve the mortar paste. That's one of the benefits of choosing to use muriatic acid.

As long as you don't go splashing it around and use too much, it's not that toxic. Plus, once diluted with water, it becomes even more safe.

Weak Acids

There are other acids that will react and dissolve the alkaline chemicals in the mortar. Even white vinegar that's in your kitchen will work to some degree.

Since you eat vinegar in many foods, you know it's not a toxic acid.

mortar on bricks

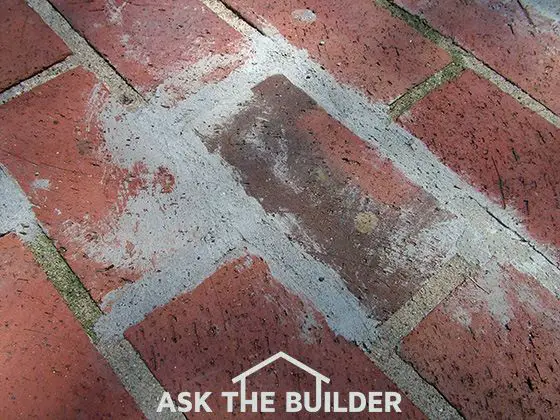
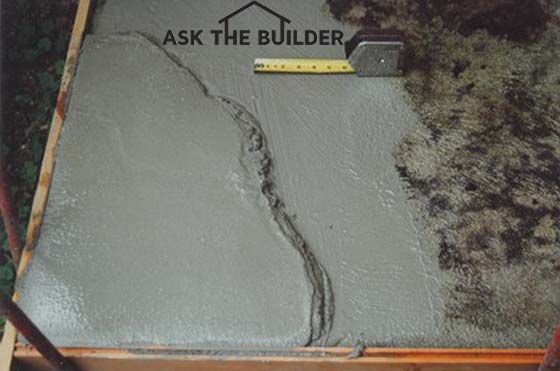
This is a pretty typical mortar smear on a flat patio brick. The wire-cut lines in the brick can be very hard to clean if the mortar gets in them. When laying brick, discover how to not be messy. ©2017 Tim Carter

Tough Choice

The challenge for you is finding an acid somewhere between vinegar and hydrochloric acid that will efficiently remove the mortar buildup.

If you're really worried about the toxicity of muriatic acid, and you shouldn't be, you should consider calling a physical chemistry professor at a local college or high school.

You can also visit a building supply company to see if they stock a non-toxic acid that will dissolve the mortar.

Remove Excess Mortar

The first step in the process is to remove as much of the mortar as possible with a scraper or chisel without scratching the brick face. Clear water flowing over the brick acts as an effective lubricant that will minimize damage to the brick.

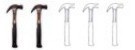
I've had great luck using a 3-inch-wide stiff scraper with a chiseled edge.

stiff putty knife

This is an all-around great tool to have. It's wonderful to mix sanded or wall grout. Keep it clean to last for decades! CLICK THE IMAGE NOW TO ORDER ONE BEFORE THEY'RE ALL GONE!

If you have to tap the scraper with a hammer, do so at a low angle with the face of the scraper nearly parallel with the face of the brick. You're trying to get the mortar film to a thickness less than that of a plastic credit card.

CLICK HERE to get FREE & FAST BIDS from local bricklayers who specialize in repairs and mortar clean-up.

Bathe The Brick

Once the majority of the mortar is off the brick, you then should consider bathing the brick with a diluted acid solution. As mentioned before, muriatic acid is highly effective, and it works on most brick. However, you need to wet the brick before you apply the acid. See below.

Usually you mix one part of the acid with ten parts of clean water. Always read the instructions on the acid label and pay particular attention to all safety instructions.

IMPORTANT TIP: It's also a good idea to contact the manufacturer of the brick if you know who made it. Some brick can be damaged and discolored by acids. It's really worth the effort to call the brick manufacturer if possible.

Wet The Brick

I've found in most cases you should dampen the brick with clear water before you apply the acid solution. Always try this in an out-of-the-way area if you're unsure if the acid will harm the brick.

If you don't do this, it's possible to burn the brick. Some brick don't like muriatic acid and it can discolor them.

Be sure to TEST the acid on the brick. Don't take a chance.

Bubble & Fizz

If you use muriatic acid, you should see tiny bubbles forming where the solution contacts the smeared mortar. This tells you the acid is reacting with the mortar paste and is starting to dissolve it into the liquid solution.

Use a scrub brush to help remove the mortar. Wait five, ten or more minutes after the acid solution has been applied to the brick before you scrub.  The longer you allow the acid solution to work, the less you have to scrub.

It can take multiple applications of acid solution to remove all of the mortar if the buildup is thick. Rinse the acid solution from the brick with lots of water. The more water you use, the better.

Powerful Jujumagumbo

Working with acid solutions is very tricky. You can hurt yourself, your clothes, your brick, the new mortar and vegetation around your home. If you have valuable vegetation and landscaping, you should try to stop any acid solution from getting into the soil.

Plastic sheets work well for this purpose.

Protective Gear

Be sure to wear all of the protective gear to prevent burns to your skin and eyes. Muriatic acid straight from the bottle is a wicked liquid.

The fumes are very toxic, and it can cause serious burns to your skin very quickly. Don't underestimate this chemical.

Wait 30 Days

I would not ever use muriatic acid on fresh mortar. Allow the mortar to cure a minimum of thirty days before you attempt to acid wash it. Each day the mortar gets stronger.

That said, if you get mortar on brick you should immediately try to scrape it off or brush it off. If there's a thin mortar paste that has no sand in it, it will easily and quickly be removed with mild acids like vinegar.

Harsh acids will attack the fresh mortar between the brick that you do not want to remove.

CLICK HERE to get FREE & FAST BIDS from local bricklayers who specialize in repairs and mortar clean-up.

Column 735

How to Granite Sealer

Stonetech Sealer

This is the best granite sealer I've used. The BEST sealers cost the most. BEWARE of low-priced granite sealers. CLICK THE IMAGE NOW TO BUY THIS AMAZING SEALER.

"Another key point is colored fruit juices, cooking oils, grease, fats, marker pens, and anything that has color in it can seep into these small fissures and cracks. The resulting discoloration can be very difficult to remove."

Granite Sealer TIPS

DEAR TIM: I've talked to three different people about granite sealers and have received three different answers.

I'm hoping you can set me straight about if granite needs to be sealed, when it should happen, how it is done and how frequently.

The house I just purchased has granite countertops that are in great shape, and I want to keep them that way. Jennifer L., Antioch, IL

DEAR JENNIFER: It's really discouraging to get different answers from different people, but in this case, much of what you were told might be true.

What is Granite Sealer?

Granite sealer is a clear liquid that contains microscopic solids that fill invisible cracks in granite. The sealers prevent liquids from penetrating into the stone.

It's important to realize granite countertop sealers can be as varied as cars on a used car lot. Add that to the different types, colors and grain size of granite, and you have a recipe for granite-sealing information gumbo soup.

What is the Best Granite Sealer?

The best granite sealer is one made with the best ingredients. These sealers almost always are the most expensive ones you can buy. Better ingredients and more of them in the granite sealer cost the manufacturer more money.

How Does Granite Crack?

Let's first talk about granite and why it should be sealed. I knew my college degree in geology would pay off one day. The granite used for your countertops is a natural stone made up of different interlocking mineral crystals.

granite countertop

This is my own undermount sink at my own home. My wife loved this countertop and sink. We sold the house and moved to New Hampshire. © 2017 Tim Carter

It must be remembered that the mineralogy is vastly different from granite to granite. This difference produces the nearly infinite color ranges of granite, the size of the crystals and the porosity of the stone.

Furthermore, some granites have very small cracks in them from natural stresses that happened while the granite was still part of a mountain.

CLICK HERE to get FREE & FAST BIDS from local granite countertop contractors who specialize in repairing and servicing granite.

What Things Stain Granite?

Another key point is colored fruit juices, cooking oils, grease, fats, marker pens and anything that has color in it can seep into these small fissures and cracks. The resulting discoloration can be very difficult to remove.

Sealers act as a shield to prevent stains from entering the granite in the first place.

When Should Granite Be Sealed?

A point often overlooked is granite should be sealed before it's put into use. This doesn't mean the day it is installed.

Granite sealers should be applied to the polished surfaces of the granite when there's very little airborne dust.

This means that in new construction and remodeling jobs, it is best to wait until the end of the job after the final cleaning has taken place.

Someone should seal the granite the day after the cleaning crew leaves and just before the homeowner takes possession of the kitchen, bathroom or wet bar where the granite tops are installed.

How Many Coats of Granite Sealer Do I Need?

It's a good idea to apply multiple coats of granite sealer. Read the label to see how much time you need to wait in between coats.

Now, with that being said, there are small areas of the granite that should be sealed just after the granite is installed. It's a great idea to apply a sealer to the areas immediately adjacent to where faucets, sinks, and cooktops will be installed on or under the granite.

Faucets, cooktops and over-mount sinks hide small areas of granite that can be still be attacked by liquids that might seep under a seal. Apply the granite sealer to the polished surface of the granite as well as the rough cut holes and edges where these different fixtures will be installed.

Sealer bottles on granite countertop

This is the granite kitchen countertop in the last house I built in Cincinnati, Ohio. It was a gorgeous light granite and I sealed it to ensure there were no stains. Copyright 2017 Tim Carter

Should Existing Granite Be Sealed?

Yes, existing granite tops in a house you just moved into should be sealed immediately.

If you're moving into a previously owned home that has granite countertops, you have no clue if they were sealed. At the same time, the previous homeowner may have used a cheap granite sealer.

Be that as it may, assume the granite was not sealed and do so on move-in day. If at all possible, do it before you move in.

I realize you'll be very busy moving in, but you will regret sealing the granite if someone spills grape juice or leaves a greasy pizza box sitting on the countertops as you collapse from all of the work on move-in day.

CLICK HERE to get FREE & FAST BIDS from local granite countertop contractors who specialize in repairing and servicing granite.

How Long Do Granite Sealers Last?

High-quality granite sealers have a long lifespan. Some can provide protection for up to ten years.

The life expectancy of the sealer you purchase should be clearly marked on the product label. To be safe, I'd not wait until the old sealer wears off before applying additional coats.

Are Granite Sealers Easy to Apply?

Granite sealers are easy to work with. As with any specialty product, always read the application instructions, and follow them to the letter.

Does the Granite Have to be Dry?

Yes, granite sealers should be applied to dry granite. This is very important. Be aware of what dry means. This doesn't mean clean the countertop and then dry it with a paper towel.

For one thing, water from the cleaning process can seep into the granite just as a liquid that might stain it. If water is in the small cracks, fissures, and spaces between the crystals, the sealer can't penetrate into the granite.

How Long Do I Need to Wait?

Clean the granite and let it sit for 24 hours or allow a fan to blow across the granite for eight hours. Wet granite has a richer color than dry granite, so wait for the granite to get that faded look before opening the sealer.

Is Buffing Granite a Good Idea?

Yes, buffing the granite creates a wonderful shine. Buff the granite with an old terry-cloth bath towel after the sealer dries. These rough cloths do a fantastic job of making the granite shine.

Cordless orbital buffers will really make this buff job easy.


Orbital Hand Sander

This is an affordable orbital buffer. It's not meant to use everyday. It will polish your granite top with ease. CLICK THE IMAGE NOW TO ORDER IT.

CLICK HERE to get FREE & FAST BIDS from local granite countertop contractors who specialize in repairing and servicing granite.

Column 664

Blacktop Driveways Over Concrete

Blacktop Over Concrete

Blacktop over concrete is what you see. Here's a 2-inch layer of blacktop on top of concrete. It's falling apart and I don't see any asphalt binder on the concrete. I'm not a big fan of putting asphalt on top of concrete. © Copyright 2018 Tim Carter

"But keep in mind that you may have crack problems at a later date with your blacktop. My guess is your current concrete drive has control or expansion joints at 10 - 15-foot intervals."

Blacktop Driveways Over Concrete Checklist

Related Links

Tar and Chip - The Ultimate Blacktop - SECRET INFORMATION - Please Don't Share

Blacktop Facts - The Real Truth

DEAR TIM: The surface of my concrete driveway is eroding after years of wear and tear. I'm thinking about resurfacing my existing concrete driveway with blacktop. It's my intention to add two inches of blacktop to the existing concrete after all of the loose debris is removed.

Is this a good idea? Do you see any problems?

Are there other alternatives? Patrick O., Lexington, KY

DEAR PATRICK: What you plan to do is done on hundreds of thousands of miles of roadways and driveways each year in the USA.

Can Blacktop Be Put Over Concrete?

Blacktop can be successfully installed over concrete. But there are issues as you might expect. In addition, you do have an alternative paving method that may surprise you.

Does Concrete Provide a Solid Base?

One positive aspect of installing blacktop over concrete is the concrete provides a firm base for the flexible asphalt paving. Experts who work each day in the blacktop industry, refer to blacktop as flexible pavement.

It doesn't have near the strength of concrete when you measure them inch for inch. The asphalt cement that bonds the pieces of sand and gravel in the blacktop can and does move over time.

CLICK HERE to get FREE & FAST BIDS from local contractors that install new blacktop and asphalt driveways.

What is Asphalt Cement?

Asphalt cement, the binder that holds together the sand and gravel in blacktop, is a unique material in that it possesses qualities of both a solid and a liquid.

Any chemist will tell you that asphalt is much like glass. Both will succumb to the pull of gravity, albeit it takes years to see it happen. Window panes in old homes that have survived the test of time are almost always thicker at the bottom of the pane than the top.

Blacktop Drive Installation Video

Here's a great video showing lots of things you need to know about installing blacktop.

How is Concrete Similar to Blacktop?

Concrete is very similar to blacktop in that it also contains sand and gravel pieces. But the Portland cement ingredient that crystallizes and bonds tenaciously to the sand and gravel is as hard as rock.

In fact, and geologist will tell you that regular concrete looks and feels exactly like a sedimentary rock called conglomerate.

Where Does Blacktop Get Its Strength?

Blacktop derives its strength from the base beneath it. New blacktop driveways are routinely installed over a compacted crushed-gravel base.

This base stone is often eight to ten inches thick and when installed on firm compacted soil, it makes a superb foundation for the blacktop.

But if your concrete driveway is crack-free and the individual slabs are not tilted, the blacktop covering will perform as well or better on it than the gravel.

Can You Have Crack Problems in the New Blacktop?

But keep in mind that you may have crack problems at a later date with your blacktop. My guess is your current concrete drive has control or expansion joints at 10 - 15-foot intervals.

Or perhaps there are a few random cracks and some slight displacement between the cracked pieces of concrete. If this is the case, these cracks will eventually telegraph through the new blacktop covering.

Your blacktop contractor can saw cut in crisp lines in the blacktop directly over the concrete control and expansion joints if you like. These thin lines can be filled with a special epoxy crack filler and the small stones that are in the blacktop mix.

IMPORTANT TIP: CLICK HERE to read about the magic method and secret epoxy I use to fill blacktop cracks.


CLICK HERE to get FREE & FAST BIDS from local contractors that install new blacktop and asphalt driveways.

Can The New Blacktop Be Too High?

The new blacktop on top of the concrete can be too high. This can cause water puddling and tripping issues where the blacktop touches other paving.

The added two inches of blacktop might cause safety issues where the driveway abuts stairs and sidewalks. The added thickness of the blacktop can reduce the riser height at stairs.

A tapered two-inch lip can create a stumbling hazard when people walk from adjacent paved surfaces onto the driveway.

Does The Blacktop Require Future Maintenance?

Keep in mind that your blacktop driveway may become a maintenance item every three to five years.

Blacktop Sealer

This is a name-brand blacktop sealer. Apply it when there's no chance of rain for 24 hours. CLICK THE IMAGE NOW TO BUY IT.

To keep blacktop from degrading due to exposure to the elements and liquids such as gasoline, oil and hydraulic fluids, it's not a bad idea to keep a coat of premium sealer on it at all times.

Sealers aren't necessary because public roads are never sealed. The car traffic would wear off the film in a short time. Low-traffic driveways will not be an issue.

Blacktop Driveway

This is a blacktop driveway near my last home. it's in great shape and you know it's got a solid gravel base under it. © Copyright 2017 Tim Carter

What is a Better Option Over the Concrete?

If I were you, I'd seriously consider installing a thin concrete overlay on your driveway. You can apply a layer of cement stucco as thin as 3/8 inch that will last for another 40 or more years.

It's possible to add an even thicker layer of concrete with small stones in it, but then you have the same safety issues I have already discussed.

blacktop over concrete

This is an example of a concrete overlay. The thin overlay is in the lower left corner. You can see a coat of cement paint on the old concrete. Look at the paint under the tape measure. Copyright 2018 Tim Carter

Can I Do a Stamped Concrete Overlay?

There are professional companies that can stamp and colorize the thin overlays if you want a truly distinctive driveway. Stamped concrete is not a do-it-yourself (DIY) project unless you have lots of experience and many friends who can assist you.

Is Concrete Overlay DIY Friendly?

The concrete overlay project is very DIY friendly as you don't have to do the entire driveway on one day or even a weekend. You can apply the overlay to one or two sections of driveway at a time.

The trick to making sure the driveway looks the same once complete lies in getting all of the materials you need at the same time. You must buy all the sand at one time and the bags of cement must be from the same manufacturer and batch.

Can I Trust Blacktop Contractors?

Beware of blacktop contractors that speak with a forked tongue. Some might say all will be well if they install blacktop over broken and crumbling concrete.

It will look fine for awhile, but wait until you start to drive on it or heavy trucks pull into your drive. If you live in a cold climate, all sorts of cracks will appear half-way through the coldest part of the winter when the soil freezes and heaves the driveway.

How Does the Concrete Overlay Bond to the Old Concrete?

If you decide to install the concrete overlay, you must make sure all loose material is removed and the concrete is slightly damp. Immediately before applying the overlay mix, paint on a thin coat of cement paint.

Cement paint is made by mixing Portland cement powder with clear water. CLICK HERE for a step-by-step guide for doing a concrete overlay.

CLICK HERE to get FREE & FAST BIDS from local contractors that install new blacktop and asphalt driveways.

Column 508

How to Pour a Concrete Footing or Footer

How To Pour A Concrete Footing TIPS

This spring you may have ambitious plans to build that long-awaited DIY room addition, shed or detached garage.

Good for you!

Many a homeowner just like you has successfully completed one of these smaller projects.

All structures need a great foundation so they can stand the test of time.

Foundation walls almost always are supported by a footing, or footer.

Footing Is First

The footing is almost always the first thing one does when building anything.

The bottom of the footing is what touches Mother Earth. It's no different than your foot, hence the name.

CLICK HERE to get FREE & FAST BIDS from local foundation contractors who can put in your footing.

Spreads Weight

The purpose of a footing is to spread out the weight of the structure onto the soil. The foundation wall rests on this footer. Most common footings for houses, room additions, detached garages, etc. are 24 inches wide and no less than 8 inches thick.

You can access a handy quick start guide for concrete footers with more tips and a full tool list here: Concrete Footer Quick Start Guide

Degree of Difficulty: hammer-4-5

Concrete Footing Step-By-Step Videos

Watch these videos to see the entire process of forming and pouring footers. You may be doing a trench footer where trench walls become the forms. These require you to stand down in the concrete if you have a frost depth that exceeds 24 inches. 

After watching the videos, then continue to read for extra detail that may have been skipped in the videos.


Permits & Frost Depth

Check with your local building department concerning building permits, and the frost depth in your area. The bottom of the footer needs to be below the frost depth. It’s always a great idea to go just a little deeper than recommended.

Call 811

Be sure you locate and identify any underground utilities before you dig. Call 811 and have all utilities marked so you don’t get hurt or cause neighbors to have problems if you slice into a buried electric, water or gas line.

Must Be Square

Be sure you double check the footer is square before you dig. Layout the foundation on the ground before digging.

When the diagonal measurements are the same in a square or rectangular foundation, it’s square! Watch this video about squaring up a footing or a wall.


Watch this video to see a neat trick using some long 2x4s. You can build a box that represents the actual outer shape of your finished foundation. Make sure the lumber is straight, square it up and then spray paint a line about 8 inches on the outside of the box to represent where you need to dig your trench.

If you footing is going to be 24 inches wide, most are, and your foundation is 8 inches thick, that means the footing extends 8 inches beyond the outer line of your foundation wall.

Digging Is Work

You can dig by hand, I’ve done it for many a footer, but tool rental businesses now rent very small excavators that can fit in a small yard. You don’t need a full-size backhoe to dig a shallow footer.

Great Soil

If the soil smells like rotten eggs, is squishy or you sink in it even when you get down to the desired depth, STOP and get a professional opinion. You may have to dig deeper to get to STRONG soil or you may have to install piers. Smelly soil often means there's lots of organic material rotting in the soil. This will cause a foundation failure in the future.

Steel Is A Must

Footers need long pieces of reinforcing steel. One-half-inch diameter, #4, is almost always sufficient. This steel needs to be continuous through the entire footer and be held up at least 3 inches from the soil. Overlap splices at least 16 inches.

CLICK HERE to get FREE & FAST BIDS from local foundation contractors who can put in your footing.

8 Inches Thick

The footer should be at least 8 inches thick. Most architects call for a footer to be 20 inches wide, but I always poured mine 24 inches wide. Wider is better because it spreads out the weight of the building onto the soil

Must Be Level

You can just pour the concrete in a 24-inch wide trench if you like. It’s key the concrete is very level.

Drive vertical pieces of reinforcing steel into the soil every 4 feet in the center of the footer as leveling reference points. Use a laser level or builder’s transit to get the tops of these pins at the same height.

Helpers A Must

Have plenty of help on hand when the concrete truck arrives. Be sure to have spare wheelbarrows in case one breaks.

Don’t overfill wheelbarrows as concrete is very heavy. Consider renting a small machine with a bucket that you can use to make trips from the concrete truck to the footer.

Boots & Tools

Wear rubber boots if you’re working in the trench to level the concrete. Concrete will cause burns to skin, so wash off any as soon as possible. Use a simple wood float or magnesium float to smooth the concrete.

Hard Work

No one task, other than digging the hole and wheelbarrowing the concrete, is really hard in this job. It’s all a matter of common sense and thinking the job through.

Column HT007

Staining a Fiberglass Door

Finishing Fiberglass Doors TIPS

Must Be Clean

The fiberglass door must be perfectly clean to achieve the best results.

You can't assume the door is clean.

Most oils are clear and you'd have no idea they're on the surface.

The stain or paint will not bond well if the surface is dirty.

You can do it with a standard soap and water solution such as Top Job, Dawn Dish Soap or any other liquid type soap. Rinse the door with clear water and dry it. The door must be dry before you stain it.

CLICK HERE to get FREE & FAST BIDS from local painters that specialize staining fiberglass doors.

Deep Cleaning

Oxygen Bleach

Stain Solver is MADE in the USA with USA ingredients that are food-grade quality. CLICK THE IMAGE to order some NOW.

If you want to deep clean the door removing all mildew, algae, oils, etc. then use Stain Solver.

Stain Solver is made in the USA with USA ingredients. It's a pure powder you mix with warm water.

Once dissolved, you can brush it onto the door. Work in the shade keeping the door wet with the solution for about 15 minutes.

Follow up cleaning with liquid dish soap solution, rinse well and allow to dry.

Most fiberglass doors allow you to use mineral spirits to clean the door, but never use turpentine! Follow the finishing instructions that come with your door if you have them.

Stain Colors

If you have a new door, look at the stain kit. Most have some sample pieces of fiberglass.

fiberglass-door-stain-kit

The stain in this kit was specially formulated for fiberglass doors. It's not NORMAL oil stain for wood. CLICK HERE NOW TO GET THIS AMAZING STAIN KIT.

You use one of these to test the stain color. If you don't have a scrap, well, you may be out of luck. If the hinge edge is fiberglass (most are), then you can try to sample the color near the bottom of the door on this edge.

Depth Of Color = Time

Stain color can be adjusted by the amount of time you allow the stain to sit on the door / sample before brushing and how much pressure you apply when brushing. If you want a lighter color, let the stain sit for a short while and remove lots of it with the brush.

Do the opposite for a darker look.

Rub in Circles

The stain is applied to the door with a cloth rubbing it in a circular motion. Work from the center of the door to the outer members. Don't try to do the entire door at once. Work in small areas and feather out stain in overlap portions.

Don't forget to stain the fiberglass sample. You'll need this finished as well as the door. You'll use the sample to test the door for gloss loss due to sun exposure.

CLICK HERE to get FREE & FAST BIDS from local painters that specialize staining fiberglass doors.

Stain Must Be Dry

Most fiberglass stains need 48 hours to dry. You can test for dryness by applying a piece of acrylic painters masking tape to the door or better yet, to the fiberglass sample.

painters-tape

Use this kind of tape to do the *dry-stain* test. CLICK THE IMAGE NOW TO ORDER THIS MAGIC TAPE.

Rub the tape with a piece of wood or knife handle. If the stain is dry the tape will be clean when you pull it off the stained object. If the stain is dry, you are now ready to go to the final steps.

Applying the Top Coat

Here is where many people goof up. The temptation is to apply thick coats of finish to protect the door.

Most fiberglass door manufacturers want you to apply two thin coats.

IMPORTANT TIP: Thick coats will not dry properly. Try to coat the door in a dust-free environment if at all possible.

Milky But Clear

The top coats often look like thin milk.

Don't panic! If you apply them sparingly they'll dry crystal clear. Avoid dipping the entire brush in the clear coat. Try to just get the tip of the brush wet.

VERY IMPORTANT TIP: Work quickly and don't over brush. Apply some in an area and move on.

If you brush back and forth over the same area too much, you can dissolve the stain! Always brush in the direction of the grain! Work from the center of the door out towards the edges.

Don't forget to apply a clear coat at this time to the fiberglass sample if you have one.

The Second Coat

Follow the instructions on the top coat container. Many will indicate a short drying time of less than 4 hours.

Don't sand the door after the first coat.

Apply the final coat as you did the first coat. The surfaces normally look wet when you apply a thin coat - not milky.

A milky appearance may be a clue that you are applying too much finish.

Painting a Fiberglass Door

Several readers wrote to me asking if they can paint a fiberglass door. Absolutely!

You paint one as you would any exterior surface. Clean the door with soap and water and allow it to dry.

Use a latex primer matched to a 100 percent acrylic top coat paint.

fiberglass-door-paint

This is a special paint formulated to BOND to fiberglass. It can be tinted. CLICK THE IMAGE TO ORDER IT NOW.

Remove Weatherstripping

I always like to remove the weather-stripping if at all possible. This allows you to work more quickly and keeps the door from sticking to the weather-stripping.

Keep the weather-stripping out of the door if at all possible for a week to 10 days. This drying time will allow the paint to fully cure and harden. If the paint is tacky it can stick to weather-stripping.

CLICK HERE to get FREE & FAST BIDS from local painters that specialize staining fiberglass doors.

Column B264

Grouting Tile

how to grout floor tiles

The consistency of the grout is extremely important. If it is too wet when mixed, there is a good chance the grout job might fail over time. ©2017 Tim Carter

"Never ever add more water to grout that's become stiff in the bucket. This added water will..."

Grouting Tile Checklist

DEAR TIM: I need to know how to mix grout. I'm about to tackle a floor tile grout job before my relatives come over for a holiday party. I don't know mixing grout and how to grout tile, but feel it's easy.

What type of tile grout should I use for my ceramic floor tile?

Is mixing grout difficult? How much grout should be mixed at one time?

Can you share your top grouting tips? Amy H. Oakdale, MN

DEAR AMY: There's not a doubt in my mind that you will succeed grouting your ceramic floor tile.

Is it Easy to Grout Tile?

It's easy to grout tile, but only if you can follow instructions.

You've asked many of the right questions concerning grouting tile. Although the process of grouting tile is not like laying heavy concrete blocks, I can think of easier jobs to do. If you protect your knees, back and skin on your hands, you should survive the job with very few aches and pains.

CLICK HERE to get FREE & FAST BIDS from local tile contractors if you want to bail out of this DIY project.

What is Wall Tile Grout?

Wall tile grout is just pure Portland cement, often with colored pigments. Wall grout does not contain any sand because it needs to fit into small spaces between the tile.

Grout that's used for ceramic tile is available in many different forms, but the two most common are wall grout and sanded floor grout. Wall grout is usually colored Portland cement.

It's a fine powder that sometimes has dried acrylic modifiers that help it to stick to ceramic tile. Wall grout should be used on ceramic tile joints that are one-eighth inch or less in width.

What is Sanded Grout?

Sanded grout is a mixture of pure Portland cement and fine grains of silica sand. It's a miniature version of concrete and is used to fill grout lines 1/8-inch or wider.

Ceramic floor tile is often installed with grout joints much larger than one-eighth inch. It's not uncommon to see grout joints as wide as three-eighths inch.

Wall grout will shrink when used to fill joints this wide, so sanded grout is used. Sanded grout is a blend of wall grout and fine particles of silica sand.

The silica sand makes the grout very durable to wear and tear and takes up room within the grout so as to prevent unsightly shrinkage cracks as the grout dries and cures.

Where are Mixing Grout Videos?

I suggest you watch the following videos, then read the rest of the column. Much of it will make sense. Links to the tools you'll need will be below.


Is Mixing Grout Easy?

Yes, I find it fairly easy to mix either wall or sanded grouts. The trick is to only mix about as much as you can fit into a half-gallon milk container, maybe less.

I've used for years a simple stiff 3-inch putty knife to mix grout in a 2 or 5-gallon bucket.

putty knife

This is an all-around great tool to have. It's wonderful to mix sanded or wall grout. Keep it clean to last for decades! CLICK THE IMAGE NOW TO ORDER ONE BEFORE THEY'RE ALL GONE!

You may discover that when grouting a floor, you can mix two or three times this amount, but for the first batch, mix a small amount until you learn how to grout.

CLICK HERE to get FREE & FAST BIDS from local tile contractors if you want to bail out of this DIY project.

How Much Time Can The Grout Sit in a Bucket?

The grout can usually only sit in the bucket about 20 minutes. The hotter the air temperature, the grout powder and the water, the less time you have to install it once it's mixed.

You can extend the working time of mixed grout if you refrigerate the grout powder, use cold water to mix it and apply the grout if the room temperature is 50 F.

If you're doing this job solo, then you need to realize that you'll spend time removing excess grout from the floor tile and striking the joints with a grout sponge.

As you do this tedious work, the mixed grout can harden in the bucket. This is why you don't want to mix too much grout up until you discover how fast you can use it up.

Can I Add Water to Stiff Grout?

IMPORTANT TIP: Never ever add more water to grout that's become stiff in the bucket. This added water will weaken the grout that was in the process of transitioning from a plastic mix to an artificial rock!

What is the Correct Grout Consistency?

The correct grout consistency is when it resembles warm cake icing. It needs to be spreadable but not so thin it would pour from a bucket.

Mixing grout to the right consistency is very important. You want the grout to be workable so it can be spread with a rubber float, but it should not be so wet that it resembles moist, runny cake icing.

I feel the best consistency for either sanded floor or wall grout is when the grout is stiff enough that it can be formed almost into a ball and hold its shape. Think mashed potatoes for wall grout and nice firm applesauce for sanded floor grout.

What is a Rubber Grout Float?

A rubber grout float is a special tool you use to spread the grout and pack it into the spaces between the tiles.

Now that the grout is mixed, it's time to put it in the gaps between the tiles. You achieve this with a special rubber float that spreads the grout across the tile.

Rubber Grout Float

This is just like the rubber grout float I've used for decades. Care for it and it will treat you well. CLICK THE IMAGE NOW TO ORDER ONE.

Always pull the rubber grout float across the grout lines at a 45-degree angle. This prevents the edge of the float from dropping down into a grout joint and scooping out grout from the joint. Dip the float in clear water before using it on the tile.

Remove as much excess grout from the tile surfaces as possible with the rubber grout float.

What is a Grout Sponge?

A grout sponge is one that has all rounded edges and corners. Never use a sponge that has sharp 90-degree edges and corners. These will remove grout from the lines.

You need to strike the grout joints after they've gotten a little hard. If you try to finish the grout too early and it's soft, you'll remove it from the joints.

Grout Sponge

Here's a fantastic newer sponge that will do a great job of cleaning dried grout haze. CLICK THE IMAGE NOW TO BUY ONE.

Grout joints that are fully filled, look better, clean easier and they protect the fragile edges of the ceramic tile.

Should I Practice Grouting?

Yes, you should practice grouting on a test panel in your garage before trying it on a wall or floor.

Since you are a beginner, the most important tip I can give is for you to practice grouting on a piece of tile-backer board in your garage. Install some scraps of the floor tile or a cheap tile that is similar to the one on your floor.

Attach this tile to the piece of backer board that is just laying on the garage floor. The next day, mix some grout and apply it.

Wait a few minutes and remove the excess grout and grout film with a grout sponge. Get a feel for the process before experimenting on your real floor.

How Much Water Should be in the Grout Sponge?

There should be very little water in the grout sponge. Squeeze as much water out as possible.

When removing the grout film from the tile, use a grout sponge that has rounded corners, and be sure to squeeze out all excess water from the sponge before the sponge contacts the grout. Change the rinse water frequently.

What Causes Grout to Fail?

The biggest cause of grout failure is water. Either too much is used to mix the grout or too much is used when removing the grout film from the surface of the tile.

Excess water dilutes the amount of Portland cement in the grout. When this happens, the grout can turn to powder or simply crumble in a short amount of time.

How Far Should You Apply the Grout?

You only want to grout as much tile as you can reach across. Kneeling on top of freshly grouted tile joints is not a great idea as you try to finish the floor. Think about where to start grouting the tile and how you will exit the room once you are finished.

How Much Grout Should I Buy?

Buy plenty of grout before you start the job. Be sure it's fresh, and absolutely make sure the grout is from the same batch or dye lot.

To ensure perfect results, it is often a great idea to blend different bags of the dried grout together to make sure the finished color of the grout is uniform.

CLICK HERE to get FREE & FAST BIDS from local tile contractors if you want to bail out of this DIY project.

Theresa had a grout problem with her new ceramic tile floor. The installer didn't clean the tiles properly after grouting. CLICK HERE to read her story and the helpful tips.

Column 701

Cleaning Paint Brushes

cleaning paint brush

An old paint can, some warm water and soap and a quick wrist is all it takes to clean a paint brush. ©2017 Tim Carter

Cleaning Paint Brushes TIPS

DEAR TIM: I'm having trouble cleaning paint brushes. My high-quality paint brushes are stiff halfway up from the tips, even though I have been using latex paint and washing them with warm water immediately after each use.

I've tried using the plethora of products that claim they will restore paint brushes, but none have worked.

In fact, they seem to harm the brushes. How do you clean paint brushes so they last for years? Is it possible, or should I just buy disposable paint brushes and throw them away after each job? Jack L., Findlay, OH

DEAR JACK: It's time for some tough love.

Operator Error

The expensive brushes are being ruined because you're not cleaning them properly. It took me a few years of experimentation to figure out one way to properly clean paint brushes, no matter whether they are synthetic fiber used for latex paint or natural fiber used for oil paints.

Believe it or not, I have a few paint brushes that have been used over one hundred times. They look like new, and the bristles have no paint in them where they connect to the brush body.

CLICK HERE to get FREE & FAST BIDS from local painters so you never clean a brush again! WOO HOO!

Best Paint Brushes Video

Watch this video so you know what brush to use where and why.

Brush Renewal Products - BAH!

You couldn't pay me to use brush-revival products. I've read their labels on many occasions, and the skull and crossbones image tells me that some of these products are highly toxic.

Examine the label of these products and you'll often see the chemical names acetone, methanol, methylene chloride, toluene and xylene.

Some of these are very dangerous and can cause serious and permanent health issues. It's easier and safer to simply learn how to care for your paint brushes rather than try to bring them back from the dead.

Before You Dip

The process of cleaning a paint brush starts at the beginning of the painting day. All too often, I see people take a new brush or a dry one and dip it directly into the paint.

This, in my opinion, is a mistake. On hot, dry days the paint on the outside of the brushes up near the handle can harden within an hour or two.

Wet The Bristles

You can prevent this, or slow the hardening of the paint, by wetting the brush with water before using it. Use water when applying latex or water-based paint.

If you are painting with oil-based paint, dip the brush in paint thinner before getting paint on the brush. Be sure to lightly shake out any excess water or paint thinner before dipping the brush for the first time into the paint.

Brush At Breaks

If you take breaks during painting, you need to get the brush out of the sun, and wrap it with a damp rag if you are using latex paint. This rag stops the evaporation of water and other chemicals from the paint. It keeps the paint on the brush fresh.

Use a rag soaked in paint thinner if you are applying oil-based paint. It's advised to store the paint thinner-soaked rag and brush in a closed container for safety. If painting outdoors, I'll actually clean my brush if I stop to eat lunch. It only takes two minutes to clean a brush, so I don't lose much time from my well-deserved break.

Brush Protectors

There are some very clever inventions you can use to keep the paint on a brush from getting hard while you take a break. If you use one, be sure to keep it out of direct sunlight.

brush cover

This is a plastic case you put your brush in while you take a break. It seals tight preventing air from drying the paint. CLICK THE IMAGE TO ORDER IT NOW.

Paint Brush Protector Video

Watch this video to see how these plastic covers work.

Never Upside Down!

I have seen people ruin a brand-new paint brush the first time they clean it. They turn on the sink faucet and then turn the brush upside down to get the water stream to shoot straight into the tips of the bristles.

Never do this.

It's totally unnecessary.

No Pressing!

Another bad idea is pushing down on the bristles so they bend at a 90-degree angle to squeeze out the paint. This stresses the bristles and causes premature bristle failure.

Brush Out First

Before you start to clean a brush, try to get as much paint out of it by brushing it on a scrap piece of anything. It could even be a cardboard box. Don't press so hard as to really bend the bristles. You're just trying to get off the easy-to-remove paint.

CLICK HERE to get FREE & FAST BIDS from local painters so you never clean a brush again! WOO HOO!

Rinse Next

Through trial and error, I discovered that the best way to clean brushes that have latex or water-based paint in and on them is to rinse as much paint out as I can with warm water flowing over the outside of the bristles, toward the bristle ends.

Swish It

The next step is to use an old paint can that's been cleaned of all paint. I fill this can halfway with warm soapy water. Two tablespoons of common liquid dish soap works well in a half-gallon of water.

Dip the brush into the soapy water and rapidly move it back and forth, making sure the bristles do not touch the bottom of the can.

Be careful, as vigorous movement can splash some of the warm soapy paint-saturated water onto your clothes or in your face. Twenty seconds of back-and-forth motion will remove 95 percent of the paint from the entire brush.

Clear Rinse

Refill the can halfway with just clear warm water and repeat the process. If the water turns slightly cloudy, it means you still have more paint in the brush.

Clear Swishing = Clean

Continue the fresh-water rinsing process until the water stays perfectly clear. If there is hardened paint on the handle or tops of the bristles near the handle, use a stiff nylon brush to clean off this paint.

paint brush comb

This is a specialized tool with brass stiff bristles to clean the semi-hardened paint from bristles up near the ferrule. The brass will not harm the bristles. The other side is a comb for once the brush is clean. CLICK THE IMAGE NOW TO GET THIS TOOL.

Brush DOWN the bristles with the stiff brush. Push down only do NOT try to brush up and down.

Do NOT scrub the bristles at a 90-degree angle to remove the paint.

Suspend Test

The best way to determine if there is any residual paint in the brush is to suspend it in a clear container after you think it is clean. Use a string or thin wire through the hole at the end of the brush handle to suspend just the bristles in clean water.

Let it sit in the water for about four hours. If there's any latex paint left in the brush, it will turn the water cloudy. This means you have to be more thorough when you are cleaning the brush.

No Shaking But Comb It

Once clean, comb the bristles. Then hang the brush from the wire to get it to dry.

brush and roller cleaner

This is a handy tool to comb paint brushes after they're clean. The other side you use to scrape as much paint as possible from a paint roller before you start to clean it. CLICK THE IMAGE NOW TO BUY THIS GREAT TOOL.

Do not shake the water out of the brush and bend the bristles. Once dry, insert the brush in the handy protective cover that came with it from the paint store.

CLICK HERE to get FREE & FAST BIDS from local painters so you never clean a brush again! WOO HOO!


Column 686

Brick Pavers

brick pavers sidewalk

This brick paver sidewalk has endured severe frost heave, snow, ice and heavy traffic. It can take lots of punishment. It's Achilles heel is that the color fades over time. This sidewalk was a deep brown when installed and now is very light in color. ©2017 Tim Carter

Brick Pavers TIPS

DEAR TIM: It’s time to replace our sidewalk, and I’m leaning towards brick pavers. Before I invest this money, I’d like to know as many pros and cons about this building material.

Should I use clay brick pavers? I’m also interested in different brick paver designs and ideas. What brick pavers would you use and why? Leslie W. Tacoma, WA

DEAR LESLIE: I’ve installed my fair share of brick paver sidewalks in my lifetime.

Brick Is Timeless

I’ve also used them with great success on large patios and steps. At my last home, every person who saw our front brick sidewalk and our two brick paver patios always commented on how gorgeous they were.

CLICK HERE to get FREE & FAST BIDS from local patio and sidewalk brick contractors. Show them the laser brick below!

Color & Texture

I truly believe that brick pavers make a great sidewalk because they are so distinctive. The color, texture and sheen of the brick are so unlike concrete, perhaps the most common sidewalk material.

Natural stone can also create a unique sidewalk look, but it’s often the most expensive paving option.

Clay & Concrete

There are two primary types of brick pavers in my opinion: clay brick and concrete brick. Decades ago the rage was to install colored concrete brick pavers that required no mortar. They interlocked with one another and could withstand all that Mother Nature could dish out if they were made correctly.

Newer Shapes & Patterns

This paving product is maturing and the designs, colors, shapes of the concrete brick continue to expand. One advantage of this material is that you can have a new sidewalk installed and completed in hours not days. That might be a major consideration for you.

Concrete Color Fades

But understand that the color of these concrete paving brick will change and fade over time. Guaranteed.

And the fading gets worse by the year.

Pigments & Cement Paste

The color is achieved by adding pigments to the concrete mix. These pigments become part of the cement paste that coats the sand and gravel in the brick.

But over time, this ultra-thin cement paste on the top surface of the brick wears off exposing the true color of the sand and gravel. You may not like that faded color in two, five or ten years. Realize that the sun's ultraviolet (UV) light will also work to break down the pigments that are in between the sand grains causing further fading.

Paver Patio Brick Video

Watch this video for a few tips.

32 F

Climate is a big factor with brick sidewalks. Brick pavers in Tampa, Florida, and other warm climates that never see freezing temperatures, will survive longer than brick of any type in a cold, freezing climate.

If you use concrete brick, you should consider a brick paver sealer every few years to minimize water penetration into the concrete brick. CLICK HERE to get a fantastic one that's made with silanes and siloxane ingredients.

Penetrating sealer concrete masonry sealer can

This is a magnificent silane - siloxane water repellent that soaks into concrete. CLICK THIS IMAGE NOW TO ORDER IT.

Clay = Colorfast

I prefer thin brick pavers made from real clay. The color of the material is solid through the entire brick.

Purchase ones that have been made for cold climates, and they’ll last for possibly over 100 years. The hotter the kiln and the longer the brick are left in the kiln, the harder they get. These will have a SW rating from the manufacturer. The SW stand for severe weathering.

CLICK HERE to get FREE & FAST BIDS from local patio and sidewalk brick contractors. Show them the laser brick below!

Athens Ohio Brick

You can see paving brick used in roadways that are well over 100 years old in many cities. Athens, Ohio is one that comes to mind as my oldest daughter went to college there.

While walking across the roads there, I had lots of images of the workers installing brick pavers well over a hundred years ago. Even after being scraped with city snow plows and abused by heavy trucks, many of the brick look like they just came from the brick manufacturer. This tells you that clay brick can last in your sidewalk.

Infinite Designs

Brick paver designs are as plentiful as cobs of corn in a farmer’s field. A clever installer can install a serpentine sidewalk for you. Curves are no issue.

If you prefer a more geometric design like herringbone or crosshatching you might see in a cane chair, that’s also possible. Many brick manufacturers have great photography of how their brick can be used to create more patterns and designs than you can imagine.

Engraved Brick

If you want to go all out and make your sidewalk very distinctive, consider some engraved brick pavers. Companies use lasers to cut into a brick’s surface and etch any words, names or designs that you might want.

etched brick

This is a laser etched brick made for me. The detail is incredible. This brick measures 8 inches wide and 4 inches high. So you can see how fine the laser can cut. The laser MELTS the clay turning it to GLASS. The laser etching will last for centuries outdoors unless you beat on it with a hammer. © Copyright 2017 Tim Carter

You could engrave several or many brick that have a welcome message or even some poem that sets the mood as your guests walk up to your front door. The possibilities are endless.

Cheap Price = Cheap Product

As with any product, use caution when looking at wholesale brick pavers or discount brick pavers. Be leery as to where they were made. Brick made in China or some other foreign nation may not be up to our standards.

Unscrupulous businessmen may not care if your brick sidewalk crumbles. Buy brick pavers from an established business in your town. Ask about the weathering index for the brick. Not all brick are made the same.

Cleaning Brick

Oxygen Bleach

Stain Solver is MADE in the USA with USA ingredients that are food-grade quality. CLICK THE IMAGE to order some NOW.

Cleaning brick pavers is easy. You can use Stain Solver oxygen bleach solution to remove algae, dirt and mold.

Stain Solver is Made in the USA with USA ingredients. It's non-toxic to nearby plants, trees or expensive landscaping.

It's a powder you mix with water and apply with a garden hand-pump sprayer.

The trick is to apply it to dry brick and allow the Stain Solver solution to bubble and fizz for up to 30 minutes. Keep the brick very wet with the solution.

After waiting, use a stiff push broom or scrub brush on a pole to get the algae off the brick. Rinse with hose water.

Brick Cleaning Video

Watch this video to see how to use Stain Solver to clean algae off clay patio brick.

Chlorine = TOXIC

Avoid chlorine bleach as it is highly toxic to grass, landscaping and trees.

Pressure Washers = BAD for Concrete

Pressure washing will erode the cement paste off of concrete brick, so use those machines with great care.

A pressure washer will not harm a clay brick surface if the brick has a severe-weather rating. This rating certifies the brick is very dense and very hard as a result of being fired in the kiln for a longer time.

CLICK HERE to get FREE & FAST BIDS from local patio and sidewalk brick contractors. Show them the laser brick above!

Column 851

Water Heater Venting – Serious Business

water heater venting

Water Heater Venting | Can you see the mistake in this photo? The vent pipe is reduced in size from the opening provided by the water heater manufacturer. After this discovery, the homeowner immediately installed a 4-inch pipe from the heater to the chimney. © Copyright 2021 Tim Carter

Water Heater Venting TIPS

DEAR TIM: I recently had my heating system replaced with a high-efficiency system. The new furnace vents directly through the wall to the exterior. My water heater is now the only thing venting into the masonry chimney. I'm concerned about exhaust gas damage that might be occurring inside my chimney. Do you think it's necessary to have a chimney liner installed? Robert K., Norwich, CT

DEAR ROBERT: Venting of any fuel-burning appliance is serious business.

Should Vent Pipes Meet the Code?

Water heater vent pipes must meet the current building code. They can be death traps.

The vent for your recently orphaned water heater may not have been checked by the furnace installer. Many building codes mandate that once modified or changed, all fuel-burning appliance vents must be sized according to code.

What is an Orphaned Water Heater?

An orphaned water heater is one that vents into a chimney flue liner that used to accept the exhaust gas of the water heater and usually a furnace. A new high-efficiency furnace may now vent through a plastic pipe that exits a sidewall of the home, not the chimney. Thus, the water heater vent is now an orphan in the chimney.

I suggest that you contact your local building or fire department inspector. These two public servants should provide you with the information to ensure your hot water heater and your chimney meets code.

CLICK HERE to get FREE & FAST BIDS from local chimney sweeps who can inspect your chimney for defects.

Are Water Heater Drafting Dynamics Complicated?

The dynamics of drafting are complicated. Traditional masonry chimneys and fireplaces have precise design dimensions. They were designed and sized to vent very hot flue gases from old coal, wood burning, or low-efficiency gas furnaces.

The exhaust gas temperature of modern gas furnaces and water heaters is much lower than past appliances because much more heat is harvested so you waste less money up your chimney.

Chimneys are like water pipes, they can only handle so much exhaust at a given pressure. Imagine if the huge boilers of your local power plant tried to exhaust up your house chimney.

There simply wouldn't be enough room to handle all the smoke and ash.

Will Water Heater Exhaust Go Up in a Large Chimney?

On the contrary, if you tried to exhaust your furnace and water heater into a power plant chimney, the exhaust gases very likely wouldn't rise.

The giant chimney of the power plant is filled with a column of cold, dense air.

The small amount of warm, or hot air, from your water heater would have a tough time offsetting this falling air that's trying to enter your home. If that were to happen, it could drag some of the exhaust gas back into your basement. This could cause a carbon monoxide poisoning issue.

Will an Oversized Flue Liner Create Condensation?

An oversized flue liner will create condensation problems. The exhaust gas temperature from the heater may not be sufficient to heat up the dense masonry enough to stop condensation from forming. 

Herein lies the problem. Your chimney's existing flue liner may be oversized for the orphaned water heater. This can, in some instances, create condensation problems inside of masonry chimneys.

Water vapor is a byproduct of the combustion of natural gas. If the inside of the chimney cools down too much or there is too much cold air inside the chimney, the water vapor can condense and saturate the masonry inside the chimney before it can escape into the atmosphere.

Sometimes the condensed water contains acids that can chemically attack poor quality mortars.

Should I Use a Stainless Steel Liner?

It's best to use a stainless steel chimney liner if you're high-efficiency water heater or furnace exhausts into a masonry chimney.

stainless-steel-chimnney-liner

This is a kit that allows you to install a stainless-steel liner inside a larger masonry chimney clay flue. CLICK THIS IMAGE NOW TO BUY THIS KIT.

Does a Furnace Help Keep a Chimney Warm?

Before you installed your new furnace, your old low-efficiency furnace cycled on and off frequently. This process kept the inside of the chimney warm. That heat source has been removed.

Although the water heater does contribute heat to the chimney during its off cycle, it may not be enough to prime the vent so to speak.

CLICK HERE to get FREE & FAST BIDS from local chimney sweeps who can inspect your chimney for defects.

Who Produces Building Codes?

Currently, there are many organizations that produce building codes. For many years, the American Gas Association (www.aga.org) and the National Fire Protection Association, Inc. (www.nfpa.org) have authored the National Fuel Gas Code.

This code, as well as other uniform building codes, contains tables and charts that people use to properly size and install chimneys for fuel-burning appliances. Research is currently being conducted by the Gas Research Institute that may create changes used in sizing masonry chimneys.

In other words, code refinements are forthcoming with regards to venting modern fuel-burning appliances.

How Big Can the Chimney Flue Liners Be?

You can do a quick check of your chimney to see if it meets an old rule of thumb and some of the current codes. Measure the diameter of the exhaust pipe leaving your water heater.

If it is a 3-inch-diameter round metal exhaust pipe, the inside cross-sectional area of the clay or masonry chimney flue liner should not exceed 49 square inches. Most flue liners are square or rectangular. Thus if square, the inside measurement should not be more than 7 inches on the sides of the square. If rectangular, the length X width calculation of the inside of the liner once again, should not exceed 49 square inches.

If the metal round metal exhaust pipe is 4 inches in diameter, the flue liner cross-sectional area should not be larger than 88 square inches. Do the math the same way as in the above example for a 3-inch-vent pipe.

Can I Slide a Metal Liner Into a Larger Flue Pipe?

If you find that your chimney does not meet the code or it is too large, you can reduce the size of a chimney lining. There are approved corrugated metal pipes that you can snake down the chimney and connect to the exhaust pipe of your heater.

What is a Slurry Solution for Relining a Chimney?

Some chimney companies can reduce the size of the chimney by pumping a cement slurry around a giant inflatable bladder. Low moisture content cement and vermiculite mortars can also be used to create a new inner lining.

If you decide to reline your chimney, by all means make sure you do it under the guidance of your local building department officials.

CLICK HERE to get FREE & FAST BIDS from local chimney sweeps who can inspect your chimney for defects.

Column 205


How to Paint Wrought Iron

How to Paint Wrought Iron TIPS

How many homes in lots of the older cities around the USA have traditional and durable wrought iron porch railings, decorative porch supports or majestic wrought iron fencing? My guess is tens of thousands.

It could be hundreds of thousands.

Wrought iron is one of those materials of old that's proven itself. In almost all cases, it's a high-quality steel with few impurities in it.

That's why it doesn't turn to rust powder in just a few years.

Most wrought iron I've seen has stood the test of time. With just a little care on your part, you can preserve it so other future families that own your home can enjoy it too.

Degree of Difficulty: Two Hammers out of Five.

CLICK HERE to get FREE & FAST BIDS from local exterior painters who know wrought iron.

Needed Supplies

 Gather the following supplies:

paint with primer

Here's a great newer paint that's got the primer built in. This saves you TIME AND MONEY. CLICK HERE TO ORDER THIS PAINT. It comes in many colors. While you're buying this paint at Amazon, be SURE TO GET all the other tools you need in the following list.

Get These Tools

  • paint scraper
  • wire brush
  • assorted small paint brushes
  • paint cleaning tools
  • drop cloths

You may want to consider using a power drill equipped with a wire wheel if you have lots of rusty spots to prepare. You may also consider a versatile oscillating multi-tool to speed up this work.

Paint Is Glue

Paint is simply a colored glue. Any paint chemist will confirm this. All glues like to bond to surfaces that are clean, free of oil, dust-free, no rust, no rust scale, etc. The better condition the thing you're painting is in, and assuming you purchase a high-quality paint and matching primer, you can expect to get ten or more years out of a paint job.

Scrape Away

The most common problem with wrought iron is peeling paint with rust under the paint. Scrape off as much of the paint as you can. Use a wire brush or a power tool equipped with one that allows you to remove the rust so you see bare metal. Wear a special dust mask that will keep any of the paint dust out of your lungs. There's a very good chance you might be dealing with older layers of paint that very likely contain lead.

X-O Rust Paint Video

Watch the following video. You'll be blown away by the test panels showing how good this paint is next to the name brand you were going to buy.

The video shows a spray paint, but this same paint is available in quarts and gallons for large jobs.

Rub The Rust

The success of your new paint job is based on the amount of time you spend in getting ready to paint. Most people don't want to invest the time to get rid of any and all rust. You must do this. It's non-negotiable.

CLICK HERE to get FREE & FAST BIDS from local exterior painters who know wrought iron.

Remove Dust

Once you've removed all rust, take a dry older paint brush and dust off all bare metal. Wipe down any existing painted wrought iron to remove any dust and dirt. Dust is your enemy.

Follow Label Instructions

Read the label on the metal primer can. Follow all the instructions, paying attention to the temperature limits. If you're trying to paint in the early spring or late fall, you could bump up against the lower temperature limit. Also pay attention to the time it says you have to wait to re-coat with finish paint. Some metal primers will allow you to paint metal that has a light coating of rust.

Finish Paint FAST

You'll get the best results with your finish paint if you apply it as soon as the primer says it can be recoated. You'll achieve a better mechanical and chemical bond. Plan ahead so you can apply the finish paint soon to the primed areas and not have days of time between the priming and the finish paint application.

Best Weather

You may think it's best to paint on sunny breezy days. That's the worst time. Overcast days with light or no wind are the best and if the temperature is around 65 F, it's ideal. Be sure there's no threat of rain until such time as the paint is dry.

Brush Tips

Apply the finish paint with the brush of your choice. If it's an oil paint, dip the brush in mineral spirits before you dip it in the paint. Getting the bristles wet with the solvent will make it easier to clean the brush later. If you're using a water-based metal paint, dip your brush in water first.

Don't Put It Off

The key to an easy wrought iron paint job is keeping up with it. If you allow the existing paint to fail miserably, then you'll have more prep work to do that's mind-numbing. Remember, purchase the most expensive metal paint and primer you can. Expensive paint almost always has the best ingredients.

CLICK HERE to get FREE & FAST BIDS from local exterior painters who know wrought iron.

Column: HT042