Backfilling a Foundation Wall

Backfilling a Foundation Wall

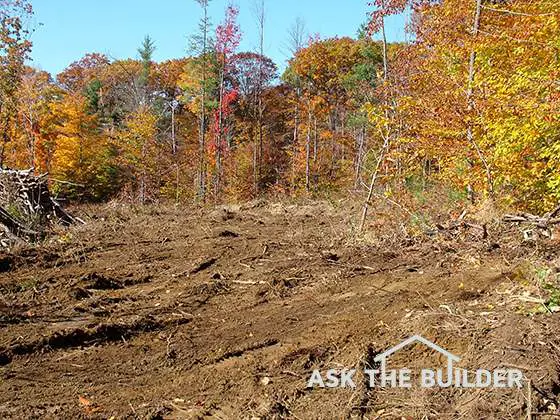
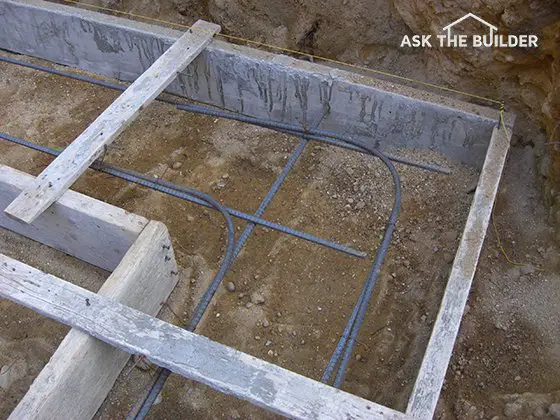
Backfilling a Foundation Wall - Believe it or not, this is a precast foundation wall. It is made from poured concrete and rests on compacted gravel, not a poured concrete footer. If this wall was backfilled before the interior floor was poured, it would collapse in no time. ©2023 Tim Carter

Backfilling Foundation Wall TIPS

DEAR TIM: I am building a new home and the poured concrete foundation was installed 17 days ago. The weather has been cool with temperatures averaging about 51 F.

I was told to let the concrete cure for 25-30 days before backfilling it. However, the contractor is applying pressure to backfill so the rough carpentry subs can get to work.

Should I cave in and let them backfill against the walls or should I suffer the consequences of delaying the project? Shawn S., Pittsburgh, PA

DEAR SHAWN: In my opinion, concrete is a mystical building material. That said, you want to know about backfilling a foundation.

When Should A Foundation Be Backfilled?

A poured concrete foundation should be backfilled AFTER:

  • the concrete has achieved a minimum of 75% of its design strength
  • the basement slab, if there is one, has been installed. It acts as a support column at the base of the wall preventing it from sliding off the footing
  • the wood subfloor has been installed. The floor joists and subfloor assembly once bolted to the top of the foundation act as a support column at the top of the poured wall.

Think of a poured concrete wall as a BIG BEAM that needs support at each end (top and bottom) just like a floor joist needs support at each end. The soil is applying sideways pressure to the foundation wall just as a heavy load applies downward pressure to a floor joist.

Concrete is Liquid Rock

It often arrives at a job site in a truck pre-mixed and ready to pour. Typically it has the consistency of cooked oatmeal, but hours later it resembles damp solid rock.

CLICK HERE to get FREE & FAST BIDS from local foundation contractors near you!

This transformation happens because of a chemical reaction that starts to happen the instant water is added to the Portland cement powder. The hydration chemical reaction causes microscopic crystals to grow that connect all of the sand and gravel to one another.

Concrete Strength Achieved After Many Weeks 

The trouble is, this chemical reaction continues for weeks, and even months, after the concrete truck leaves the job site. In fact, standard concrete that is moist cured under ideal conditions often only achieves 40-45 percent of its design strength after three days.

After seven days, it should hit 75 percent of its final design strength. To get to 100% of it's design strength, you often have to wait 28 days or more. These numbers assume temperatures at or near 70F.

Cold Temperature Slows Strength

In cold weather, the strength-building process can slow considerably and even stop completely if the temperature gets very cold. Once the weather warms up, the concrete starts to strengthen again on its own so long as it still retains moisture.

That's why it's a big risk to backfill a cast, or poured, concrete foundation during the winter. You can build on top of the foundation with little risk.

It's the weight of all the dirt pressing against the new, tender concrete that's the issue.

bowed new foundation wall

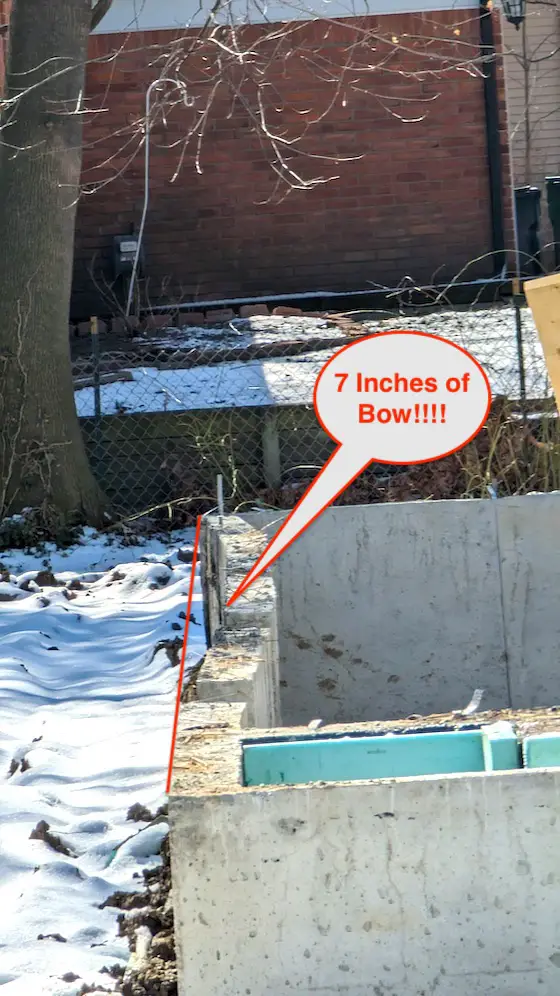
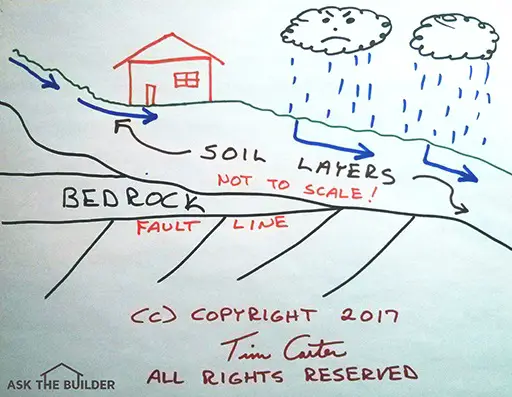
This is what happens when you backfill a foundation too early. The red line indicates WHERE the top of the wall should be - in a straight line. Look at the snow on the ground. The builder of this home is an IDIOT. Copyright 2023 Tim Carter ALL RIGHTS RESERVED

When Should A Foundation Be Backfilled?

A poured concrete foundation should not be backfilled until:

  • the concrete has achieved a minimum of 75% of its design strength
  • the basement slab, if there is one, must be installed. It acts as a support column at the base of the wall preventing it from sliding off the footing
  • the wood subfloor must be installed. It acts as a support column at the top of the poured wall.

Think of a poured concrete wall as a BIG BEAM that needs support at each end (top and bottom) just like a floor joist needs support at each end. The soil is applying sideways pressure to the foundation wall just as a heavy load applies downward pressure to a floor joist.

Vertical Steel Prevents Horizontal Bending

If you had told me that you had vertical steel reinforcing bars in the poured concrete, then maybe I would say to move ahead and backfill. But vertical reinforcing steel is rarely placed in residential concrete foundation walls.

It's not hard to put it in, but it does cost extra money.

If you decide to put vertical steel in a foundation wall to resist backfill pressure, the steel needs to be placed closer to the inside face of the wall. The usual standard is 2 inches.

backfilling a foundation wall

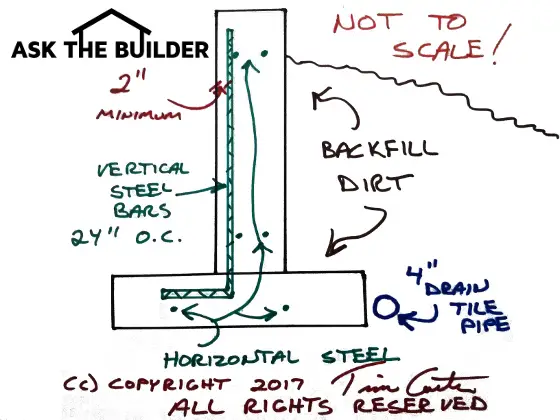
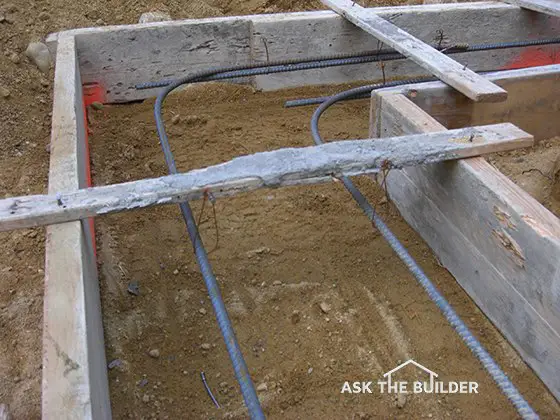
This ATB drawing done in haste shows vertical and horizontal steel bars using teal color. There are four horizontal bars in the foundation wall and two in the footing. You can see the vertical steel bar. These would be put every 2 feet on center. NOTE: The vertical steel bars start at 2 inches from the inner face of the foundation wall. This placement is CRITICAL. ©2017 Tim Carter

Horizontal Steel Common

Foundation walls often have two rows of horizontal reinforcing steel placed near the bottom and top of the walls. This steel helps prevent vertical cracks in the foundation walls should the soil beneath the foundation shift or move. This movement is an up and down movement.

This steel is usually about one foot up from the top of the footing and one foot down from the top of the wall.

CLICK HERE to get FREE & FAST BIDS from local foundation contractors near you!

Backfill Creates Sideways Pressure

Backfill dirt that is placed against the foundation wall causes a lateral or sideways movement. Vertical steel bars add enormous strength to poured concrete and help prevent horizontal cracks that are caused by soil pressures.

Loaders & Dozers Are BAD!

Lateral pressure can also be caused by the heavy machinery that places the dirt against the walls. An inexperienced heavy equipment operator can crack a new foundation wall by pushing dirt into the void space against the wall instead of gently dropping it in from above.

Walls = Wide Beams

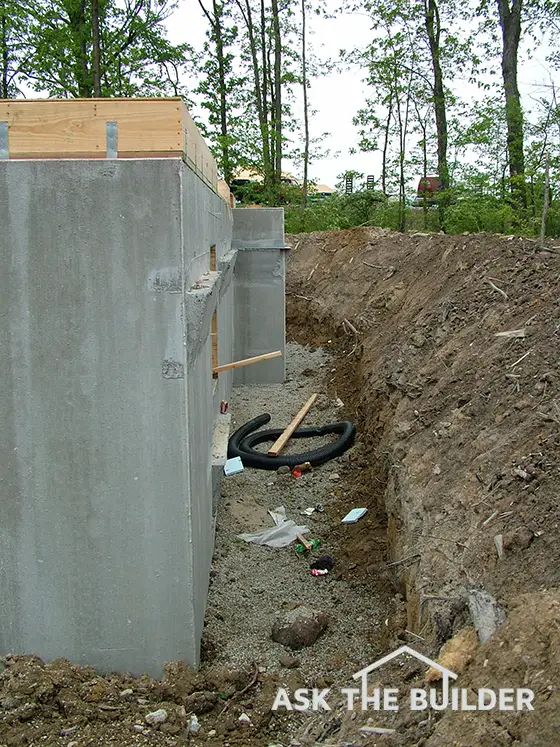
Backfilling a poured concrete wall or even a masonry concrete block wall can be very risky if two other tradespeople are not finished with their work. The basement slab and the first floor that sits on top of the foundation should be complete before backfilling proceeds.

These two building systems help lock the bottom and top of the foundation walls in place as the soil pressure pushes against the walls. I've seen poured concrete foundations that were backfilled before a basement slab was poured. In certain instances the wall cracked and slid off the footer from the intense soil pressure.

Backfill Dirt Is Heavy

Keep in mind that wet soil is very heavy. It's not uncommon for this material to weigh nearly 100 pounds per cubic foot. When you calculate the weight of all of the soil being dumped against the foundation you quickly discover it is tens of thousands of pounds.

A foundation wall is just a concrete slab turned on edge. Concentrated loads routinely crack flat concrete slabs so it's not hard to imagine soil pressure creating a crack.

Patience Pays Off

My advice to you is to wait. Your builder and many others will scoff at you and will put pressure on you to move ahead. But this pressure pales in comparison to the weight of the dirt that is placed against the foundation walls.

Furthermore, if the foundation does crack because of premature backfilling, this structural scar will haunt you until you eventually sell your home. In fact, you will probably have to explain what happened to the professional home inspector that is hired by the buyers after they see the ugly cracked foundation walls.

Vertical Steel is Easy

The vertical steel bars that should be placed in poured concrete walls are not hard to install. It often only takes an experienced crew maybe one extra day, perhaps two, to install this valuable structural component.

Steel is 100X Stronger Than Concrete

The reason steel is needed is simple. Concrete has fantastic compressive strength. This means if you squeeze or compress it, it takes enormous pressure to crack concrete. But if you try to bend or pull concrete, it only has one-tenth the strength it exhibits when you compress it.

This bending of concrete is referred to as tension by engineers and concrete professionals. The mix used by many foundation contractors might only have 350 pounds per square inch of tensile strength.

Steel, on the other hand has enormous tensile strength. The steel bars a contractor would often buy would require 40,000 pounds of tension applied to them before they'd rip apart. That's over 100 times stronger than the concrete.

These steel bars, once placed inside the wet concrete, transfer their strength to the concrete. Imagine how strong a foundation wall might be that has vertical steel bars placed two-feet on center. I can tell you that a wall built this way will stand the test of time.


Column 569

How to Build a Cheap Desktop

build desktop

This cheap desk was built in one hour with one sheet of plywood and two pieces of thin molding. ©2018 Tim Carter

"The first thing to realize when you're building a desk to work at is the height above the finished floor."

How To Build A Cheap Desk Checklist

DEAR TIM: I need to build two cheap desktops. I'm lucky in that I have small cabinets that the top can rest on.

One top is for my man cave and the other one is for a hobby and craft center for my wife and young kids. I'm looking for durability, affordability, ease of construction and good looks.

Realize that I have limited skills and tools. What would you do if you were me? Can I do this for less than $100? If you can offer a solution, I'd be most grateful. Travis S., Morgan Hill, CA

DEAR TRAVIS: I've got great news for you.

How Long Does it Take to Build a Cheap Desk?

You can build these desktops in no time at all and I can bring them in under budget for you assuming you need no more than 16 feet of total length for both desktops. Believe me, 16 feet of a desktop is quite a bit.

CLICK HERE to get FREE & FAST BIDS from local finish carpenters who can build this desktop in minutes.

How High Above the Floor Should the Desk Be?

The first thing to realize when you're building a desk to work at is the height above the finished floor. This is critical if you're using standard chairs that are not adjustable with respect to height.

Most tables that you eat at have a finished height above the floor of 29 to 30 inches. This works great for adults, but not so well for young children.

How High Should A Child's Desk Be?

A child's desk, depending on their age, can be anywhere from 18 to 25 inches high. As the child grows, so must the height of the desk.

You may want to keep this in mind as you build the desktop for your hobby and craft center. If I were you, I'd consider designing a simple desk or workstation where the top can be raised by putting blocks under the supports as your young children grow. Just keep that in mind.

What is the Cheapest Desk Material?

I've had huge success in the past by using 4 x 8-foot sheets of 3/4-inch-thick plywood as a desktop. If you cut a piece of plywood like this in half lengthwise, you end up with two pieces of wood that are 24 inches wide by 8 feet long.

What is the Best Desk Plywood?

My favorite plywood for a project like this is A/C Fir. Fir is a somewhat tough wood species and the letters A and C stand for what each side of the plywood looks like.

You'll rarely if ever, find this product at a home center. You'll need to visit a local old-fashioned lumberyard for great plywood like this. Believe me, when you make the trip to the lumberyard, you may make it your favorite place to get products!

What Does the "A" Mean in the Plywood Name?

The A side of the plywood looks almost like a gorgeous piece of furniture with no knots or major defects. The C side forms the underside of your desktop and that surface will have some shallow knotholes and other defects.

diy desktop

This is the A side of A/C fir plywood. Note how there are no knots and it looks like a fine piece of furniture. ©2018 Tim Carter

How Deep Should the Desk Be?

I almost always make my desktops 24 inches deep. This depth provides ample space for larger desktop computers and just about anything you'd put on a desk.

It's also a perfect depth, in my opinion, for a craft or hobby workspace because you can put along the back edge of the desktop 8-inch-wide shelves for supplies and still have an abundant workspace for most things you're working on.

Plywood Desk Video

Watch this video I made of desks I built for the AsktheBuilder.com Intergalactic headquarters. These had interesting plywood gussets that supported the ends.

What Tools are Required to Make the Cheap Desk?

You only need a circular saw to make the needed cuts in the plywood.

Circular Saw

This is a wonderful corded saw. It will last generations if you care for it. It cuts very accurately. CLICK THE IMAGE NOW TO BUY THIS SAW.

Be sure you use a sharp blade and always make your cuts with the A side of the plywood facing the ground. This minimizes splintering of the finished side of the desktops when you cut 90 degrees across the grain of the plywood.

CLICK HERE to get FREE & FAST BIDS from local finish carpenters who can build this desktop in minutes.

How Do You Plan Cuts for Minimal Waste?

You need to plan your cuts so that you end up with a factory edge of the plywood facing out where you'll sit at the desktop. It's very hard to cut a straight line using a hand-held circular saw without fancy clamps and straightedges to guide the saw.

Clamping Straigthedge for straight cuts

This clamping straightedge will allow you to make PERFECT straight cuts. You can get extensions so you can cut the full 8-foot length of the plywood. CLICK THE IMAGE NOW TO BUY THIS FANTASTIC TOOL.

How Do You Trim the Edges?

I always cover the unattractive edge of the plywood with thin strips of solid wood molding. Most old-fashioned lumberyards will stock a piece of wood that is as wide as the plywood is thick.

This wood strip will only be 1/4-inch thick and it is available in lengths up to 16-feet long! I always use regular yellow carpenter's glue and small 1 and 1/4-inch finish nails to attach this strip of wood to the plywood edge.

Do You Need to Sand the Plywood?

Once you have the desktop built and the wood strip on the edges, then you just need to sand it with a medium sandpaper and finish it.

What Stain & Urethane Should You Use?

You can stain the plywood if you want a rich color, or you can just urethane it with a clear finish if you want a light look. You can also paint the plywood if that's the style you want. If you do paint it, I'd then add two coats of clear water-based urethane to protect the softer painted film.

Polyurethane Satin Finish

SECRET TIP is to coat the drywall BEFORE finishing with this amazing urethane product. It WILL STOP water from penetrating into the paper of the drywall. CLICK IMAGE TO ORDER IT NOW. Always be sure to order the exact sheen you want. There's a big difference between satin and high-gloss!

If you just decide to urethane the bare plywood and you use a water-based urethane that dries within 90 minutes, then realize it's important to sand the desktop again before you add the second coat of urethane. The water in the urethane will raise the grain of the wood and it will feel rough. This roughness sands down easily and your second coat of urethane will be quite smooth.

How Long Do I Wait After the Urethane is Applied?

Once you have the final coat of urethane on, don't put anything on the desktop for at least 72 hours. The urethane, while it's dry, it's not cured.

If you set things on the finish, there's a good chance they'll stick. The curing time will take longer if it's cool where the top is. Hot dry conditions accelerate curing time.

Should I Buy Flat Sheets of Plywood?

When you do shop for the plywood, be sure to get pieces that are nice and flat. Don't transport the plywood in the rain or allow it to get wet as it can develop a warp to it so your desktop may not be as flat as it could.

How Strong is the Plywood?

You'll be stunned by how strong this plywood desktop will be. It can stand abuse and it can be modified or moved in seconds. That's one of the things I like best about these modular desktops as you can change what you have in just minutes.

You can't do that with a traditional desk that has the top and base as one complete unit.

How Long Will the Plywood Desk Last?

If you're wondering how long a desktop like this can last, let me share with you that I've had one in heavy daily use for over fifteen years and it looks like the day I built it.

Realize you can get other finish-grade plywood that has hardwood veneer if you desire a very upscale look.

Should I Get Birch Plywood?

You can also get wood species like birch that has very little grain to it and is very smooth. Spend some time at the lumberyard and see what they stock!

Brandi asked a similar question. Read her email in my Fast Desktop column.

CLICK HERE to get FREE & FAST BIDS from local finish carpenters who can build this desktop in minutes.

Column 1087

February 12, 2017 AsktheBuilder Newsletter

It's coming - perhaps the biggest storm of the season.

Twelve hours from now, the maw of the Nor'easter could be directly overhead. If you're a new subscriber, I live in central New Hampshire.

January was a fairly dry month with little snow, but February is making up for lost time.

Today may be the day I lose access to my front walk for a month or more.

I thought you'd be interested in this before photo I took just after 7:00 am this morning. It's the calm before the storm.

See that stick at the end of the walk? It's an 8-foot grade pole one uses with a laser level or builders transit.

The pile of snow at the end of the walk is 6-feet tall.

Snow cascades off the two roofs on either side of the walk and from above my head. It's a box canyon.

I didn't build this house and the architect that designed it was obviously from Antigua or Houston, Texas. IDIOT

I'll have an after photo, and probably video, for you on Tuesday.

​​​​​​​Assuming I survive.

3-Stage Snowblower Video Review

Two days ago, I taped a video of the best snowblower I've ever used. It's made in the USA.

It's a Troy-Bilt Vortex 2490. The vortex name comes from the unique center high-speed auger that chews through crusty snow like I eat a Skyline Chili 5-way after being deprived for six, or more, months.

CLICK HERE or the photo of the spinning auger below and watch the video. I was a little excited at the end. You'll probably laugh. If not, you may need to meet me in person.

Soft Close Photos

My very good friends at LE Johnson want me to share a few stunning photos with you.

Each one of the doors you'll see can be equipped with their revolutionary soft-close mechanism.

Cool Blue Glow

Green Trilobite Vase Destractor

Giant Tri-Panel Slider

Electric Linesman's Dream Bedroom

Hidden Red Rotating Machines of Cleanliness

To discover how you can adapt your current LE Johnson pocket, slider or wall-mount doors with the soft-close hardware, CLICK HERE NOW.

It goes without saying you can get it on new LE Johnson doors too!

Maggie's Paint-Review Observation

You may be one of my subscribers that I've shaken your hand or given you a hug. I'm blessed to have been able to see you in person.

Maybe I've stayed at your home, ridden in your Jeep in Sedona and flown around the red rocks in a helicopter you rented or gone to your splendid gun and rod club.

I could go on and on and it's my hope to meet you one day if our paths have yet to cross.

There's also an elite group of subscribers who've sent me things or made something for me. It's almost impossible to describe that joy or wonderment!

Maggie's in this group. She loves to knit and most recently made me a Morse muff. It's a stunning hand-warming muff I can use while doing outdoor amateur radio in the cold.

I had a case of frostbite in my late teens to both hands and the doctor told me I'd forever have heightened cold sensitivity. He was spot on.

But I digress!!!!!

Maggie emailed my last week after I introduced you to the two amazing True Value paints - the X-O Rust spray paint and the EasyCare interior paint.

Here are links to the two reviews I did:

X-O Rust spray paint

EasyCare interior paint

You can get these at your local True Value hardware store, but I also provided links to both paints at Amazon.com.

Maggie went to Amazon, poked around and read the reviews.

Here's what she emailed me:

"True Value might want to look at how few stars their paint is being given: not exactly a raving endorsement?

I’m not sure why I’d want to buy paint online unless it was exactly a color/brand I’ve had before but even that would be a stretch. Seeing those reviews would deter me from going to the store!"

I also received a grumble comment from a subscriber who had an issue with the X-O Rust spray paint.

Here was my response to Maggie and the other subscriber. My thoughts are based on selling my Stain Solver oxygen bleach for twenty-one years and having to deal with complaining customers.

1. You never ever should assume the person writing the review (complaining) knows how to do the project or use the material.

2. The reviewer could have a dog in the fight. They could work for a competing company, distributor or retailer.

3. The reviewer could be like many who NEVER EVER read the instructions on the label.

4. The reviewer may not possess the needed hand-eye coordination required to get excellent results.

I could go on and on......

When it comes to paint, you need to realize that MANY PEOPLE have NO CLUE how to apply paint. I know because I've WATCHED THEM TRY TO PAINT.

They might be using cheap rollers and brushes. They may not have washed the walls.

They may be over-rolling the paint and spreading it too thin.

They may not have shaken the can of spray paint enough so the solids needed for coverage get mixed in.

They may not know how to spray paint. Their lack of skill then causes runs or other defects.

Get the point? Don't ASSUME the reviewers are QUALIFIED to render a valid and objective opinion.

Latest Revised Columns

There's some unbelievable revised content below.

You'd be remiss if you don't at least CLICK EACH ONE and skim it.

Some of the photos and videos you'll see are beyond description:

Roof Ventilation with Turbine Vents - THE BEST

How to Wallpaper Over Drywall - SPECIAL TRICK

Can I Cut My Roof Trusses? Yes, But….!

Treated Wood Foundations - Not For Me

How to Connect Cabinets

Washing Machine Water Valve Stuck

Small Engine Storage Tips

How To Repair Chipped Ceramic Tile

R Value Meaning and Map

Painting Walls or Trim First - Well…..

Tile Falls Off Walls​​​​​​​

Shed Floor Material - What’s Best?

Hot Garage Ventilation

How to Clean a Deck

Drywall Cutting Tools and Tips

Foundation Footer or Footing

Water in Heating Ducts - STOP the Water!

Scissors Truss Design - Vaulted Ceiling Baby!

Kitchen Exhaust Fan 101 - Important!

Land Clearing - Rarely DIY

Painting Steps - They Look Great!

HOLY TOMATO!!!!

That's a boatload of revisions. I'm doing it so you have a better user experience at www.AsktheBuilder.com.

Do you LIKE the revisions???

Got to go get ready for the blizzard! Wish me luck!!!

Tim Carter
Founder - www.AsktheBuilder.com

Do It Right, Not Over!

Painting Steps

stencil steps

These steps are painted and have a great stencil pattern on each tread. There are highlights as well on the ends of each tread. ©2017 Tim Carter

Painting Steps TIPS

DEAR TIM: Yesterday I stopped by a friend’s house and she was painting steps. These were wood steps leading to her basement.

It looked fantastic, as she was using a stencil. What’s the best paint for steps?

How do you keep the steps looking great for years, as I feel the paint will get scuffed and look horrible in no time. Please give me as many tips as possible, because I want my steps to look better than my friends. Pam W., Green Bay, WI

DEAR PAM: There’s no need to make this into a competition. In fact, I hope you share what you discover so that your friend’s steps stay looking great for years.

Basketball

Let’s talk about painting steps and painting floors. I can see why you might be worried about durability of standard paint, as paint is typically a softer substance and can scratch fairly easily.

But if you’re a fan of indoor sports, you’ve seen painted floors that take enormous abuse and probably never even thought about what you were looking at.

For example, think about the paint on basketball, volleyball and even badminton courts. Those are almost always hardwood floors that get large sections painted or at the very least lines and logos.

CLICK HERE to get FREE & FAST BIDS from local painters that can paint your steps.

Urethane Coating

The reason they look good year after year is simple. The paint is protected by numerous coats of clear finish that’s no different than what you’d put on your stained hardwood floors.

Rapid Curing

You can use just about any paint for your steps, but it’s best if you can find one that cures quickly. Years ago, oil-based paints tended to cure faster than latex paints, but paint chemistry has advanced such that many latex paints have a rapid cure time.

Curing is the process that paint undergoes as it gets hard. Understand that there’s interesting chemistry happening when paint dries. It goes from a liquid material to one that’s pretty hard.

Doing this liberates any number of chemicals into the air. This transformation from liquid to solid happens during the curing process. The trouble is it can take days or weeks to happen.

Porch Paint

I suggest getting a paint that’s high quality. There are paints made to be walked on. They're some of the best around. Often on the label they say they're for porches. CLICK HERE to see an assortment of excellent porch paints that can be tinted just about any color.

porch paint

Here's a great porch paint you can tint to any color you want. CLICK THE IMAGE TO BUY IT NOW.

More $$$ = Better Paint

Price is usually a great barometer of quality. Keep in mind that paint is simply colored glue, so you want a really good glue that will stick to your steps. Great glues or adhesives in the paint tend to be more expensive.

CLICK HERE to get FREE & FAST BIDS from local painters that can paint your steps.

Test First

I highly recommend taking some scrap wood to test what you’re going to do. Some of the most unique steps I’ve seen painted are ones where the entire set of steps is painted a base color such as an off white with the colored stencil patterns applied as highlights.

You want to practice on these scrap pieces of wood until you really refine the process of working with stencils or even free-hand painting of patterns.

Stand Back

Be careful about being too critical of your work. Always stand back 4 or 5 feet to view the finished work.

You’ll be surprised how artwork you see regularly doesn’t really have tremendous detail. Your brain tends to make any missing connections that the artist left out.

Read The Label

When you get ready to start painting the actual steps, read carefully the label on your paint can or cans. Follow the directions to the letter. It’s very important that the surfaces you’re painting be clean and dust free.

Use regular soap and water to wash the steps making sure you rinse and dry them. If the steps have a glossy finish, you need to rough them up so the new paint bonds well. You can use sandpaper or liquid deglossers.

paint deglosser

This is a great deglosser. It's super easy to work with. CLICK THE IMAGE NOW TO ORDER IT.


Water-Base Urethane

After your new paintwork is complete, you need to protect it. I prefer to use clear water-based urethanes for this. The water-based urethanes tend to stay clear for years.

varathan polyurethane

I've had excellent results with this clear water-based urethane. It dries FAST. CLICK THE IMAGE TO ORDER SOME NOW.

Oil-based urethanes had a strong tendency to develop a golden patina. This may appeal to you. If so, see if you can still find oil-based urethanes. Laws controlling volatile organic compounds (VOCs) have really stifled the production of these products.

Four Coats

Because steps take so much abuse, I’d apply no less than four coats of urethane. The water-based products have a quick dry and re-coat time, and it’s possible you may be able to apply all the coats in one day if you assist the drying process.

Be sure to read the instructions on the urethane can to get the best results.

Practice Makes Perfect

I can’t emphasize enough the importance of practicing using the stencil patterns. You want to make sure the results on each step are fairly uniform, so develop a technique you can repeat as you work your way up or down the steps.

Traffic Flow

The biggest problem you’ll have, if the stairs are the only way up and down in your home is determining how to maintain a flow of traffic while the work is going on. Be very careful of people wearing socks as the fibers from the socks can bond to tacky or uncured paint or urethane.

Farm Them Out

You may want to send as many family members as possible to a friend’s or relative’s house while you ramrod this project. Less feet around the house will ensure success!

CLICK HERE to get FREE & FAST BIDS from local painters that can paint your steps.

Column 820

Land Clearing

NH lot cleared

Land Clearing TIPS

DEAR TIM: Land clearing is now on my radar since I purchased some raw land to build a new home. The land has lots of large trees and just a few bushes.

I don't know where to start or how to do this. Is clearing land something I should consider doing myself?

What kind of land clearing equipment would I need? Are there regulations about land clearing that affect what I do? Mike G., Hewlett, NY

DEAR MIKE: I can think of lots of do-it-yourself projects, but I have to be honest; land clearing would be either at the bottom of the list or left off on purpose.

Big Toys

Clearing land is hard work, and typically involves lots of large heavy equipment not usually operated by weekend warriors. I'm not saying you can't do this, but I'm saying it's a very large-scale project, even if it's a smaller building lot.

The list of land clearing equipment starts with simple hand tools and can extend all the way up to enormous bulldozers used for clearing land.

CLICK HERE to get FREE & FAST BIDS from local land-clearing contractors who have big machines!

Chain Saws

At the very least you'll need a powerful commercial grade chain saw or two and all the safety equipment that one uses with chain saws.

chain saw

This is a great brand-name saw. It's a powerful one that will cut large trees with no problems. Be SURE to buy chaps, a helmet with visor and safety glasses at the same time. CLICK HERE TO GET THIS GREAT SAW NOW.

If you've never operated a chain saw, then you must obtain training. Felling trees is extremely dangerous.

Even when a tree has fallen, it can have stored energy that can cause the tree to roll or move in such a way to cause the saw to bind or you to get crushed.

Keep Chain Sharp

Chain saws used all day in the field require sharpening. If you use a handy special tool, you can field dress a chain in about ten minutes.

Watch this video to see how easy it is to do.

Many Ways

There are all sorts of ways to do land clearing and if you ask five experts, you most likely will get five different answers. The method chosen often has lots to do with what happens to the trees and bushes that are being removed.

Cash Crop

You may live in an area like I do where trees are used to create electricity. I have a power plant just twelve miles from my house that burns wood chips instead of coal or natural gas. There are many local companies near me always looking to clear trees to sell to the power plant.

You may locate a contractor that will clear most of your small trees for free. If this happens, be prepared to deal with the slash, that's the name for left-over branches, that's left behind.

Rip Them Out

Some land-clearing experts love to push down the entire tree, and then move it over to a place on the land where it can be processed. Your lot, or that of someone else, may have trees suitable for lumber processing.

Don't automatically think all trees need to be ground up or cut for firewood. Some land-clearing contractors have giant machines that can grind up entire stumps. 

CLICK HERE to get FREE & FAST BIDS from local land-clearing contractors who have big machines!

Stumps

Other contractors like to cut down the tree leaving a stump that sticks out of the ground about three feet. The stump stub gives a bulldozer leverage to pop the stump out of the ground much like a wisdom tooth from a teenager's jaw.

Stump Removal Video

Watch this video to see how to use a DIY excavator machine to rip out stumps FAST!

Timber Sale

Before you do anything, you may want to see if you have any valuable timber on the land. You might be surprised to discover the trees you intend to remove might have value to someone.

Be sure to get multiple estimates from timber buyers. In some cases, they'll actually come in and do the tree removal for you as part of the deal. If you decide to do this, get referrals from other landowners who worked with the timber company.

Some timber companies respect landowners and the land, while others tend to think only of themselves leaving you with a giant mess as well as a raped and scarred piece of land.

Permits

You need to check with your local government as well as regional and state officials. There may be scads of regulations regarding land clearing including, but not limited to, timber permits, silt fencing, tree ordinances, burning, composting, burying organic material, etc.

Land clearing is considered by many to be a harmful process, so it can be highly regulated in many areas. Some places will allow you to burn the brush and limbs, while others might require you to grind and compost the trees and bushes.

Rent DIY Machines

You often can rent medium-sized equipment that can do a somewhat respectable job of clearing land. Recently, I rented a powerful skid-steer loader that was able to move stumps that weighed over two tons.

The same tool-rental company rented a tracked excavator backhoe. This machine allowed me to dig drainage trenches and remove stumps with ease.

lot clearing - Tim with excavator

This mid-sized tracked excavator does a superb job of removing stumps in a matter of minutes. PHOTO CREDIT: Brent Walter

Requires Skill

I've used this type of mechanical equipment for years, so I was very proficient with it. It can take hours or days for a beginner to learn how to extract the most efficiency from these powerful machines, so don't expect to get lots of work done the first few times using this land-clearing machinery.

Training

If you decide to rent equipment like this, have frank discussions with the tool rental company. Ask if they have a training facility where you can learn how to safely use the machines.

One At A Time

If you decide to cut down the trees using a chain saw, try to avoid cutting down multiple trees that fall down upon one another. You may end up with a rat's nest of limbs that make it hard to get at and remove the debris.

Help Needed

You should absolutely try to recruit helpers when you start this land-clearing project. You'll almost always have some hand work to do with smaller tools and it can become tedious if you try this alone.

It's also a great idea to have others there for safety reasons. If someone gets hurt, the others can give first aid or call for help.

Erosion Issues

Once the land is cleared, erosion becomes a serious threat. Consider seeding the ground with some sort of grass that will hold the topsoil. Annual rye grass is sometimes used if you are working in the fall.

Talk with a local extension agent or government soil district employee who knows how to preserve this valuable natural resource.

CLICK HERE to get FREE & FAST BIDS from local land-clearing contractors who have big machines!

Column 700

Kitchen Exhaust Fan

range hood over pot filler

PHOTO CAPTION: This high-powered kitchen exhaust fan is tucked up under a decorative hood. It is sized properly for the large kitchen. ©2017 Tim Carter

"Generally speaking, I prefer the overhead kitchen exhaust fans rather than the down-draft ones simply because hot air rises."

Kitchen Exhaust Fan TIPS

DEAR TIM: My new kitchen plans call for a new kitchen exhaust fan. To be more precise, a kitchen hood exhaust fan has been suggested.

Is one kitchen stove exhaust fan more effective than another? Years ago the down-draft exhaust fans were popular.

What exhaust fan is in your kitchen if you don't mind me asking? How do I make sure the kitchen exhaust fan I select will adequately ventilate my kitchen? Where does the replacement air enter the house? Kathleen K., Exeter, NH

DEAR KATHLEEN: You're asking all of the right questions about your new kitchen exhaust fan.

What Are the Biggest Kitchen Exhaust Fan Mistakes?

The biggest kitchen exhaust fan mistakes are:

  • fan not large enough
  • vent pipes too small or unsealed
  • no makeup air

It's important to realize I see builders and remodelers fall down here. Either the fan installed is not powerful enough for the size of the kitchen, the installer fails to vent it properly, or overlooks the need for makeup air.

CLICK HERE to get FREE & FAST BIDS from local contractors who install fans.

Do the Fans Get Rid of Grease Vapor?

Yes, the exhaust fans do exhaust grease vapor.

It must be remembered you really need a good kitchen exhaust-fan system if you cook greasy foods and boil foods. The cooking process often creates both visible particles as well as an invisible aerosol mist of grease and smoke.

Grease can and does coat the surfaces of your kitchen if they're not vacuumed and exhausted to the exterior of your home. Sooner or later even with a great exhaust fan, you can still develop a fine coating of grease on light fixtures, cabinets, walls, and ceilings. This is the voice of experience talking.

What is the Best Performing Exhaust Fan?

Generally speaking, I prefer the overhead kitchen exhaust fans rather than the down-draft ones simply because hot air rises. Why not use that physical axiom to your advantage and collect the cooking vapors with a hood?

How Do You Size the Fan?

The fan manufacturers have sizing charts that allow you to purchase the correct fan to match the size of your kitchen.

My kitchen exhaust fan is matched to the size of my kitchen. The fan is a powerful three-speed model that has brilliant halogen bulbs that are built-in to the fan.

There are three removable grease-collector screens that we take out regularly and put into our dishwasher. When the fan is on the highest fan speed, it sucks 1,100 cubic feet of air per minute (CFM) from above our cooktop and pushes it outside.

Should I Use Solid Metal Duct to Vent the Fan?

Solid metal duct should be used to vent the fan all the way out and through a roof or a sidewall of your home. Tape all duct seams with aluminum metal duct tape, not plastic tape.

aluminum duct tape

This is metal tape. Yes, it's aluminum that has a high-grade adhesive on the back. This is what pros use to tape ductwork. CLICK THE PHOTO now to have this delivered to your home.

Another key point is the fan is connected to metal ductwork that extends from the fan all the way to the roof of my home.

IMPORTANT TIP: Each joint in the ductwork was carefully taped with special metal-foil duct tape by my ventilation contractor.

It's very important that no air seeps from the duct to other parts of the house. If that were to happen, hidden spaces in your home could become grease-covered posing a significant fire hazard.

How Do You Vent Through the Roof?

The exhaust from my fan exits the roof through a special roof cap that is made to handle that much air flow. It was easy to install so that rain does not enter the house.

Kitchen Exhaust Fan

>This is a large-capacity roof cap or vent hood. An 8-inch duct connects to it. You need to match the size to your fan. CLICK THIS IMAGE TO BUY THIS ROOF CAP.

Roof Cap Installation Video

Watch the following video to see how to install one of these roof caps.

What is the Formula for Exhaust Fan Sizing?

Many experts simply measure the square footage of the kitchen floor and multiply that by two to arrive at the cubic-feet-per-minute of output for the fan.

For example, since my kitchen is 350 square feet, I would need a fan that must exhaust at least 700 CFM of airflow. My fan can do that on its middle speed, and the highest speed produces the massive 1,100 CFM of air movement.

CLICK HERE to get FREE & FAST BIDS from local contractors who install fans.

How Much Replacement Air is Required?

You need to supply the fan with as much replacement air as it is exhausting out of your home.

You're really observant to recognize that large kitchen exhaust fans like these have a voracious appetite for air. You need to replace every cubic foot of air the fan pushes to the outside.

IMPORTANT TIP: You absolutely must control where the replacement are comes from. You need to put in a special fresh-air intake hood that's large enough to suck in the needed air.

How Do I Avoid Dangerous Backdrafts?

In today's modern homes that are well sealed for energy reasons, sucking that much air out of a house can cause serious backdrafting issues if a makeup air inlet is not installed. Backdrafting can cause deadly carbon monoxide to be drawn back down a chimney or metal vent pipe and/or smoke or smoke odors from fireplaces.

What is the Path of Least Resistance For Replacement Air?

The path of least resistance for replacement air is that path where air enters your home with the least amount of effort.

Newer homes are so airtight that when the air is sucked from a house by a powerful fan, it replaces that air with air from outdoors through the path of least resistance.

That path could be a furnace or water-heater vent, a chimney, or another vent that is open to the atmosphere. Installing a makeup-air vent solves this problem in almost all cases as outside air can easily flow through this device into the home.

Should I Read the Installation Instructions?

Before you buy a kitchen exhaust fan, it's always a good idea to get the written installation instructions from the manufacturer. These documents will often contain sizing guidelines as well as detailed step-by-step methods the manufacturer wants you to follow to keep the warranty in force.

Reading these ensures that the fan you are considering is the right size and that you can satisfy the minimum installation requirements.

What Size Should the Duct Be?

The exhaust duct size should be what's called out in the written installation instructions. Do not go smaller and larger is not a good idea either. Do exactly what the installation instructions say to do.

Resist the temptation to use smaller ducting for the fan. Some people think that the size of the exhaust piping is not that important. Believe me, you must use the exact pipe as called for, and be sure that you do not exceed the maximum length of pipe allowed.

How Many Bends Can I Put in the Ducting?

The written instructions will almost always tell you to avoid 90-degree bends, and how many and what type of bends can be put in the exhaust piping. The instructions will also tell you the maximum length the exhaust duct can be.

These hard bends in the pipe create significant restrictions that make it hard for the fan to exhaust the air from your kitchen.

CLICK HERE to get FREE & FAST BIDS from local contractors who install fans.

Column 725

Scissors Truss Design

scissor truss

A scissor truss provides support while providing a vaulted interior. Note how the bottom chords are not flat. Copyright 2018 Tim Carter

"I think the motto of truss engineers is: If you can dream it, we can build it."

Scissors Truss Design Checklist

What is a Scissor Truss?

A scissor truss is a truss that has sloped bottom chords that create a sloping inverted-V shape inside the room under the truss.

A scissors truss is a really cool roof framing option. You not only get the speed of framing that you get with common trusses but also the added benefits of an interior sloped ceiling.

Related Links

Attic Trusses Create Free Bonus Rooms

Storage Trusses Work Well Over Garages

What is the Normal Interior Slope of the Scissor Truss?

The slope of the interior bottom chord of the scissor truss is one-half the slope of the outer roof.

Free & Fast Bids

CLICK HERE to get bids from local carpenters who work with trusses all the time.

For example, if you have a fairly steep 8:12-pitch roof outside, your inside vaulted ceiling pitch will be 4:12.

Those numbers stand for inches of rise per foot of run. In other words, the 8:12 means the roof goes up 8 inches for every horizontal foot it travels.

How Do Engineers Calculate a Scissor Truss?

The companies that fabricate the trusses use sophisticated software to design the trusses. You provide the span of the roof and the desired exterior roof pitch and the software does the rest.

You can ask the structural engineer at the truss fabrication plant if there is a way to increase the interior slope, but I doubt you'll get much more than one-half the slope of the exterior roof surface.

CLICK HERE to get FREE & FAST BIDS from carpenters who work with trusses all the time.

Can you Create a Partial Scissor Truss?

Yes, you can create a partial scissor truss where the bottom chord starts off at a slope but then flattens out before it slopes down to the opposite exterior bearing wall.

I think the motto of truss engineers is: If you can dream it, we can build it.

I say this because I've been to truss manufacturing plants and seen countless drawings for trusses of all different shapes.

A few years ago a new home being built near where I live in central New Hampshire had a unique truss that was a partial scissor truss.

The truss had a short bottom chord for a short distance where it came up off the exterior walls and then the bottom chord flattened out until it approached the other exterior wall.

Here I am at the job site with the truss! Watch this video to see this unique scissor truss.

This truss was used in a large garage where the owner wanted a taller ceiling, but this truss could have just as easily been used indoor where a homeowner had a large room they wanted some sloped ceiling as well as flat in the same room.

Remember, the closer you get to the actual exterior slope, you negate the impact of the interior truss components. A true cathedral ceiling using regular rafters mimics the actual roof slope because each rafter becomes a large beam.

Can You Mix Scissor Trusses With Normal Trusses?

Yes, you can mix and match trusses! Over part of your home you can have scissors trusses, while over another part you can have common ones and over the garage, you can have attic or storage trusses.

The cool thing is that from the outside no one would ever know since the exterior roof slope of all the trusses is identical. Ask your builder to explore all truss options including attic trusses and storage trusses!

CLICK HERE to read about attic trusses.

CLICK HERE to read about storage trusses.

CLICK HERE to get FREE & FAST BIDS from carpenters who work with trusses all the time.

Column B348

Water in Heating Ducts

HVAC Floor Vent

Use a wet-dry vacuum to suck out water from the ducts under a concrete slab. © 2017 Tim Carter

Water in Heating Ducts TIPS

DEAR TIM: My husband and I live in a one-story home built on a slab. The home was built thirty years ago and we are the fourth owners. A few days ago I heard a bubbling noise coming from one of the floor heating vents.

I looked inside the vent and there was standing water! We pumped out water for two hours but the vents filled back up.

Where is the water coming from? How can we stop it? Do you think this problem was known by the previous owner and if so, do we have any recourse? Lynn F., Norcross, GA

DEAR LYNN: Oh my goodness. You've got a serious problem or two.

Water Is In Soil

Water is in just about every soil to one degree or another. I majored in geology in college and took a deep interest in hydrogeology - the study of groundwater.

This sub-surface water can not only cause enormous problems for people who own slabs, but those who have houses on crawlspaces and those built with full basements. Many people who own a slab house think they are immune to problems caused by subsurface water. But I can't begin to tell you how many emails I receive from people who have your identical problem: flooded buried heating and cooling ducts.

CLICK HERE to get FREE & FAST BIDS from local contractors who specialize in duct relocation and problems.

Water Moves Sideways

The problem is happening because water often moves sideways through soil instead of straight down. If you lived in parts of Florida or other parts of the USA where the soil is extremely sandy and drains like water passing through a cooking colander, we'd not be having this conversation. But my guess is that your home is built on soil that has a certain percentage of clay.

When rainwater falls onto the ground it readily passes through the topsoil as this upper level of the soil frequently contains lots of air voids. But as you go deeper into clay soils, the soil becomes extremely dense and often water is blocked from going down.

drain tile

Here's a side view of a typical house. The black clouds release rain. It falls into the soil and starts to go down, but then sideways. The bedrock under the soil generally, but not always, follows the shape of the soil above it. Soil depths can vary from several feet to tens-of-feet thick. ©2017 Tim Carter

The water then starts to move sideways through the soil always flowing downhill and often pops to the surface as a spring. This water is the fuel that creates creeks, streams and rivers.

Thousands of Gallons

If you look outside your home and imagine the vast amount of soil that might be higher in elevation than your house, you might be amazed to learn that there are hundreds of thousands of gallons of water in the soil much of which is moving directly towards your home.

This water can easily find its way under the slab and into the ductwork beneath the slab. It's no wonder the vents filled back up after you pumped them out.

Capture The Water

Anyone who suffers from subsurface water that is invading any part of a house can stop it in almost all cases by capturing the water outdoors and then redirecting this water to the lowest part of the lot.

I've stopped water getting into ducts for decades with my Linear French Drain. CLICK HERE to get a fantastic Streaming Video showing you a DIY install method.

Linear French Drain Streaming Video

Do your own DIY install of a Linear French Drain with Tim Carter's time-tested methods and materials! CLICK IMAGE TO ORDER NOW!

Linear French Drain Video

Watch this quick video to show you how well the linear french drain in my Streaming Video works! Yes, it's the same drain the spring after it was installed!

Gutter In The Ground

Think of how gutters work on the roof of a house. Gutters capture the vast amount of water on a roof, channel it to various outlet holes within the gutter and then this water is piped away from the roof.

Ideally rainwater from a roof should be piped far away from a house and not be allowed to drop out of downspouts onto simple splash blocks adjacent to a foundation.

draintile

Splash blocks don't do much to channel water away from the foundation. © 2017 Roger Henthorn

Easy DIY Trench

You can capture the subsurface water by digging a trench around the outside of your home. This trench should be placed about 6 to 8-feet away from the edge of your home.

Call 811 first to have any underground utilities marked.

Dig this trench 6 inches wide and between 18 to 24 inches deep. The bottom of the trench should be parallel with the soil as it goes around your home. The trench should be extended away from the house and needs to end up at or near the lowest point of elevation on your building lot.

CLICK HERE to get FREE & FAST BIDS from local landscapers who might dig your linear french drain trench.

Level Trench

As the trench starts away from the house, make the bottom of the trench nearly level. As the ground falls away from the house, the trench will become shallower and eventually the bottom of the trench will be level with the top of the soil.

Best Gravel

You place a 1 or 2-inch layer of washed 1-inch diameter gravel in the bottom of the trench and then place a 4-inch diameter perforated pipe in the trench.

Fill the trench with more 1-inch washed gravel until you are within 1 or 2 inches of the top of the trench. You can place pieces of sod over the gravel.

Path Of Resistance

The subsurface water will now pass through the soil and enter the trench. Because it is easier to pass through gravel instead of soil, the water will drop down to the pipe.

There it will enter the pipe and be transported rapidly away from your home to the lowest part of your lot. The underside of your slab will never be saturated with water again.

Disclosure Law Weenie

If your state has a property disclosure law and the previous owners knew of this serious defect, they may have been obligated to bring this flaw to your attention. You should call the Realtor you used in the transaction to see if there was a property disclosure form that was not given to you.

The last house I purchased was sold to me by a liar. He lied about three or four water issues. My father-in-law had a saying about people like this: The mills of the gods grind slowly but thoroughly.

Fire Department Run Records

You can also stop by your local fire department. Just about every fire department in the nation keeps very good records of each time they leave the station and are asked to put out a fire or help in a situation.

If they were ever called to the house to help pump out the vents, you know the previous owner knew there was a problem. Well there is always the possibility your local fire department has mystic extra-sensory-perception powers!

Serious Health Issues

Water in buried heating and cooling ducts can cause serious health problems. The water in the ducts can initiate the growth of mold. Each time the heating or cooling system operates, the air moving through the ducts can blast millions of mold spores throughout the house.

Relocate Ducts

Although expensive to do, it might be a good idea to investigate the feasibility of moving the ducts into the attic space. The one-time expense may be a great way to protect the health of you and your family.

Believe it or not, it may be cheaper to abandon the under-floor ducts and put everything up in the attic. You'll save the cost of the linear french drain and cleaning the ducts out.

What's more, if you hire a real pro who knows how to properly size ducts so you have the proper flow into each room and the system maintains static pressure throughout, you could be more comfortable with the new ducts!

CLICK HERE to get FREE & FAST BIDS from local contractors who specialize in duct relocation and problems.

Column 561

Foundation Footer

footer frame

These wooden form boards will soon be adjusted and filled with concrete to create a strong foundation footer. ©2017 Tim Carter

Foundation Footing TIPS

DEAR TIM: I’m thinking of a career in new home construction and know very little. One of the things I don’t fully understand is the foundation footer, or footing. I’m also stumped about piers.

What’s the real purpose of these things? Can you install a foundation without concrete footings?

What tips can you share about pouring concrete footings? I’m sure you’ve sloshed around in wet concrete down in more excavations than you care to remember. Brad T., Topeka, KS

DEAR BRAD: You bet I can tell stories about concrete footers.

Big Footing - Perfect Conditions

Several jobs come to mind, but perhaps the one that stands out the most is the time I had to pour a massive footer for a commercial building in Blue Ash, Ohio with just one helper.

CLICK HERE to get FREE & FAST BIDS from local foundation contractors to pour your footings.

Fortunately for me, the job site allowed the concrete trucks access to all sides of the excavation hole, the weather was cool, and my helper that day was lucid.

You can’t afford mistakes to happen when you have expensive concrete tumbling in the drums of several 10-yard ready-mix concrete trucks!

Mother Earth Contact

Structural engineers, building inspectors and other builders may have more to say about this topic than me, but suffice it to say that a foundation footing is perhaps one of the most critical aspects of the house.

It’s almost always the first building element that makes intimate contact with Mother Earth or soil that the house rests upon. In rare cases, a footing may be supported by piers of one type or another that are placed in the soil under a footer.

Spread Footing

The term spread footing was used years ago and it's with good reason.

The primary purpose of the footer is to spread out the weight of the structure across a larger footprint than the foundation would if it was in direct contact with the earth.

Frequently a concrete footer is 20, 24 or even 30 inches wide and at least 8-inches thick. More often than not you’ll see them 10-inches thick. The average foundation wall is usually only 8-inches thick (wide).

wood footer frames

You're looking at the wood forms that will restrain the wet concrete used to create the footing. Those are 1/2-inch steel rebar that's suspended down about four inches from the horizontal spreader boards that hold the forms parallel. The steel needs to overlap at least 18-24 inches at splice points. ©2017 Tim Carter

Enormous Weight

When you calculate the total weight of a completed house plus everything in it, you’d be stunned by the total tonnage. Just the interior furnishings and possessions in an average home can weigh tens of thousands of pounds.

Add this to the many tons of weight of the building materials and you end up with enormous concentrated loads. Without a footer under a foundation wall, the foundation wall may actually start to slice into soil much like a knife cuts into a stick of butter.

Footing Videos

Watch these three videos showing a footing being poured at a house next to mine in New Hampshire. This was NOT my job. I'm just an inquisitive neighbor!


Foundation Form Aid

But a footer, because it’s wider than the foundation wall, displaces this weight over a much larger area. A footer also creates a nice, level surface for the foundation contractor to set his forms.

CLICK HERE to get FREE & FAST BIDS from local foundation contractors to pour your footings.

Piers

Piers are used to provide a solid foundation in weak soils. Think of piers as table legs for a moment.

Some piers that you pour yourself come with an ingenious design that incorporates a footing into the pier. The bottom of the pier is fatter than the top of the pier. CLICK HERE TO ORDER THESE FORMS.

pier form

This is a great pier form I've used to build my shed and for my large deck. It's got a built-in footing at the bottom. No tools required for assembly and the steel comes with it PRE-CUT! It's amazing. CLICK THE IMAGE NOW TO ORDER AS MANY AS YOU NEED.

The top of the table represents the actual footer. The table legs are the piers that extend below the footer until they reach solid soil below. Some piers are designed to have enough sidewall friction where the piers touch the soil along the entire length of the drilled shaft.

DIY Pier Form Video

Here's a quick video that shows you a DIY pier form. It should make sense.

I have MANY MORE pier videos here on the website. Just use my search engine on each page to locate them.

Pre-Cast On Stone

Some pre-cast concrete foundation systems are routinely installed without a poured concrete footer. They rest on compacted gravel that acts as a footer. Be sure this type of footer is approved for your area and the gravel used is crushed and angular.

Rounded gravel might not be a good choice because it can move with ease. Think about how ball bearings roll around.

Steel A Must

Reinforcing steel is a must in concrete footings. Concrete has great compressive strength, but little when subjected to tension.

If the ground moves under the footing, concrete can come under tension, bend, crack and go down.

100X Stronger

The presence of steel dramatically increases the tensile strength of the footer. Average concrete only has about 400 pounds per square inch (PSI) of strength to resist tension failure. The steel rebar you buy at the lumber yard has no less than 40,000 PSI of tensile strength. You can get it with 60,000 PSI or more if you special order it.

Steel Overlap

When overlapping the steel bars, make sure they overlap at least 18 - 24 inches. Structural engineers will specify the best location of the steel inside the concrete footer. They'll often mention in the specifications the minimum overlap distance. It's sometimes referred to as a minimum multiple of the diameter of the steel called for.

You may see a specification say, "Overlap steel bars no less than 20 bar diameters."

Keyways

I like to place a keyway in my foundation footers. This is a channel or groove that’s created after the concrete is smoothed over in the forms. You can slide a 2x4 in the concrete to create this feature.

When you then pour the concrete foundation, that concrete flows into the groove in the footer. This mechanical connection between the two elements helps keep the foundation wall from sliding across the footer if the foundation wall is subjected to horizontal pressure.

Level The Footing

Take the time to ensure the footing is as level as possible. This will make the job of setting the foundation forms much easier. It’s also mission critical that the footing be square so the foundation is centered on the footer. Sigh, so much more to say but there’s just not room!

Nails & Rods

If you’re pouring a trench footing, be sure to place nails, if possible, in the sides of the trench that tell you how deep to pour the footer. You can also drive steel rods in the center of the trench to help you establish the correct depth of the concrete. Take your time to get the concrete level as it will make it so much easier to pour the foundation or lay concrete blocks that may form the foundation walls.

Form Boards

Concrete footing forms should be made from sturdy 2x8’s or 2x10’s. Many foundation contractors prefer to use 2x8’s and stake them up off the ground several inches.

This technique makes it easier to level the form boards in case the excavator was not able to dig a level hole. That’s not as easy to do as you might think.

CLICK HERE to get FREE & FAST BIDS from local foundation contractors to pour your footings.

Column 848

Drywall Cutting Tools and Tips

drywall cutting tools

How to cut drywall you ask? Here are three nifty drywall cutting tools to help cut drywall. The smallest one is the most ingenious and it's new technology. ©2017 Tim Carter

"He was attacking the drywall with a circular saw creating so much dust that I thought the EPA was going to issue a county-wide air quality alert."

Drywall Cutting Tools Checklist

DEAR TIM: I'm a remodeling novice, and am going to be doing some drywall work soon. I've never worked with the material and have no idea how to cut it.

Not only do I have to cut new sheets to size, but I also have to make cutouts in existing drywall walls and ceilings. A friend suggested I use a circular saw. That makes sense to me.

What tools and techniques do you use to cut drywall? I'm interested in both accuracy, speed and safety. Rachel C., Tacoma, WA

DEAR RACHEL: I clearly remember one weekend driving to a potential customer's house to look at a job. His next door neighbor had a sheet of drywall laying flat on two sawhorses out on his driveway.

Can a Circular Saw Cut Drywall?

A circular saw can cut drywall, but it creates far too much dust. The dust is hard on your lungs and it's hard on the moving parts in a circular saw.

He was attacking the drywall with a circular saw creating so much dust that I thought the EPA was going to issue a county-wide air quality alert. Suffice it to say I offered this man the some of the same advice I'll offer to you.

First, don't use a circular saw to cut drywall. It's like using a rock to hammer nails. Both are the wrong tools for the job.

CLICK HERE to get FREE & FAST BIDS from local drywall hangers in case you don't want to get dusty.

A circular saw creates giant clouds of unnecessary dust. This dust causes premature wear on the moving parts of the saw, as well as your lungs and those standing nearby.

How Do Pros Cut Drywall?

Professional drywall hangers use a regular razor knife to make straight cuts on drywall. Standard drywall, or sheetrock, is simply a sandwich product.

drywall cutting tools

This is my FAVORITE razor knife of all time. I've used countless ones and this fits my hand perfectly. You'll never allow anyone to use it once you use it. CLICK THE IMAGE NOW AND BUY TWO OF THEM. You'll hide the second one in case you lose the first one.

This method creates little, or no, dust. That's a good thing.

It's comprised of two outer layers of special paper that conceal a gypsum-based core. Each drywall manufacturer might have a special recipe of ingredients found in the core, including a high-purity synthetic gypsum that's recovered from the flue gasses that are emitted from coal-fired power plants.

Is Drywall Dust Unhealthy?

The fine dust created by a spinning saw blade cutting through the gypsum core in drywall is not healthy for you or your power tools. Spinning saw blades work well with wood because they normally create a harmless dust for the most part.

What is Score & Snap When Cutting Drywall?

Scoring drywall means cutting into the paper facing on one side of the drywall panel. A sharp razor knife will cut through the paper with one stroke.

To cut a straight line with drywall and create minimal airborne dust, you just score one side of the drywall with a sharp razor knife. Apply enough pressure to completely cut through the paper and into the gypsum core about one-eighth inch. You need to cut this line all the way across the piece of drywall from edge to edge.

How Do you Snap a Piece of Drywall?

After making the cut, you go to the other side of the drywall and apply pressure directly behind the cut line. This pressure causes the drywall panel to snap along the cut line and bend over completely on itself.

You finish the cut by simply cutting through the paper backing on the other side of the drywall panel.

How Thick is Standard Drywall?

Standard drywall is one-half-inch thick. You can use this method to cut off pieces as narrow as one and one-half inches wide. If you need to cut narrower pieces from a sheet of drywall, it requires you to make deeper cuts with the razor knife into the gypsum core.

Do this carefully so the razor knife cuts only the drywall and not you.

CLICK HERE to get FREE & FAST BIDS from local drywall hangers in case you don't want to get dusty.

What's the Best Power Tool To Cut Shapes and Holes?

A RotoZip Saw is what professionals use to cut shapes and holes in drywall. It's extremely fast.

This is the dream tool for all drywall hangers. All pro hangers have one because it increases their productivity by a factor of 10X or more.

drywall cutting tools

This is an amazing tool invented decades ago. It cuts holes in drywall accurately and FAST. CLICK THE IMAGE NOW TO ORDER ONE. Get EXTRA spiral bits.

This tool comes with special bits that have cutting edges on the spiral twist of the shaft. You'd think they were just regular drill bits, but you'd be wrong. You need to  cut counterclockwise with these around electrical boxes or the tool will spin right into the drywall!

How Do You Cut Holes By Hand?

A hand, or jab, saw is a great tool rookie or DIYrs use to make square, rectangular, or circle holes in drywall. I've used one for years. You'll discover quickly to apply pressure on the push stroke so you don't create jagged edges on the paper with the pull stroke.

drywall cutting tools

This is a fine saw. You'll use it hundreds of times. CLICK THE IMAGE NOW TO ORDER ONE.

 Keep in mind these blades are normally about 5 or 6 inches long and they can easily reach wires, cables, pipes and other things hidden behind the drywall. A rookie like you can easily create big and expensive repair problems in a hurry using one of these tools.

Use this tool with great care if you're cutting into drywall already attached to a wall. If you're cutting new drywall that's standing up next to you on the stack, cut away post haste!

How Can You Safely Cut Into Existing Drywall?

You can cut safely into existing drywall using a special dull small blade that fits into a reciprocating saw.

To make cuts into existing drywall that's screwed or nailed to walls or ceilings, you can make repeated cuts with a very sharp razor knife, but it's very time consuming and hard to do. The gypsum core creates a large amount of friction making the cutting difficult.

It's far better to use a new short metal blade has been developed for electric-powered reciprocating saws that's designed specifically to cut holes into existing drywall.

drywall cutting tools

Here's a new drywall cutting blade that fits in an electric reciprocating saw. It's perfect for cutting holes in drywall on walls and ceilings but not the things hidden behind the drywall! CLICK THE IMAGE NOW TO BUY THIS GREAT BLADE ©2017 Tim Carter

The blade has a blunt tip, and it's only about one and one-quarter inch long. It doesn't have sharp teeth, but rather square notched cut outs.

It does a splendid job of cutting drywall, but won't cut deep enough to harm anything behind the drywall, especially if you hold the blade at a 45-degree angle as you glide it across the surface of the drywall.

Is It Dangerous to Cut Holes in Ceilings?

Be careful when cutting holes in drywall ceilings. Always wear safety goggles, not safety glasses. Drywall dust and small chunks of gypsum core in your eyes can cause you to make an expensive trip to an emergency room or eye doctor.

Professional drywall hangers use a small rotary cutting tool fitted with a bit that looks like a standard drill bit. This bit has special cutting edges on the spiral shaft that allow it to cut rapidly through drywall.

drywall cutting tools

This is a circle cutter with dust shield. Very handy. CLICK THE IMAGE NOW TO ORDER IT.

You want one that comes with the dust shield. They work well to capture the dust that otherwise would float in your eyes and around the room.

These tools are used by every professional drywall hanger that I know. While they increase production by a factor of five or more, they also create small clouds of dust.

How Do you Smooth the Rough Snapped Edge?

Use a hand rasp to smooth the rough snapped edge of drywall.

When you score and snap drywall you can end up with a rough edge. This handy tool cuts away the gypsum core in seconds allowing you to have a nice fit and no issues with a piece that's an eighth of an inch too BIG!

drywall cutting tools

If you're a perfectionist and want tight-fitting pieces, you'll NEED this tool. CLICK THE IMAGE NOW TO ORDER ONE.

Author's Note: Rob Crangle sent the following email regarding fly ash in drywall.

"Hi Tim,

Enjoy reading your articles. Just finished your article on drywall cutting techniques.

Your concerns regarding fly ash are quite valid. I'm the Gypsum Commodity Analyst at the US Geological Survey. About half of the country's drywall is made of synthetic gypsum, most of which comes from coal-fired electrical power plants, where, indeed, a lot of fly ash is also produced. Thankfully, almost none of that (I'd say zero, but there's likely a lab technician out there who would find a trace of it and make me a liar) ends up in the synthetic-gypsum production stream.

Agree that it's not a good idea to inhale large quantities of drywall dust, but that dust, even if the gypsum originated from a coal-fired plant, probably contains little to no fly ash.

Best,"

Rob Crangle

CLICK HERE to get FREE & FAST BIDS from local drywall hangers in case you don't want to get dusty.


Column 977