Troy Bilt 3 Stage Snowblower Review

Troy Bilt 3 Stage Snowblower Review

I had the distinct pleasure to test this Troy-Bilt 3-stage snowblower yesterday, February 10, 2017. (Reviewed in the February 12, 2017 Newsletter.)

The day before central New Hampshire, Boston, and Maine got hammered by a Nor'easter that dumped about 9 or 10 inches of snow at my house.

The snow slides off my DaVinci Roofscapes synthetic slate roof like an athlete zooming down a luge.

The snow compacts on my rear deck. If you don't remove it, the snow would get 8 feet tall and collapse the deck.

CLICK HERE to get FREE & FAST BIDS to remove the snow at your home if you don't like it when the air hurts your face.

 Since I don't want my Trex Transcend deck ruined, I need to get it off. Shoveling is not an option because the snow can compact like CONCRETE.

That's why I wanted to use a snowblower that's parked on the deck the entire winter.

The high-speed center auger chewed through the packed snow and sent it halfway down to the lake like you might munch on a cracker.

I've never operated a more aggressive snowblower. It exceeded my expectations.

You'll love it and best of all, it's Made in the USA!

troy-bilt-snowblower

This is an amazing snowblower. It's the BEST ONE I've ever used - hands down. CLICK THE IMAGE NOW TO ORDER ONE.

I loved the heated hand grips.

It was easy to start.

The controls are responsive.

The chute was easy to control.

CLICK HERE TO ORDER this amazing snowblower.

I also happen to love the color red as it matched my New England Patriots knit hat!

CLICK HERE to get FREE & FAST BIDS to remove the snow at your home if you don't like it when the air hurts your face.

How to Clean a Deck

Clean a Deck

You have at least two choices when you decide to clean a wood deck. Here are two of them - a pressure washer and oxygen bleach. This column was SO GOOD that I shared with the 31,000 subscribers who read my May 31, 2019 AsktheBuilder Newsletter.  ©2017 Tim Carter

How to Clean a Deck TIPS

DEAR TIM: I'm having a spirited debate with my husband about how to clean a deck. Deck cleaning doesn't seem that hard, but my husband wants to use a pressure washer thinking it will save time.

I want to use a green cleaner that's non-toxic and environmentally safe. What's the proper way to clean a deck and keep it looking nice? Lisa T., Burlington, NC

DEAR LISA: Cleaning a backyard deck is not supposed to create marital strife. In this instance, I think you and your husband might be able to reach a compromise that allows each of you to clean the deck in the manner you see fit. I have cleaned countless decks, and there are pros and cons to each of the methods you mention.

Pressure Washing Hazard

Let's talk about pressure washers. These tools are extremely popular that appeal to homeowners.

Pressure washers are like shoes - they come in all different sizes and the end of the spray wand can be equipped with different tips that concentrate the high-pressure stream of water.

CLICK HERE to get FREE & FAST BIDS from local deck cleaning companies. Ask them about using Stain Solver - see below.

The stream of water that is thrust from the tip of the wand mechanically agitates the surface of whatever it strikes. This is what cleans.

Pressure Destroys Wood

A pressure washer can clean a wood deck much faster than you can do it scrubbing by hand. That's a terrific advantage.

But one of the side effects of a pressure washer is that it frequently destroys the surface of the wood. The stream of water can be so powerful the light-colored spring wood fibers are eroded by the water.

Those that are not eroded can be dislodged so that the wood is fuzzy or rough after it dries.

Pressure Washer Damage Video

Watch this corny video to see the damage done by a pressure washer and the alternative organic cleaner. I taped it for the ABC-TV affiliate in Cincinnati, Ohio and they wanted me to have some fun with it.

Half Truths

Professional deck cleaners argue with me that this only happens when an inexperienced user is working with the tool, the pressure was too great, the tip used at the end of the wand produced a stream of water that is too harsh and/or the tip is held too closely to the wood surface.

Because they have a dog in the fight, that's what I'd expect them to say. The truth is any extreme pressure much more than a regular hose nozzle, will harm wood.

Test For Damage

If you decide to use a pressure washer, then you better test it or have the professional prove to you they can use the tool and not damage the wood. Go to some remote part of the deck and clean one half of one board with a pressure washer.

Wash the other half by hand, rinse and compare for wear.

CLICK HERE to get FREE & FAST BIDS from local deck cleaning companies. Ask them about using Stain Solver - see below.

Gasoline & CO2

If you're really interested in making your deck-cleaning project a green-cleaning activity, you should give serious consideration to the secondary effects gasoline or electric-powered machines have on our environment. How much CO2 will you add to the atmosphere that local trees will have to gobble up to make oxygen?

Toxic Cleaners

I'm a big proponent of non-toxic cleaners. The older I get, I have this sneaking suspicion that certain chemicals we encounter in everyday products are responsible for many health issues.

I'm not a doctor, but common sense tells me that harsh chemicals are not processed well by our bodies.

Certified Organic Cleaner

Years ago, I discovered there are different types of bleaches - one of them being oxygen bleach. Many people think bleach is bleach, but the bleach found in most homes is chlorine bleach.

The active ingredient in chlorine bleach is sodium hypochlorite. Check the label of many bleaches or deck cleaners, and you might see this chemical name. Chlorine bleach is toxic. Very few will argue that it's not.

Stain Solver

Oxygen Bleach

Stain Solver is MADE in the USA with USA ingredients that are food-grade quality. CLICK THE IMAGE to order some NOW.

Stain Solver is a powerful certified organic oxygen bleach cleaner. I own the company along with my wife. We discovered this magic cleaner back around 1995.

It's a powder you mix with warm tap water. When you mix Stain Solver with water to make a deck-cleaning solution, all you create is more water, oxygen and soda ash. 


Oxygen Action

The oxygen bubbles in the solution do most of the work done by the pressure washer. The solution soaks into the dry wood and the oxygen ions deep clean the wood by breaking apart dirt, algae and mildew molecules.

The solution is not toxic. It's safe to use around the plants, bushes or trees around your deck. You can't say that about chlorine bleach. My neighbor systematically murdered her gorgeous maple tree around her deck by cleaning the algae off the concrete patio every spring.

I warned her to stop, but she thought I was an idiot. I'll never forget the day the tree company came and cut down that amazing tree she had poisoned.

Scrub A Dub

When you decide you're going to use a green cleaner, you'll discover you need to spend time and elbow grease to clean the deck.

Here's the simple steps to minimize the work:

  • Start early in the morning working in the shade
  • Apply the Stain Solver solution to dry wood
  • Keep the surface very wet with the solution
  • Wait 15-20 minutes then scrub
  • Rinse with a garden hose

CLICK HERE to get FREE & FAST BIDS from local deck cleaning companies. Ask them about using Stain Solver.

Column 726

Hot Garage Ventilation

garage ventilation

Garage ventilation is needed here. This garage gets very hot in the summer even though it's directly beneath a large shade tree. How to cool a hot garage was in Tim's August 10, 2018 Newsletter. © Copyright 2017 Tim Carter

Hot Garage Ventilation Checklist

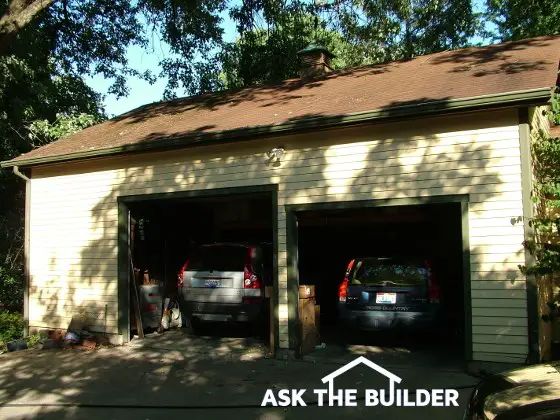
DEAR TIM: The garage attached to my townhome gets the full afternoon sun. The temperature in the garage has reached 110 degrees at times this summer.

There's some attic space above the front half of the garage and two bedrooms over the rear half of the garage both of which get very warm during the summer.

Would an insulated garage door help keep the garage cooler, or is there a way to vent the garage to remove some of the hot air? I have a roll-down screen, but in the summer it does not seem to offer much relief from the heat. Jan McM., Largo FL

DEAR JAN: No wonder your garage is an oven.

Is West Facing Garage the Worst?

You garage west-facing orientation couldn't be worse. As the day progresses and temperatures climb, they often peak between 4 and 5 p.m. This is exactly when the direct rays of the sun are cooking everything they shine upon including your garage and everything inside it.

Free & Fast Bids

CLICK HERE to get FREE & FAST BIDS from local fan contractors.

Do Cars Add Heat to a Garage?

Yes, cars that have been out on the road and then park in a garage add considerable heat to the space.

All of the car's mechanical parts can be very hot after it has been driven for just 10 or 15 minutes in the summer months.

Some of the parts, like the disc-brake rotors, can easily be in excess of 250 F. The car will radiate heat into the garage for hours after it's parked.

Does the Concrete Floor Store Heat?

If the sun beats on your concrete floor, it acts like a massive heat sink. I've tried to walk across concrete in the middle of summer with bare feet and scorched the bottoms of my feet. 

You can imagine how much heat the concrete collects from the sun and then releases it later.


garage ventilation

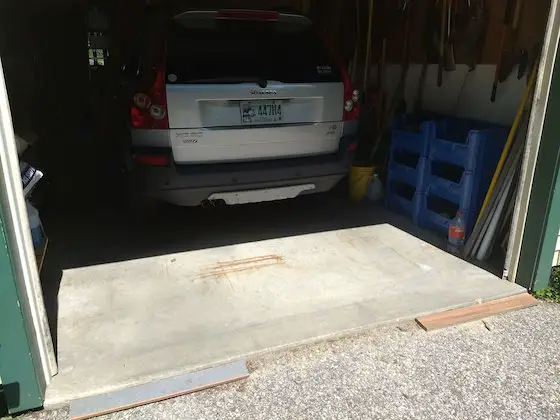
The direct sunlight is cooking the concrete floor raising its temperature. Look at the infrared photo just below to see how hot the concrete is! Copyright 2018 Tim Carter

infrared concrete slab

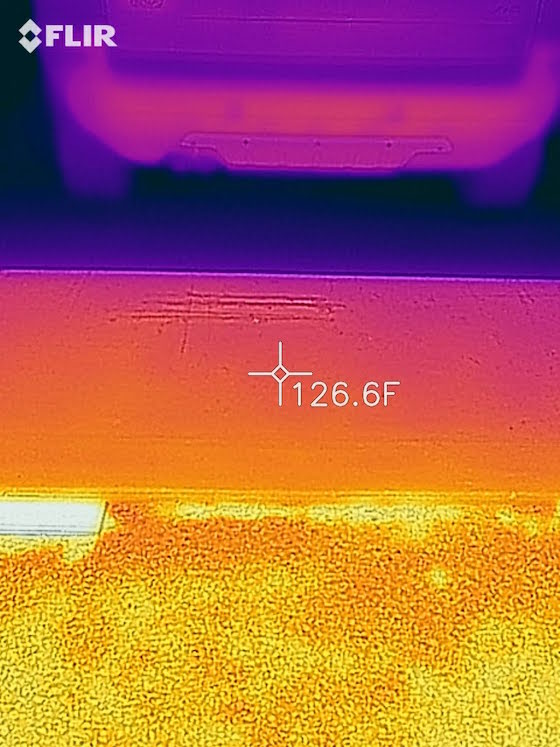
The concrete is already 126+ F and it's just after noon. After a few more hours, it's going to be getting up or over 140 F! Copyright 2018 Tim Carter

garage ventilation

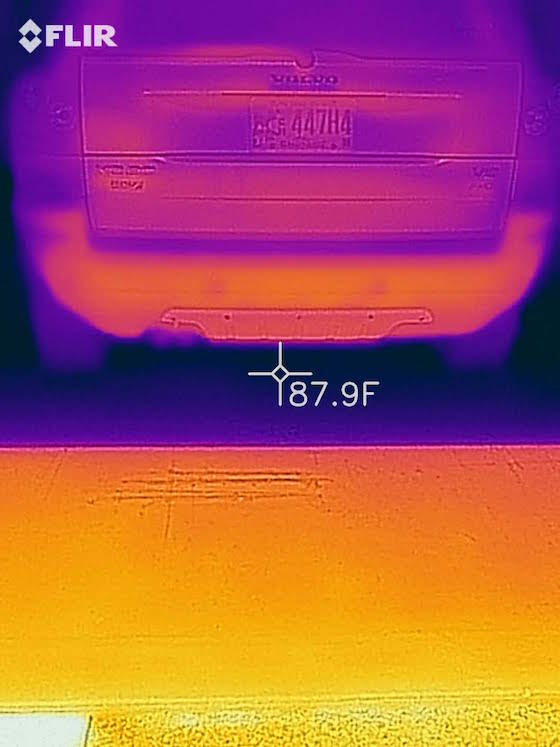
Look at the difference! The concrete under the car in the shade is only 87.9 F. You can see why you want to keep the concrete shaded if you want your garage cooler. Copyright 2018 Tim Carter

Does an Insulated Door Cool the Garage?

An insulated garage door can trap heat inside a garage. Insulation is designed to slow the transfer of heat.

If you were to install an insulated garage door and close it, you would trap this heat inside the garage where you do not want it. An insulated garage door may be a great idea for other times of year, it just becomes problematic in the summer months.

Does An Insulated Door Help in the Winter?

Insulated doors are excellent if you're in a cold climate and wanting to preserve car heat in the winter months. If you live in parts of the deep southern USA, Florida or the southwest where it rarely gets cold, I don't know if I'd get one if I wanted a cooler garage.

Do All the Contents of the Garage Radiate Heat?

Just as the metal parts in your car absorb and radiate heat, so do all of the objects in the garage. Think of how a dying campfire's embers and any rocks that surround it radiates heat for hours after the flames have stopped flickering.

How Long Will the Heat Last?

This low-level infrared heat can be felt inside a garage even early the next day. I know, as my own garage gets very hot in the summer months.

It's very common for my interior-garage temperature to be 10 or 15 F warmer than the outside air temperature when I go into the garage in the morning. The ceiling and walls of my garage are well insulated.

CLICK HERE to get FREE & FAST BIDS from local fan contractors.

Will the Garage Heat Rise to the Attic?

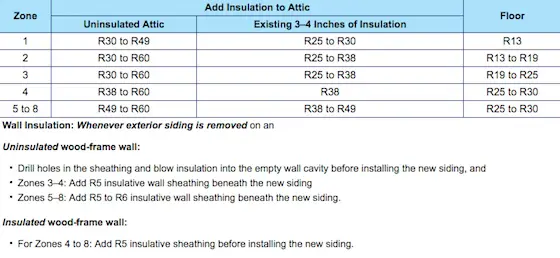
The heat from the garage will absolutely contribute to high temperatures in the attic space above as well as the finished rooms. Hopefully, the ceiling cavity between the garage and the finished spaces was insulted. If not, you may want to consider adding blown-in insulation.

Heat moves from hot places to cooler places. That's the basic law of thermodynamics.

This means if your garage is 110 F and adjacent rooms are 85 F, then the nearby rooms are going to be absorbing the heat. You can't stop this transfer.

What is the Best Garage Ventilation?

The best garage ventilation is lots of moving air. You want to bring in cooler air from outdoors into the garage.

To cool your garage as efficiently as possible, you probably will need to install one or two powerful sidewall ventilation fans. There are any number of fans designed to pull air through the garage and exhaust it back outdoors.

Garage Fan

Here's a sidewall garage fan. It's meant to ventilate out the side of the garage. These come in different diameters. The bigger the blade, the more air it will move. CLICK THE IMAGE NOW TO BUY ONE.

How Cool Will the Garage Get?

The fans will not be able to drop the temperature lower than the outdoor air temperature. It may feel cooler to you as you stand in the path of the blowing air, but that's caused by the perspiration evaporating from your skin.

This means if it is 90F outdoors at 5 or 6 p.m., it will probably be in the upper 90's F inside the garage.

IMPORTANT TIP: The fans must have plenty of incoming air to feed their voracious appetites. You'll probably have to keep the garage door up off the floor about 4 inches to ensure plenty of air from outdoors is flowing through the garage.

The fans will do the best job of cooling if they're located high on the wall directly opposite the garage door.

The fans will pull the air across the garage if you have this orientation.

Will the Garage Contents Get Cool?

The air stream will seem very cool to you if you stand in it. But don't think the objects in the garage feel as cool as you do.

You feel cool because the evaporating perspiration on your skin is rapidly extracting heat from your body.

The inanimate objects in your garage do not sweat, so they will take a while to cool down.

Should I Install a Timer Or Thermostat Switch?

Consider putting the fans on a timer that allows them to run for several hours or use a thermostat to control when they go off. You can buy thermostats that will turn the fans on and off at predetermined settings.

Timer Switch

This is a time-tested timer switch. You rotate the dial and it operates for how much time you choose. CLICK THE IMAGE NOW TO BUY IT.

How Big Should the Fans Be?

To do any appreciable cooling you're looking for ventilation fans that move thousands of cubic feet of air per minute. Always use price as a guideline.

Fans with well-balanced blades, high-quality motors and excellent exterior weatherproof self-closing louvers will always cost more. I urge you to buy as much fan as you can possibly afford.

Should the Fans Be on a Separate Circuit?

Yes, be sure the electrical wiring that's installed to make the fans work is a separate circuit and done according to all codes.

There's a good chance you'll have to install a new circuit or two if you buy large fans. They can draw a significant amount of electricity, and can overload existing circuits if you are not careful.

CLICK HERE to get FREE & FAST BIDS from local fan contractors.

Author's Comments:

The following are comments from several emails between Norm Sippel and Tim Carter, founder of AsktheBuilder.com.

Dear Tim,

    "I faced a similar problem when I moved here three years ago. My hobby is racing vintage sports cars. I need to work on the cars year-round. Early in March of our first year here, I went to the garage (which faces east) at 10 a.m. I measured the steel door temperature with a pyrometer at 114 degrees. It was a radiator. No way I could work in those conditions in March, much less in August.

My solution - I insulated the garage doors (a double & a single) with 2" foam panels from a big box home store. I glued them to the panels between the ribs & under the beams. The few metal pieces that were still exposed were still hot, but closer to 100 degrees.

The ambient temperature in the garage dropped into the low 90s. I added blown-in insulation after that. Mid-summer the ambient temperature in the garage was down into the high 80s. Running two 5" air conditioning inlets into the ceiling that I can open if necessary dropped the temp even further. I keep them closed when I am not working in the garage & there is no return duct for safety reasons. This dropped the temp in August to the low to mid-80's. That's a tolerable temperature.

You are correct that bringing a hot car into an insulated garage will just keep it hot in there. The brake rotors you note as a major heat source cool a lot faster than the radiator, exhaust & engine do. But if Jan leaves the car out until after dark when it cools down (to the high 70s/low 80s here) before bringing it in, it will be a much-improved situation. And, the insulated garage door will do its job in the afternoon sun. That alone should lower the in-garage temperature about 15 degrees in the circumstances described."

(Tim Carter comment: I'm all for insulated garage doors, you just have to realize they block the heat transfer in both directions. The insulation holds in the heat overnight.)

    "That's true. But, managing the interior temp is a lot easier when you don't have so many square feet of metal radiating heat to the interior.

Before I moved south, people said to avoid west-facing back-yards. I had hoped to find something where I could watch the sunset. Well, that didn't happen. I'm a mile inland from the Gulf. And, the back of my house with big sliders faces north. BUT, I have even bigger sliders that do face west. So, we have to deal with that. The best solution has been Queen Palm trees. In three years, they are tall enough that they shade the sliders by 4 p.m. in mid-summer.

"Here's a link to the magazine I work on: www.vintageracecar.com. But, in a previous business life, I worked for Fine Woodworking."

Norm Sippel
Palm Harbor, FL

Column 690

Shed Floor Material

Shed Floor Material

This large storage shed under construction has a treated wood floor system. It's just one possible option. ©2017 Tim Carter

Shed Floor Material TIPS

DEAR TIM: I'm going to build a storage shed. Actually I'm building two sheds, as my wife wants her own cute garden shed.

I'm not able to get much help for these projects and am wondering what to do about the floor of each shed. I want them to be waterproof, but I can't even imagine pouring a concrete slab myself.

What are my options when it comes to building a shed with a waterproof floor that will stand the test of time? Al H., Asheville, NC

DEAR AL: I commend you on thinking ahead about the durability and longevity of your shed. All too often people just throw something together and fail to realize what things could look like 30 or 50 years down the road.

Wood & Water Bad Juju

The floor of the shed is absolutely important. You bet you want a floor that can handle water. You might bring in a dripping wet garden tractor covered with water. I used to pull my garden tractor into my shed caked with snow on the machine and the plow. When the temperature rose, puddles of water would be in my shed.

CLICK HERE to get FREE & FAST BIDS from local shed builders.

Your wife will probably want a sink in her shed that's fed by a garden hose. You know that water on the floor of that shed is going to happen like the sun is going to rise tomorrow.

Concrete Is Possible

I don't know how big your sheds will be, but if they're 10 x 12 foot in size or smaller, you can pour a concrete slab with ease if the following conditions exist.

If the concrete truck can pull up to the shed location eliminating the need to wheelbarrow the concrete, you'll be in great shape. Second, you have to have just one fairly unskilled laborer who'll help you for less than an hour place the concrete. Once the concrete has been poured, has been screeded and bullfloated, one man can easily finish a 10 x 12-foot slab.

Concrete Floor Video Series

Watch these following videos to see how easy it is to pour a small concrete slab.


Vapor Barrier

If you do decide you can tackle a concrete slab, be sure to put a high-quality vapor barrier under the concrete. You don't want water vapor from the soil permeating into the shed. Also be sure the slab contains reinforcing steel so the slab doesn't crack and break apart.

The best vapor barriers are cross-laminated virgin vinyl ones. I've had great success with Tru-Tuf. CLICK HERE to ORDER IT.

Treated Plywood

If you can't pour concrete, you can have a waterproof shed floor with little effort. The best part is that you can do this completely by yourself.

You can install a treated wood floor system that will not rot and will give you peace of mind for decades, if not longer. I've built sheds with concrete floors and treated wood floors and both have stood the test of time.

Treated Joists Too

A waterproof wood floor system for a shed starts with a floor framing system just like an outdoor deck. You use treated lumber floor joists that are raised up off the soil. I like to have at least 6 inches of air space between the bottom of the floor joists and the top of the soil.

This space allows foxes and other animals to keep mice away. It also allows you to deal with critters that might want to set up a homestead under the shed.

CLICK HERE to get FREE & FAST BIDS from local shed builders.

Closed Cell Foam

I then prefer to install closed-cell foam insulation in between the floor joists that's located just under the treated plywood that is nailed to the top of the floor joists.


The closed cell foam insulation provides superior energy savings and comfort in case you decide to heat the sheds.

It's also an amazing vapor barrier that stops water vapor from entering the shed through the floor. This water vapor can rust tools that you store in the shed.

Visit Real Lumber Yard

Many people don't realize you can purchase treated plywood. You rarely find this at home centers, but traditional lumber yards almost always stock this fantastic product. You'll need a extra sheet or two to make a low-slope ramp to get you in and out of the shed.

Concrete Piers

The entire floor system can rest on concrete piers that rise up out of the ground. You can also connect the wood floor system to wood posts that rest on concrete piers.

Be sure to use approved hold-down anchors to connect the floor system to the buried concrete footers. You don't want your shed tumbling across your yard in a severe windstorm.

Treated Lumber Bottom Plates

When I frame the walls of my sheds, I always use treated lumber for the bottom plates. This is necessary for concrete, but it's a best practice on a wood-floor system. The reason you want treated lumber for a bottom plate is because no matter what floor you have, it's possible for liquid water to flow across the floor and contact the bottom plate.

You never want the possibility of the bottom plate rotting out. Not only is it hard to replace this critical framing element, it's also very time consuming. The cost to use treated lumber vs. regular lumber is just a few dollars.

Shed Building Videos

You can get access to a series of videos that show you how to build a shed, including a wood floor system. Simply click on this link "shed videos".

I also have a complete set of step-by-step videos for building a shed. I completed the shed this year and videoed each step. The videos are broken down into the various aspects of the shed construction. The complete video series is available for purchase at my AsktheBuilder Store. Just click here for the Shed Building Videos.

CLICK HERE to get FREE & FAST BIDS from local shed builders.

Column 964

Tile Falls Off Wall

 tiles fall off the wall

These wall tiles had poor adhesion to the wall. The reasons for failure are many. Photo Credit: Lloyd May

Tile Falls Off Wall TIPS

DEAR TIM: The 8-inch by 10-inch wall tiles in my bathroom are bulging out in places. I pushed on them and they moved.

Further investigation revealed many are loose and only held in place by the grout between the tiles. The tile have been up for eight years installed by a pro who supplied the adhesive.

What might be the cause for this problem? I believe I can salvage the tile. How can I permanently adhere my salvaged tile to the wall? Lloyd May, Sydney, New South Wales, Australia

DEAR LLOYD: I'm sorry to hear about your dilemma.

CLICK HERE to get FREE & FAST BIDS from local tile contractors.

My Own Failure

I've had the same thing happen to me many years ago when I was just getting started in construction. It only took eight days for my tile job to fail, not eight years! It was the first and last time I had a problem with tile failing.

Disappearing Secrets

As each day passes, I'm afraid young contractors and tile setters become more detached from the tile setting methods of old. I have vivid memories of using a sledge hammer to remove ceramic tile from a wall.

It was cemented, yes - real cement - to a bed of cement mortar that was installed over metal lath. That tile, had I not beat it to death with the hammer, would have stayed on the wall for centuries.

New Methods Not Tested

New time and cost-saving methods often push aside time-tested techniques used by the master tile setters of old. Fortunately there's a compromise you can choose allowing you to reinstall your tile so it will not fail.

Organic Glue

Let's first discuss the possible reasons for failure. I can see from your photos the installer used an organic mastic on your wall. This glue resembles warm cake icing and is usually water-based. It's not a bad product and can have strong adhesion if you just follow the use instructions.

Skin Over Blues

The biggest mistake many make when using an organic mastic is allowing it to skin over. This happens if you expose the mastic to air for too much time before you press the tile into the adhesive.

When a skin develops on the mastic, the adhesive doesn't offer much of a mechanical bond to the tile. The water evaporating from the mastic causes the mastic to stick to itself. The best example I can offer is a piece of fresh adhesive tape that gets coated with dust. The tape is no longer sticky.

Possible Defect

The mastic could have been defective, although I would say this is a low probability. The tile setter could have used the wrong sized notched trowel. The instructions that come with the tile or mastic tell you what size trowel to use for each sized tile. Bigger tile need a larger notched trowel.

CLICK HERE to get FREE & FAST BIDS from local tile contractors.

Dust Issues

The wall surface or backs of the tile could have been dusty before the adhesive was applied. Dust and adhesive are bad jujumagumbo. The dust is selfish and steals all the adhesive for itself.

Not Flat

The wall surface could have been irregular with humps and dips in it. I feel this, in conjunction with skinned-over adhesive, is the root cause of your tile failure. As ceramic tile get larger, the wall or floor surface must be flatter and flatter.

Since the tile is flat and in the same plane, the wall surface must also be a perfect match. If the wall has humps, the back of the tile will touch the hump and then not contact the wall where there is a dip.

This is why my tile job failed all those years ago. When I pulled my tile of the wall, you could clearly see bare spots on the tile where no adhesive even touched the tile.

Lady Luck

I'm glad you're able to salvage the tile. Your job now is to remove any organic mastic that is stuck to the tile backing. If you soak the tile in water, the mastic will almost always soften. You can scrape it off with a flat spackling knife or a chisel.

Remove Glue

It's now time for the hard part. You may be able to scrape off any mastic from your walls using the same method. You'll have to spritz the mastic on the wall with water from a spray bottle. You may discover using a paste paint stripper is an easier way to soften the adhesive as paint is nothing more than colored glue.

Fill Hollow Spots

Once the mastic is off the wall, it's time to use a straightedge to determine if the wall surface is perfectly flat. If there are low spots and humps, you need to skim coat the wall with cement-based thinset to get the wall surface flat and in the same plane.

thinset

Thinset is just silica sand and Portland cement. It's dry and needs water. CLICK HERE TO ORDER THIS THINSET NOW.

Cement and Sand

Thinset is a blend of fine silica sand and Portland cement. It's imperative the wall is dust-free and slightly damp when you apply the thinset. You want the thinset to bond very well to the existing wall surface.

Thinset Video

Watch this video just to see what thinset is. I'm using it on a floor, but it goes on walls too. Pay attention to the consistency of it.

Work Fast

You'll use the same thinset to adhere the tile to the wall. Do what the master tile setters did nearly one hundred years ago. Install the tile the day after you flatten the wall with the thinset. The microscopic crystals of the hydrating cement in the thinset already on the wall will interlock with the fresh thinset you trowel onto the wall creating a lasting bond.

Cover in 5

Only apply as much thinset on the wall as you can cover with tile in five minutes. Use cold water to mix the thinset to retard the setting time. Do NOT add water to the thinset if it starts to get hard in the bucket before you spread it. Only mix enough thinset as you can use in one hour or less.

Correct Notched Trowel

Use the correct notched trowel to apply the thinset. CLICK HERE to see lots of great notched trowels.

notched trowel

Here's a 1/4 x 1/4-inch notched trowel. This is a great size for 8 x 8 tile. The bigger the tile, the larger the notch has to be. CLICK THE IMAGE TO BUY THIS TROWEL.

CLICK HERE to get FREE & FAST BIDS from local tile contractors.

This column was featured in the November 6, 2013 AsktheBuilder Newsletter.

Column 1011

Painting Walls or Trim First

Tim painting woodwork outside

When woodwork is flat and waist high, you can make hay while the sun shines!

Painting Walls or Trim First TIPS

DEAR TIM: My husband and I are building a new home. We're going to install all of the door and window trim ourselves and paint the entire interior as well.

Should we paint all of the trim before it's installed and spray paint the walls and ceilings? Is it better to install the trim and paint it in place?

We want to spray as much as possible but don't quite know the order in which things should happen. Johnette P., Ft. Dodge, IA

DEAR JOHNETTE: I don't know if there are correct answers to your questions. My guess is if we had ten painters and ten finish carpenters in a room and presented your case, we'd get back twenty different scenarios as to the precise steps they would take to minimize work and maximize the quality of the overall job.

Pre-Finished Surfaces

Perhaps the biggest challenge you face is working with finished materials. It sounds to me as if you're trying to install pre-painted trim on top of walls that have been finish-painted.

While this sounds good in theory, it doesn't translate well in practice because you will damage the pre-finished surfaces as you finish the job.

CLICK HERE to get FREE & FAST BIDS from local painters who can paint FAST.

Spray Painting

I have no problems with spray painting walls and ceilings. It's been done on several of my jobs with outstanding results. The finished look is as good or better than if the walls had been painted with the best rollers.

The speed with which an experienced person can spray paint a room is astonishing. If you have minimal spray painting experience, I suggest you practice in a garage or closets before moving out into rooms you will see each day.

Airless Sprayers

The technology of DIY paint sprayers has advanced rapidly. There are some very good airless paint sprayers that are easy to operate and clean. When you have the paint thinned correctly, they deliver professional results.

Paint Sprayer Videos

Watch these two DIY paint sprayer videos. I really liked the one sprayer.


Installing Woodwork Dirty

Installing woodwork on walls around windows and doors is not as easy as you might think. I's not uncommon for a wall to get scuffed by a hammer as the finish carpenter taps the edges of trim to adjust it.

A carpenter's hands get dirty while working and she/he may smear a wall by accident. Walls can get nicked and scratched as long lengths of trim are moved around the house. The time spent being careful may be counter productive.

Touch up painting of the spray-painted walls with a brush can also yield less than satisfactory results.

CLICK HERE to get FREE & FAST BIDS from local finish carpenters who can install your woodwork.

Prime Woodwork

It's a great idea to prime woodwork on both sides and applying one coat of finish paint on its exposed face before it's installed. The finish trim will need one final coat of paint after it is installed.

The woodwork can get nicked, scratched and abused as it is installed. What's more, the spackling compound used to fill the countersunk nail holes will have to be sanded, primed and sealed before the final coat of paint is applied if you use the wrong one.

There are spackling compounds that have a built-in primer/sealer. CLICK HERE to buy it.

spackling with primer

Here's a pretty cool spackling compound. It's got paint primer built into it. This saves you time and money. CLICK THE IMAGE NOW TO ORDER THIS SPACKLING.

Flat Dots

If you fail to prime and seal these small filled holes, they often stand out after the finish paint is applied. You see a bunch of dots that have a different sheen than the gloss of the paint on the wood.

The porosity of the adjacent painted wood is much different from that of the sanded porous filler. Primer/sealers even out the porosity between the spackling compound and painted wood.

Caulk Gaps

Woodwork rarely fits perfectly against the walls. There can be long large and small cracks between the woodwork and walls that should be filled with caulk.

If the walls and trim are already painted, the resulting caulk job will look like pinstriping as it is doubtful the caulk color will perfectly match the color of the finish paint. The caulk will look best if it's covered with a coat, or two, of paint.

Partial Paint

If I were in your shoes, I'd spray paint the walls with a primer/sealer paint and then follow with one coat of finish paint. The ceilings can be finish painted at this time if no woodwork touches up against them.

I'd then install all of the woodwork including the baseboard. All cracks would be then caulked and all nail holes would be spackled. I prefer to use the lightweight spackling that can be wet sanded with a damp sponge.

Wet sanding eliminates dust problems. I would then spot prime and seal all spackling, unless I had used the newer spackling compound with the primer / sealer in it.

CLICK HERE to get FREE & FAST BIDS from local painters who can paint FAST.

Paint Walls Next

If I were you I would apply one final coat of paint to the walls. It's a smart thing to brush a very small amount of paint up onto the edges of all the woodwork as you are covering the caulk with the wall paint.

After the wall paint is dry, I'd then apply the final coat of paint to the woodwork using an expensive two-inch tapered brush. The final coat of woodwork paint extends to the edge of the woodwork where it touches up against the walls.

If you have excellent hand-eye coordination, you should have no problem maintaining a crisp paint line at this intersection. Don't believe what you see on the home improvement TV shows about using masking tape. It's a joke and takes too much time.

Caulk Is The Secret

If you desire truly professional results, you'll caulk each and every crack you see. This is the most obvious mistake I see in DIY paint jobs - missing caulk.

The trick to applying caulk is to have a bucket of warm water and a grout sponge with you as you caulk. Cut the tip of the caulk tube so it is slightly smaller than the average sized crack and use a top-quality caulk gun to carefully control the amount of caulk being discharged into the crack.

Caulking Videos

Watch this video to see how I apply and finish caulk. You need to wipe the caulk with a sponge!

Two Feet

Apply caulk to no more than two lineal feet of crack at a time and then use your finger to smooth the caulk. The excess caulk on your finger should be minimal if you applied just enough caulk.

Immediately stroke the caulk twice with the damp, not dripping, sponge to remove any excess caulk that smeared onto the wall or woodwork. The only caulk visible should be that in the crack.

CLICK HERE to get FREE & FAST BIDS from local painters who can paint FAST.

Column 516

R Value Meaning and Map

R Value Meaning & Map TIPS

insulation USA map

This is a very good map showing the different insulation zones in the USA. CLICK THE IMAGE to get MORE INFORMATION.

R Value - What It Means

You may be one that wonders what  R value means. It's pretty easy.

The R represents the word resistance. Pretty good alliteration for 6:45 AM wouldn't you say?

R value is a measurement of resistance to heat flow. There's an entire body of science that studies heat. It's complex and called thermodynamics.

That's a cool word when you stop and think about it. Thermo describes heat and dynamics describes movement.

It's a perfect word because heat is constantly moving to a place where it's colder.

CLICK HERE to get FREE & FAST BIDS from local contractors to INCREASE your INSULATION.

Your Body

Think about your own body and how it reacts to heat and cold. In the summer if it's blistering hot, the heat tries to get inside your body.

Let's say it's 110 F outdoors and you're in Phoenix, Arizona. Your body is 98.6 F if you're feeling fine.

The extreme heat, even in the shade, is trying to creep into your body. You sweat to try to combat the heat transfer. But if you run out of water, it's over.

In the winter, you already know that without great clothes on your body loses heat faster than water going through a colander.

Insulation Resistance

Insulation is designed to slow the transfer of heat. Some insulation work better than others. 

Fiberglass is not a bad insulation and it's found in many homes. It's cheap to make.

Foam insulation works better and it's part of the reason you find it in picnic coolers. On a per-inch-basis, foam slows down heat transfer better than fiberglass.

Moving Target

The US Department of Energy constantly develops new insulation guidelines. This happens so the bureaucrats stay busy and because there are technology changes that bring us better insulating materials.

Minimum Standards

The guidelines are minimum standards. There's absolutely nothing stopping you from installing more insulation. The only thing you need to consider is the long-term payback.

At the time I built my last house in Cincinnati, Ohio, the guidelines for ceiling insulation were an R-30 in my climate zone. I doubled that and installed an R-60 ceiling of blown-in fiberglass.

Did I waste my money? I think not. My neighbors fuel bills for houses smaller than mine were nearly double mine! To be fair, I built a new home and all the homes around me were at least thirty-five years old, some being fifty years old.

I had better wall insulation, better windows and an air-infiltration barrier.

CLICK HERE to get FREE & FAST BIDS from local contractors to INCREASE your INSULATION.

Big Savings Possible

I saved approximately $1,000 per heating season in that Cincinnati, OH house. I probably saved an additional $400 during the cooling season. Most of these savings can be attributed to my thicker sidewall insulation, an air infiltration barrier, and tight building practices. But no doubt I saved hundreds of dollars with the thicker attic insulation.

Savings Not Immediate

However, in your existing home, you might save $150 to $200 per year on average. If it costs you only $300 more to upgrade to an R-60 or more, do so! Within two to three years, you'll be saving money once you pay yourself back in energy savings the amount of money you spent on the extra insulation.


R Value Map

The following table shows the different R values that you need to achieve in ceilings, walls and floors with respect to the zone you live in. Study it for a few moments and it will make sense.

insulation USA map

This is a very good map showing the different insulation zones in the USA. CLICK THE IMAGE to get MORE INFORMATION.

insulation table

This table explains what you need to do depending upon which zone you live in. Look up at the map. (C) Copyright 2017 Me and every other US Taxpayer

CLICK HERE to get FREE & FAST BIDS from local contractors to INCREASE your INSULATION.

Column B165

How to Repair Chipped Tile

How to Repair Chipped Tile TIPS

DEAR TIM: I dropped a glass on our new tile and put a chip in one of the tiles. The chipped tile is part way under the refrigerator and we don't want to put in a new tile.

The inside of the tile is very dark, but the top glazed surface on all of the other tile is a white/tan color. Is there anyway we can fill the chipped place and do some kind of repair job? Ann A., Estero, FL

DEAR ANN: It's absolutely possible to repair this chipped tile.

If you're patient and have some decent hand-eye coordination, you can very possibly accomplish a repair that will fool everyone unless you draw their attention to the exact spot of the accident.

CLICK HERE to get FREE & FAST BIDS from local handymen who can repair your chipped tile.

Simple Materials

The first step is to gather the needed materials for the job. You'll need the following:

CLICK HERE to get a wonderful primer / sealer that's easy to use and dries fast.

clear primer sealer

This clear primer sealer is perfect to seal the absorbent inner core of the chipped tile. CLICK THE IMAGE NOW TO ORDER SOME.

You'll get the finish paint at a top-quality local paint store. Your challenge will be to get a great color match. This may take a few attempts.

Hopefully you have a piece of spare tile you can take with you to the paint store. If not, you'll have to use the color chip samples and get as close as possible.

CLICK HERE to get a great two-part quick-setting epoxy I've used for years. It's a great product.

clear epoxy

I use this brand of clear epoxy all the time. It's a great product and will work well on your chipped tile. CLICK THE IMAGE NOW TO ORDER IT.

Clean Tile

Oxygen Bleach

Stain Solver is MADE in the USA with USA ingredients that are food-grade quality. CLICK THE IMAGE to order some NOW.

I prefer to use Stain Solver to clean tile and grout. It's a deep cleaner that's certified organic.

You mix Stain Solver with warm tap water and stir. Apply some of the solution to the chipped area of the tile and allow it to soak.

After 15 minutes, scrub the tile and chipped area and rinse. Use a hair dryer for several minutes to ensure the tile is completely dry.

Even when you think it is dry, continue to blow warm air over the chipped area for 15 minutes. The exposed tile can soak up lots of water and it may take a while to wick out all of the moisture from the tile. It's best to wait 24 hours before proceeding.

You need the tile and chipped area perfectly clean so the next materials bond permanently to the tile.

Seal Porous Tile

Once the tile is dry, use a very small brush and carefully apply some of the primer/sealer to just the chipped area of the tile. Don't get any on the upper glazed surface immediately adjacent to the chipped depression.

Don't apply so much that you end up with a puddle of paint in the chipped area.

The primer / sealer is going to allow you to make sure you get a perfect color match with the glossy paint you'll be using.

CLICK HERE to get FREE & FAST BIDS from local handymen who can repair your chipped tile.

Finish Paint

Wait an hour and then apply a coat of finish paint in the same manner as you applied the primer/sealer. Once again do not get any on the glazed surface of the tile and don't apply any excess paint so it puddles in the chipped area.

The purpose of this step is to see if you've got a perfect color match. You don't want to discover at the final step the paint doesn't match.

Wait for the paint to dry and check the color against the adjacent tile that's not chipped. 

Be sure to check the color in different light, both night and day. If the color is off, do what you need to do to get the paint to match.

Epoxy

Once you have a great color match it's time to install the epoxy. The epoxy is going to be built up so the depression created by the chip is filled in.

Carefully squirt out equal amounts of each part of the epoxy onto a scrap of cardboard and mix it very well. I prefer to use a toothpick for this task. Be sure the chipped tile area is lighted very well so that you can see what you're doing.

Tile Repair Video

I taped this video a few years before refined my method of repairing chipped tiles. That means what you see in the video will not match exactly what you read here. Follow the steps you read here for perfection, but still watch the video.

The video shows you how to use the Stain Solver and how easy it is to use the clear epoxy. It's worth watching.

Precision Work

Apply the epoxy with the tip of a toothpick being very careful to only get it in the chipped area. Carefully dab a small amount of epoxy at a time and add just enough so the top of the epoxy is level with the top of the tile. It usually takes an hour for the epoxy to fully set.

You may need to apply two layers of epoxy to get the surface to match the adjacent tile. You can apply the second layer in just 30 minutes.

Final Paint

Allow the epoxy to set for about eight hours. Paint the epoxy patch and sit back and pat yourself on the back for a job well done!

CLICK HERE to get FREE & FAST BIDS from local handymen who can repair your chipped tile.

Column EM0007

New Home Construction Checklist

New Home Construction Checklist

Would you like to have a checklist of some of the top things I've discovered make the perfect, or near-perfect home?

Can you imagine waving a magic wand and having my years of experience at your fingertips?

It's possible. You can access the tips just below.

Must-Have Tips

I've tried to collect as many of the tricks and tips I've discovered from building new homes and fixing defects in those that weren't build so well by other builders.

The top tips are in my checklist. When you see them all, you'll understand why it's important to make sure you include as many of them as you can in your new home.

CLICK HERE to get FREE & FAST BIDS from local architects and designers that can help you plan the perfect home.

Save Thousands of $$$

Just one of the items in the checklist could save you thousands of dollars in the future. Here's an example:

Ceramic Tile Backer Board - Avoid using green board drywall. It's not waterproof. When the paper rots after getting wet, the tile WILL FALL from the wall.

Use pure cement board or GP DensShield, or equivalent, waterproof board.

If you're forced to use green board, you can try to make the green board more water resistant, but it may not last forever. CLICK HERE for more information about this topic.

Peace Of Mind

See how that one tip could save you vast amounts of money? What do you think it's going to cost you in five years to replace all that ceramic tile in all your bathrooms that were placed over the crap green board?

Here are four more checklist items:

Building Lot - Does your lot have superb drainage? Is your lot susceptible to flash flooding?

The ideal lot has at least 4 feet of fall across it so water runs away from your home.

Lots at, or near, the bottom of a V-shaped gentle valley are where water runs. This valley, before homes were there, had water in it during periods of heavy rain.

CLICK HERE for more information about building lots.

CLICK HERE for more information about how to read topo maps about ground slope.


Concrete Slabs - Will your new concrete driveway and patio resist large cracks?  Will the surface of the concrete not crumble?

Outdoor concrete should contain reinforcing steel, either 1/2-inch rebar or mesh. This holds the concrete together.

Slab thickness should be 5 inches minimum for driveways and patios.

Water added at the job site can dilute the Portland cement in the concrete mix. Don't allow finishers to sprinkle water on the concrete as they finish it.

CLICK HERE for more information about reinforcing steel in concrete.

CLICK HERE for more information about finishing concrete.

CLICK HERE to get FREE & FAST BIDS from local architects and designers that can help you plan the perfect home.

Bath Fan Vents - Will your bathroom fan vents exit the house at the right location?  Will the builder use inferior flexible accordion-style plastic pipe or solid-steel pipe?

Bath fan exhaust needs to be vented to the outdoors. The best place is out of the roof if you live where you get little snow. If you're in a snow region, vent it out a sidewall away from a roof overhang. Never vent a fan at a soffit.

Bath fans should be vented using solid galvanized pipe or smooth PVC pipe. Joints need to be sealed and the pipe needs insulation if in a cold climate.

CLICK HERE for more information about bathroom exhaust fans.


Roof Ventilation - Will your new home have continuous ridge vents? Did you know these don't work to exhaust hot air in the summer?

Continuous ridge vent is over hyped. You can have it installed but you should also install at least two 14-inch turbine vents. Turbine vents can suck all the air out of an attic in less than an hour providing excellent ventilation. They're inexpensive too.

CLICK HERE for more information about time-tested turbine vents.


Instant Hot Water - Will your new home have a simple return loop so you can have a gravity hot-water recirculation system? Are you being pressured to buy a tankless water heater?

A good plumber can install a simple length of pipe from the fixture farthest away from the water heater back to the heater in just a few hours. This pipe creates a loop so you can have hot water in two seconds each time you need it.

Tankless water heaters consume energy at a rate three times higher than a traditional storage water heater. They burn at this rate for however long you have a hot water faucet open. Many people who have tankless water heaters see higher fuel bills.

CLICK HERE for more information about a gravity hot-water loop.

CLICK HERE for more information about tankless water heaters.

CLICK HERE to get FREE & FAST BIDS from local architects and designers that can help you plan the perfect home.


CLICK HERE to purchase many other tips, checklist items and helpful suggestions that will guide you as you plan your new home!

Small Engine Care and Storage Tips

small engine carburetor

Gum and varnish build-up inside a small engine carburetor will eventually lead to problems. The secret tips below are SO GOOD I shared them with 31,000 subscribers who read my November 15, 2020 FREE newsletter. Copyright 2018 Tim Carter

"Gasoline begins to degrade about thirty days after it's pumped."

Small Engine Care and Storage TIPS

Want to listen to this column? Use the following audio player:

DEAR TIM: Spring has finally arrived in the high country here. It's time to cut the grass, but the small gasoline engine on my lawn mower refuses to start. I use the same gasoline that goes in my truck, and my truck always starts.

My guess is that you work with small engines all the time and know what the problem might be and how to prevent it.

What's the best way to store a small engine for months so when it's time to use it you can depend on it starting? Don G., Baker, NV


DEAR DON: I used to have hard-start issues with small engines. I've also had small engines that refused to start no matter how much starting fluid you squirt in the air filter.

How Can I Start Engine First Pull?

You can have your small engine start first pull if you do the following:

  • store the engine with a full tank of gas
  • use 91 octane or higher gas with stabilizer
  • start the engine every 30-45 days to keep fuel in the carburetor

Years ago I discovered a trick that ensures my small engines start the first pull each time I take them out of winter or summer storage.

CLICK HERE to get FREE & FAST BIDS from local handymen that can clean your small engine carburetor.

Your truck starts all the time because you drive it frequently and the gasoline in the tank and fuel system are almost always fresh. If you add gasoline to your truck every thirty days, you'll rarely have problems.

People that don't drive their cars much should absolutely continue reading because they need to do what I do with my small engines.

Did You Talk With a Briggs & Stratton Engineer?

I decided that I'd blend my years of personal experience with the vast knowledge base of Briggs & Stratton's Wayne Rassel, an engineer, to shed some light on how to store small engines. I have small engines in snow blowers, a lawn mower, a hydraulic log splitter and a standby generator. All the engines sit idle for months at a time, so it's important that they respond when I need them.

What are the Best Storage Practices?

I discovered a simple trick years ago that allows my engines to start each time I pull the starting cord. But information I got from Wayne has caused me to modify my approach to storing small gasoline engines.

Now I incorporate the best practices known to woman or man about how to ensure small engines start.

Is Ethanol BAD for Small Engines?

Yes, ethanol is very bad for small engines and even larger ones like in your car or light truck.

The gasoline you and I purchase contains 10-percent ethanol. Using gasoline that contains more than 10-percent ethanol can cause significant damage to small engines, so avoid it at all costs.

If you want to put the best gas in your small engines, get ethanol-free gasoline.

Where Can You Find the Best Gasoline?

There is a website called pure-gas.org that has a list of over 10,000 locations, broken down by states or provinces, that sell pure, ethanol-free gas.

If you can't locate a station near you, just visit your local small airport. All aviation gasoline is ethanol-free. You can buy great gasoline at any small airport.

Some boat marinas may also sell ethanol-free gasoline.

CLICK HERE to get FREE & FAST BIDS from local handymen that can clean your small engine carburetor.

Does Gasoline Break Down?

Gasoline begins to degrade about thirty days after it's pumped. If you've not used all the gasoline in your gas cans within that time frame, pour it into your truck's fuel tank and drive to the gas station to get fresh fuel for your small engines.

That's what I do. I never put gasoline in my small engines that's older than thirty days.

What is the Chemistry of Gasoline?

Understand that ethanol-based fuels tend to attract water. Water is heavier than gasoline.

IMPORTANT TIP: If you don't operate your engines on a frequent basis, a layer of ethanol-enriched water can settle to the bottom of the tank and be drawn up into the carburetor and engine.

This water-ethanol blend is highly corrosive to small engine parts.

How Does Gum & Crap Form?

Gum and varnish, chemical compounds in the gasoline, form as the fuel degrades. This gum and varnish can lead to stuck intake valves, clogged fuel lines and jets in the carburetor.

This could be why your engine is refusing to start. It could be clogged with this gunk.

Should the Tank Be Filled at All Times?

I keep my small engines in great shape by keeping the gas tank filled to the brim at all times. I do this after I shut the engine off.

I do this even if I'm going to use the engine in a week. Keeping the tank filled with fuel minimizes the oxygen in the tank.

Oxygen reacts with gasoline causing degradation. 

BEST Storage Tip - Fill 'er Up With Stabilized 91-Octane Gas

At the end of each season, I discovered that if I ran the engine completely out of gas right before storing it for months, I'd be able to restart the engine with no issues. However, after talking with Wayne, I've decided that state-of-the-art fuel treatments and stabilizers are probably the best way to protect my small engines throughout the entire year.

You also want to use 91-octane gasoline too unless you go to a local small airport and get higher octane gas with NO ethanol in it. Ethanol is NOT permitted in small-aircraft engines so I'm told.

What About Modern Stabilizers?

Some modern fuel additives have a triple anti-oxidant formulation that slows down the fuel degradation issue. The chemicals in the additives react with the gasoline preventing outside water vapor from causing the gasoline to deteriorate.

The additives protect the entire fuel system and all engine parts exposed to the gasoline. Metal parts receive a protective coating that prevent rust and corrosion.

gasoline stabilizer

This is the brand I use to keep my small engines in great shape. CLICK or TAP HERE or the image to have it delivered to your home.

Metal deactivators in the additives stop aggressive chemical reactions caused by dissolved metal ions in the fuel. Detergents in the additives help prevent the formation of the gum and varnishes that cause hard or no-starting issues.

You can get long-lasting results if you decide to use the advanced formula fuel stabilizers. If you want two years of protection, just add one-half ounce to each 2.5 gallons of gasoline. Double the amount of stabilizer and you can protect gasoline up to three years.

Since I take a conservative approach to small engine care and maintenance, I'm going to start to add the fuel stabilizer to all my gasoline. I want to protect the metal parts in my engine. The fuel stabilizers are not expensive, and one 8-ounce bottle treats up to 40 gallons of gasoline. Believe me, I can blow lots of snow and cut lots of grass with 40 gallons of gasoline!

CLICK HERE to get FREE & FAST BIDS from local handymen that can clean your small engine carburetor.

A small engine reminder was featured in my June 25, 2013, April 13, 2014 and my  January 25, 2017 AsktheBuilder Newsletter.

Column 992