Washing Machine Water Valve Stuck

washing machine valves

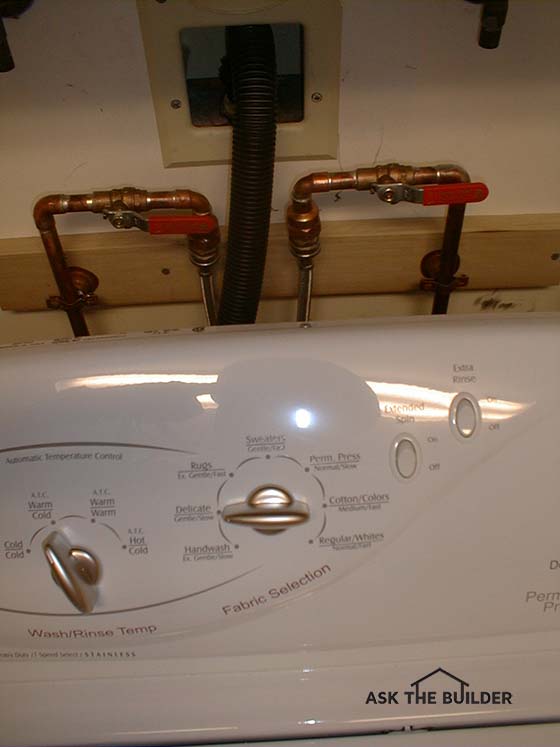
Here are two ball valves that control the hot and cold water into my washing machine. I have them up above the machine in view so it's easy to operate. I also exercise them once a month so they don't get stuck. Copyright 2017 Tim Carter CLICK THE IMAGE NOW TO ORDER BALL VALVES.

Washing Machine Water Valve TIPS

DEAR TIM: One of my washing machine water valves is stuck and I can't turn it. The other water inlet valve that supplies cold water to our washing machine drips slowly and water accumulates on the round handle.

I see a hex nut at the base of the stem that connects the handle to the valve body. What happens if I turn that nut?

Will I be forced to replace the valve? If so, what is the best type of valve to buy and why? How do you solder the new valve? Greg H., Atlanta, GA

DEAR GREG: Let's stop the leaking valve first then deal with the stuck valve.

Turn The Nut

If you turn the nut counterclockwise looking down on top of the valve, the leak will get drastically worse. If you turn it clockwise, perhaps one-eighth of a full revolution, there is a good chance the leak will stop.

See far below some additional tips from Connie on dealing with old packing nuts. 

CLICK HERE to get FREE & FAST BIDS from local plumbers who do repair work.

Packing Nuts Old Technology

The nut in question is called a packing nut. It's the component of an old, and old-technology, valve that serves to keep water from squirting into the room. The actual stem that connects the handle to the valve is surrounded by a packing material.

This material must be compressed around the stem and the inside of the valve to keep pressurized water from leaking out of the valve body past the stem. The nut you see provides this compression when it is tightened.

Packing Dries Out

The packing material can dry out over the years and lose it's leak-stopping super powers.

IMPORTANT TIP: The packing around a valve stem can wear out. You may stop the leak as soon as you tighten the nut, but the next time you open and close the valve be sure to inspect it every hour or so.

It's possible for the valve to leak again and again. At some point you will reach the limit of tightening the packing nut and water will drip no matter how tight you have turned it. This happens when the packing material has reached the end of its useful life.

Stuck Valves

I got my master plumber certification before I was thirty years old. I've always loved plumbing.

Before you even attempt to open that stuck valve, go and locate your main water shut-off valve. Be sure that valve works. In fact, turn off all the water to your home before you try to wrestle with the stuck valve.

Many a homeowner has caused a massive gushing mess by breaking a valve or pipe where it connects to the valve by applying too much pressure to unstick it.

Don't be that person filing an insurance claim.

Use A Wrench

Get a pipe wrench and attach it to the valve handle. If the valve is inside on of the tiny recessed washing machine boxes, you're pretty much toast. You'll never get a wrench into that spot to be able to do any good.

You can try any tool you can think of to turn the valve. I'll wager you'll have less than a 25% chance of success.

And even if you do get it unstuck, there's a chance the calcification inside the valve parts will not work to completely shut off the water.

If the valve is really old, you'll end up snapping the valve stem.

Cheap Stem Valves

Based upon your description of the existing valve, it sounds like you have a fairly common shut off valve. These valves are very inexpensive and fraught with maintenance headaches as you now know.

Often when you want the valve to stop the flow of water, it will not do so as the rubber or plastic washer hidden within the valve has worn out. The valve seat inside the valve can also become encrusted with sediment.

Ball Valves Are Best

If you want a shut off valve that is virtually maintenance free, you should seriously consider replacing your existing valve with a ball valve. These shut off valves are constructed differently than the valve you have.

The inside of a ball valve is just that - a stainless steel ball that has a hole bored through the middle of the metal sphere. A shaft is welded to this ball that connects to a flat handle.

When you rotate the handle just 90 degrees, the valve turns completely on or off. If you rotate the handle anywhere in between, you get partial or controlled water flow.

Hard Plastic Seat

Ball valves have a wonderful hard plastic seat that surrounds the entire ball. It's not much different than the hip joint in our own bodies.

The fit between the ball and the plastic seat is so precise that each time you move the handle, the valve cleans itself of any and all deposits.

CLICK HERE to get FREE & FAST BIDS from local plumbers who do repair work.

Full Flow

Another advantage of ball valves is full water flow. The diameter of the hole in the ball is often identical to the size of the water line that feeds the valve. This full-bore opening provides for unrestricted water flow through the valve. The valve you have now does not offer this advantage.

New Nylon Packing

Ball valves also have a small packing nut that sometimes requires adjustment. But once tightened, they rarely leak again.

The packing is a synthetic hard plastic or nylon. They can last for decades with no leaks.

Low Cost

The ball valves also cost just one or two dollars more than a conventional shut off valve, so in my opinion they are worth every penny. In fact, I would gladly pay even more money for the years of leak and trouble-free performance they deliver.

My washing machine is served with ball valves that give me enormous peace of mind.

Exercise the Valves

To prevent valves from getting stuck, you need to exercise them. This means you need to operate the valve. It's a good idea to do this twice a year. With modern technology, there's all sorts of ways you can set reminder to do this.

Burst-Proof Hoses

Furthermore, I installed burst-proof water supply hoses from the valves to the washing machine. These rubber hoses are sheathed with stainless steel fabric that prevents them from breaking. I urge you to install these hoses when you replace your valves. CLICK HERE to see an assortment of burst-proof stainless-steel washing machine hoses.

washing machine hose

This is the brand of stainless-steel braided washing machine hose I use. I've never had a failure with this brand. CLICK THE IMAGE NOW TO BUY THIS HOSE. You may need two of them.

Soldering

Soldering a ball valve onto copper water lines is easy. The water lines must be void of any water so be sure to turn off the main water valve in your home and drain the system.

Soldering Copper & Valves Video

Watch these videos to see how to solder and a great torch to use to solder.

Clean Fittings & Pipe

The ball valves and copper tubing must be cleaned with sandpaper or a wire brush to remove all oxidation. Apply a light coat of soldering flux paste to the copper tubing and the inside surface of the ball valve.

Close Ball Valve

Insert the copper tubing into the valve and make sure it is fully seated. Rotate the handle and close the ball valve. Doing this helps maintain the shape of the plastic seat within the valve as you heat the valve with the torch.

Solder Both Sides

Be sure to insert an additional piece of copper tubing into the other end of the valve and solder both sides of the ball valve at the same time.

Lead-Free Solder

Use lead-free solder to create the soldered joint. Apply uniform heat with a torch to the ball valve body and to the tubing. You should heat the valve so that solder will melt and flow freely into the joint when the torch flame is removed from the valve and tubing. Once you have soldered both joints, use a dry rag to gently remove any molten solder drops that are hanging from the joint.

Cool Down Quickly

Immediately apply a damp rag to the body of the ball valve. Be very careful since hot steam will be created as the stored heat in the valve flash heats the water in the rag. This moist rag cools the ball valve slowly so that you do not overheat the plastic seat within the ball valve body.

Install Balls Everywhere

Ball valves can and should be used at many locations within a home. A ball valve absolutely should be used as the primary shut off valve for the main water line of your home.

It's easy for plumbers to install a ball valve for use as the shut off valve under every plumbing fixture. A simple adapter can be soldered to the copper tubing leaving the valve that allows you to attach a flexible water line between the valve and any fixture.

Reliable

One of the best things about ball valves is their reliability. As a traditional valve ages, the inner parts can corrode and fail as you turn the valve handle. The inside of most ball valves are made from plastic and stainless steel.

Neither of these materials will corrode. I have turned the handle of a ball valve that had not been touched for fifteen years and it worked as if I had installed it the day before. Ball valves rock!


Author's Notes:

I was very fortunate to receive a letter from Connie Dearolf who lives and works in Trenton, NJ. Connie works for the Trenton Water Works as a meter repair person and read the above column with great interest.

She scolded me for not including the following tips. I did write her back and tried to explain that newspapers hold me to a specific column length and one simply can't include all of the information one might like to. But here are some helpful things Connie thought all should know:

"....three things you didn't mention regarding stopping leaks at a valve packing nut:

  1. If tightening the nut does not stop the leak you can put Teflon tape on the stem threads. Wrap the tape clockwise.
  2. If Teflon tape doesn't stop the leak, you can purchase packing at a local plumbing supply store. Use the string-like packing to repack the nut.
  3. Be careful about tightening the nut too tight! It can crack and you will be forced to replace the packing nut or the entire valve.

Additionally, you didn't mention another common problem with gate valves, especially older ones. If you close a gate valve too tightly, the gate may drop and break off of the stem. It will be permanently in the closed position......" Connie Dearolf, Trenton, NJ

CLICK HERE to get FREE & FAST BIDS from local plumbers who do repair work.

Column 484

How To Connect Cabinets

How to Connect Cabinets

DEAR TIM: I’m on a very tight budget and remodeling my kitchen by myself. I’m having great difficulty connecting my cabinets together. After numerous attempts, there are gaps in between the face frames and the front faces of the cabinets don’t line up.

What am I doing wrong? How can I get professional results? Also, what’s the best order to install cabinets, both wall and base cabinets? Amy M. Waterville, OH

DEAR AMY: Your question brought back strong flashback memories of my early days in the remodeling and building business.

CLICK HERE to get FREE & FAST BIDS from local finish carpenters who install cabinets.

My First Attempt

I clearly remember the first job I had installing kitchen cabinets. I was pulling my hair out having the exact same issues as you’re experiencing. Once I saw the face of the cabinet frames go out of alignment, I knew I had to do something different.

Then there was the time I split the cabinet frame because I failed to drill a pilot hole deep enough. 

Oh, and then there was the time I snapped off a screw halfway because the pilot hole was too narrow and the dense oak wood frame won the battle of friction.

Only through trial and error did I finally develop a system that produced professional results every time.

No Clamp Syndrome

My guess is you’re having issues because you’re trying to hold the cabinets together with your hands as you drill the screw pilot holes through the edges of the face frames. No matter how hard you squeeze all seems well until you then drive the screw. As you tighten the screw, the cabinet face frames move out of alignment. Am I close?

Shavings - You Gotta Hate Them

To add insult to injury, my guess is you’re getting small shavings of wood from the drilling operation in between the cabinets. That makes it impossible to have a tight seam between the cabinet frames.

The only way to prevent shavings is to have the face frames be as tight as possible with no gap as you drill the pilot hole through the one frame and then into the adjacent cabinet frame.

The clamps never are removed until the screws are tight.

Ratchet Or Screw Clamps

The solution I’ve used for years are ratcheting squeeze clamps that have hard rubber pads that won’t harm the cabinets. These clamps, when installed properly, temporarily hold the cabinets together stronger than the grip of Ironman™! The best clamp I've ever used is the one you see in the photo below.

connect cabinets clamps

Using professional ratcheting squeeze clamps are a must if you want to expertly connect cabinets. © Copyright 2017 Tim Carter

It's got a unique cam on the rotating handle. You open the handle so it's in the same orientation as the long bar.

The next step is to adjust the jaws so they're pretty tight on the two things you want to clamp. You should have the two face frames as tight as possible at this point. You then rotate the handle and as you approach about 60 degrees, the clamp really begins to squeeze tightly.

If you can't locate a cam ratchet clamp, then go with the screw type but be sure you use a block of oak wood to protect the one face frame. You can crush the wood fibers if you don't spread out the pressure from the metal foot.

screw-type clamp

This is a screw-type clamp. These work really well too, but you need to protect the sides of the cabinet face frames from wood crush. Yes, you can screw them so tight you can crush the wood! CLICK THE IMAGE NOW TO BUY THIS SET OF FOUR. You may need more than four!

IMPORTANT TIP: Don't think that a simple squeeze clamp is going to work. Most of these clamps don't have enough squeeze power and leverage to do the job. The screw clamp or a ratchet clamp with a cam is the only way to go. I'm finding it increasingly difficult to find the cam-type ratchet clamps.

Shim Base Cabinets

It’s imperative you have the cabinets shimmed to the proper height before you start the connection process. The cabinet face frames need to be perfectly aligned and touching with no gaps before you apply clamping pressure. Expecting the clamps to make up for an out-of-level floor or a wavy wall is asking too much.

Two Or More

I use two clamps to squeeze the cabinet frames together. I then drill the screw pilot holes. I put a minimum of two screws in each one about 1.5 inches from the top and bottom of the face frame opening. Cabinets 24 inches or taller always get three screws connecting the face frames.

CLICK HERE to get FREE & FAST BIDS from local finish carpenters who install cabinets.

The Screws

I've had great success using 2.5-inch drywall screws to hold the cabinet face frames together. The bugle-shaped head of the drywall screw works perfectly with the countersink bit you read about in a moment. This provides lots of contact area for the head of the screw which is important.

drywall screw

This is a fine thread drywall screw. They work great. Be sure you drill a pilot hole that's 1/32 of an inch smaller than the diameter of this screw. CLICK THE IMAGE NOW TO ORDER THESE PERFECT SCREWS.

Countersink

Once the pilot holes are drilled, I create the countersink cavity for the screw head. Using my drill/driver or an impact driver I then install the screws. CLICK HERE to see the great impact driver I use to install cabinets.

After all that, I remove the clamps. If you do everything right, the cabinets are locked into position and the seam between the two cabinets should look superb.

 countersink bits

Here's a marvelous set of countersink bits. You match the diameter of the bit to the head of the screw. CLICK THE IMAGE NOW TO ORDER THESE.

Wall Cabinets First

I’ve found it’s far easier installing wall cabinets first. You don’t have to reach over the base cabinets risking damage to them. Interestingly enough you’ll have other carpenters or builders tell you just the opposite. They prefer to put in the base cabinets first.

Hold Back

When I install wall cabinets that need to be screwed together, I don’t drive the screws holding them to the wall completely in. I want the cabinets to have a small amount of play in them so I can pull them together with the squeeze clamps.

Couple Cabinets

If you have plenty of muscle power or a few helpers you can also do what I’ve done for years. Screw the wall cabinets together on the ground - as many as you can safely lift - and then install the solid mass of cabinetry as one unit. This same trick can be done with base cabinets.

Screws Into Studs

You’ll have to have lots of help to do this and it really pays to do the math ahead of time as to drilling the holes in the back of the cabinets so the screws go into the center of wall studs or pre-installed solid blocking that’s hidden behind the drywall or plaster.

Be sure to use screws long enough to penetrate at least 1 and 1/2 inches into the wall studs. The weight of the cabinet and the items in the cabinets can be hundreds of pounds. Special screws like the ones just below are made for hanging wall cabinets.

cabinet screw

These are the screws you use to mount the cabinets to the wall. Do NOT use these to screw cabinets together. CLICK THE IMAGE NOW TO ORDER THESE GREAT SCREWS.

Remove Doors

I also recommend removing cabinet doors, especially wall cabinets, when you’re trying to connect them. It’s mandatory if you need to screw together cabinets where the hinges connect to the face frames. The cabinet doors need to be out of the way for the squeeze clamps to grasp the cabinet face frames.

Removing the cabinet doors minimizes the chance of damage to them as you work. In the case of wall cabinets, it also decreases the weight of them as you lift them into place.

Practice Countersink

If you’ve never used a countersink bit to create the cavity for the screws, I beg you to practice. You want to discover the correct depth of the countersink hole so the screw head is flush with the inside edge of the face frame. It’s a precision task. If you drill to deep, the diameter of the countersink hole will be too large. Drill too shallow and the screw head will be proud of the cabinet frame.

CLICK HERE to get FREE & FAST BIDS from local finish carpenters who install cabinets.

Column 1024

Treated Wood Foundation Problems

termite damage treated lumber

Lookie lookie, Can you see the extensive termite damage on the right side of the post? Imagine my reaction when I pulled this treated lumber post out of the ground. I was told it wouldn't rot and that termites couldn't eat it. How would you like to have your foundation built out of this wood???? You'd have to be NUTS to take that chance. ©2017 Tim Carter

Treated Wood Foundation TIPS

DEAR TIM: Several years ago, there was a movement toward the use of wood foundations due to the rising cost of labor and concrete. I toured a couple of newly constructed homes in the Toledo, Ohio area at the time that had used this technique.

My question is "How have these structures fared over time?" Are they still considered sound and what has become of the idea of wood frame foundations?

Are there any contractors using this method actively today? At the time I thought it a good idea, but being the skeptic I am I thought it was better left to someone else to prove the concept.

I've built several homes over the years (for my own use) and have given thought to another project. Your thoughts and insight are always appreciated as I am an avid reader of your column in the Toledo Blade. Roger Puppos, Toledo, OH

DEAR ROGER: I absolutely remember that movement promoting wood over masonry for foundations. The thought back then that rushed through my head was the fable about the Three Little Pigs. As many of us know, the big bad wolf ate two of the three little pigs - the ones that used straw and wood to build their homes. The pig that used masonry was not harmed by the wolf.

CLICK HERE to get FREE & FAST BIDS from local foundation contractors.

Castle Clues

Have you ever seen photos of ancient castles in Europe? Often the walls are still standing, but the roof is long gone.

Treated Wood Foundation Problems

Here's an old castle in Germany. The masonry walls are still standing, but the wood roof structure is long gone. Wood never wins against water, insects and fungi. Copyright 2017 Kathy Ziprik

The roofs were made from wood. The walls were made from stone. They didn't have treated lumber a thousand years ago, but believe me the timbers they used to construct those castle roofs were the densest and most rot-resistant lumber available at the time. Water always wins with lumber if there's oxygen around.

Cast, or poured, concrete is artificial rock or stone. You can order it with more Portland cement and make it incredibly strong so it lasts hundreds of years if that's the legacy you want to create.

Wood Is Strong

My problem with the wood foundations was never one concerning engineering. I was convinced a properly constructed wood foundation could easily act as a retaining wall against all soil pressures that were trying to push it over. Wood shoring has been used for years to protect workmen who install piping in deep trenches and those who work in mines.

I have no doubt that the treated wood manufacturers still promote wood as a viable material for foundations. I also believe there are builders who still use wood for foundation work.

Insects & Rot

My real concern was long-term degradation caused by water and insects. The thought that kept playing in my head like an endless loop of video tape was an image of a workman at a plant that makes treated lumber. There were two episodes in this short documentary.

Human Error

The first one was of the workman coming to work with a very bad head cold or the flu. In this episode, he starts to blend the chemicals that are used to preserve the wood, but because of his lack of concentration he makes a serious mistake and that batch of lumber does not receive enough chemical treatment.

Hoping

The wood certified for wood foundations is supposed to contain a higher amount of the preservatives. That's a given. But how do you know if it does?

Do you want to hope your treated lumber foundation has enough preservatives? Hope is the emotion of last resort. You hope for things you can't control.

You can control your foundation. You can make your foundation wall last as long, or longer, than castle walls.

CLICK HERE to get FREE & FAST BIDS from local foundation contractors.

Anger Issues

Episode two is a little different but the result is the same. The workman who mixes the chemicals goes and asks his boss for a raise. The plant manager tells the worker that he is not deserving of a pay increase. The disgruntled worker goes back to the work station and decides to take his anger out on the next load of pressure treated lumber.

Quality Control?

I don't doubt for a moment that plants that make pressure treated lumber have quality control measures in place and follow them making sure mistakes don't happen. That's just good business. But mistakes do happen and I have proof.

How many food recalls or other product recalls can you remember in the past year or two?

How did those mistakes happen? Who was in charge of the quality control that day at the factory?

Impossible Test

The questions you have to ask yourself, since you can't easily test the lumber at your job site, might be:

  •  Is the treatment in this lumber the correct mixture and will it LAST?
  • Was the lumber mislabeled?
  • Was the correct amount of preservative used and was the pressure high enough in the vessel?

Tim's Failure

In the early 1990's when CCA treated lumber was still being produced, I built a large play structure for my daughter. The main supports were 4x4 posts that I placed directly into the ground and backfilled with the soil.

These posts were approved for direct ground burial. The treated lumber came with a lifetime warranty against rot or decay.

Fifteen years later, I took the play structure apart so I could build a large Queen Anne Victorian garden shed for my wife. To my amazement, two of the six 4x4 posts had significant termite damage to that portion that was buried in the ground.

To say the least, I felt vindicated about my suspicion that treated lumber was not to be trusted 100 percent of the time.

Great Wonders Of The World

When it comes to building for a lifetime, I have a tendency to lean on my college degree in geology. Look at the great temples, tombs and castles that are still standing in the world today. One thing they all have in common is they all are made from rock.

The Great Pyramids are still standing after thousands of years as are temples in Central and South America. Europe has castles that are hundreds of years old that are still in excellent condition. Remember, concrete is nothing more than artificial rock.

Build your foundation from concrete and sleep well at night.

CLICK HERE to get FREE & FAST BIDS from local foundation contractors.

This column was mentioned in the May 12, 2015 AsktheBuilder Newsletter.

Column EM0013

Can I Cut My Roof Trusses?

Attic trusses

Attic trusses are complex structural elements of a building. They’re designed by registered engineers in almost all situations and you should never cut any part of a truss without consulting an engineer first. © Copyright 2017 Tim Carter

Can I Cut My Roof Trusses TIPS

DEAR TIM: My family is growing and I need to move my home office. I looked up into the attic over my garage that’s built with standard roof trusses. There’s plenty of room to create a room.

How do I cut and modify the trusses to create an open space like the attic in the old house I grew up in? It doesn’t seem to be that hard to do.

I need to get started soon as the new baby will be here before you know it. Kevin B., Silver Spring, MD

DEAR KEVIN: If you want to live to see that new addition to the family, make sure your reciprocating saw stays in its case for now. The good news is you can convert that space above your garage into a room, but you’re going to go about it with some help from a registered structural engineer.

CLICK HERE to get FREE & FAST BIDS from local structural engineers who can help you cut your trusses.

Trusses vs. Common Rafters

Let’s compare common roof trusses with the roof framing materials that were used in your parent’s house. While they look the same, you probably didn’t notice the subtle differences.

Most common attic trusses for homes and garages are made with 2x4’s. Your parents' roof rafters were probably made from 2x8's and could have been 2x10's or 2x12's. My own home I live in now has 2x12 rafters.

Strong Wood Species

Typically the truss designer will specify a very strong wood species like southern yellow pine or even Douglas fir. A 2x4 on it’s own can’t support lots of weight without cracking. So how do they do it when you consider how heavy shingles are and possibly 2 feet of snow on a roof?

Webbing Support

Trusses will have angled pieces of 2x4 that connect between the sloped top chord member and the horizontal bottom chord. These are referred to as webbing. Each piece of webbing where it contacts the sloped top chord acts like a support beam to the otherwise flimsy 2x4.

Triangles

You’ll notice a common truss is almost always a series of interconnected triangles that make up one giant triangle. A triangle is an incredibly strong structural shape. This is why you see this same design used in massive bridges that span hundreds of feet over rivers and canyons.

CLICK HERE to get FREE & FAST BIDS from local structural engineers who can help you cut your trusses.

Wood Truss Videos

Watch these two videos and pay attention to the angled webbing pieces that extend from the bottom chord up to the top chord. These are VITAL to a truss's overall strength.


Common Roof Framing

Let’s look at the attic in your parent’s house. Typically you’ll have a long common rafter that extends from the roof peak down to one of the exterior walls. This rough lumber is not a 2x4. At the very least it’s a 2x6, and it’s probably a 2x8 or 2x10.

The attic floor you walked on as a kid was no doubt made with similar larger dimensional lumber. These pieces of lumber, when spiked together with long nails, also created a giant triangle.

Collapse Hazard

The horizontal bottom chord of the truss, as well as the attic floor lumber at your parent’s home, hold the sloped top chords and common rafter is position so the roof doesn’t kick out and collapse.

Possible Engineering Solution

A structural engineer who knows all about roof truss design may be able to come up with a design that allows you to modify all the small angled pieces of 2x4 that connect between the top and bottom chords.

I guarantee you he’ll come up with a design that requires you to install a much larger bottom chord. This will not be easy to do, but it’s possible.

CLICK HERE to get FREE & FAST BIDS from local structural engineers who can help you cut your trusses.

Take Measurements

I suggest you take measurements of your garage as well as great photos of the exterior and photos of your existing trusses. You’ll need the width of the garage and the height of the trusses measured from the tip of the peak down to the bottom of the bottom chord.

Truss Plant Visit

Take all of this information to your local truss fabrication plant. You can locate these via a trip to your local old-fashioned lumber yard. The lumber yards order the trusses they sell from these local plants. Call and make an appointment to meet with the plant engineer. Most will accommodate you as they don’t want to read about you in the newspaper.

Quick Consult

The engineer can look at your photos and measurements and tell you within minutes if there’s a chance at modifying your existing trusses. If you get good news, ask how much it would cost for him to complete a design drawing that you can follow.

Be sure to ask for the step-by-step directions on how to provide temporary support to a truss as you start to modify it. You just can’t start to cut and hope all works out!

CLICK HERE to get FREE & FAST BIDS from local structural engineers who can help you cut your trusses.

Attic Trusses

To get a quick idea of what you’re trying to do, you can get a drawing of the truss that should have been installed above your garage when it was built. Attic trusses don’t cost that much more than a common truss and it’s a shame more builders don’t use them all the time.

Your local lumber yard often can produce this drawing while you wait using computer software. You’ll see what the engineer may come up with before you even meet with him.

My Man Cave

I have attic trusses that span my garage giving me a room that’s 12 feet wide and has a ceiling height of 8 feet. Part of the walls of the room are sloped, but that’s okay. My cozy man cave is inside the room created within the attic trusses. It's a great room.

I’ve also used attic trusses on jobs where a standard rectangular room was created that had straight walls floor to ceiling. Good luck, take your time and be safe!

CLICK HERE to get FREE & FAST BIDS from local structural engineers who can help you cut your trusses.

Column 1042

How to Wallpaper on Drywall

How to Wallpaper on Drywall

How to Wallpaper on Drywall TIPS

DEAR TIM: I was thinking of wallpapering several rooms in my house and installing a few borders in others. But after talking with some friends who have removed wallpaper from their houses, I think I might not do it.

As they removed the paper, they ruined their walls. The paper facing on the drywall was ripped off! Is there a way to prevent this? What can my friends do to restore their drywall? Darcey R., Brookville, IN

DEAR DARCEY: Ouch! I absolutely know how frustrated your friends must be. Tell them not to panic as there is an easy repair method that will restore the walls to like new condition.

Drywall Damage Preventable

The sad thing is that all of the damage to the drywall face paper could have been prevented. Whoever installed the paper skipped a vital step. They failed to size the walls before they hung the paper. 

CLICK HERE to get FREE & FAST BIDS from local wallpaper hangers who use the special sealers. Ask them!

Sizing = Ancient Process

Sizing walls is a mystical process that generates lots of puzzled looks from clerks at paint stores as well as homeowners who wonder what it is. I can remember clearly the first time I heard the term.

I thought it meant you had to carefully measure the walls before you hung paper so that you purchased a sufficient amount of wallpaper. The truth of the matter is that sizing is a process that allows wallpaper to be installed with ease and at the same time allows it to be removed at some future time with little or no effect on the wall substrate.

Primer / Sealer = New Method

The word sizing tends to be used by older professional wallpaper hangers. New paper hangers just entering the field talk about priming and sealing walls instead of sizing them.

Many years ago paper hangers applied diluted wheat-paste adhesives on plaster walls to size them before they hung paper. This adhesive soaked into the fresh plaster and acted as a crude sealer. Modern technology has produced some amazing products that work much better than applying a thin wheat-paste to a wall.

Just A Few Tools

Let's get started with the tools. Fortunately, you don't need many tools to wallpaper.

Here's a list that will get you going on this job:

  • retractable razor knife with snap-off blades
  • 4.5 or 6-inch drywall taping knife
  • smoothing brush or plastic smoother
  • 4-foot level
  • grout sponge
  • measuring tape
  • paint roller & pan
  • paint brush

Click the Image Below to get all, or some, of the tools now:

Wallpaper Tools List

CLICK HERE to get all the tools I recommend in one place. It's easy and fast.

Plaster Wall Suction

Without the diluted adhesive coating the adhesive on the back of the paper sucked into the bare plaster too quickly. This made it difficult to adjust and smooth the paper. In some instances the wallpaper adhesive soaked so deeply into the plaster little glue remained behind to hold the paper to the wall.

Wallpaper Videos

Watch these wallpaper videos to get an idea of what you're up against. It's not that hard, but I'd start on a small room first to get your skills honed.


New Adhesives

Modern wallpaper adhesives are very different than the old wheat-paste glues. Some are so strong that they can actually penetrate through many porous wall paints and actually grab onto the wall surface beneath the paint.

This is where many rookie paper hangers and homeowners get into trouble. They look at a painted wall and think that the wall has been primed and sealed. Indeed the wall may have a paint primer on it but this is not the right type of primer.

The new sealers create a barrier the glue can't get through. You absolutely need this if you're applying wallpaper over drywall.

CLICK HERE to get FREE & FAST BIDS from local wallpaper hangers who use the special sealers. Ask them!

High-Tech Sealers

To prevent the high-strength paper adhesives from bonding to the drywall paper you must apply specialized primer/sealers made for wallpaper. These water-based low-odor products form a tough barrier that paper adhesives can not penetrate. CLICK HERE to buy some of this special primer / sealer now.

high-tech wallpaper primer / sealer

This is the new high-tech wallpaper primer / sealer. It's an amazing product. I've used it and like it very much. You can tint it. CLICK THE IMAGE NOW TO BUY SOME.

The primer/sealers are perfect for painted drywall, bare drywall, paneling, and even existing walls that already have wallpaper on them. The products look just like paint and apply the same way.

Tint The Sealer

What's more, some brands are tintable. You can colorize the primer to match the background color of the wallpaper. This feature comes in very handy if a paper seam spreads apart in the future.

Extend Hang Time

The new primer/sealers also help you when you hang paper. They help to slow the drying time of the adhesives so that you have plenty of time to adjust and trim the paper as you work each sheet.

This characteristic is very important if you're double cutting paper as you install inlaid borders within a paper pattern. Not all wallpaper sealer/primers are created equal. If you want the best performance you will have to pay slightly more per gallon for it.

Seal Damaged Drywall

The damaged drywall at your friend's house can be salvaged with a similar product. Advise your friends to purchase a similar water-based sealer formulated specifically to seal unpainted or damaged drywall surface. CLICK HERE to buy this special primer.

drywall primer

This is the fantastic clear drywall primer made to stabilize drywall that's lost it's top layer of paper. This is easy to apply and dries fast. CLICK THE IMAGE NOW TO BUY IT.

Before they apply this special sealer they need to sand off any loose or ragged paper edges. The special sealer is blue when wet but dries clear. Your friends will appreciate this once they begin to apply the necessary skim coating that will transform the ugly mess into smooth walls once again.

Blisters & Bubbles

If you don't seal the damaged drywall, the water from the joint compound used to skim coat the walls creates horrible blisters and bubbles. If you think your friends are upset now, just wait till you see their faces when the walls resemble a life sized mural of blister packing material!

CLICK HERE to get FREE & FAST BIDS from local wallpaper hangers who use the special sealers. Ask them!

Column 377

Roof Ventilation with Turbine Vents

roof turbine

Roof Ventilation with Turbine Vent | This turbine vent spins with just the slightest breeze. It is but one tool to use when you want superior attic ventilation. The top part of this vent was made from durable plastic. The vent was manufactured in Australia. It was on my Queen Anne Victorian garden shed in Cincinnati. PHOTO CREDIT: Tim Carter

Roof Ventilation With Turbine Vent TIPS

Is Roof Ventilation Important?

Yes, roof ventilation is very important. The more you can get the better.

The roof-ventilation rage over the past fifteen years has been continuous ridge and soffit ventilation. These systems are nearly invisible and they create a system through which air enters your attic space and then gently floats through the attic space.

But I've discovered over the years there's a much better product to use to ventilate an attic.

Do Ridge Vents Work All the Time?

Ridge vents do not work all the time. In hot weather with no wind, no air floats out of your attic space.

The companies that make the ridge ventilation products claim that no matter what the time of year, the air exits the attic space through small gaps at the peak of the roof. I've tested this claim, or hypothesis, and it doesn't work in the summertime.

IMPORTANT TIP: I'll explain more in a moment, but realize that hot air rises, it doesn't go down. 

At the peak of your roof there's a gap in the wood sheathing.

This gap is covered with any number of different products that allow air to pass, but prohibit rain, snow and insects from entering your attic area. You can't see these vents as they are almost always covered by the roofing shingles at the peak.

CLICK HERE to get FREE & FAST BIDS from local roofers who can install turbine vents in an hour or less.

Ridge Vent Gap Video

Watch the video just below to see this gap. You'll see it about 1:40 into the video. If you want to advance to that point, just do so. Realize this gap you see is where the air comes out of the underside of the roof.

What is the Physics of Hot Air?

The mechanics of the air movement are quite simple. During warm weather, the air inside your attic heats up. Since warm air rises, it tends to float out of the highest ventilation spaces. As air leaves your attic, more air has to replace it.

The conventional wisdom is to put in soffit vents down at the bottom of the roof so the replacement air can enter here and flow up under all the roof sheathing.  This convection movement naturally draws in cooler outside air to replace the air that just exited.

Does Wind Suck Air From Attics?

Yes, wind does suck air from attics. It's called the venturi effect.

Wind that blows across the roof anytime of year also acts to vacuum air from the attic space. The wind blowing across a roof can create a partial vacuum on the leeward side of a roof. When the wind blows and at the right angle a significant amount of air can be pulled through the attic space by the vacuum created as wind blows across the peak of the roof covered with a ridge vent.

Can You Test Ridge Vents With Incense?

I loved taking physics in high school and college. There I discovered that hot air rises and cold air falls down.

For a ridge vent to work, the hot air has to rise up to the peak under the shingles, then it needs to go down several inches in altitude to get out of the ridge vent.

That seemed impossible to me. I decided to test it.

I went up into my attic on a blistering hot day around 1 pm. The sun had been beating on my roof for hours and it was probably 145 F up there.

I made sure there was no wind outdoors. It was a calm humid Cincinnati summer day.

I lit a stick of incense and held the stick about 10 inches down from the underside of my continuous ridge vent.

Smoke from the incense floated lazily up but it was NOT drawn out of the ridge vent. It just sat up near the peak of the roof.

Are Turbine Vents The Best Ventilation?

In my opinion, turbine vents are the best ventilation. They work with just the slightest breeze.

Turbine vents can vacuum vast quantities of air from an attic space on a windy day. It's the common turbine vent. Some people call them whirlybirds or whirlybirds.

These balance ventilators have a dome that spins on high-quality ball bearings. Just hot air rising out of one will make it spin.

If the wind is blowing and catches the fins, then the turbines act like giant vacuum pumps sucking hundreds of cubic feet of hot air out of an attic per minute.

The faster the wind speed, the faster the turbine rotates.

turbine vent

This is a standard turbine vent. They come in different colors. Some have external braces. This one you see is Made in the USA. CLICK THE IMAGE TO ORDER ONE OF THESE GREAT TURBINE VENTS.

CLICK HERE to get FREE & FAST BIDS from local roofers who can install turbine vents in an hour or less.

Turbine Vents are Time Tested

Turbine vents have been used for many years in both residential, commercial, agricultural and industrial buildings. The vents are very affordable, easy to install, and they pump vast amounts of air from attic spaces.

CLICK HERE to see an assortment of turbine vents that I've used on my jobs. Made in the USA!

A Small Turbine = Lots Of Air

A small 12-inch diameter turbine vent with a constant wind speed of 5 miles per hour (mph) can remove 347 cubic feet of air per minute (cfm) from the attic space.

A single 14-inch diameter turbine vent that is subjected to 15 mph winds can expel up to 1,342 cfm of air! If the winds are still, the vents still allow air to drift up and out of the attic space, although not nearly as much.

How Much Attic Air Change is Required?

Those amounts of air might not mean much to you at first blush. But consider a moderately sized home whose attic space is 36 feet deep, 50 feet long and 10 feet high at the peak. This attic space contains 18,000 cubic feet of air.

A single 12 inch diameter turbine vent could provide a complete change of air in the attic space every 52 minutes if the outside breeze was just 5 mph.

The 14 inch diameter unit could provide a complete air change in the attic every 14 minutes at 15 mph. Imagine what happens if you install two or three of these simplistic turbine vents on the back side of your roof out of view!

Can You Achieve a Leak-Proof Installation with Turbine Vents?

It's easy to install a turbine vent and have no roof leaks.

The roofer your builder hires can install a turbine vent in less than 15 minutes. The average cost of a high quality turbine vent is just $50. The best ones provide years of maintenance-free service since they have permanently sealed ball bearings.

Roof Flashing Video

Watch this video of me installing a bathroom vent fan hood. It's the EXACT SAME process for a roof turbine vent. Nothing about the install is different.

If your roof is not too steep and you have asphalt shingles, this is a DIY project. Once again, watch this video and imagine I'm installing a turbine vent. The base flashing of the turbine vent is IDENTICAL to the bath fan flashing you'll see.

CLICK HERE to get FREE & FAST BIDS from local roofers who can install turbine vents in an hour or less.

No Leaks

Many people look at the vents and think they will leak during a rainstorm. The wind that almost always accompanies a rain shower or storm actually causes the turbine to spin and blow rain drops away from the vent. The same is true for snow.

If you want the strongest turbine vent, be sure to buy one that has external braces. These are simple metal braces that extend out beyond the spinning turbine. These visible braces do a fantastic job of stabilizing the turbine when the winds are really blowing.

CLICK HERE to get FREE & FAST BIDS from local roofers who can install turbine vents in an hour or less.

Column NH039

February 8, 2017 AsktheBuilder Newsletter

This is going to be VERY FAST since I reached out yesterday.

You may have missed the exciting news about True Value Hardware.

CLICK HERE to see what I had to share.

Look over what I sent yesterday and consider doing both of us a huge favor.

Would you consider forwarding / sharing my email I sent you about the paint videos to all of your friends and relatives? Let them know about the great paint and the rebate offers.

Send them this link:

http://go.askthebuilder.com/TwoGreatPaints

Let's try to get this to go viral. Spread the news on social media if you use that.

Here's a url you can use on all your social media channels:

http://go.askthebuilder.com/TwoGreatPaints

Woodprix SPAMMERS

I wanted to warn you about a suspicious website that sells plans.

It's called woodprix.com.

I've been having a HORRIBLE time deleting their SPAM comments from many of my videos.

They open up countless false, or empty, accounts on YouTube so they can comment on videos.

It's like playing Whack-a-Mole. Each time I block the account from commenting a new name pops up.

I can tell you based on this activity I'd NEVER BUY ANYTHING from this website.

Many New Revised Columns

I've gotten way ahead on you. Sorry about that.

Consider clicking the following links and SKIM them so you know there's great information and products for you at the website.

Some of these have incredible embedded videos and NEW TIPS I've never shared before.

Good luck!

Diagonal Bracing Tips - VERY IMPORTANT!!

Duct and PVC Pipe Noise

How to Clean Exterior Siding

How to Drill Ceramic Tile

How to Insulate an Old Brick Home

Easy Peasy Tile Grout Cleaning

Blown vs Batt Insulation - Guess the Best!

Magic Toilet Bowl Cleaner & Restorer

DIY Home Inspection - Yes, But ...

How to Paint Aluminum Gutters - Special Primer!!

Ceramic Tile Wall Gap Issue

Cultured Marble - It’s Still Around

Septic Tank Garbage Disposals

Replace Paneling with Drywall - Not So Fast!

Reinforcing Steel in Concrete - GREAT VIDEOS

Pot Filler Faucet - Back Saver for Cooks!

Concrete Resurfacing - It’s a DIY Project

That's quite enough for today.

Tim Carter
Founder - www.AsktheBuilder.com

Do It Right, Not Over!

Resurfacing Concrete

Resurfacing Concrete

Here's an overlay on a small concrete slab. You can see the form boards that allow you to get the top in the same plane. There's a nice coat of cement paint that bonds the new overlay to the old concrete. (C) Copyright 2017 Tim Carter

Concrete Resurfacing TIPS

DEAR TIM: Is it possible to add an additional layer of thin concrete on top of an existing concrete surface? My concrete patio and front porch are scaling and there are patches where the top surface has deteriorated. The rest of the concrete looks fine. Can the average homeowner successfully complete such a job? Marcia D., Helena, MT

Podcast Concrete Overlay

CLICK this image and listen to the first story - Vic has a gorgeous patio on the back of his house. One part of the patio has sunken down. I've got the fix.

DEAR MARCIA: Resurfacing concrete with an overlay over existing concrete surfaces is a fantastic way to extend the life of a driveway, sidewalk, patio or porch. Believe it or not, this is a great DIY project if you just practice first on a smaller concrete slab.

Super Strong

The new surface will be durable and certainly more long lasting than the original finish if you diligently follow a few simple steps. The best part is that the material cost is minimal and you can do the work on different days to suit your schedule. I believe you can tackle this project if you take your time.

Remove Loose Material

The most important step in the process is to make sure that all loose concrete material is removed. Weak concrete can be removed by hand with a chisel and hammer or you can rent a lightweight demolition chipping hammer that blasts away material.

CLICK HERE to get FREE & FAST BIDS from local concrete contractors that do overlays.

Hammer Drill

This is a great demolition hammer tool to chip out rotten concrete. If you've got a bigger job that's going to last a few days, you should BUY one, keep it in good shape and then SELL it on Craigslist once done. This will be cheaper than renting one. CLICK THE IMAGE NOW TO BUY THIS GREAT POWER TOOL. I own one just like it.

Industrial-strength power washers can also be used. The concentrated stream of water removes weak concrete. The surface that will receive the overlay must be clean, oil and dust free.

Low Angle

Hold the wand close to the concrete at a low angle and use it much like a paint scraper trying to get the water jet spray under the thin layers of peeling concrete.

Thickness Matters

Before you purchase the materials for the job you need to decide how thick the overlay will be. If the thickness will be 3/4 inch or less you will not need any small stone aggregate. The size of stone in concrete mixes is very critical.

1/3 Rule

The maximum diameter of any stone in a concrete mix should never exceed 1/3 the thickness of the pour. Small pea gravel often has stones larger than 1/4 inch in diameter, thus it can only be used in overlays that are greater than 3/4 inch thick.

Ultra-Thin Overlay

Overlays can be as thin as 1/16th inch thick. In these instances you would use fine sand mixed with Portland cement. You can purchase these products already premixed in a bag or pail. You just need to add water.

quikrete-concrete-overlay

This is a resurfacer material that's premixed. You just follow the instructions on the label. Remember, it's just for THIN overlays. CLICK THE IMAGE NOW TO ORDER THIS PRODUCT.

If you decide to mix your own, realize that sand purchased from a traditional gravel pit or building supply yard often is available in three grades: fine, medium and coarse.

Coarse sand has very small stones in it that can be as large as 1/8 inch in diameter. This sand is perfect for one half to 3/4 inch thick overlays.

For a thin overlay, you need to get fine sand.

Form Boards

Before you mix any material you need to set up some small form boards. Use furring strips that are braced against the sides of the existing concrete work. The top of these pieces of lumber should be set at the final height of the overlay.

It's not necessary to attach them to the existing slab. Simply drive stakes next to the furring strips to pinch them against the existing concrete work.

CLICK HERE to get FREE & FAST BIDS from local concrete contractors that do overlays.

More Cement = Better Job

If your overlay will just contain sand and cement, make the mixture rich. Simply mix the two parts sand and one part cement together before you add any water. If you decide to do a thick overlay, here's the recipe I'd use:

  • 3 parts rounded gravel
  • 2 parts sand
  • 1.5 parts cement

Feel free to add another half measure of cement for an extra strong overlay. You should add enough water to the mix to make the mixture plastic. It should flow out of a wheelbarrow like pancake batter pours from a bowl.

Secret Ingredient - Lime

If you want to really make the overlay mixture sticky, then consider adding hydrated mason's lime to the overlay mixture.  Lime is one of those magic ingredients that's rapidly becoming myth. This happens in construction. Some great methods and materials transform from history, to legend to myth. 

hydrated lime

This is excellent hydrated lime. It's a fine white powder and it's going to look great on your home. CLICK THE IMAGE TO ORDER SOME RIGHT NOW.

This is the recipe you need if you decide to use lime:

  • 3 parts rounded gravel
  • 2 parts sand
  • 1.5 parts cement
  • 0.5 part hydrated lime

Cement Paint

To permanently bond the overlay to the old concrete, apply a cement paint to the old concrete. This paint is made by simply mixing Portland cement and water until it is the consistency of paint. Don't allow the cement paint dry on the existing concrete. It must be covered with the overlay mix within minutes of being applied.

Cement Paint Video

Watch the first three minutes of this video to see how easy it is to mix cement paint. You just need a bag of pure Portland cement.

Best Weather

The best weather to perform this work is when the temperatures are in the 50 - 60F range. Overcast days are ideal. You want the resurfacing to set up slowly. You apply your final finish to the overlay when the material is somewhat firm.

IMPORTANT TIP: Don't sprinkle water on the surface as you finish it. This will weaken the top skin of concrete. Tightly cover the finish slab with plastic to cure it or spray a clear curing compound on it so that the overlay cures very slowly. This will allow the concrete to attain maximum strength.

CLICK HERE to get FREE & FAST BIDS from local concrete contractors that do overlays.

Column 379

February 7, 2017 AsktheBuilder Newsletter

I've been doing this newsletter since 1997 is my best guess. I can't tell you when I sent out my first newsletter.

One of the biggest mistakes I've made in the Ask the Builder journey is not keeping a journal or diary.

That one line from the movie Field of Dreams that old Doc Graham uttered in his office comes to mind.

"At the time you don't think much of it. You know, we don't recognize the most significant moments of our lives while they're happening."

Well, I do recognize this moment right now. And it will forever be kept at my AsktheBuilder.com website so I can go back and reflect on it.

What is it? Read on, please.

True Value Hardware Paint

Two months ago I mentioned that I had been in Chicago for a brief business trip. I can now share where I was.

I had the good fortune to visit the True Value Hardware paint manufacturing plant in Cary, Illinois.

I've been on many a factory tour. They're all eye-opening.

Usually my biggest takeaway as I watch all the products marching rapidly down the assembly and packing lines is, "How is it possible THIS MUCH of this product is needed day after day after day?"

You're wondering, "Tim, big deal. What's in this for ME? Why should I care about your cool factory tour?"

There's quite possibly LOTS in it for you. Keep reading please.

The Test

I got to meet the top team members while there, John, Rich, Mark, and a few others I fail to remember because I didn't get their business cards.

We all agreed I'd tape two videos for them about two paints True Value is very excited about.

The one was their X-O Rust spray paint and the other one was their EasyCare interior paint. Both are made at the Cary, IL plant. It's a massive facility.

EasyCare Washable Paint

Above is a photo of the can of EasyCare paint I bought from one of my local True Value hardware stores. I had it sitting on my deck railing.

The following photo shows two lab test panels where the X-O Rust spray paint was put up against a top national brand you've probably used for years. The True Value X-O Rust paint is the one that's on the right in the photo.

These test panels were subjected to an official scratch test and then subjected to an ASTM 200-hour salt-fog test.

xo paint vs rustoleum salt fog

These two paints are exclusive to True Value Hardware and you can only get them at your local True Value hardware store owned by one of your neighbors.

The True Value team at the paint plant wanted to test to see how well you would react to my feelings about their paint.

They wanted me to try it myself, do an honest review of both and then see if you'd then consider using it yourself.

To encourage you to do just that, I was able to get them to create two EXCLUSIVE rebate offers. They're fantastic offers and they only run for the next three weeks.

These rebates are ONLY AVAILABLE to you as an AsktheBuilder.com follower / subscriber.

Both rebate offers expire on March 1st.

True Value paid me to take the time to test the two paints and create a video about each one. The links to them are just below.

But Wait, There's More

The real payoff for you is not the rebates. Yes, they're great, yes, you'll save money, yes, you'll get some of the best paint you've ever used.

But the big payoff is a little farther down the road.

However, this payoff all depends on you. Only you can make it happen.

If you can prove to True Value that you trust what I say, go buy a little bit of this great paint you're about to see AND then send in for the rebates, then there's a really good chance I'll be taping many more videos for you.

These videos will help show you how to save lots of time and money and demonstrate amazing new products that I love.

Both paints are already an exceptional VALUE before the rebates.

I can pretty much tell you after you get two cans of the spray paint, you'll wish True Value would have allowed you to send in the rebate for ten cans.

Watch the Videos

Please click the two links and watch the videos. Do that first, then keep reading. The links to the rebate offers are just below.

CLICK HERE to watch the EasyCare wall paint video review.

CLICK HERE to watch the XO-Rust spray paint review video.

The Rebate Offers

Now it's your turn. If you feel the paints are worthy of your investment, then please go visit your local True Value Hardware store and buy some.

CLICK HERE to find your closest True Value Hardware store.

Each rebate is good for two cans total per household. Just read the offers and you'll figure it out.

You NEED TO ACT FAST because the rebates are only good if you buy the paints by March 1st and then send in the rebate form. You'll see.

CLICK HERE for the X-O Rust spray paint rebate.

CLICK HERE for the EasyCare interior paint rebate.

Why It's So IMPORTANT

I thought years ago that some company would take an interest in me and help me get the word out to you about great products.

But it never happened. It could have been poor marketing of myself to companies.

However, the time has come.

To get the word out to you about great products, great methods, etc., a person like me needs resources and support.

We both know that video is powerful and it's the future for allowing you to discover new things FAST.

But video done RIGHT is resource intensive.

I've had the pleasure to work with a professional video recording team over the years. John Wall, now a good friend, was my producer / director / mentor.

There were others on the team and some invisible people who did all the post production. A team like this costs money. A real set to tape on costs money. I could go on and on.

The videos you see me do now are done by me with little or no help. Occasionally I can enlist my son to help, but it depends on his schedule.

If you step up and come through buying some of the amazing EasyCare and X-O Rust paint, then there's a CHANCE I'll get to once again work with a professional crew and really crank out lots of videos.

You'll get to watch them for free forever.

Help me get all that information that's in my brain into and out of a video camera.

Help me create more videos.

Help your kids, your grandkids and friends discover at least one more time-tested way to Do It Right and Not Over.

Help me make this a day we'll both never forget.

Tim Carter
Founder - www.AsktheBuilder.com

Do It Right, Not Over!

EasyCare Paint Review

EasyCare Paint Review

Watch the above video review of the EasyCare paint sold exclusively at True Value Hardware stores.

I tested EasyCare out in my own bathroom. Here's my opinion:

  • Nice and thick
  • Above-average hiding power
  • No roll splatter
  • Very low odor
  • Exceptional value

Paint Prices

When you compare indoor wall and ceiling paint, you should always consider the price. Traditionally, cheaper paints didn't perform that well.

Guess what? There are apartment building owners that WANT A CHEAP paint. They just want to freshen up walls before a new tenant moves in only to mess up the walls in a month.

This is one reason there are low-cost paints. Some look good, but don't hold up.

Great Price & Performance

EasyCare is a great paint that doesn't leave you broke. It's not the cheapest by far, but it's not priced out-of-sight like some huge national brands that I've used in my home.

I'm convinced when you go into your local True Value hardware store and see how much it is, you'll do a double take.

You can also order it NOW if you want online. CLICK HERE to check pricing. Just realize what you gain in convenience not visiting a True Value store, you'll pay for in shipping.

Also, when you go to your local store, you can get any color you want. They'll match other brand-name paint color chip names. Bring in a different brand paint chip you love, and they'll mix it in EasyCare.

EasyCare Washable Paint

Here's a washable wall paint. I tried this in my bathroom and it cleans easily. CLICK THE PHOTO NOW to have this delivered to your home.

EasyCare Price

What you'll discover when you compare the price of EasyCare is that it's substantially lower in price than many of the top name-brand paints that perform just as well as EasyCare.

Why are these other paints so expensive? My guess is they spend more on advertising and/or the stores selling the paint have to make up so much of their soft business costs if they're just selling paint.

A True Value hardware store owner has hundreds and hundreds of other products they sell that they can use to spread out the soft business costs. But realize I used to eat lunch sitting on overturned drywall buckets and I don't have a master's degree in business administration!

CLICK HERE NOW to BUY EasyCare paint and have it delivered to your door!

Reminder - February 19, 2017 AsktheBuilder Newsletter