Diagonal Brace Tips

Diagonal Brace

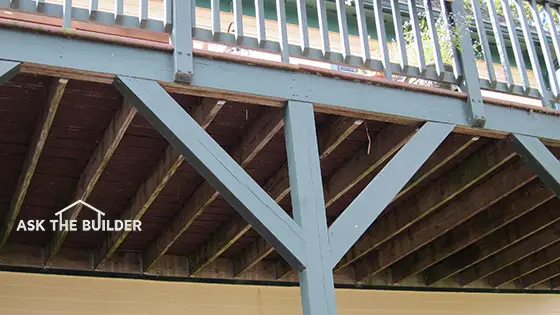
These two diagonal braces help prevent the deck from moving side to side. These were just toenailed into the horizontal beam and vertical wood post. It would have been better if they had been bolted using 6-inch-long lag bolts. © 2017 Tim Carter

Diagonal Brace TIPS

DEAR TIM: I have some building projects facing me. One's a tall deck, another is framing a garden shed, and then I need to help a friend with a room addition. I'm wondering about diagonal bracing.

I don't understand it and need to know why it's important. Is there a short cut? Can you give me the executive summary so I don't have any problems on these jobs? Randy P., Kokomo, IN

DEAR RANDY: You'll be getting the executive summary all right. Books have been written about diagonal bracing. Talk to any structural engineer and I'm sure he'll tell you that entire college courses are offered on the topic.

Diagonal bracing is a very complex topic, but I'll do my best to give you the basics so you don't have a failure on any of your projects.

Prevents Collapse

Diagonal bracing is a structural component of just about any building. It provides lateral stability preventing collapse of a wall, deck, roof, etc.

Let's talk about what happens when you don't have diagonal bracing in place so you get a better understanding. Imagine if you were to build a wall using 2x4s 16-inches-on-center and you make it 8-feet-tall.

CLICK HERE to get FREE & FAST BIDS from local carpenters who know all about diagonal bracing.

Straight Down Forces

If you stand the wall up and nail the bottom plate to the floor to hold just that in place, the wall might seem strong if you put weight on the top. The wall can support weight pushing straight down very well if the wall is stabilized.

Don't you stand on the wall to test this. It will collapse.

Sideways Force

But here's the scary test. Get on a stepladder at one end of the wall. Push on the end of the top plate as if you're trying to move the 2x4 plate forward, not side to side so as to make the wall tip over.

You'll quickly discover you can collapse the wall down onto itself with little effort like you'd close an accordion door. In seconds you can have the 8-foot tall wall folded up on itself and only inches high on the floor.

Wind Pressure

Imagine what would happen if you built a home with no, or inferior, diagonal bracing and a severe windstorm blows against the house. Without diagonal bracing, the wind would push against the walls just like you pushed against that simple wall to make it collapse.

The bottom of the walls, or house, would stay attached to the foundation, but the top would go towards the direction the wind was blowing until it collapsed.

Earthquakes

Or imagine the violent side-to-side shaking that happens when the shear waves of an earthquake hit a house.

Earthquakes create two waves that are 90 degrees to one another. The first wave to hit is called the primary, or P, wave. It makes the ground go up and down much like you see waves ripple on a pond when you toss in a stone.

But the shear, or S, waves that come a few seconds later travel sideways through the ground. They look like a snake that's moving at high speed going across the soil. The s waves are the destructive waves that cause buildings to collapse as they shake the structures sideways back and forth like a rag doll in a dog's mouth.

Preventing Collapse

Can you see how the house could easily collapse? When pro carpenters build a house, they install different types of bracing. One might be a metal diagonal bracing from the lower corner of a wall up to the top plate.

Plywood or oriented strand board (OSB) properly nailed will also provide excellent diagonal bracing. You typically only have to put one full sheet of plywood at each corner of a wall to provide the needed stability.

Old carpenters sometimes put in let-in bracing where they mortise in a 1x4 into the wall studs. This brace travel diagonally across the wall studs from the top to the bottom plate. It's time consuming to install.

Diagonal blocking can also be installed in between wall studs. These blocks start at the bottom plate and march up the wall in a straight line until they reach the underside of the top plate. The pieces of wood do double duty acting as fire blocking within a wall.

Stability Secret

The single piece of plywood or OSB works because the sheet in and of itself is rigid. When you lay a full sheet of plywood or OSB on the vertical studs and then nail through it to the studs and the top and bottom plate, the top and bottom plate can't move independently of one another as they can when there's nothing nailed to them.

The plywood or OSB transfers its rigidity to the wall.

 diagonal wall brace

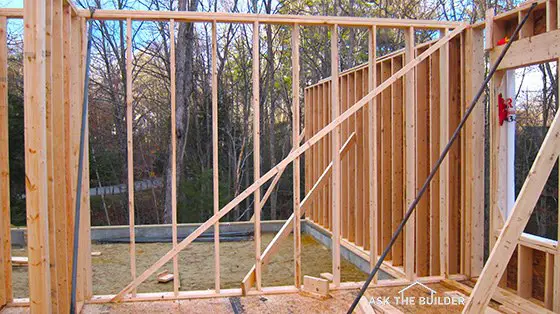
See that angled board nailed to the vertical wall studs? It extends from the top right corner of the wall to the lower left corner bottom plate. It’s a temporary diagonal wall brace used to stabilize the framing while the house is built. © 2017 Tim Carter Builder

Deck Collapses

Deck collapses can also be traced to a lack of sufficient diagonal bracing. I've seen decks built where the outer support beam just rests on wood posts.

If a group of people up on the deck start dancing and a harmonic motion builds up, the entire deck can collapse as the deck starts to shift sideways. Diagonal bracing prevents this side-to-side movement.

CLICK HERE to get FREE & FAST BIDS from local carpenters who know all about diagonal bracing.

Deck Diagonals

You can get great diagonal bracing for a deck by screwing a 2x6 to the underside of the floor joists. Use 4-inch long Simpson Strong-Tie timber screws rated for outdoor exposure.

simpson strong tie timber screw

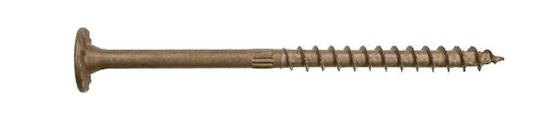
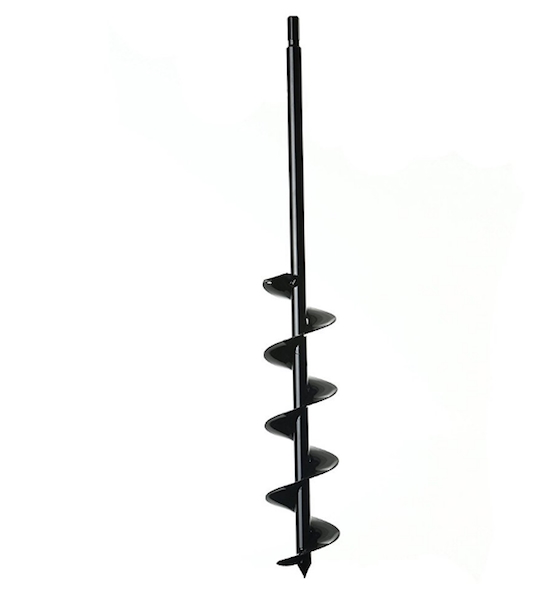
This is a Simpson Strong-Tie Timber screw. I've used them on my own home. CLICK THE IMAGE NOW TO ORDER THEM.

There are any number of ways to install diagonal bracing for a deck. One way is to put diagonal braces that connect the deck beams to the vertical posts. These braces are typically cut at a 45-degree angle. It's really important to bolt these instead of relying on nails.

Deck Underbelly

You can also install a flat 2x6 or 2x8 on the underside of the floor joists to give the decking great diagonal support. Drive no less than two 16d galvanized nails through the brace at each floor joist. Be sure the nails have the proper coating to match the treated lumber you're using to prevent corrosion.

underside of diagonal brace

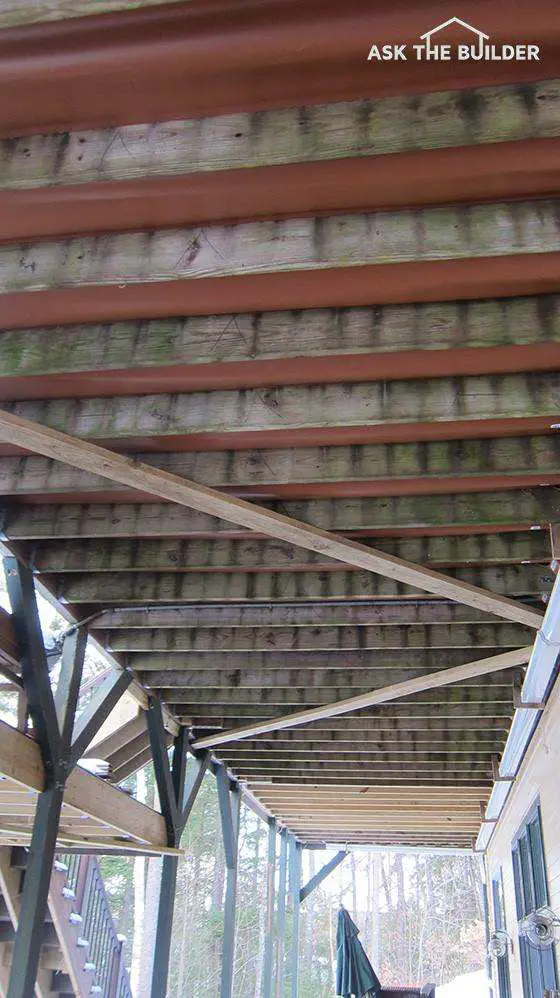
You can see the two diagonal braces on the underside of the deck floor joists. Both extend to the outer beam on the left and the ledger board hidden by the white rain gutter. The brownish-orange troughs are Trex Rain-Escape keeping the lower deck dry when it rains.© 2017 Tim Carter

Roof Truss Bracing

Diagonal bracing is really important if you're working with roof trusses on that upcoming room addition. Many a carpenter has been killed or seriously injured when roof trusses suddenly collapse as they're erected. Wind can easily push them over without bracing.

Large truss roofs often come with detailed drawings that show bracing that needs to be installed in the webs of the trusses. Always be sure to reference any drawings or talk with the engineer at the truss company if you have any questions.

Code Guidelines

Be aware there are very strict building code guidelines with respect to diagonal bracing. The code almost always dictates the type of nail, length, shape of the head, special coatings, etc. The reason is simple: Diagonal bracing is mission critical to the structural stability of a building.

Square Walls Before

I've always found it best to install diagonal bracing for walls while the wall is built flat on a floor surface. With the wall down on the ground, it's easy to square it up.

With the wall square on the ground, you can temporarily toenail the bottom and top plate so the wall doesn't move while you nail on the plywood or OSB at the corners.

You can also nail on the rest of the wall sheathing if you like. When you tilt up the wall, it's already square and you can move on to the next wall.

CLICK HERE to get FREE & FAST BIDS from local carpenters who know all about diagonal bracing.

February 8, 2017 AsktheBuilder Newsletter

Column 906

February 2, 2017 AsktheBuilder Newsletter

I don't have much time. I need to scoot out the door in about 35 minutes.

This is FAST. I've been CRAZY BUSY with some amazing new revised columns for you.

The tips in these are astonishing. I'm just going to give you links below and no descriptions. I don't have time for that. The headlines should be good for you.

GREAT NEW DOOR PRODUCT - SUNDAY!

I've got an unbelievable new interior door product to share with you on Sunday. Watch for that email EARLY Sunday morning!

Paint Videos

I got the thumbs up on the two NEW paint videos to share with you!!!!! WOO HOO!

Best part: The manufacturer is going to give YOU an exclusive REBATE offer on both paints.

When I saw the rebate on the one, I about fainted. You'll be stunned too. It's that good. WOW!

The REBATE is only for AsktheBuilder.com subscribers. HOW COOL IS THAT?

Watch for those two videos on Tuesday. You're NOT GOING TO BELIEVE the one video.

New Revised Columns

Please click every one of the links below.

"What's in it for ME Tim? Why should I click?"

  • Lots of new content
  • FANTASTIC PRODUCT LINKS
  • Embedded Videos
  • Tim Carter hand-drawn illustrations
  • and much more

Brush Marks on Trim - How to Prevent ​​​​​​​

Hot Water Loops - Hot Water INSTANTLY!

How To Garage Shelving Ideas

How to Modify Wood Attic Trusses - Doable, But BIG JOB

Different Bathroom Exhaust Fans - Music and QUIET ONES!

Tunneling Under Sidewalks and Driveways

Tar Paper - Time Tested Contender

Efflorescence - Pesky Problem

Long Lasting Concrete Repairs

Matching Paint Colors Perfectly - DIY Style

Adding a Second Story - Lots of Work

Compact Fill Under Slabs For Sure

Clay Soil Water Injection System for Shallow Foundations

Recessed Lighting Problems

How To Polish Marble - DIY EASY!!!​​​​​​​

Crawl Space Vents MythBusting

No translation today

Tim Carter
Founder - www.AsktheBuilder.com

Do It Right, Not Over!

Crawl Space Vents

crawl space vents

Crawl space vents like this one are supposed to allow air into and out of a crawl space. You need many to get great air flow. © 2018 Tim Carter

"The better idea, in my opinion, is to install a high-performance cross-laminated vapor retarder over the soil in the crawl space..."

Crawl Space Vents Tips

DEAR TIM: Should I keep my crawl space vents open year round? Are they really necessary? I live in Maryland and get all four seasons and temperature conditions. What's the latest crawl space ventilation technology? Stephen King, Lexington Park , MD

DEAR STEPHEN: There are thousands of people who wonder what to do with crawl space vents. Years ago when I installed them in room addition projects I often thought about the science behind these smallish vents. The actual net free space that allowed air to pass didn't see that big.

How Much Air Flows Through a Crawl Space?

Not much air flows through a crawl space that has just a few small vents.

I'd actually be in the crawl spaces on windy days and could barely feel a puff of air come through the vents. That led me to believe to this day that there was very little science backing up the minimum building code requirements that forced homeowners to install the vents.

Related Links

Crawl space Encapsulation Holds Promise

Crawl space Ventilation Tips - More is Better

Why Do Crawl Spaces Need Ventilation?

Here is the reasoning behind crawl space ventilation. Take a clear piece of plastic and place it over what appears to be very dry ground in your yard. Put some boards around the edges to weight down the plastic so no air gets under the large plastic sheet. If you can do this on a sunny day you will get almost instantaneous results.

I'll bet within minutes you start to see a slight fog develop on the underside of the plastic. Wait longer and the fog will turn to water droplets. The soil around your house and inside of crawl spaces is constantly liberating water vapor. Sunlight, wind and natural evaporation pull this moisture from the ground.

CLICK HERE to get FREE & FAST BIDS from local contractors who deal with crawlspaces.

Where Does The Water Vapor Come From?

The moisture content comes out of the soil. Tremendous amounts of water in the soil drive this water vapor engine.

People who live in the extreme arid parts of the Southwest USA have little water vapor escaping from the soil for much of the year. But even they have a monsoon season and the soil does get wet at certain times of the year.

People who live in the Northwest, Northeast, Midwest, and Southeast have water vapor streaming from the soil year round.

Where Does The Water From My Lawn Go?

The water vapor in the soil out in your yard readily escapes to the atmosphere. But under a crawl space, this water vapor can collect and begin to condense on the foundation walls and the subfloor structure.

If the subfloor is wood, the water can create mildew in short order and eventually the wood will develop wood rot.

What Was the Theory Behind Vents?

The theory for many years was to install the crawl space vents so that outside air could get into the crawl space and lower the relative humidity.

But I'm here to tell you that I have been in many crawl spaces with plenty of open vents and I felt as if I was in a damp cave. I just feel the vents do little good to circulate enough outside air into the confined crawl space.

What's the Best Way to Treat a Crawl Space?

The better idea, in my opinion, is to install a high-performance cross-laminated vapor retarder over the soil in the crawl space in addition to the building code-required foundation vents.

This vapor retarder needs to lap up onto the sides of the foundation and be secured to the wall with treated lumber or rot-resistant wood strips. Tu-Tuf is a great vapor barrier that's been around for years and works well.

CLICK HERE to order Tu-Tuf vapor barrier now.

The best vapor retarders come with a special tape that allows you to permanently seal any seams where the vapor retarder laps over itself or is cut around objects that stick up through the ground in the crawl space.

Do You Still Need Crawl Space Vents?

These vapor retarders block the water vapor and effectively cancel out the need for the crawl space vents. But be careful: My theory may not be synchronized with your local building code if you decide to build another room addition.

CLICK HERE to get FREE & FAST BIDS from local contractors who deal with crawlspaces.

Watch the Encapsulate Video

Watch this video to see what a crawlspace looks like that's covered with the amazing plastic sheeting.

Are Crawl Space Vents a Code Requirement?

Building inspectors may make you install vents. The issue is there are local customs and beliefs that may not be grounded in science.

Each city, town, or county is it's own little building kingdom and the building inspectors are the rulers. No matter what you do, always be sure to check with your local building department and obey the building code in your area.

What About Conditioned Air in a Crawl Space?

Pumping conditioned air into an encapsulated crawl space may be a good idea.

Some local building departments have adopted code modifications that allow a variation of my theory. They permit installation of the vapor retarders as I describe and do not require any foundation vents.

But if you do not install vents, you must insulate the side walls of the crawl space and the heating contractor must pipe in a small amount of conditioned air into the space.

Furthermore, the foundation insulation must be fireproof or if it is not, it must be covered with a fireproof material.

Do I Need Vents With Encapsulation?

No, you do not need vents if you encapsulate your crawl space.

The bottom line is if you install the high-performance vapor retarders correctly, you can forget about your vents. I don't care if you keep them open or closed, it will make little difference.

The proof of concept of this method of encapsulation is widespread. Any home that's got a full basement and has had waterproofing applied to the outer foundation walls and a great vapor barrier under the concrete slab is going to have a delightfully dry basement that's not damp.

The last home I built for my family had this. My basement was as dry as the Atacama Desert. It was never damp, no water got in and there was no mold.

The high-performance plastic used in encapsulation does the same job.

Is the Code a Minimum Requirement?

Yes, the building code is a set of minimum requirements. You can always build things better than what the code says.

Crawl space ventilation is another prime example of how the building code can be argued to be a set of minimum specifications. The building code is indeed a wonderful set of regulations, but it by no means offers a builder or a homeowner the best possible way to do a task.

There are countless examples of where builders can go beyond the code and do extra work or use better materials that will produce a home that will last hundreds of years instead of perhaps 40 to 70 years.

Is Water a Serious Problem?

Water is a serious menace when it comes to residential construction. It can create havoc and misery when leaks develop or even simple water vapor condenses on crawl space floor joists, attic framing or even exterior walls.

The best defense against water vapor problems in crawl spaces is to keep the water in the soil and don't let it enter the crawl space at all. The same is true for concrete slabs poured on grade.

Always install a high-performance vapor retarder under slabs to stop water vapor from seeping through the concrete.

How Do you Stop Water Flowing into a Crawl Space?

Install one of my linear french drains around the crawlspace if you really want to keep your crawlspace dry. This is just a gutter in the ground that collects and redirects the water in the soil.

The water moving through the soil is trying to get into your crawlspace. The narrow trench with the drain tile and gravel intercepts the water and redirects it to a low spot on your land. 

Get my Linear French Drain Streaming Video to see how to install this wonderful system.

Linear French Drain Streaming Video

Do your own DIY install of a Linear French Drain with Tim Carter's time-tested methods and materials! CLICK IMAGE TO ORDER NOW!

CLICK HERE to get FREE & FAST BIDS from local contractors who deal with crawlspaces. 

Column 543

How To Polish Marble

Polish Marble

A drill, or orbital polishing tool, outfitted with a flexible pad equipped with special silicone-carbide sandpaper allows you to dry polish marble. © 2017 Tim Carter

How To Polish Marble TIPS

DEAR TIM: I need to discover how to polish marble. In my house, there is some marble flooring that has seen better days. The scratches aren’t too deep, but they look bad.

I also had to cut a piece of marble and now have an ugly dull stone edge that needs to look like the high-gloss polished finish on the top. What’s the secret? Do I need all sorts of expensive equipment? Do I need to use water? Paul H., Santa Barbara, CA

DEAR PAUL: You’re in luck. The great news is that you’ll be able to get very nearly professional results in short order.

It may take a little practice, but I think you’re going to be amazed at how easy it is to take a dull stone edge and transform it to a highly polished surface that broadcasts the natural beauty of the stone.


No Expensive Tools

Guess what? You don’t need thousands of dollars of expensive equipment to polish marble. It’s quite possible that you have a simple tool in your garage or workshop that will allow you to achieve very good results.

At the bare minimum, you need a regular drill that has a variable-speed motor. All you need is a pad that fits into the drill chuck and the sanding discs attach to the pad. Here's a very inexpensive one that will work.

Sanding Disc Kits

There are many different sanding disc kits out there like this. You can shop around at Amazon to see which one is best for you. CLICK THE IMAGE TO ORDER THIS ONE OR SEE OTHERS.

If you have access to an orbital stone polisher, that’s all the better.

CLICK HERE to get FREE & FAST BIDS from local marble pros who can polish your marble.

Dry or Wet

Understand there are at least two ways to polish marble and other stones. You can use the dry method or the wet method. It’s hard to believe, but dry polishing works very well.

Dry = Dust

This method creates a fine dust, so you need to work in a place where dust won’t ruin things. When dry polishing, you need to wear both eye and breathing protection.

It’s not a good idea to ingest stone dust into your lungs, especially stone dust that contains silica.

Silicone-Carbide Paper

Using special silicone-carbide sandpaper that’s made for stone polishing, you can cut away successive ultra-fine layers of the stone until you have a high-gloss finish.

Sandpaper can be purchased that attaches with adhesive or hook and loop technology to a flexible round sanding pad. These pads attach to a regular drill or to a special mounting base that connects to a stone grinder.

At Least Five Grits

The polishing process starts with a coarse-grit sandpaper that has a low number like 24 or maybe 60 grit. As the grit number gets larger, the size of the silicone-carbide particles gets smaller and smaller.

Grit sizes march through the double digits, triple digits and beyond. I guarantee you that you’ll be using 120 grit, 220, 400, 500, 600 and over 1,000 grit.

Coarse First

The process starts by using a coarse-grit paper and cutting away a fine layer of the stone to remove the scratches or saw-blade marks. It’s mission critical that you cut away any and all grooves leaving a surface that may be rough, but all in the same plane.

If you leave small grooves, tinier than the thickness of a piece of hair, you’ll see these as you start to achieve a high polish.

High Gloss Cons

The high-gloss finish works to your disadvantage as you polish. The higher the gloss, the more light reflects off at a different angle from imperfections. This is why you now see the scratches in your marble floor as light that hits the scratches bounces away from you at a different angle than the light that reflects off the polished areas that are free of scratches.

CLICK HERE to get FREE & FAST BIDS from local marble pros who can polish your marble.

Orbital Sander Best

When you use the tools, you need to keep them moving. By that I mean that the drill or grinder will be spinning as it’s on, but don’t keep it stationary in one spot. This is why an orbital sander is the best tool. The sandpaper automagically moves around as it should with just simple back-and-forth motions.

orbital sander / polisher

This is a superb orbital sander / polisher. You can get the needed pads that hold onto the sandpaper. CLICK THE IMAGE NOW TO BUY THIS TOOL.

If you can't afford an orbital sander and must use a drill with a sanding disc, you need to slide it constantly across the surface of the stone so the sandpaper doesn’t cut a circular groove into the stone. Moderate pressure is all you need. Let the sandpaper do the work for you.

More Grits = Better Job

It’s best to use many different grits of sandpaper as you start to achieve the polish. You may start with 24 grit, then use 60, 120, 220, 320, 400, 500, 600 and then 1,000. If you skip a grit, you may end up with tiny scratch lines that show through the polish.

You can also use dry diamond polishing pads in the same manner. They also come in different grits with some grits that are as high as 3,000.

Polish A Scrap Piece

It’s best to test your skills on a scrap piece of marble first. Try to get a piece that matches your floor marble now so that you can see what it’s like.

Use some regular sand to scratch the scrap piece and then start to see if you can polish these scratches out like a pro. Once you've achieved success with the scrap piece, advance to your floor and to the cut edge.

Wet Sanding

Wet polishing or sanding has some advantages as the water helps keep dust down and it reduces the friction of the abrasive materials allowing them to last longer.

But the downside to wet polishing is the water on the stone causes the color of the stone to naturally deepen tricking you into believing you’ve achieved success. You may feel you have a gorgeous polished surface as you’re working because the color of the edge or surface matches that of the polished top.

Practice Makes Perfect

But when the stone dries, which can take a while depending upon the porosity of the stone, a dull or scratched surface shows up. It takes quite a bit of practice to achieve professional results using wet-polishing methods and tools.

CLICK HERE to get FREE & FAST BIDS from local marble pros who can polish your marble.

Column 879

Recessed Lighting Problems

recessed light transformer kit

Recessed lighting problems solved with kit | You can solve your recessed light issue in minutes working from inside the room. No repainting, no hassle! CLICK THE IMAGE NOW TO BUY THIS GREAT LIGHT. MULTI-PAKS are available.

"There are several reasons why your recessed lights turn off by themselves."

Recessed Lighting Problems Checklist


DEAR TIM: My husband installed some recessed lights in a family room we just built. I think he goofed something up. Every time I turn the lights on, ten minutes later they automatically turn off.

Also, I feel a draft through these fixtures. Did we make a mistake purchasing recessed lights? T. G.

DEAR T. G.: No. However, your husband very likely made several mistakes during the installation. Some of these are potentially very serious and could result in a fire.

FIRE HAZARD: Do not use the lights again until you have them checked by a professional or by your local electrical inspector. By the way, the electrical inspector DID look at the lights and wiring before they were covered, didn't he? I hope your flashlight batteries are fresh.

CLICK HERE to get FREE & FAST BIDS from local electricians who specialize in recessed lights.

Can Recessed Lights Produce Layers Of Light?

Recessed lighting is a very functional type of lighting. It can be used to create a border of light in a room, flood work areas with light, spotlight pictures or sculptures, and as general purpose lighting.

Personally, I prefer to mix recessed lights with other types of lighting fixtures such as indirect lights and hanging fixtures. This creates layers of light that can be peeled from one another to create different moods. 

Is the Thermal Protection Switch the Issue?

There are several reasons why your recessed lights turn off by themselves. All Underwriters Laboratory (UL) approved recessed lighting fixtures produced since the early 1980s must have a thermal protection switch built into the fixture. This device will turn off the light if the temperature inside the fixture gets too hot.

It turns off the light so the excess heat doesn't melt the plastic insulation on the electrical wires. If that insulation melts, arcing can happen and a fire results.

After the light cools down, the sensor resets itself allowing the light to turn back on.

If this is what's happening to you, your lights are telling you there is a problem that must be addressed.

Does Ceiling Insulation Trap Heat?

Your problem may be the ceiling insulation. Some recessed fixtures are allowed to be smothered in insulation. These often are designated IC fixtures.

Fixtures without this designation must have a minimum of 3 inches of clearance between the fixture, its junction box, ballasts and any insulation.

The National Electric Code specifically states that nothing should be installed above these fixtures that will either trap heat or block free air circulation through the fixture.

Is Light Bulb Wattage Important?

The wattage of the light bulbs is important. More wattage means more heat. The fixture is rated for a maximum bulb wattage.

In your case, your husband may have installed a fixture without the IC designation. If insulation is too close or on top of this fixture, the fixture will overheat. The problem may also be as simple as the light bulb within the fixture. If it is too large (too high a wattage), the bulb is creating too much heat.

Where is the Bulb Wattage Label?

Remove the bulb and look inside the recessed light housing. You should see labeling which tells you the maximum wattage of the bulb that you can place in the fixture. Be sure to use the approved light trims for the fixture as well. Intermixing trims between fixtures can cause you to lose your UL rating.

CLICK HERE to get FREE & FAST BIDS from local electricians who specialize in recessed lights.

Am I Supposed to Feel a Cold Draft Through the Light?

The draft you feel is unnecessary. Many manufacturers now make recessed lights that are completely sealed. Using these fixtures can save you money.

A single recessed light fixture that's not airtight can allow up to 2.5 million cubic feet of air to pass through it in one year. This type of air flow could waste up to 1 million BTU's of energy loss per fixture per year!

Are There Great DIY Electric Books?

If you're looking for a great book for installing simple wall lights to running wire in new construction and in existing walls and ceilings, then Wiring a House is the book for you.

Wiring a House by Rex Cauldwell

I own this book. Rex Cauldwell makes it easy to understand perplexing electric. CLICK THE IMAGE TO ORDER IT NOW.

This book, written by master electrician Rex Cauldwell, is sure to become an indispensable reference for anyone who wants a common sense guide to residential electricity. The photos and illustrations featured in this book are clear, crisp and easy to understand. 

If you're looking for a book with invaluable information on tools and materials, detailed instructions for how to repair or replace the wiring in old buildings and bring them up to code then you need a copy of Old Electrical Wiring. This 400-plus-page book tells you everything you could ever imagine about switch layouts, troubleshooting, and design change.

It also has an extensive glossary of old wiring terms and slang. Packed with drawings and illustrations, including pictures of old devices, this practical book will tell you whether an old electrical system should be torn out or repaired. This book will really help you.

Old Electrical Wiring by David E Shapirp

If you have an older home, this is a must-have book. CLICK THE PHOTO NOW TO HAVE THIS BOOK DELIVERED TO YOU BY SPECIAL COURIER.

CLICK HERE to get FREE & FAST BIDS from local electricians who specialize in recessed lights.

Column 091

Clay Soil Water Infiltration Inject Water

Clay Soil Settlement Water Injection TIPS

  • Soil can move up and down
  • Clay soil movement can be huge
  • Keep soil constant moisture level
  • Use drain tile to inject water or gravel tubes
  • CLICK HERE to Get Tim's FREE & FUNNY Newsletter!

DEAR TIM: I recently started a room addition project that has a crawl space. My builder insisted on installing a drain tile pipe on top of the foundation footer. Since there's no basement below my room addition, I feel that the pipe is a waste of money. Would you do this on one of your projects? B. F.

DEAR B. F.:  Hah, smart builder. You should hug him! The money you are spending for this pipe is a very wise investment. I feel that you're extremely lucky to have selected a knowledgeable builder.

Dual-Purpose Tile

Foundation drain tile systems serve a very important function. They're generally installed to provide a means to channel excess water away from your footing and foundation. However, if equipped with a simple optional pipe, they can also allow you to inject water along your footing and foundation. The value of this second point is frequently overlooked.

This is very important for structures that have shallow foundations and are in soils that have a fairly high clay content.

CLICK HERE to get FREE & FAST BIDS from local Builders who can construct your room addition.

Soil 101

Most houses or room addition projects are constructed on soil, not bedrock. Soil is made up of small deteriorated pieces of rock. However, these solid pieces only make up a portion of the total space that soil occupies.

The remainder of space is comprised of void areas. These empty areas can be filled with a combination of gas, air, or water in varying amounts. The closest thing I can compare it to is a sponge.

Because of these characteristics, some soils can cause tremendous problems if allowed to become alternately dry and wet. Certain clay soils expand when wet and contract when they alternately get wet and then dry.

Secret Soil Water Injection Video

Watch this video to show you how to get water fast into clay soils using a simple soaking hose. You can use this method if your builder didn't install a water injection pipe up from your drain tile.

Some clay soils react dramatically to moisture variations. They actually shrink and swell. Parts of Texas have clay soils that wreak havoc on homes that don't have fantastic foundations that can withstand the stress.

auger bit

Use an auger like this that you attach to a cordless drill. You drill down into the soil and then put small pea gravel down into the hole. CLICK THE IMAGE TO BUY THIS GREAT AUGER NOW.

CLICK HERE to get FREE & FAST BIDS from local Builders who can construct your room addition.

Swelling Sponges

You can demonstrate this very easily with certain types of sponges. These sponges tend to shrivel up when dry, however as soon as you wet them they 'puff' up. Can you imagine how your house or room addition reacts when this happens to the soil surrounding your foundation and footer?

Trick the Soil

There's an interesting thing about these soils. When subjected to an even, constant state of moisture content, they usually don't shrink or swell. They have a strong tendency to stay the same size.

The trick is to maintain this delicate balance. Geologists have a fancy name for this condition -- dynamic equilibrium.

For those of you who have decided to stay with me on this, here's the payoff. Your drain tile system allows you to easily maintain this state of dynamic equilibrium. Here's how it works.

Add Water To Tile

During dry spells or drought conditions, you can inject water into your drain tile system. This allows you to trick the soil in contact with your footing and foundation. It will have no idea that it hasn't rained in months.

To be able to inject water easily, you must have your builder install a 'T' fitting in your drain tile system. A pipe will extend to the surface from this 'T' fitting.

This simple pipe allows you to easily inject the necessary water to saturate the soil surrounding your foundation footer.

drain tile

You should be able to figure this out. The dashed blue lines are the riser pipe that sticks up above the level of the grass or soil. © 2017 Tim Carter

Garden Hose On Low

I usually recommend that people insert their garden hose into this riser pipe, turn the water on low, and let it run overnight. If you do this once a week during drought, or very dry conditions, you generally will not have any problems. You must monitor the water flow carefully if you have a basement. If your foundation is not waterproofed, too much water might possibly cause a leak into your basement.

Soil Maps

You can check your soil characteristics by using a soil map. These maps and descriptions are usually available for free at your county offices. They're also available online in many instances.

Often they can be found in the agricultural department or the engineering and building department. These maps are prepared by geologists who specialize in soils. I highly recommend that you obtain one prior to building your next home or room addition.

CLICK HERE to get FREE & FAST BIDS from local Builders who can construct your room addition.

Column 014

Fireplace Design & Dimensions

Fireplace design

Fireplace design details can be found in this amazing book. CLICK THIS IMAGE TO GET INSPIRATIONAL PHOTOS of GREAT FIREPLACES.

"Fireplace design details do not stop on the front face of the fireplace. The firebox must be shaped and sized perfectly so it doesn't smoke."

Revised September 2018 and featured in the September 30, 2018 AsktheBuilder Newsletter.

Be sure to check Tim's (not the AsktheBuilder one) smoking fireplace, featured in the January 31, 2021 Newsletter and his email in the Fix Smoking Fireplace - You May Have to Start Over.

Fireplace Design Details Checklist

  • Sides of firebox must pinch in towards back
  • Back wall of fireplace must be straight up for first 12 inches
  • Back wall must slope towards front for remainder of height
  • Width and height of opening MUST come from table below
  • Smoke shelf up above fireplace must be sized correctly - see below

CLICK HERE to get FREE & FAST BIDS from local masons to build your new fireplace.

Why Does a Fireplace Smoke?

A fireplace will puff smoke into a room if its design is flawed. The physics of smoke rising into a chimney is complex and several things must be done right so all the smoke from the fire exits your home.

It's important to realize there are three aspects of fireplace design you should be concerned about. The first is the inner shape and design of the firebox where the fire burns (firebox), the hidden smoke shelf area above the firebox, and the flue that rises up and through the roof.

Whitewash Fireplace Brick

Here's the fireplace once finished. Maggie and her daughter did a magnificent job and the hydrated lime will look this good for decades. Copyright 2017 Tim Carter

All three of these things MUST BE done correctly or your fireplace will send billowing smoke into your home. All you need to know is below.

Is Stone the Best Fireplace Material?

Stone fireplaces can be very durable. Granite and many other dense stones can make a gorgeous outer face of your fireplace. Here's one I saw in Southwest Harbor, Maine.

stone fireplace

This is a stunning fireplace made with real stone. The colors of the stones really make it visually attractive. The mason did a magnificent job of shaping the stones so they fit like pieces of a jigsaw puzzle. Copyright 2018 Tim Carter

The second design consideration is what the fireplace looks like to those who look at it while in the room. If you need inspiration and want to see stunning photos of some fantastic fireplaces, then order Fire Places: A Practical Design Guide for Fireplaces and Stoves

Related Links

How To Build a Smoke-Free Fireplace

Fireplace Design Basics - IMPORTANT TIPS HERE

Where is Free Fireplace Design Literature?

The Brick Industry Association has three excellent pamphlets about fireplace and chimney design and construction. I recommend you read these three things:

#19 Residential Fireplace Design

#19A Residential Fireplaces, Details and Construction

#19B Residential Chimney Design

Watch this short video to see properly sloped firebox brick:

CLICK HERE to get FREE & FAST BIDS from local masons to build your new fireplace.

What are the Best Fireplace Design Dimensions?

The best fireplace design dimensions are the ones that ensure your fireplace will not smoke. The Brick Industry Association is perhaps the most respected source of fireplace design criteria in the world.

Be sure your mason builds your fireplace according to the values in the following table. All the data is courtesy of the Brick Industry Association.
.

Fireplace Opening Width 24" 28" 32" 36" 40" 42" 48" 54"
Fireplace Opening Height 24" 24" 29" 29" 29" 32" 32" 37"
Firebox Depth* See Note Below 16" 16" 16" 16" 16" 16" 18" 20"
Rear Firebox Width 11" 15" 19" 23" 27" 29" 33" 37"
Rear Firebox Vertical Height 14" 14" 14" 14" 14" 16" 16" 16"
Smoke Chamber Height 19" 21" 24" 27" 29" 32" 37" 45"
Throat Height 8" 8" 8" 8" 8" 8" 8" 8"
Nominal Flue Size 8x12" 8x12" 12x12" 12x12" 12x16" 12x16" 12x16" 16x16"
Minimum Chimney Height 18' 22' 19' 21' 15' 19' 23' 23'

*Note: The firebox depth does not include the thickness of the facing material you see when looking at the fireplace.

The firebox design is critical. Here is a photo of a new masonry firebox in my own home. The rear wall of the firebox rises vertically from the floor of the fireplace and then begins to slant towards the fireplace opening just at the top of the gas logs. The sidewalls of the firebox are vertical. Note that the firebox is not the same width front to back. It gets narrower towards the rear of the firebox!

fireplace blueprint

This blueprint is nearly 100 years old. The architect knew EXACTLY how to design the fireplace, chimney, and firebox so it would NOT SMOKE. Use this as your North Star.

Can You Mix and Match Flue Sizes With Chimney Heights?

You can mix and match flue sizes with chimney heights. To properly size a flue, you must use a Nomograph.

flue size nomograph

This is a wonderful flue-sizing tool. It's a Nomograph from the Brick Industry Association's Technical Notes #19. Copyright 2018 Brick Industry Association

What is the Best Flue Size?

It's always better to use the smaller flue size when you have two choices. When using the smaller flue size, you will be required to raise the height of the chimney.

Do Tall Chimneys Draw Better Than Short Ones?

Taller chimneys draw better than short chimneys of the same flue size.

Is the Smoke Chamber Height Critical?

The smoke chamber height and design are very critical. You generally can't see this space as it is hidden above your fireplace damper.

How High Up Should the Damper Be Above the Fireplace Opening?

The bottom of the damper should be a minimum of 8 inches above the top of the fireplace opening. This part of the fireplace is called the throat. If your damper is not at least 8 inches above this spot, you will have smoking problems for sure!

I urge you to read the pamphlets I have mentioned from the Brick Industry Association. They have excellent illustrations which will enable you to clearly see what I am trying to explain! The following table and its values are courtesy of the Brick Industry Association.

What is the Best Mortar for the Beige Fire Brick?

The best mortar for firebrick is fire clay. It's often called refractory cement and it rated for temperatures above 2,000 degrees F.

fire clay

This is fire clay. It's a fine powder that you mix with water. CLICK THE TUB to have it delivered to your home in days.

Fire clay is a fine powder you mix with water to the consistency of gravy. You dip one edge of the firebrick into a pot of the wet fire clay to coat it. You don't want large wide joints. The joints between firebrick should be no greater than 3/32nds of an inch!

Column B110

Compact Fill Under Slab

The dirt and rock in the center of the future garage has been compacted by Mother Nature for eons. But the trenches next to the new foundation require special care by the builder. Photo Credit: Tim Carter

The dirt and rock in the center of the future garage has been compacted by Mother Nature for eons. But the trenches next to the new foundation require special care by the builder. © 2017 Tim Carter

Compact Fill Under Slab TIPS

DEAR TIM: My new home is under construction. I'm in a disagreement with my builder about what's going to happen under my garage slab. Right now there's a trench around the inside on all four walls where they had to dig to install the foundation.

The center of the garage area is undisturbed dirt and rock that's been there since the dinosaurs roamed. My builder says he's just going to fill it in with the dirt he dug out and all will be well.

I think that's a mistake. What should be done? If he does use the dirt is there a special way to install it? Are there other things that can be done? What would you do? Tom M., Binghampton, NY

DEAR TOM: Un-compacted fill under concrete slabs of any type is a recipe for disaster. The slab could be for an entire home, it might be an exterior patio slab, a front porch slab, a driveway, etc. Concrete is an amazing material, but it has an Achilles heel.

CLICK HERE to get FREE & FAST BIDS from local concrete slab contractors.

Concrete Weakness

Concrete has tremendous compressive strength. This means if you squeeze it, it often takes 3,000, 4,000 or more pounds of pressure per square inch to get it to crack and fail. But the exact same concrete mix, when you stretch or bend it, engineers call this tension, has on average only one tenth the strength as it has in compression.

Soil Settles

If un-compacted, or poorly compacted, soil or fill sinks under a slab you end up with a hollow spot. If you drive on this concrete and apply pressure to it, the concrete tries to bend or stretch to conform to the hollow spot. The result is almost always a crack and the concrete slab drops down. I see photos of this unnecessary damage all the time.

Add Water to Compact

You're correct that the dirt in the center of the garage area is solid fill. Mother Nature, over time, does an amazing job of compacting soils. Rainwater plays an important part of this process. Adding water to fluffed or disturbed soil will go a long way to accelerate natural compaction of soil particles.

When I was still building on a daily basis, I would go to great lengths to water the fill soil in utility trenches and around the outside of a new home to get the soil to settle faster. Many builders don't take this extra time.

Engineering Specs

Your builder can use the soil he dug out of the ground to fill the trenches back in, but to do it right requires lots of work. A soil engineer can develop a compaction plan that speaks to the amount of soil that can go in the trench at a time, the fancy name for this is a lift, what tool needs to be used to compact the soil and how long the tool needs to be used to get the soil compact.

When fill dirt is placed in large amounts for highways and other projects, the fluffed dirt is brought in, spread out in thin layers and then compacted by large machinery designed to compact dirt and rock. The moisture content of the fill dirt is important as is every other facet of the operation. The same process can be done for smaller jobs like yours.

Your builder has all sorts of options if he doesn't want to go to all that work. Each has to be studied to see which is the most cost effective.

Concrete Block Ledges

One option is to lay concrete block up off the interior ledge of the footers to just below where the concrete slab will be. These can be spaced at 4-foot intervals around the interior foundation walls. The concrete slab will rest on these and provide solid support down to the footer. 

foundation fill

Here's a quick drawing I made showing the concrete block ledges. This is a side view showing just one of the supports. You lay block up off the footing so it comes to the bottom of the slab. You place these piers about 4-feet-on-center around the entire slab. Fill the void spaces with self-compacting gravel like the green pea gravel you see. © 2017 Tim Carter

CLICK HERE to get FREE & FAST BIDS from local concrete slab contractors.

Rebar For Sure

The slab will have to have steel rebar, no less than one-half-inch in diameter in both directions spaced at 2-foot centers to make this work. The steel bars need to be placed so they line up with the concrete block pilasters.

The slab then acts as a bridge between the pilasters and the compact dirt in the center of the garage.

This is 1/2-inch rebar. The rods are almost always 20-feet long. Hand and pocket knife for scale. © 2017 Tim Carter

Magic Gravel

The easiest fix to the situation in my opinion is to just fill the trenches with self-compacting gravel. This is what I used to do on my jobs. You may be lucky to have a gravel company that has a truck equipped with a conveyor belt that will shoot the gravel in place so very little work has to be done by hand.

I was lucky to build in an area where there was abundant rounded sand and gravel. This was created by the massive continental glaciers that covered much of the northeast USA and the upper Midwest about 15,000 years ago. When all that ice melted on it's own with no help from us, it created untold cubic yards of this wonderful rounded gravel.

Pea Gravel

I preferred to use washed pea gravel for filling trenches like this in garages. This gravel is the size of small green peas and it naturally compacts as it's put into a void space. Visit a few local gravel pits in your area to see if they have this small rounded gravel.

You can also fill the trenches with a gravel product that's a mixture of washed sand and different sizes of rounded gravel. This product requires water to get it to naturally compact and you need to install it in layers no thicker than one foot at a time.

If you have to use crushed stone, be aware that it requires mechanical compaction so the pieces of gravel interlock. This extra step is costly and it must be done correctly so your slab never fails.

CLICK HERE to get FREE & FAST BIDS from local concrete slab contractors.

Column 1102

Matching Paint Colors Perfectly

color match paint

Color match paint is possible using a Color Wheel or Color Computer. You can also use a handy hand scanner and phone app. (See Below) If you want to use this older color wheel, you dial up the color you need and it shows you the colors you need to combine to get you there. CLICK THIS IMAGE NOW TO BUY THIS INEXPENSIVE TOOL to create basic colors.

"If you decide to attempt to color match paint yourself, the process requires patience, excellent lighting, soap and water, and lots of luck. You can do it."

Color Match Paint Tips

  • try using a color match paint app first
  • take a color chip sample from wall to paint store
  • last resort is to try blending paint at your home to get the match

DEAR TIM: I need to color match paint in my living room. I recently modified my curtains. This required patching numerous small holes. It's now time to match the flat wall paint adjacent to these patched areas.

I've never had luck in getting an exact color match from the paint store. The shades are close but you can always see the painted area.

Is there a way to match the color so I don't have to paint the entire room? Have you ever had success in matching colors in a situation like this? Vivian S., Cincinnati, OH

DEAR VIVIAN: Paint matching has driven many people close to the edge of insanity. I recently met a frustrated woman in a paint store who said that she had over fifty small cans of paint in her basement. These cans represented failed attempts at trying to perfectly match a wall color.

Free & Fast Bids

CLICK HERE to get FREE & FAST BIDS from local painters who can match paint perfectly.

How Do Paint Matching Machines Work?

A paint matching machine scans an actual paint sample and reverse engineers the amounts of pigment it would take to create the color it sees.

Matching existing paint colors can be done. If you expect a paint store to do it for you, you need to bring in a clean sample of the paint color.

Paint stores have amazing optical scanners that can compute the needed pigments to match the sample you provide. Usually, the sample needs to be about 1.5-inch square.

Related Links

Paint Tinting Tricks

Paint Color Match Story

Are There Color Match Paint Apps?

Yes, there are color match paint apps for your smartphone! The last time I checked, there were over five of them.

Sherwin Williams also makes a small hand-held scanner that you press against a painted surface and it gives you the best color match for one of their paints. It's called the Color Muse.

This is the Sherwin Williams ColorSnap Match tool and phone app. CLICK THE PHOTO now to have it delivered to your home.

Watch this video to see how it works.

How Long Does it Take to Match Paint?

A paint store with this equipment can give you a very close match within minutes. Often they'll mix a small quantity of paint, open the can, put a small amount of the new paint on your sample and use a blow dryer to see how well it matches.

How Do You Match the Paint Gloss?

The same color formula will render different shades of a color depending upon the sheen or gloss of the final paint. Keep that in mind!

How Do you do DIY Paint Matching?

If you decide to color match paint yourself, the process requires patience, excellent lighting, soap and water, and lots of luck. You can do it.

I've had great success in the past. Recently I successfully matched a nine-year-old light beige color in a client's living room.

I did this by getting a slightly darker shade of beige than what was on the wall and I started to mix different small amounts of the paint with pure white paint until I got a perfect match. I was very lucky.

IMPORTANT TIP: The color or hue of an object is actually generated by the light that's illuminating the object.

Sunlight produces all of the wavelengths or color possibilities that we can see with our naked eye. If you live in a place with low humidity, it's a cloud-free day and the sun is high in the sky, the colors you see of things outdoors are pretty much the true color of that object.

What are The Golden Hours?

The golden hours are referred to that time of day just after the sun rises and just before it sets. Reds, oranges, and yellows are more vibrant at this time of day.

Let's say you're standing outside at noon on a cloud-free day at the Grand Canyon. You're blown away by the rocks and sky.

But you fall asleep and take a nap waking up just as the sun is about to set. All of a sudden the reds and oranges in the rock formations are far more vivid.

You're in what's known as the golden hour.

What's happening is the sun's light is now passing through lots of the atmosphere at such a low angle in the sky and the blue and green light rays of natural light are getting absorbed by the atmosphere. Only the reds, oranges and yellows of the color spectrum are making it through all the air and they enhance anything that's red, orange or yellow!

The same phenomenon happens at sunrise for about an hour.

Can Artificial Light Mimic Sunlight?

Artificial light created by any type of light bulb has a hard time mimicking all the wavelengths in sunlight. It's really hard to mimic Mother Nature.

Most light bulbs only put out part of the entire visible light spectrum.

As a result, an object viewed in natural sunlight outdoors at noon as we talked above can look very different when observed under artificial light (paint store fluorescent lights, living room lamps, etc.).

CLICK HERE to get FREE & FAST BIDS from local painters who can match paint perfectly.

Do Sodium-Vapor Lights Ruin Color?

Yes, sodium-vapor lights ruin many colors.

Parking-lot lights are good examples. Have you ever noticed how your car sometimes appears a very different color at night under harsh sodium vapor lights?

Many parking lot lights are sodium vapor or halogen. The trend now is to LED bulbs. All of these tend to create a very narrow band of color they produce.

Is Flat Paint the Easiest to Color Match?

Yes, flat paint tends to be the easiest paint to color match.

The sheen or gloss of paint also makes it very difficult to match colors. It's much easier to match flat colors than those with gloss.

High-gloss paints are very unforgiving. It's almost impossible to touch up a defect using the same high gloss paint just days after a new paint job!

Should I Wash Surfaces Before Color Matching?

Yes, you first need to wash surfaces with soap and water before trying to color match them. This process is necessary even if you decide to repaint the entire room. Paint should always be applied to a clean, dry surface.

The washing will remove accumulated dirt, grease, and smoke particles. It is virtually impossible to get an exact match on a dirty wall surface.

matching paint colors

Grab the paints that get you close, some disposable cups and measuring spoons and you can start to blend paints until you develop your own custom formula.

Get A Close Match First

Once the walls are clean, proceed to your local paint store and ask for numerous color chip samples that are close or match your wall color. Take these back and hold them against the walls in different spots on a sunny day.

Attempt to select a color on a wall that receives indirect sunlight. Never hold a chip on a wall illuminated by a sunbeam. If you're lucky, a color on one of the chips will match closely.

How Much Paint Should I Buy?

Proceed to the paint store and purchase the smallest quantity of flat paint that can be custom tinted to the color chip you feel is the closest match. Some paint stores or hardware stores can do this with very small amounts of paint saving you money.

Should I Start With A Darker Color?

Yes, when doing DIY color matching, start with a slightly darker color.

I've had the best luck matching colors when I select a color that is slightly darker than the color I am trying to match.

Purchase an additional pint or quart of plain white paint at the same time. You'll need this to adjust the color back at your house.

Does Paint Dry Darker?

Yes, paint has a tendency to dry darker than when first applied.

Apply a small amount of the pre-mixed paint to your wall. It may look like a perfect match when you first apply it. Many flat paint colors deepen as they dry.

The paint tends to dry darker because as the water in the paint evaporates the color pigments concentrate causing this phenomenon. If the paint dries darker, that's fine.

You'll now start to make micro-batches of paint on your own using your plastic measuring spoons and paper cups.

Measure Accurately

Take a teaspoon of the tinted paint and a teaspoon of the pure white paint and mix them together in a paper cup. Always rinse and dry the measuring spoon completely before you scoop paint from a different can.

Apply this to the wall and allow it to dry for twenty minutes. The use of a hair blow dryer will accelerate the drying time.

Different Recipes

Adjust the proportions of white paint and colored paint if you don't get a perfect match. Keep track of the test paint areas and the proportions of paint that you mix with one another. With a little luck and lots of patience, you'll probably get an exact match.

CLICK HERE to get FREE & FAST BIDS from local painters who can match paint perfectly.

Related Articles:  Color WheelPaint Colors - Tips & TricksPaint Colors - Mix to Match

Column 208

Adding a Second Story

adding a second story

Adding square footage to your home by going up instead of out presents many challenges. © 2017 Tim Carter

Adding a Second Story TIPS

DEAR TIM: My current 1,100 square-foot single-story three-bedroom one-bath home is not large enough for my growing family. To get a somewhat larger new home that barely meets our needs costs $200,000 more than what I can sell my existing home.

It seems as if I need to stay put and add space here. My lot is small so a second story seems the only way to go. How hard is it to add a second story to a home? What do I need to think about? Maria E., Sacramento, CA

DEAR MARIA: It's not too hard to add a second story to a home. You have quite a bit to think about to put it bluntly. There are so many things to consider, I almost do not know where to start.

Old Houses = Big Bargains

Fortunately, you've already done part of the mathematical analysis that has illustrated a point many people overlook. You can almost always buy square footage in an existing or used home for far less than new-home square footage.

A new home in a great location on a nice lot can be very pricey. Older existing homes in great neighborhoods often can be fantastic bargains when you simply compare them to a new home if you find out how much each one is selling for per square foot of finished living space.

CLICK HERE to get FREE & FAST BIDS from local remodeling contractors that can add a second story.

Zoning Hassle

The first thing you need to do in my opinion is to visit your local government zoning office. They should be able to tell you if you're permitted to add a second story. Ask them about total structure height.

Many building and zoning codes only allow the top of the structure to be so many feet above the grade level. For example, the Ohio village I used to live in didn't allow the top of any part of the house's roof to be higher than 35 feet above the soil around the house.

You need to do some fast quick calculations to see what the total height of your house would be with a second story. If there are existing homes in the neighborhood with them, you shouldn't run into any zoning restrictions.

Subdivision Restrictions

You may have to visit your local recorder's office at the same time to see if any subdivision restrictions were recorded with your property deed or plat.

As crazy as it sounds, maybe the developer of your land included restrictions that simply do not allow second-story additions. This might be very common in the desert southwest and other areas where a taller home might block the view of another homeowner.

Get Current Remodel Costs

If you determine you can add a second story, it's time to talk with at least two remodeling contractors who have done this type of work.

Interview a few and ask them to provide addresses of several homes where they have added a second story. Ask them what they feel the current cost per square foot is to add the necessary room to your home.

Guesstimates

Be sure to ask what the extra cost might be to add a full bathroom. Remember, these are just guesstimate numbers and you should be prepared to pay as much as 20 percent more as the plans are developed and challenges of your job are addressed.

Do Simple Math

Using these very rough preliminary numbers, see if you can afford to add the amount of space you need.

Let's say you feel you need 800 more square feet of space. If the current cost for a second story in your market is $175.00 per square foot, then you're already at $140,000. (2017 numbers) Add an additional $8,000.00 more for the full bath, you're looking at a possible cost of $148,000.00. Then you need to add the 20 percent contingency. You're now just south of $178,000!

Can you borrow this much comfortably? Visit your local banker or mortgage company and ask them to help you with a quick refinancing analysis.

Pre-Plan Checklist

If you qualify for a new loan, you should now start thinking about the actual project. Here's a partial list of the things I see as issues:

  • Will the current exterior walls support the load of the second story?
  • Is the foundation strong enough to carry the new load?
  • How will the plumbing from the new bathroom connect to the existing?
  • How will the new staircase between floors impact the existing floor plan?
  • Is it better to install separate heating and air conditioning for the new space?
  • Do you have to install a new electric service and panel for the added electrical loads?
  • Does the contractor know how to minimize sound transmission between the new and old spaces?
  • Is it wise/affordable to add special storage or possibly attic trusses in the new roof to gain bonus space?

How would you like me to build your new home? It's probably impossible for me to fit your job into my schedule, but I will gladly share hundreds of my tricks and building secrets with you and your builder. Check out my New House Specifications.


If you're lucky and the remodelers you speak with are experienced, they may add several more things to my abbreviated list.

CLICK HERE to get FREE & FAST BIDS from local remodeling contractors that can add a second story.

The Reality

Let's say you are a go to do the job. You can get the money, you can add a second story. It's nothing but rainbows and unicorns.

Here's the reality. Nothing could be more disruptive than ripping off the roof of a home, building a new subfloor, second-story walls and then a new roof.

I've read stories where some very skilled remodeling contractors were able to disconnect the roof of an existing home, have a crane lift it up and set it aside while they quickly build the new floor and set pre-fabricated exterior walls.

This all happened within a 36-hour period so the house would not get rained on while the roof was off.

Even with this kind of blitzkrieg work, it's enormously disruptive. If you do it the old way and it takes days to tear off the old roof, build the floor and walls and then the new roof and it rains at some point, well, you get the picture.

Major Disruption

Furthermore, as you begin to proceed with plans, it would be very wise to speak with two or three homeowners who went through the same process of raising a roof. Ask them about how they dealt with the disruption.

The best questions to ask might be what they would do differently if they could rewind the tape and play the experience over once more. You just might be surprised with their input.

CLICK HERE to get FREE & FAST BIDS from local remodeling contractors that can add a second story.

Column 475