Plumbing Preventative Maintenance

Plumbing Preventative Maintenance is Easy - Saves Big Bucks

I received two frantic phone calls in less than twelve hours several days ago. Both calls were about plumbing emergencies. The one young woman was so flustered she hung up on me the instant she discovered my Google Maps listing was about drawing plumbing plans, not doing plumbing service calls. I speculated a pipe had burst and water was flooding her home once the line went dead.

The second call was from the young woman who attends my church. I’ve shared other tales about her home-repair challenges in past columns. This time the hot water in her home would only last for ten seconds. Ice-cold water would then flow from the faucets and her sole shower head. The last thing anyone wants in New Hampshire is to take a cold shower in February.

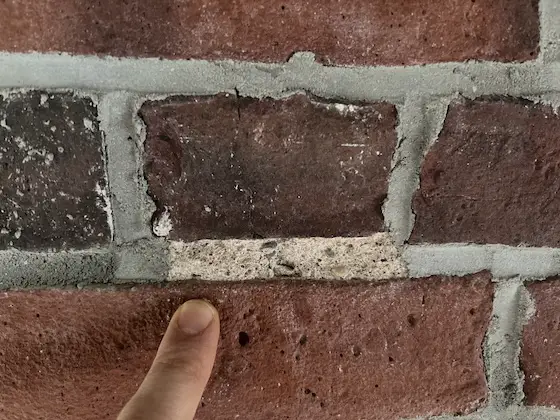
A Photo Reveals Mixing Valve

I asked her to send me a photo of her boiler room so I could start to diagnose the issue without a house call. I saw a pesky mixing valve in the photo. These valves blend cold water with the scalding hot water produced by the boiler. Without one, your skin would look like that of a lobster in a cooking pot. Second-degree burns would follow in minutes. Mixing valves malfunction if they’re not exercised on a regular basis.

The young woman admitted she was pretty much clueless as to how all the plumbing worked in her home. I shared that the fix was easy and she breathed a sigh of relief. She thought she might need a new boiler.

Once the emergency was over, I pondered how these two calls could save millions of dollars should you, and every other reader of this column, get up to speed on how to prevent expensive plumbing service calls. A plumbing service call can start at $300, and be as high as $800.

It’s important to realize I’ve been a master plumber since age 29. The first place to start is your incoming water supply line. The water pressure inside your home is almost always greater than 40 pounds per square inch. Should a water line rupture, hundreds of gallons of water can flood your home in minutes. It’s imperative you know how to shut off the main water valve to stop the flow of water and that the valve works.

The biggest mistake most homeowners make is the failure to exercise valves. Exercising valves means to turn them on and off. You exercise your faucet and toilet valves each day by using the fixtures in your home. This is why those valves turn on and off with ease.

You need to do the same thing with shutoff valves. Set a calendar reminder on your phone to turn on and off your main shutoff valve once every three months. The pesky ones are old-fashioned gate valves that have a circular handle. The best shutoff valves in my opinion are ball valves. These have a straight handle. You just rotate the handle 90 degrees to get it to open or close.

1 inch ball valve

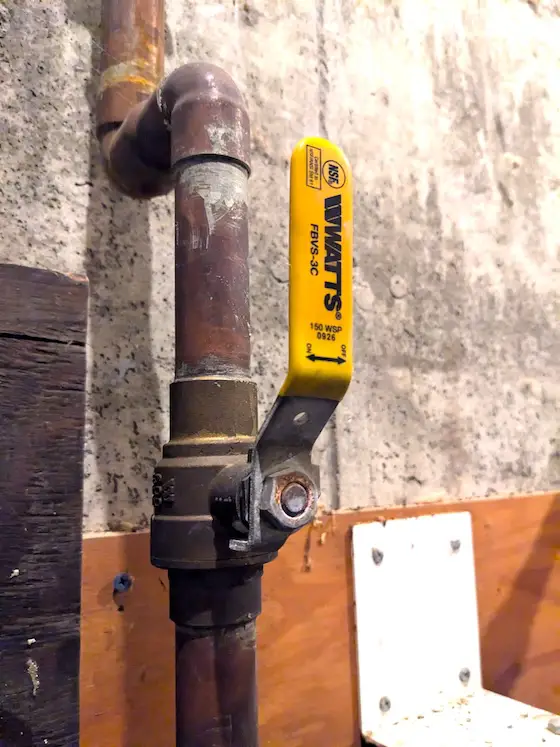
When was the last time you tried to turn off and back on a shut-off valve like this or the one under your toilet? Copyright 2025 Tim Carter

It’s not a bad idea to exercise all shutoff valves under sinks and toilets, but that can be a pain in the you-know-what. Shutting off all the water in your home using the main valve will stop the flow until such time as the repair can be made.

Tool rental businesses allow you to make emergency repairs that will save you hundreds of dollars. You can repair burst copper water lines using a press tool that makes water-tight connections using special copper fittings that have internal rubber o-rings. I checked moments ago and these tools can be rented for $50 for an entire day. I have a video on my AsktheBuilder.com website showing how to use a press tool.

Simple hand tools can also be used by you to make repairs to PEX and CPVC water lines. Watch a few videos on YouTube.com and consider purchasing these tools to have on hand.

Drain lines are not as important as water lines in my opinion. Leaks in drain lines can be stopped by not using the fixture. Clogs are perhaps the biggest issue with drain lines. Hundreds of millions of dollars are given to drain-cleaning companies and plumbers each year by homeowners like you. Much of this can be prevented.

For starters, only flush bodily waste and toilet paper down toilets. Avoid flushing feminine hygiene products and the dreaded flushable wipes. I recorded a very popular video that you can watch on my website to see what happens when you flush wipes. It’s okay to use wipes, but dispose of them in a sanitary waste can in your bathroom just as you’d get rid of a soiled infant diaper.

Grease is a huge issue. You can prevent grease clogs by wiping all liquid grease from dishes and cooking pots and pans before washing them. I save not-so-dirty paper towels and use these to sop up grease. I then throw away the paper towels in the trash.

Grease buildup in drain pipes is expensive to remove. Plumbers need to flush the drains with enormous amounts of very hot water. It’s an expensive service call.

I pour 25 gallons of boiling water down my kitchen sink every three months to ensure my pipes have no grease buildup. You might try doing the same thing.

Column 1600

Decorative Pavers for Garden

decorative paver in garden small stones

This medallion was created using simple rounded stones, cement stucco, and an artistic flair. Imagine what’s possible on your patio, driveway, or garden pathway! Copyright 2025 Tim Carter

Decorative Pavers for Gardens, Sidewalks, Driveways, and Patios

Last fall I traveled with my wife across the USA. We arrived in Los Angeles, CA and a few hours later got to hold our newest granddaughter. It was magical to say the very least.

My youngest daughter inherited her mother’s love of gardening. It was decided a day trip to the magnificent Huntington Botanical Gardens located in San Marino, CA was in order. The adventure was the highlight of the trip. I can’t begin to share with you the tranquility that washes over you when you meander through paths surrounded by countless plants of all types and sizes.

Our circuitous route led us through the Japanese Garden. I was attracted to a large. paved patio at the Freshwater Pavilion. Beneath my feet were hundreds of thousands of small rounded stones. Skilled workers created a mosaic pattern carefully orienting the oblong colored stones. These stones were set in cement stucco that bonded them to a large concrete slab.

I blinked my eyes and was taken back over forty-five years. Our kids weren’t yet a glint in my or my wife’s eyes. My bride of just a few years asked me to build her a goldfish and lily pond in the backyard of our second home.

The Goldfish Pond

I was filled to the brim with energy as my 30th natal anniversary was years away. I’d come home from work and then work until dark doing all that was necessary to create the pond.

We were fortunate to have enough fall on the lot allowing me to install a drain in the pond. This would make cleaning it a simple chore. My wife asked me to create a kidney-shaped water feature. Steel-reinforced concrete would be the perfect material.

My wife showed me a magazine photograph of a garden path that was created using small colored stones set in mortar. I knew I could reproduce that look.

I hand-mixed the concrete making it quite stiff. I was able to shape it with no problem. It helped to work in the cool of the evening.

I visited a local masonry supply business that sold sand and gravel. They had an assortment of colored, rounded glacial gravel that would be perfect. I purchased a small sample and my dear wife approved them. Many were the size of normal green or red grapes.

Cement Mortar and Cement Paint

Bonding these small stones to the concrete was easy. I mixed medium sand and Portland cement. My mix was 3 measures of sand to 1.5 measures of Portland cement. I added enough water to make stucco the consistency of applesauce.

I’d only mix up enough stucco to last me one hour. Before I applied it to the concrete, I spritzed the dry concrete with water. Years later I discovered that it would have been even better to apply a thin coat of cement paint to the concrete just before applying the stucco. Cement paint is made by mixing Portland cement with clear water until it’s like a thin paint.

cement paint poured on old concrete

This is cement paint being installed to bond old concrete to new concrete.

CLICK HERE to see cement paint being installed to bond new concrete to old concrete.

I would trowel on a 3/4-inch-thick layer of the cement stucco to an area about 1-foot square. My wife would hand me the stones and tell me where to position them. We were a great team and she made sure the colors were random. My only regret is I never took photos of the process or the finished job.

What can you do at your home to add some color and texture in your outdoor paving? You are so much luckier than I was. I had one photo as a guide. You have countless photos on the Internet. You can search design websites or use any search engine’s image search to help you find what you like.

You’ve also got amazon.com or local landscaping businesses that often stock lots of different colored gravel. You can purchase bags and boxes of colored glass beads to set in stucco. Some are crystals that will glitter in the sunlight.

Imagine covering 1-foot square concrete pavers from a big box store with colored stones, glass beads, or even weather-resistant ceramic tile. These finished blocks can be set into a new concrete patio or sidewalk. You can use them as simple stepping stones in a miniature garden.

Your possibilities are endless. Spend several hours scouring the Internet for inspiration. Visit local public gardens to see if they have paving like what I saw in California. The time you spend getting the exact look that dazzles you will pay off in spades.

Column 1599

Interior Wall Covering Ideas

hand painted tile backsplash

This is a custom hand-painted tile backsplash. The owner had a local artist paint the white tile with durable oil-based paint. Copyright 2025 Tim Carter

Interior Wall Covering Ideas - Maps, Custom Tile Murals & More

Two days ago I was skim coating hundreds of square feet of new drywall in my son’s basement. I added water to the thick drywall joint compound so it was the consistency of latex paint. Investing in this extra step makes the new drywall satin smooth because the paper face of the drywall ends up with the same texture and porosity of the taped joists and filled screw heads.

I thought about how the walls in his basement could come alive in any number of ways. Many people hang paintings or posters to break up the monotony of a painted wall. That works, but framed artwork can put a serious ding in your budget.

As the day wore on and my shoulder started to ache, I thought about what I did when I was a little younger than my son. My lovely wife and I purchased a three-story five-bedroom home that needed lots of tender loving care. We painted the entire house inside and out.

My wife loved wallpaper. I installed a pattern that was from the famous Williamsburg Colonial collection in our entrance hall and the stairs leading to the second floor. Many visitors and friends complimented us on the choice.

The plain walls in the dining room were transformed by installing a simple chair rail moulding. The room already had a large crown moulding where the walls met the ceiling. I painted the walls below the new chair rail and installed a different wallpaper above the moulding. Once again, plain walls became eye candy.

The third floor of this grand house had two bedrooms. I staked a claim in one of them making it my man cave. The room had a sloped wall created by the roof rafters. Many Cape Cod houses built after World War II have this feature.

Geology was my college major. In addition, I had always loved maps of any type. I remembered a huge 5-foot-tall by 10-feet-long color geologic map of the USA that adorned a wall in one of my classrooms. I ordered the same map by mail from the US Geological Survey. There was no such thing as online ordering back in the 1970s.

With great care and help from my wife, we glued this map to one of the sloped walls in my office. This simple two-hour project brought a smile each time I entered the room. The range of colors in the map, as well as the symbols and legend, added a wow factor to anyone that visited. It was dramatic to say the least.

geologic map wallpapered to slanted wall Tim Carter House Cincinnati

Here's the actual map in my office. I can't believe I found this old photo that's almost 50 years old! The photo was probably shot in 1977.

We customized our kitchen with the help of my wife’s younger sister. She had an artistic flair, and volunteered to hand-paint some yellow flowers on blank white 4x4 tiles we used for the countertop backsplash. She used the same oil-based paint I applied to the interior doors and trim in the house. That paint was durable and could withstand being washed.

All of the things I’ve just described can be done by you in your home. The possibilities are endless. I spent a few hours online and was amazed at how easy it is to make your home something that is unlike anything else in the world.

For starters, there are websites that will take your favorite high-resolution photographs and transform them into wallpaper. You can control the size of the scene on the wall. Imagine that amazing sunrise or sunset photo you took on vacation! You can relive it every day in your home on a particular wall.

You can do the same thing with ceramic tile. Companies have tile murals ready to purchase or you can create your own by uploading a high-resolution photo you have. You get to select the tile size and the finished size of the mural.

My son-in-law purchased a condominium this past summer. The previous owners hired a local artist to paint a lighthouse sitting on a rocky Maine shoreline. This painting was done on the wall behind the kitchen sink. The artist signed her work in the lower right corner for that personal touch. The vibrant colors bathe the kitchen in tranquility. You can almost hear the waves crashing against the rocks!

Your takeaway should be just one thing. Think about how much time you spend inside your home. Wouldn’t you be in a better mood if the walls, and even the ceiling, had on them scenes or images of the things that bring you the most happiness?

One easy way to do this is to mimic what’s in my dentist office. The husband-wife team love the outdoors. A large flat-screen television is in the waiting room. They have a series of photos they took on vacations that appear on the screen. Each photo is there for about ten seconds then the next one appears. This might be a simple way for you to make one, or more, of your rooms to be yours and yours alone.

Column 1598

Garage Width for 2 Cars

2 car garage in winter

This appears to be a spacious two-car garage. It is so long as you never store anything against the walls or in between the cars. Copyright 2025 Tim Carter

Garage Width for 2 Cars - 26 Feet Minimum 28 is Better

Do you park your car or light truck in a garage? I do both here at my home. I didn’t build the house I live in but hope to build my final dream home with my dream garage in the next few years.

I grumble each time I back my Ford F250 Super Duty 4x4 into my bay. The architect who designed my home made the same mistakes that have been made by thousands of other architects over the past 100 years. Allow me to explain.

Eight months ago I stopped by a new home construction site. The foundation of the house and garage had just been backfilled. The carpenters had yet to arrive. I could see the 16-foot-wide notch for the two-car garage that faced the street. The architect who drew the plans must have been related the the one that designed my flawed garage.

Viral Video

I decided to record a short 50-second video showing the flaw. Much to my surprise this video has gone viral on YouTube. It’s been watched 207,000 times as I type this sentence.

The attached garage at this new house is only 20 feet wide and about 22 feet deep. My guess is you’ve never taken the time to measure the average outdoor parking lot space. Most are 9 feet wide and 20 feet deep. You know from experience that if a car is in the next space and centered, you’ll bang your door against the other car if you try to open it all the way.

A 16-foot garage door cheats each slot out of one foot. Each car in this situation gets only 8 feet of width. It’s a very tight squeeze to get in and out of a car or light truck when both are parked next to one another in a garage like this.

I was stunned by the thousands of comments my video received. Most say the garage is perfect and that I’m a whiner. They didn’t seem to pay much attention to the point I touched on about having garbage cans, recycling bins, bicycles, lawnmowers, plastic storage bins, etc. stacked along the walls.

I decided to survey the 20,000 homeowners like you who subscribe to my free newsletter. I asked the subscribers to watch the same video. The results of the survey were the exact opposite of those commenting on the video. CLICK HERE to see the survey.

Seventy-eight percent of the respondents said they wish their existing garage was wider and deeper. They wanted to have more room to get in and out of their cars and light trucks.

pie chart of garage size results

The question was: Do you wish your garage was wider and deeper so you could store things in it and have plenty of room to get in and out of your vehicle?

Architects of Old Made the Same Mistake

About the same time I recorded the video, I had shared in my newsletter a house plan catalog that is nearly 100 years old. It was published by the Home Builders Catalog Company of Chicago in 1928. The last section of this catalog has many detached garage plans. Each one of them had the exact same design flaw. You can access this amazing catalog at www.archive.org.

The flaw, in my opinion, is the walls on either side of the garage door opening. These walls almost always measure two feet long from the notch for the door to the outer corner of the garage foundation. All of the old garage plans show the same flaw.

When my wife pulls into our garage, the passenger side of the car is only 34 inches away from the inside face of the exterior wall. Thirty-nine inches of space is required to open a door all the way. Anything wider than one foot stored along the wall makes it impossible to exit the car inside the garage. I have to let my wife out of the car in the rain and snow and have her walk into the garage when we both come home from church. It’s a pesky problem.

Off-Site Storage or Sheds?

The current prices for off-site or on-site storage is higher than thin cirrus clouds. The current rate for a tiny 5x5-foot off-site unconditioned storage space near me is $50 per month. I can rent an on-site storage cube that’s 8x8 feet for $99 per month. Large sheds you can buy to put in your back yard can approach $10,000.

Building a larger garage that has ample space for your car, light truck, and lots of other possessions might only cost you $45 more per month on a mortgage payment. I share this with you in the event you’re planning to build a new home or build a dream detached garage.

There are many other design considerations you should think about when it comes to planning a spacious garage. If you’re an architect, or an architecture student, I recommend you read all of my past columns on my AsktheBuilder.com website about dream garages. Let’s stop cloning that same mistake I see in all those old and new garage plans!

Column 1597

Automist Fire Protection

Automist Fire Protection - Your Personal Robot Firefighter

Traditional fire sprinklers in residential houses require LOTS of water. They're expensive to install.

The Automist fire protection system is a game changer for sure. Imagine having six firefighters living inside the walls of your home ready to spring into action!

I know a thing or two about firefighting. After watching the Automist videos below, GO HERE.

and this one:

Match Brick Mortar Color

brick mortar doesn't match

The person who tuck pointed this brick at the old sardine factory in Bass Harbor, Maine ruined it. He was supposed to match the white hydrated lime and use the correct sand. Copyright 2025 Tim Carter

Match Brick Mortar Color - It Starts With the Sand

You may not know this, but I received a bachelor of science degree in geology many moons ago. I was fascinated by the topic, and it helped me build houses and buildings that would not fail. Hydrogeology, the study of groundwater, and continental glaciation were two subjects that have allowed me to solve wet basement problems for thousands of homeowners like you.

One of the things I discovered in my college years is that normal sand you find anywhere is nothing more than very tiny pieces of rock. Some sand is quite pure like that you might find on Siesta Key in western Florida. Many call it sugar sand.

Most sand is comprised of different small pieces of rock. These miniature boulders are often different colors. Each grain of sand is no doubt a very small piece of a specific mineral. Black particles might be biotite. White sand might be quartz. Orange particles might have originated from a sandstone with a high iron content.

I live in central New Hampshire. The sand that’s used to combat ice on roads sparkles in the sun. The glitter is caused by very tiny flecks of mica. It gorgeous to look at on a sunny day.

I share this background with you for a reason. You may not have ever given much thought to how bricklayer’s mortar is made. Standard mortar is a combination of three ingredients:

  • sand
  • powdered Portland cement, lime, and some other ingredients
  • water

Sand is the most abundant ingredient in the mix. The powdered cement and lime are the glue that holds the sand together and allows the mortar to bond to each brick, concrete block, or rock. Common sense tells you if you just got sand wet and laid brick with it, the brick would not bond to one another.

Masonry buildings older than 150 years didn’t have Portland cement in the mortar. The expert masons of old just mixed hydrated lime with the sand. They added just enough water to make the mortar mix the consistency of apple sauce.

When you mix the three ingredients above to make fresh mortar, the cement and lime coat each grain of sand much like adding beans to a meat chili. The color of each sand particle is hidden by the gray cement/lime coating.

This is why when you look at a brand-new brick or concrete block wall the color of the mortar is uniform. It’s almost always some shade of solid gray.

Mother Nature removes this thin coating of cement/lime paste over time exposing the sand color to your eyes. Look closely at old mortar and you’ll see individual grains of sand at the surface. The mortar color on old walls is created by the combination of all these tiny different pinpricks of color plus the cement/lime paste that you can see in between the particles of sand.

Your job, or that of the workman you hire to tuck point your brick, is to take time and find sand that matches the sand in your existing mortar. You need to match both the color and grain size.

Start your search at the closest gravel or sand pit near your home. Think of how hard it was to get sand to your house all those years ago when it was built. The bricklayer didn’t want to pay to have sand transported great distances if he didn’t have to.

One exception might be if you live in Cincinnati, Ohio. The best bricklayers used a very special silky sand available at the now-closed Rack Sand and Gravel pit.

location of rack sand and gravel pit cincinnati oh

This body of water is the abandoned Rack Sand and Gravel Pit in Cincinnati. The top surface of the water in the pit represents the level of water in the continental glaciation deposits that underlie the entire Mill Creek Valley. Unfortunately, it's probably very polluted by all the industry that's close to the gravel pit. Image Credit: Google Maps

This rare sand was fine-grained and had a tiny amount of loam in it. It made a delightful mortar that was easy to work with and produced stunning mortar joints.

Once you have the correct sand, you now need to concentrate on matching the correct color of the powdered cement and lime. Should you have an old building like the old sardine factory in Bass Harbor, Maine, you know you’ll just have to use pure hydrated lime. It’s a magnificent mortar ingredient that’s been used for thousands of years. Lime produces an off-white mortar.

The patient person mixes and tests the mortar before committing to using it. You mix some up, lay a few bricks, and let them sit for a month. At the end of the wait period you do a light acid wash on the mortar to replicate what takes Mother Nature thirty years to accomplish. The acid wash removes the thin mortar paste from the sand at the surface.

You can then see if one of your batches matches the existing mortar you’re trying so hard to match. Yes, I know this is lots of work, but who wants their house to look like it has a large facial scar running across the brick walls or the chimney?

I know I don’t!

Column 1596