Unique Bathroom Sinks

marble shell corner sink

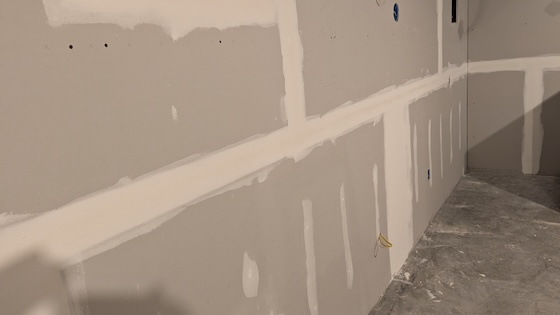
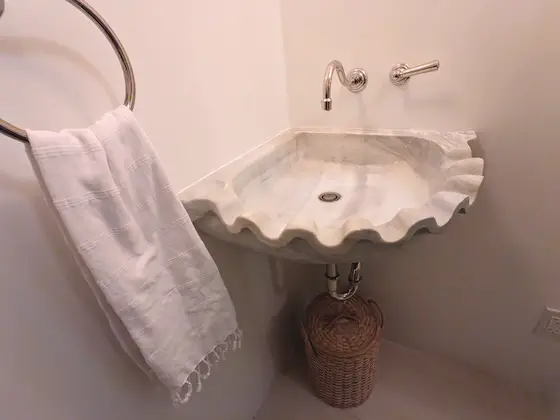
Unique Bathroom Sinks - This unusual corner shell sink with the minimalist wall faucet might be just what you’re looking for in your home.. Copyright 2025 Tim Carter

Unique Bathroom Sinks and Faucets Speak Volumes

It’s that magical time of year. The International Builders and Kitchen and Bath shows are just weeks away. This year this huge event is in Las Vegas. There are only a few convention centers in the USA large enough to house all of the exhibitors.

I’m blessed to be a member of the working press. As you might imagine, we’re treated like royalty at both shows. Just under two thousand companies want us to come to their booths to see all their new wares. I’ve been doing this for over three decades. You have to carefully pick and choose how you will spend your precious time.

Several manufacturers spend vast sums of money on their presence at the show. One is Kohler. Their booth is an oasis of eye candy if you’re entranced by anything to do with plumbing fixtures. I’ve been a master plumber for over forty years and have installed hundreds of Kohler fixtures. I always enjoy viewing the magnificent and elegant designs they debut at the show.

This is not to take away anything from the efforts of some other major brands like Moen, Delta, and American Standard. I happen to use a stunning Moen kitchen faucet each day here at my home to wash dishes.

This column is not a soft advertisement for manufacturers. It’s about how you can use some of their most unique products to set your home apart from your friends, family, and neighbors. Allow me to share a few stories that might inspire you.

Several years ago one company introduced a bathroom vanity faucet that looked like it was made in a rainforest. The spout appeared to be created from a stalk of bamboo. The handles were shaped like small bamboo stalks. My wife fell in love with it. I ordered one and installed it in our basement half bathroom. This faucet is still made today.

wallpaper installation

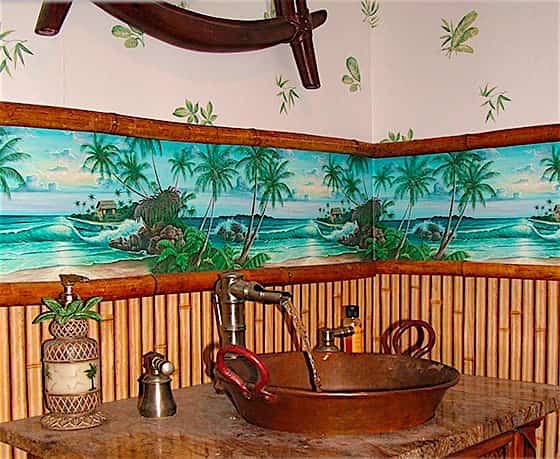
This is the bamboo faucet and copper basin. Copyright 2025 Tim Carter

The theme of the bathroom was tropical. We found two different wallpapers and a matching border that made it look like you were inside a grass hut with no glass. The openings gave you a view of the beach just beyond the palm tree line. The bamboo faucet sent water into a repurposed used copper basin. I drilled a drain hole into it creating a vessel sink that recessed into a stunning piece of brown variegated marble. You can use different faucets to create countless themes in your home.

My daughter did a similar thing in the half bath of her new home. The interior of her home was very contemporary. It had no woodwork surrounding the doors or windows. The wall board went straight down to the tile floors.

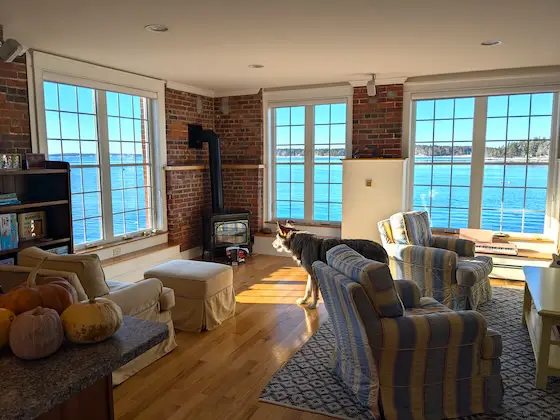
To extend this minimalist feel into her half bath, she found an antique wall-hung corner sink carved from a thick piece of marble. The artist created a scalloped curved front making the sink appear to be a giant sea shell.

I installed hidden L-brackets that were bolted to the sides of the wall studs. These extended out of the wall and the sink rested on them. The sink appeared to float in midair. The crowning touch was a single-handle wall faucet with a long gooseneck spout. Everyone that sees this sink marvels at it.

Do you think you could enlist the lowly ho-hum toilet to help create an illusion in a bathroom? My son is doing it now. He and I were forced to use a wall-hung toilet in a basement bathroom at his home.

Get the image out of your mind of the stark commercial wall-hung toilets you see in airports, office buildings, or schools. His toilet is a futuristic china fixture with smooth sides. As crazy as this sounds, it’s the most beautiful toilet I’ve ever seen. The water tank is hidden behind the tile wall. There’s a simple touch pad to activate the flushing action.

Are you planning to create a deluxe luxury shower in your home? Perhaps you’re doing a major remodel job or building a new home. Did you know you can install multiple shower heads to create a true rain downpour if that’s what you’re after? You can even include speakers that surround you with the sound of a rainstorm. The shower heads can be both in the walls or in the shower ceiling.

luxury shower with body sprays

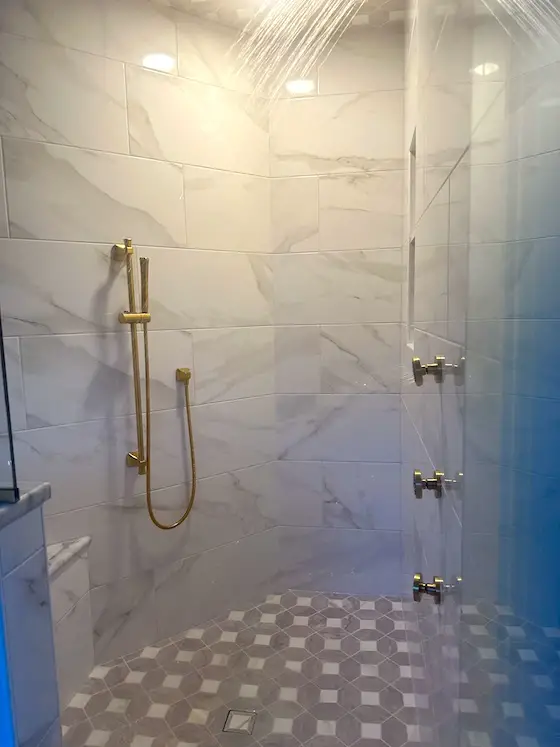
There's water flowing from the large shower head. However, as soon as you turn on the three body sprays water dribbles out of every orifice in this luxury shower. The East Coast plumber was a dunce. Copyright 2024 Tim Carter

Should you wish to do this, be sure you or your plumber does the math so you have plenty of water supplying your virtual reality shower experience. You may need to have 1-inch diameter cold and hot water lines feeding your bathroom. If you fail to do this, water may dribble from all the shower heads and body sprays.

You don’t have to have press credentials like I have to see all of these wonderful new products. At the end of February, YouTube will be flooded with thousands of videos shot at the show by members of the press. Search for IBS or KBIS 2025 videos.

You’ll be able to salivate over all the new kitchen and bath faucets from the comfort of your own home. You won’t have to be bumping into people in the crowded aisles like has happened to me too many times in the past.

Column 1595

Best Picture Windows

picture windows bass harbor condominium

Best Picture Windows - This view out to Bass Harbor, Maine was ruined by the window design. It’s such a sad mistake. Copyright 2024 Tim Carter

Best Picture Windows Bring the Outside Inside

I’m quite sure there’s a great chance you’ve been inside a house that is surrounded by spectacular scenery. You may have stayed at a resort like the one in Furnace Creek in Death Valley National Park. Perhaps you’ve stayed in the Mt. Washington Hotel in Bretton Woods, NH.

I can guarantee you the architects who designed the buildings and specified the windows in these locations did everything possible to maximize the view you’d experience when gazing outside. Not all architects are blessed with the talents to achieve this in everyday plans for houses.

I didn’t build the house I currently live in. The architect who drew up the plans squandered the view I have out to Lake Winnisquam here in central New Hampshire. My living room wall that faces the lake has three identical up-down sash windows. The view out to the lake is interrupted by ten inches of wood in between each of the windows.

picture windows lake winnisquam

The architect or homeowner squandered this magnificent view to Lake Winnisquam. Fortunately, a larger window can be installed by a seasoned remodeler in just one day. Photo credit: Tim Carter Copyright 2025

To add insult to injury, the opening could have been nine inches taller and two feet wider. I would have specified a huge picture window that would have been six feet wide by five feet high. A two-foot-wide casement window with no grills would have been on either side of the giant picture window.

I had the pleasure of staying in a condominium on Mt. Desert Island in Downeast Maine just after Christmas. This building used to be a sardine canning factory. The foundation of the building was installed in the tidal zone of Bass Harbor. You couldn’t ask for a more scenic view to the south and west.

As hard as this is to comprehend, the architect specified windows that contained grilles. These obnoxious horizontal and vertical lines ruined the view out to the harbor. Picture windows should have been used. An awning window underneath the picture window would have provided plenty of air should you want the salt-water aroma to fill the inside of the space.

My daughter didn’t make this mistake when she designed her new home six years ago. This quaint two-story home built on Mt. Desert Island, in Maine was nestled in the woods. She wanted to bring the woodlands inside.

This was accomplished by installing huge two-foot-wide by six-foot-high clear casement windows in the living room and dining room. Two of these windows were joined together to create each opening. The result was nothing short of spectacular. I was very proud of her. I assume she must have heard me many years prior talking about architect mistakes as we gathered around the dinner table.

You can create massive openings to bring the outdoors inside your existing home. I’ve done it many times. The last job I did for a customer before transitioning to Ask the Builder I installed a massive 8-foot-wide picture window with two casement flankers on each side. The customer was speechless when he stood in front of it the first time gazing back into the woods behind his home.

A decent carpenter or remodeling contractor can cut openings in solid walls. You can enlarge existing windows making them wider and taller. The carpenter will install a beam over the top of the opening. This beam can be as long as sixteen feet if need be! CLICK HERE to see how easy it is to install a new window in a solid wall.

I’ve created large openings in masonry buildings to install big windows. You can support brick with large angle irons. Structural engineers may have to size all the beams and angle irons, but this is the work they love! Don’t hesitate to ask them how big can you go.

Creating these large openings in new construction is child’s play. A Colorado couple hired me two months ago to act as their virtual general contractor. Their house has a giant wall of windows that is 16 feet wide by 25 feet tall. Realize windows can be custom made to fit openings. We had to do this on this job to maximize the view out to the mountains.

Several years ago I created an in-depth video series showing you how to create an opening in a solid wall. I wanted to install two windows at each end of my garage attic. These windows were smaller picture windows with narrow casement windows on each side. The videos show you how to install the required beam or header above the window. This beam transfers the weight of the wall above the window around the sides of the window.

You don’t ever want to put weight on top of a window. The window glass may crack or an operating window will not function with ease.

Column 1594

Efflorescence or White Mold

efflorescence crystals on a concrete slab

Efflorescence - You may see this in your garage or basement and think it’s dangerous mold. In almost all cases, it’s just harmless salt crystals.. Copyright 2024 Tim Carter

Efflorescence or White Mold? 99% Of The Time It's Silly Salt

The seasonal tumblers are all clicking into place here at my home. The same thing might be happening where you live. My central New Hampshire town, much to my dismay, uses rock salt to fight ice and snow on the roads. Yes, it works, but it also corrodes cars and trucks. The salt also creates anxiety for many a homeowner in the spring. They think their garages have a horrible toxic mold bloom.

I know this to be true based on the hundreds of comments you can read on one of my YouTube videos. A few years ago I had a marvelous efflorescence bloom in my garage. Here is that video:

I decided to record it and share how to make the pesky white growth disappear. The comments on this video have astounded me over the years. The vast majority are a mixture of relief when the viewer discovers they don’t have an expensive and toxic mold outbreak. I’m grateful each time I see one of these comments knowing I’ve saved that person lots of money.

Efflorescence Happens Everywhere

Efflorescence can happen in any climate. You can see it in Phoenix, Tallahassee, Seattle, or Kennebunkport. The root cause of efflorescence is salt. Salts of all types can be found in soils, concrete block, brick, sand, etc. Almost all of these dissolve with ease in water. I’m sure you’ve seen this happen if you add table salt to hot water before you add pasta. The salt disappears in seconds. It’s still in the water, but you can’t see it.

In my case, the salt is brought into my garage on my car and truck. It’s become one with the snow in the wheel wells. The salty snow melts and the water seeps into the web of tiny cracks in my concrete floor. The salt begins to build up week after week down in the concrete matrix. The cold garage inhibits evaporation. After several months, the concrete has transformed into a hard sponge filled with saltwater.

My First Time - The Red Brick Wall

I remember my first experience with efflorescence as a young builder. I built a 50-foot-long brick retaining wall at my second home. I worked on it after getting home from work as well as on weekends. Kathy, my wife, was delighted with it. However, a month later, the red bricks started to get a white deposit on them. I was perplexed.

I was able to wash it away with a garden hose and the wall looked great for a day or two. Just as the sun rises each day in the sky, the white deposits would return. I tried scrubbing them with water and got the same result. You might have done the same thing sharing my frustration.

There was no Internet at the time. You had to trudge to the library and spend hours doing research to get answers. I didn’t have that sort of time back then as I was trying to build my business and feed a family.

Don't Use Water

Your efflorescence issue could be on a new patio, a concrete wall, a block wall, or any other masonry surface. Each time the masonry gets wet, the water dissolves some of the salt. As soon as the sun comes out or the wind starts to blow, this salty solution is brought to the surface. The water jumps into the air, but it leaves the salt behind.

Should you make the mistake I did all those years ago trying to wash it away, you just repeat the cycle. The salt dissolves and a certain amount of it soaks right back into the brick, block, or concrete. It then reappears a few days later.

Use a Broom or Stiff Scrub Brush

I discovered the best way to deal with efflorescence is to just brush the dry salt crystals away. The ones in my garage are delicate gorgeous crystals if you peer at them from a short distance. They brush away with a simple push broom. Once out my garage door, they’re carried down to Lake Winnisquam. The salt crystals then begin their journey back to the Atlantic Ocean where they belong.

Efflorescence, in some cases, can be very difficult to remove. I’ve seen deposits on the underside of the magnificent granite bridges built by John Rockefeller, Jr. in Acadia National Park. These deposits are thick and resemble stalactites and stalagmites you’d see in a cave.

efflorescence on granite acadia national park

This is just one example of white efflorescence staining on one of Rockefeller's carriage trail bridges in Acadia National Park. Photo credit: Tim Carter Copyright 2024 ALL RIGHTS RESERVED

Thick deposits like this might be a mixture of calcium carbonate and salt. If so, you may have to deploy weak concentrations of muriatic acid to remove them. This is nasty work and it’s best to not let the deposits build up to this extent.

Stopping or preventing efflorescence is not easy. Cutting off the supply of water to the salt hidden just below the surface is one way. You can accomplish this with ease if you live in the Atacama Desert. Everywhere else, it’s an issue because of rainfall.

Your second choice is to exhaust the supply of salt. This happens in my garage by August of each year. You may not be so lucky as there could be an endless supply in the soil behind a retaining wall or under your new paver patio. The back side of new retaining walls can be coated with a waterproofing material to prevent the saltwater from entering. Cross-laminated plastic can be put on top of soil before you lay that paver patio. This will block the salts from reaching the pavers.

In the meantime, just brush away the salt crystals and never use water to do the job. I wish you the best of luck in your battle against efflorescence!

Column 1593

Infrared Photos of Electricity

infrared image of gfci outlet

This infrared image shows a GFCI outlet that’s not being used. Your first inclination might be there’s a problem. Copyright 2024 Tim Carter

Infrared Photos of Electricity - They Could Save Your Life

I grew up reading Superman comic books. One of his superpowers was x-ray vision. He could see through opaque objects to detect danger. I was mesmerized by this power as were many children and no doubt adults.

What would you say if I told you that for less than $300 you can have a simple tool that plugs into your smartphone that transforms you into a super homeowner? I’m talking about investing in an infrared thermal imaging camera. The better ones take both photos and shoot video. Armed with one, you’ll be able to detect invisible danger lurking in your home.

Infrared Thermal Imagers

Here are a few ways an infrared camera tool can save your life and those of your loved ones. These amazing tools can tell you in seconds if electrical cables in your house are getting too hot. Circuit breakers are supposed to trip when this happens, but wouldn’t it be nice to have an extra level of peace of mind?

I went into my basement and pointed my infrared camera at my circuit breaker box. The image showed one glowing cable above the box while the others were all the same temperature as the panel. The glowing wire was feeding the circuit that extends to my ham radio shack. I have an electric heater running there to keep me from freezing.

infrared photo electric cables

The cable was a safe temperature, but it was warmer than the others. Keep in mind when lots of current is flowing through a wire in your home, it creates friction. This, in turn, creates the heat. The heater in my shack was operating and drawing about 1500 watts. I installed a 12-gauge cable to the room. This wire size is rated for 20 amps or 2400 watts. Even with that large safety factor, the cable was still bright orange in the infrared image.

I then pointed the camera sensor at a GFCI outlet in my kitchen. My coffee maker was plugged into the outlet, but it was not operating. The image showed the outlet was almost bright yellow! The image is above.

I felt the outlet, and it was only slightly warm. The electronics in the outlet that provide the ground-fault protection create this warmth as they’re constantly working and on alert waiting for you to make a mistake. There was no fire danger.

Had the same thing happened if I pointed the sensor to a regular outlet, that would be a reason for concern. A loose wire might be creating an arc that would eventually lead to a fire. You can get special circuit breakers to senes these arcs, but hundreds of thousands of homes don’t have them.

A friend of mine who lives in southern California could have used one of these thermal imagers to alert him of a problem. A few years back his wife plugged in a portable electric heater to take the chill off the room she works in. She plugged it into an outlet that is controlled by a wall switch. The switch was a dimmer that was only rated for 600 watts, not the 1500 watts the heater was requesting. Read about this dimmer switch fire.

The infrared sensor, in seconds, would have detected the overheating dimmer switch. Luckily she saw smoke drifting from the switch and unplugged the heater. Imagine if this had happen in a bedroom just before falling asleep.

back of burnt dimmer switch

This is my friend's dimmer switch. You can see how much plastic burned. You can also see some of the letters from the CAUTION warning label. Dimmers are time bombs waiting for their next victim. (C) Copyright 2016 Tim Carter via anonymous friend who is still breathing along with his beautiful wife

The infrared cameras can detect hidden water leaks or moisture that causes mold growth. Evaporation is a natural cooling process. The water evaporating behind a wall will make that part of the wall cooler. It will appear black or a dark blue on the image. You can catch mold growth before it becomes a serious health issue.

My infrared camera proves that the builder who built my house, not me, did a horrible job of insulating behind all the electrical outlets and wall switches on exterior walls. The images show all of them a deep navy blue. I wish the builder would have used spray foam between the back of the electrical boxes and the exterior wall sheathing to minimize heat loss. If you’re building a new home, be sure you make that happen.

I pointed my camera at the door between my house and unheated garage. You could see the weatherstripping was doing a poor job. Cold air was leaking past the weatherstripping on all sides of the door. It’s a small amount of air, but it adds up over time.

Sealing all the air leaks the camera points out might pay back in energy savings the cost of the camera in just a few years. Imagine using it in the summer. You point it at your ceilings to see where the insulation in your attic is causing your air conditioner to work overtime.

I’ve been testing several different thermal imagers for a few years. My favorite is one made by Klein Tools. I have the TI220. This one works with Android smartphones. If you have an iPhone, you’ll want the TI222.

I have a collection of infrared images taken at all times of years. You can view these on my www.AsktheBuilder.com website. Just type “infrared images” into the search engine on the home page. Wait until you see how hot my front door gets in the summertime!

Column 1592

Filter Fabric for French Drain

foundation drain tile perforated pipe and useless filter fabric

Filter Fabric - This is a 4-inch-diameter perforated drainpipe. Everything about the installation, but one thing in this photo, is wrong. Copyright 2024 Tim Carter

Filter Fabric for French Drain - Don't Waste Your Money!

Filter fabric for french drains is not required. It's a myth. Websites and YouTube channels promote it with reckless abandon. Here's why it's a waste of money.

Water drainage is misunderstood by many a homeowner, builder, YouTube personality, and building inspector if my incoming email is an accurate barometer. I’ve lost count of the thousands of drainage help requests entered on the Ask Tim page of my www.AsktheBuilder.com website.

My Hydrogeology Degree

It’s important for you to realize my college major was geology. I was focused on the study of hydrogeology. That’s the discipline of subsurface groundwater and groundwater movement. I was also a young builder when geotextile fabrics were becoming mainstream in road and parking lot construction. They’re often required to block silt from flowing overland on construction sites. Allow that to sink in.

As so often happens, some manufacturers cross the boundaries of where their product performs well to the territory where it’s not recommended. This has happened, in my opinion, with the use of geotextile fabrics in drainage systems. Allow me to explain.

Water Moves Sideways & Downslope

The first thing to understand about subsurface water movement is water doesn’t always head straight down to the center of the Earth. In almost all cases, water starts to move sideways or downslope through the soil. This movement happens when the B soil horizon has a clay content. The clay layer under the A horizon, the topsoil, prevents water from moving down. Water, like most things, loves to travel in the path of least resistance.

Topsoil is a Natural Filter Fabric

Topsoil acts like an air filter in your furnace or AC air handler. It captures tiny silt particles that get disturbed in periods of heavy rainfall. Water flowing over the surface of the ground gets fouled with silt in storms. This is why the water in creeks, brooks, and streams turns muddy during and just after a big storm. Forty-eight hours after the storm has passed that same water will be clear. My guess is you’ve never pondered why.

Watch this video Look at the clear water flowing from a French drain at my house. The so-called French drain experts on YouTube don't have a hydrogeology degree:

Clear water in wells and streams proves that topsoil captures silt particles. If silt stayed in groundwater as it moved underground, wells and natural springs would be cloudy. The water would be unpleasant to drink.

Fluffed Dirt is a Problem

The last piece of the puzzle is fluffed soil or dirt. When you dig undisturbed soil during construction, you increase its volume by about ten percent. The soil that was protected by the topsoil is now exposed to the destructive force of raindrops and overland water flow. This explains why governments want silt fences erected around construction sites. They want that silt to stay put on the construction site.

This fluffing happens a second time when the dirt is placed alongside a foundation. Decades before geotextile fabrics were invented, builders placed one foot of dry straw on top of the coarse gravel that sat on top of the drain tile at the base of the foundation. The straw acted like the topsoil and prevented the silt from fouling the gravel and clogging the drain tile.

The Best Way to Install Foundation Drain Tile Pipe

Many experts agree on the best way to place a 4-inch drain tile at the bottom of a foundation. It should be placed on top of 4 inches of coarse gravel. This gravel should be free of any sand or fines. It should be the size of green grapes or small walnuts. It can be rounded or crushed stone. Water flows through this gravel like it does through a large kitchen colander with big holes. This is exactly what you want - rapid water movement.

Holes Aim Down, not Up

The top of the drain tile pipe should be no higher than the top of the concrete footing. This assumes the interior slab of a basement or crawlspace sits on top of the footing. The holes in the perforated pipe should be aimed down. Use an analog clock face as your north star. The holes should be placed in the same orientation of the numbers 4 and 8 on a clock face.

Many builders and laborers put the perforated drain pipe upside down with the hole pointing up. Gravel can block the holes preventing water from entering the conduit. I’ve seen builders place geotextile fabric on the dirt under the gravel below the pipe. This is a complete waste of material and time. The first few inches of gravel can rest on the undisturbed soil that the footing rests on.

The drain tile pipe doesn’t need to be sloped like a plumbing drain pipe. It can be level around the perimeter of the footing. Water flows through this pipe the same way it moves across the surface of a lake to the overflow point. Once the drain tile is extended to daylight beyond the foundation, you can transition to solid pipe. Slope this pipe 1/4 inch per foot to promote rapid water to flow away from the foundation.

It’s best practice to install 2 or 3 feet of the coarse gravel on top of the drain tile pipe. The more you put the better. Years ago an owner I worked for wanted no water entering his basement. He paid extra to put the gravel up to within 6 inches of the top of the grade around the house. This gravel should be covered with straw or the geo-textile to ensure the silt in the fluffed backfill doesn’t travel into the gravel.

Does it now make sense to you why you don’t want to put a sock on a drain tile pipe next to a footing or in a linear French drain? How about lining a French drain trench with geo-textile fabric? That’s also a mistake. The water flowing towards the French drain is clear. If it does have any silt, the fabric will trap it, get clogged, and then no water can enter the french drain pipe. This defeats the purpose of the French drain for goodness sake.

Column 1591

DIY Drywall Secrets for Pro Results

drywall taped seams and dry plus 3 joint compound

DIY Drywall Secrets - This drywall has been taped with an amazing fiberglass tape that works just like reinforcing steel in concrete. The premixed joint compound is easy to work with. Copyright 2024 Tim Carter

DIY Drywall Secrets That Make You a Pro

I’ve been helping my son finish the basement in his three-year-old home sharing DIY drywall secrets. We can only work on Saturdays, some Fridays, and any paid-time-off days he can burn up. It’s been a lifelong dream of mine to help my kids work on their homes. Five years ago I installed all the plumbing, radiant heating, and electrical cables in my oldest daughter’s home.

My son and I started hanging 100 sheets of drywall about a month ago. He had never done this task before and picked it up faster than an express train roars through a small station. DIY drywall secrets are what you need to ensure your job looks like a pro did it.

DIY Drywall Saves Thousands of Dollars

You may have a drywall project in your future. Perhaps it’s just one or two sheets. Maybe it’s thirty. The following tips should save you thousand of dollars. You should also experience an overwhelming feeling of satisfaction once you apply the first coat of paint to your smooth-as-silk finishing work.

The first thing to realize is hanging drywall is not finish carpentry. I’ve always cut my pieces 1/4 or 3/8-inch less than the actual length. The drywall tape and mud will fill the small cracks you’ll get at each end of a vertical piece. The long length of drywall, 8 or 12 feet, is placed perpendicular to the run of wall studs or ceiling joists.

Ceilings First

Ceilings are always hung first. They’re the hardest pieces to do. Enlist enough help so the piece can be held tight to the ceiling joists while screws are driven to fasten the sheetrock to the joists. A mechanical lift can be rented to hold the pieces. One and one-quarter-inch coarse-threaded drywall screws with bugle-shaped heads are used for 1/2-inch drywall. Screws in ceilings should be placed along each edge and then 12-inches on center in the body of each sheet.

Buy a Screwgun

Purchase a drywall screw gun. These affordable tools allow you to countersink the screw head perfectly. You want the screw head to be 1/16th of an inch below the surface of the drywall paper. Drive it too far and you’ll tear the paper around the screw head reducing the holding power of the screw. Watch a few online videos showing you the proper way to drive the screws.

Outside corners require some precision. Hang the drywall so it’s 1/8-inch back from the outside corner. Do this with both pieces that form the outside corner. Doing this will make it very easy to install the corner bead. Screw spacing for drywall on walls is 16 inches on center.

Lipstick Marks Electrical Boxes

Cutting the holes for electric boxes is tiresome if you try to measure them. It’s much easier to put some cheap lipstick on the front edge of the boxes. Place the drywall at the correct height where it will be on the wall. Hold it away from the wall to avoid mis-marking the box. Press the drywall against the electrical box and transfer the lipstick to the back of the sheet. Use an inexpensive drywall punch saw to cut out the rectangle or circle. You’ll get very good at this with minimal practice.

Finishing drywall is not as hard as you might think. Be sure you remove all scrap drywall from the room. Don’t sweep the floors. The dust on the floors will be your friend when it’s time to clean up the joint compound that falls to the floor.

Don't Add Much Water

Brand name ready-mixed joint compound works really well. Read the label on the bucket or box. Follow all the directions to the letter. Be sure the room is warm to accelerate drying time. Beware of adding water to the joint compound. The USG Plus-3 compound I’m using requires no extra water. It seems stiff when you remove it from the bucket, but when you start to work it in your drywall pan, it achieves the perfect consistency. You want the joint compound to resemble warm cake icing.

Fiberglass Tape for Flat Seams

I prefer to use amazing thin fiberglass tape for all flat seams. This tape is very forgiving for a rookie. The joint compound oozes through the gaps of the glass fibers. It resembles reinforcing steel in concrete. Paper tape can develop blisters should you remove too much joint compound from under the tape.

Butt seams where two 4-foot edges meet are the hardest to finish. You end up creating a hump in the ceiling or the wall at these locations. Your task is to make the center of the hump no more than 1/8-inch high. You then need to feather out joint compound about 10 inches either side of the center of the butt joint.

Tapered seams are very easy to finish. Your goal when taping them is to have just 1/16th inch of joint compound in the seam with the fiberglass tape. You’ll then add another 1/16th of an inch with your second coat.

Paper Tape for Inside Corners

Inside corners are very easy to do. I always use the traditional paper tape for these. You want the same 1/16th of an inch of joint compound between the tape and the drywall. I use a 5-inch-wide flexible taping knife to do this. You need to round off the corners of a new knife with a metal file. This will ensure the new knife doesn’t rip or tear the center line of the paper tape.

There are hundreds of videos on YouTube that will show you how to hold all of the tools to ensure you don’t leave too much joint compound on the wall. Less compound means less sanding. Watch the videos and let me know how your job comes out!

Column 1590

Virtual General Contractor For Hire

house being remodeled

I see no less than three mistakes in this job. I was standing 50 feet away. A close inspection might reveal more. Copyright 2024 Tim Carter

Virtual General Contractor - Will Work for Food & Money

Were you 100 percent satisfied with all of the work done on your last large project? I’m talking about near perfection. If you did an autopsy on all the problems, errors, delays, etc. on the big job, what do you think would be the top causes? How do you prevent problems? The answers may surprise you.

Virtual General Contractor for Colorado Home

I was hired by a young couple in Denver, Colorado to be their virtual general contractor two weeks ago. They’re building a new home up in the high desert west of the metropolis. The magic of modern technology makes this possible. Routine video calls from the job site allow me to be there even though I’m 2,000 miles away.

The husband was in a quandary and did some online research. He soon discovered a video I did about leveling a foundation. We then did a short consult call. I answered his question about the out-of-level fix in two minutes. Then I solved a difficult foundation drainage issue his on-site general contractor failed to prevent.

Four days after the first call I was on a video call with the couple. Within minutes I solved another issue that three other people failed to catch. They asked me if they could hire me to replace the wet-behind-the-ears contractor. I agreed after we discussed a few terms.

Simple Drawings Convey Clarity

I discovered the husband favors visual learning over audio or written. In the past week, I’ve made no less than ten color drawings showing how things should be done. Here's an example of one of my drawings:

foundation topping steel layout drawing

I created this drawing in about five minutes. My printing would be better if I slowed down, but it's clear enough to convey what needs to be done. Copyright 2024 Tim Carter

He told me they were invaluable, and said, “The other contractor never thought to ask me if I needed help understanding his jargon.” I could tell in the first few minutes of our conversations that the husband struggled with transforming my words into images in his brain.

Plumber Makes Mistakes

Two weeks before I was hired, the plumber installed his pipes in the basement. The couple asked me to look at photos of the installation. I’ve been a master plumber since 1989 and spotted two major problems. The plumber decided to run the drain for the basement bathtub so the wastewater would have to flow an extra seven feet upstream, make a 180-degree bend, and then finally start to head to the septic tank. He did this to avoid installing a simple dry vent at the tub.

The plumber made a second mistake. He didn’t do a deep dive into the plans, or he ignored them. He installed a stack on the rear wall of the house not near any plumbing fixtures above. A horizontal drain would have to transit through the floor trusses to reach this stack. This long pipe would interfere with air conditioning ducts that must turn up in the floor just above his planned pipe location.

I called the plumber and sent him a long email explaining how had I been brought on board two months earlier this would have never happened. My practice is to have a pre-construction meeting with all subs. I ask them how they plan to do things. It’s common for me to point out modifications due to a conflict with another trade.

The most recent issue should sear into your brain the importance of oversight. I made a drawing showing how to install radon mitigation pipes. My drawing showed they must be level and end up just below the layer of closed-cell foam that will insulate the basement floor. The workmen who installed them botched the installation. All of their work must be redone.

House Remodeling Project Errors

A major remodeling job is happening just 1/4 mile from my house. I walk past the job each day. The house is less than 30 years old. It had a screened-in porch that was built on top of a deck. The screened porch rotted out because it wasn’t built correctly.

The new homeowners hired a contractor to demolish the screened porch. The new plan is to build more living space below the salvaged roof that covered the porch. I spied new wall sheathing on the exterior house wall below the old porch. That tells me years of rainwater had infiltrated behind the fiber cement siding.

Those are all old problems caused by the original builder. I’m seeing new problems early in this job that could cause major issues in just a few years.

The new floor joists for the lower level are less than a foot above the soil. From what I can see, they don’t appear to be treated lumber. It’s a recipe for disaster.

Most Contractors Don't Accept Suggestions or Alternative Methods

I thought about stopping by and chatting up the contractor. I’ve discovered most contractors here in the Northeast feel people should mind their own business. I respect that. Most contractors don’t process questions or suggestions very well. Their emotional skin is like that of an armadillo.

I feel these two stories are helpful teaching moments. Great plans and specifications are a must. The best plans provide so much detail and information the builder doesn’t have to ask the homeowner one question. They become the north star for all trades.

You must take an active role in your project. I know it’s not easy, but you need to be the quality-control supervisor. You need to take the time to research how all of the home's products should be installed. It’s never been easier with the Internet. Most manufacturers have amazing videos showing how to install their products. Watch them.

As the job progresses, take hundreds of photos and be sure things are installed correctly. If you need help understanding the plans, ask for it.

Column 1589

Iron Pipe Handrail Disaster

maple handrail on drywall

This stairway handrail looks easy to install. It’s much harder to get right than you might imagine. There are very strict building code and common-sense guidelines you must follow. Copyright 2024 Tim Carter

Iron Pipe Handrail Disaster - DIY Inexperience Creates Danger

Several weeks ago I shared a story about a young woman with you. She attends our church, and my wife and I are friends with her. A week ago she reached out to me with a new problem. She was attempting to install a new iron pipe handrail on two flights of stairs in her condominium. CLICK HERE to see an assortment of iron pipe handrails.

This woman had the best of intentions. She got her younger sister to jump in and help. Within an hour or two, they ran into significant difficulties. I can imagine this happening to you.

The problem started when she purchased the handrail. She went to a large online retailer and purchased a pre-fabricated handrail made from black iron pipe. I’m convinced she felt that the manufacturer would sell a product that would work. That’s a very long bridge to cross in my opinion.

Iron pipe handrails are not nearly as difficult to install as over-the-post oak handrails. You need years of finish-carpentry experience to install one like this.

Farmcrest stars lower flight wide

I installed this handrail system in my Cincinnati Queen Anne Victorian home. Copyright 2018 Tim Carter

Staircase Falls are Frequent

Staircases create significant safety risks. A white paper published by the National Library of Medicine states that, on average, 1,076,558 people are treated in emergency rooms each year in the USA after getting injured on stairs. That means the injury rate is higher because some people may not go to an ER for help. That equates to just under 3,000 people a day or about 125 injuries per hour.

This high rate of injury is addressed in the building code. The causes of injuries can be the design of the stairs, the handrails, etc. Code officials for years have developed very good guidelines and requirements for stairs, landings, and handrails.

The issue is you may not be focused on these. You’ve used handrails your entire life and not thought much about how they should be done and more importantly, how they should be installed so the handrail doesn’t pull out of the wall causing you to tumble down the stairs.

Railing Length is Critical

The building code stipulates the length of the handrail must match the length of the stairs. This makes sense as you want to be able to grasp it at the top step as well as right before your foot steps off the last step on the floor below.

This woman purchased a handrail that wasn’t long enough. What’s more, the handrail came with circular flange plates that are screwed to the wall.

The emergency help text she sent me had photos of the pre-drilled holes in the circular flanges. She thought she was doing the right thing by screwing these flanges onto the short stubs of iron pipe as tight as possible. This caused some of the holes to be blocked by the handrail. It was impossible to drive the screws.

I told her, “You have to unscrew the flanges so all the holes are not blocked by the railing. The flange doesn’t need to be screwed tight to the pipe nipples. Once the handrail is up, the flanges can’t unscrew.”

Inferior Design Sets You Up for Failure

The design of the handrail was inferior in my opinion. The pre-cut pieces of pipe placed these round flanges at distinct points along the railing. The odds of the flanges being centered on a wall stud were very low.

The manufacturer sent along simple plastic anchors to put into the drywall. The railing is now a disaster waiting to happen. The woman told me that after she adjusted the flanges and installed the screws, the railing was loose and wobbly.

Railings Must be Parallel With Stair Nosings

The building code stipulates that stair handrails must be parallel with the line created by the front nosing of the steps. The vertical distance from the front tip of a stair nosing to the top of the railing in a plumb line should be between 34 and 38 inches. I’ve found from years of practical experience that 35 inches is very comfortable.

You can easily create this parallel line on a wall by creating a rectangle using stiff cardboard. Make the cardboard four feet long by 28 inches wide. Be sure it’s a perfect rectangle. Place the four-foot edge on the steps so this long edge is touching three or four stair nosings. The top of the cardboard will create the line for the top of the handrail. Slide the cardboard up or down the steps making marks with a pencil creating the line.

The next challenge is to locate the center of the wall studs. There are many stud-finder tools you can use to do this. I then like to attach the metal brackets to the handrail. If you’re using a simple wood handrail, I’ve found spacing the brackets 6 feet on center gives lots of support. Attempt to get a bracket as close to the top and bottom of the handrail as possible.

The screws should penetrate into solid wood at least 1.5 inches. Drill a pilot hole to make the installation easier. The pilot holes diameter should be about 40 percent of the outer diameter of the screw threads. The pilot hole depth only needs to be 70 percent of the depth the screw will penetrate into the wood.

How I'll Fix Her Handrail

I'm going to repair this woman's handrail. She wants the work to start after Christmas. We'll need extra help. A person needs to be stationed at each of the round flanges that touch the drywall.

I'll remove the crap plastic anchors. The holes will be enlarged to accept 1/4-inch toggle bolts. Each flange will have four toggle bolts.

1/4 inch toggle bolt

Each person at each flange will be tasked with inserting the toggle bolts into the holes in the drywall. This has to be done in unison since the handrail is so rigid.

The handrail will not wobble once all of the bolts are tightened.

Column 1588

Oldest and First Home Improvement Channel on YouTube

Oldest Home Improvement Channel on YouTube - Ask the Builder

Ask the Builder was the first home improvement channel on YouTube. Ask the Builder was part of Google Video before Google purchased YouTube.

Tim Carter is the founder of Ask the Builder, one of the first home improvement websites on the Internet. The Ask the Builder website launched in September of 1995 with 200 pages of content. Most websites in 1995 had five pages of content.

screenshot of ask the builder youtube channel

This is the look of Ask the Builder on YouTube circa 2024. It looked much different in 2006!

Google Video Before YouTube

Tim Carter was invited to attend the October 2005 Google Zeitgeist. The Google Video team approached Tim, asking him if he had produced any home improvement videos. Tim responded that he had a library of two hundred 90-second videos he had produced as the home improvement expert for the ABC and NBC-TV affiliates in Cincinnati, Ohio. The Google Video team knew that video was going to dominate the Internet. They desperately needed video content to attract advertisers.

The Google Video team asked Tim to upload all his videos to Google Video, a competitor to YouTube. YouTube launched eight months before, in February of 2005. This didn't go unnoticed by Google's top management.

Tim realized video would be a major part of the Internet back in the late 1990s. He negotiated, as part of his contract with the ABC and NBC-TV affiliates in Cincinnati, that he would own the copyright to the segments since the information was created from Tim's knowledge, not that of the TV stations. Tim also negotiated that the affiliates had to provide him with a copy of each segment on VHS tape with a custom close where Tim said, "I'm Tim Carter, Ask the Builder." Tim knew how important it would be when the videos were shown on the Internet instead of local TV.

Google Buys YouTube

Google purchased YouTube in February of 2006. Google Video was folded into YouTube. The Ask the Builder channel was one of the first 50 partners on YouTube. YouTube grew and, within a few years, being a partner, lost all of its prestige. Tens of thousands of channels became YouTube partners.

Rusted Joist Hangers

rusted corroded joist hanger next to a new one with zmax coating

The joist hanger on the left was 13 miles from Chesapeake Bay in Baltimore, MD. Imagine what they might have looked like had the house been built just back from any beach near a sea or ocean. The new joist hanger on the right shows you what yours should look like with no rust. Copyright 2024 Tim Carter

Rusted Joist Hangers are Dangerous

One of my newsletter subscribers, Robert, does handyman work on the weekends for friends and other homeowners. Eleven years ago, he wanted to learn how to frame a large shed including common roof framing. He volunteered to help me build my 16x24-foot two-story shed. We’ve been fast friends ever since that week we worked together.

Robert was repairing a deck three months ago. This deck was about thirteen miles from Chesapeake Bay in a Baltimore, MD suburb. The joist hangers had severe corrosion. He reached out to me one day and said, “Hey Tim, I’m rebuilding a deck, and the joist hangers are rotted. Would you like me to send them to you?”

I responded, “You bet! I’ll gladly pay for the postage.” I felt like a kid on Christmas morning when the box arrived. The corrosion was severe. Robert even sent some of the rusted joist hanger nails. A few of them had lost well over 60 percent of their steel! The bottom of several hangers had holes in them, and the remaining metal was paper-thin.

rusted joist hanger nails

Look how corroded the nails are! They've lost most of their holding power. Photo credit: Tim Carter Copyright 2024

This deck was a disaster waiting to happen. The structural integrity of the hangers and fasteners was compromised.

I decided to reach out to the Simpson Strong-Tie company. I’ve installed their galvanized steel framing connectors for decades and never had a rust issue. The public relations firm that works with Simpson connected me to Ms. Annie Kao. Annie has worked for Simpson for eighteen years and before her most recent promotion, she was VP of Engineering. That’s exactly who would know the answers to my questions!

Mystery Manufacturer

It’s important to realize we had no idea who manufactured the joist hangers Robert replaced. They could have been a cheap import with minimal or an inferior galvanizing treatment. Early in our discussion, Annie shared what I thought was the biggest change for Simpson Strong-Tie over the years.

It turns out that years ago, Simpson purchased raw steel in coils for their products. Simpson had their own galvanizing operation in house. The engineers at Simpson determined it was better to let the steel mills do the galvanizing. This gave birth of the ZMax labeling you see on the Simpson products. ZMax stands for maximum zinc.

I wanted to know what Annie thought about the distance Robert’s hangers were from salt water. She shared some fascinating data from a Federal Emergency Management Agency (FEMA) document. It was titled Corrosion Protection for Metal Connectors and Fasteners in Coastal Areas - NFIP Technical Bulletin 8 - June 2019.

300 - 3,000 Feet From Salt Water is Not Good

FEMA maintains that the width of the high-corrosion area near breaking salt-water waves is anywhere from 300 to 3,000 feet from the shoreline. Invisible drops of salt water enter the air when waves break on a rocky coast or the shoreline. This is similar to the tiny drops of windshield washer fluid that cover your windshield when a car hundreds of feet ahead of you cleans its glass.

Backing up my suspicion, the FEMA document verified that accelerated corrosion can happen up to ten miles inland. My guess is that’s a function of the strength and speed of the prevailing wind and how big the waves are crashing against rocks and sand.

This didn’t square with Robert’s situation. The deck he was working on is located at the far northern end of Chesapeake Bay. There’s very little wave action there like you’d see on Mt. Desert Island at Acadia National Park.

Avoid Cheap Joist Hangers

This leads me to believe the homeowner or builder of the deck used an inferior cheap joist hanger. You may have these on your home. Salt water exposure is by no means the only cause of severe corrosion of metal connectors on your deck and outdoor play sets.

Severe corrosion can happen in moist, warm climates where salt water is hundreds of miles away. The copper preservative in the treated deck lumber leaches out with each rainfall. This liquid brew corrodes bare steel and fasteners like child’s play. Treated lumber comes in different ratings containing high amounts of copper preservatives.

High-quality galvanizing that incorporates lots of zinc has a magical property. Should the galvanizing get scratched, the zinc next to the scratch corrodes faster and fills in the scratch! It’s self-healing magic.

Corrosion can be prevented by using stainless steel joist hangers, fasteners, etc. Stainless steel is available in different grades like many things. 316 stainless steel is the best. Specify or purchase that for your next deck.

It’s imperative you inspect your deck or any exterior structure that incorporates metal connectors. Check for corrosion. Extract a few random fasteners and see if they’re rusted. Replace connector nails with #9 1 and 1/2-inch-long galvanized connector screws. They have far greater holding strength.

Column 1587