I was asked to write this column by my editor at the Star-Tribune in Minneapolis, Minnesota. At the time, I felt that it would not be a problem obtaining information about something as simple as extension cords. Guess what? I was wrong!
There are probably many extension cord manufacturers. If so, it is tough to find them. I was only able to locate two! One of them happens to be the biggest player in the market place - General Cable Corporation. They make an unbelievable assortment of high quality extension cords and accessories. The astonishing thing is that they are located just 15 miles from my house and I never knew it. The other manufacturer is Leviton. Unfortunately, all I can give you is a phone number. I made repeated efforts to obtain information and product descriptions. Nothing was ever forwarded to me. I hope you have better luck than me!
General Cable Corporation 800-382-4730 From what I gather General Cable Corporation is the leader in the extension cord industry. Their cords are distributed nationally in virtually every hardware store chain or major home center. You should not have trouble finding them. The cords and accessories are OFTEN sold under the trademarks: CAROL, FROGHIDE, ULTRA FLEX and ROMEX.
General Cable's cords are marketed in four categories:
FrogHide - This is the best rubber cord you can buy. Its flexibility and durability is unmatched. The plug ends are molecularly bonded so the ends should not fall off! It has a distinctive green color so look for it where extension cords are sold. It sports a FULL LIFETIME WARRANTY - I've never seen another cord that offers this.
Lighted Yellow - This is cord that has a blend of rubber and vinyls (I think...). Its flexibility is great at room temperature, but only so-so at low temperatures. It has a cool clear female end that glows when the cord is plugged into a working power source.
All Weather Blue - This cord is made to be flexible at cold temperatures. Believe it or not, at room temperature it is unruly - I know as I own one! These cords are the exact opposite of the standard orange PVC cords that probably every homeowner has!
Round Orange - This is the old standby orange PVC cord. It is flexible when the temperature is above 60 degrees or so. But when it gets cold, forget about coiling this one up!
General Cable Corporation also makes the extension cords that have circuit breakers in the cord, ones that have safety GFCI circuit breakers within the cord, multiple head cords, extension cords that have interchangeable accessories, and other cord accessories. You absolutely must give them a call to find where you can purchase their products locally. You will not be disappointed, that I can assure you!
Leviton 800-824-3005 Leviton also makes extension cords. However, after repeated attempts, I was unable to get information. I hope that you can do better than me.
Nothing is more frustrating than trying to figure out why a 3 way or 4 way light switch system doesn't work. Years ago, I got a severe brain cramp one day trying to hook up two switches. After I consulted some books, it became crystal clear how to do it. Ever since that day, I have memorized the wiring diagram to successfully hook up 3 & 4 way switches.
The electrical wiring in your house can be installed in several ways. This can cause problems when trying to diagnose a wiring problem with 3 way or 4 way switches. If you decide to tackle this easy problem, it will help you immensely if you buy a continuity tester. This is a simple battery powered device that tells you when a circuit is complete.
Continuity testers are often electronic devices that have a needle gauge or a digital readout. There are always two wires that lead from the tester with metal tips. If you touch the wires together the needle should jump to the end. This shows that the current from the battery is flowing from one wire through the other wire to the gauge. Here is why we need this great tool.
If you goof up the wiring of 3 way or 4 way switches, you will need to determine which wires go where. There are basically two types of wires we are concerned with: the common wires and the travelers. The continuity tester allows us to figure out which wire is which.
Avoid the temptation of running your telephone wires in the same holes as high voltage wiring. This is the first mistake I often see. This practice places the telephone wire parallel and in close proximity with the high voltage wiring. This in turn can lead to interference on the telephone wire. When electricity flows through the higher voltage wire, it can sometimes induce an electromagnetic field in the telephone wire.
Try to stay at least 16 to 24 inches away, if possible from high voltage wires. This can often only be accomplished by drilling a separate set of holes for the phone wires. Don't drill less than a 3/8 inch hole.
Wire Type / Size
Use UL approved twisted pair solid conductor wire. 22 or 24 gauge is preferred. I highly recommend that you use 6 conductor wire instead of 4 conductor. This means that 6 wires are bundled together inside the outer insulation. Why the need for the extra two? I like to have at least two separate phone possibilities available at each outlet with a spare pair in case of a wire failure. This can only be accomplished with 6 conductor wire.
Home Runs..... No, not like Baseball...!
A home run in wiring refers to a single cable that leads from a central junction point to an individual outlet location. It does this without stopping at any other outlet location on the way. Your phone cables should all be home runs. Most electricians run the cable in a series. In other words, they wire from the central phone location to and through each outlet location. This practice limits your ability to isolate trouble. It also doesn't let you turn off a phone in a separate room without penalizing other downstream phones.
Stripping Insulation
You should purchase the inexpensive special wire strippers for low voltage wiring. They do a great job. However, the hardest insulation to remove is the outer cable insulation which surrounds all the inner wires. You MUST carefully remove this without scoring or removing insulation from the inner wires. This can be tough to do. I remove the outer insulation by gently using only partial pressure on the wire stripper's largest setting. This allows you to partially cut through the insulation. While applying this pressure, I pull the stripper towards the end of the wire. The insulation then rips apart without scoring any of the inner wires.
Attaching Wires to Screws
Did you know there is a right and a wrong way to attach wires around screws? If you do it incorrectly, the wire will unwind as you tighten the screw. As you look at the screw head, always wrap the wire around the screw in a clockwise fashion. Do not wrap the wire around the shaft of the screw several turns. In fact, the wire only needs to wrap around the screw just a little less then one turn. Try to minimize the amount of insulation you remove from each individual wire as well. Exposed wires can touch one another when you jam them into the box when you screw the outlet to the box. If the wires touch, it can short out the connection.
Installing telephone cable is really a treat, especially if you have been running 12 gauge high voltage cable all day. The telephone cable is easy to pull and work with. The only challenge I find is removing the outer insulation which covers and protects the individual wires within the cable. This is where most rookies get into trouble. We will talk about this in a few moments, so be patient.
Modems or Teenagers
The phone companies are being inundated for requests for additional phone lines in residences. The reasons vary, however in most cases it boils down to a computer modem or a teenager who needs a phone connection. Some houses have as many as three or four phone lines, especially those where a person works at home like me!
If you find yourself in this spot and wish to save some money, then I suggest you take care of installing the phone line once the phone company has installed the outside cable and junction device inside your home. Phone cables can be successfully installed by just about anyone.
Two Wires is All it Takes
Most people shy away from phone work because they see all of the multi colored wires at the phone outlet and at the junction box. Relax! Only two wires power your phone, fax machine, or modem. The phone cable that comes from the street into your house either has two wires or contains several pairs of wires. My house has an underground cable which I installed. It happens to contain five pairs of wires or 10 wires in all. As long as all the wires are good, this means I can have five separate phone lines feeding into my house.
Four Pair Minimum for Your Line
If you are getting ready to extend a new cable from your phone junction box or where the phone company installed/terminated your new line, you should use a minimum of 4 or 6 conductor cable. What's that? It is simply a single cable that contains 4 or 6 separate wires. Why waste the other two wires? Well, you may not waste them. You may install another phone at a later date, or, you may have to use one of the wires in case one of the other wires you intended to use is defective.
Older houses often contain 4 conductor "quad" cable. This cable often contains four wires which are solid in color. The wire colors are almost always red, green, yellow, and black. If you decide to use these wires, you will not obtain the highest quality voice or data signal.
Modern phone cable for residential houses contains individual wires that are 22 or 24 gauge in size, band striped for identification purposes, and arranged in twisted pairs. The twisting of the 2 wires around one another enables the quality of the signal to stay at a very high level.
Point A to Point B
Running cables in an existing house can be a challenge. Some people will leave phone wire exposed and run it along baseboard. Phone company installers did this for years. In fact, they had a nifty little staple gun that allowed them to neatly do this task. I would only do this as a last resort. Phone cable is somewhat fragile. It really could use as much protection as possible. Try to run it within walls when possible.
If you are trying to get a cable from one floor to another, or say from the attic to the basement in a ranch house, find the plumbing stack location. Often I have had great success in dropping a nail attached to a string from the attic to the basement right alongside a plumbing stack. The plumbers almost always cut the flooring or plates out with extra room to spare. If you jiggle the string, the nail drops right down into the basement.
Making a Test Outlet
A pair of alligator clips attached to wires that lead to the back of a modular outlet allows you to make a crude copy of those cool little phones you see the phone installer wear on their tool belts. This setup allows you to clip onto the ends of wires within your house or at the phone company termination block to see if you can generate a dial tone. This little setup can be made for less than $8 in most cases and allows you to use a standard phone to test your lines.
Make sure that the alligator clips do not touch one another when in use. If they touch, the line will short out and you will get nothing but static, disconnected, or both.
I like to make the leads on the alligator clips about 16 inches long. The wires leading from the ends of the alligator clips hook up to the green and red wires on the back of the modular outlet. These two wires are almost always traced to the center two wires or conductors of the modular outlets and mini plugs.
When not in use, store this outlet and the alligator clips in a self sealing clear plastic food freezer storage bag. The bag keeps it clean and you can always see the contents!
Do you have an existing phone outlet location with a mass of tangled wires inside? Which ones work? The wires should be color coded. If you have only one phone line in the house, it should be easy.
Go to the phone line termination board. This is where your inside phone cables meet up with the outside phone line. Look to see which color wires hook up with the phone wire that comes in from the street. This is your first clue. If the same color wires are back at the outlet you are trying to activate, connect them up.
Hopefully you will get a dial tone. If not, go to all the other phone outlets in the house to see if these wires have been connected to the wires in those outlets that you know in fact work. This is often the problem - the wires you need to work are simply disconnected at another phone outlet.
Older Phone Equipment - Can't Break Dial Tone
Are you attempting to connect an older phone? No problem, as many phones will last and last. However, you possibly will hook up the phone outlet and find that you get a dial tone but when you attempt to dial, nothing happens. You have the polarity of the wires reversed. Simply switch the two wires around on the back of the outlet screws and you will solve the problem. This problem lies in the older phone equipment. Newer phones are usually not sensitive to this polarity problem. That is, it makes no difference if the wires are reversed.
Crackling and Static in the Lines
After you hook up your new line, you may experience static or crackling. Guess what, the problem may not be in your phone line! It may be in the phone company wires. To see if the problem is in the phone company wires, connect your test outlet to the wires that come in from the street. If you still hear the crackling and you know the phone does not make this sound when hooked to another phone line, the problem is most likely the phone company's. I had this happen to me when I installed an extra phone line for my computer three years ago.
If the problem is within your house and wiring, it can almost always be traced to locations where bare wires are touching one another. Be absolutely certain that the insulation of the individual conductors has not been pierced where you stripped the outer cable casing off. This is usually where shorts are found. You have to look closely. If you find a short, try to place some electrical tape around the nick in the wire(s).
Try to use new wire for computer lines. Older wiring may give you fits in trying to locate a short. The extra time spent running a new line is well worth it. Your modem transmissions will get garbled with static in the lines.
Circuit breakers are so common today that many people take them for granted. They are the silent guardians of our household electrical systems. Without circuit breakers, the possibility of electrical fires would dramatically increase.
Prior to the advent of circuit breakers, fuses were used to protect the wiring in houses. Many people fail to realize that the wiring which originates in the fuse or circuit panel and terminates at each receptacle, switch, or fixture must be protected. Fuses and circuit breakers serve this purpose.
Short Circuits & Fire
The wiring which allows us so many conveniences has to be insulated. This insulation not only prevents you from being electrocuted, but also prevents wires from short circuiting. Short circuits occur when a wire energized by single phase 120 volt current touches a ground or neutral wire without the benefit of resistance.
When a wire short circuits, the electricity flows extremely rapidly through the wire. It's not much different than you pushing the accelerator in your car to the floor. Things can rapidly go out of control. This rapid flow of electricity creates friction which in turn creates heat. The heat can quickly melt the insulation covering the wire.
This heat can easily start a fire. Also, short circuits often create sparks. The heat is incredible. In fact, anyone who has witnessed a welder using an arc welder has seen a continuous short circuit. The short circuit is somewhat controlled in that the welding rod is used to 'control' the direction and flow of the electricity.
Resistance = 'Yellow Light'
We all know that electricity flows through wires, because we have to pay for it. However, what is different about this flow of electricity as opposed to the flow during a short circuit?
The difference is speed. When electricity encounters an electrical motor, a light bulb, an oven or toaster heating element, it has a tough time getting through those materials. In other words, it slows down. The heat or energy that otherwise would have arc welded is now being put to work for good purposes. That's it in a nutshell.
Wire Capacity
Electric wires are available in different sizes. They are sized according to their thickness. This is often referred to in the industry as its 'gauge.' Common household wiring is usually 14 and sometimes 12 gauge.
The numbering system used for these gauges is somewhat confusing. As the gauge number gets higher, the wire gets thinner. Thinner wires cannot carry as much current (electricity) safely as a thicker wire.
Electric wires carry electricity much like pipes carry water. You can only force so much water through a certain sized pipe. The same is true with electricity. Wires are rated as to the amount of electricity they can safely carry or transmit. The rating is a measurement of the electrical current or amperes (amps).
It just so happens that circuit breakers are rated the same way! That is so you can match the wire size in a particular circuit to the proper sized circuit breaker.
What's a watt?
Homeowners usually are familiar with two measurements of electricity: volts and watts. For example, virtually everyone knows that the voltage of the electricity in their house is 120 and 240 volts.
People also deal in watts on a daily basis. That's how you buy light bulbs. 75, 100, 150 watt bulbs are very common. Electrical appliances are often sold based on their wattage. Electric hairdryers are often 1,200 watts.
Conversion
Very few homeowners I have dealt with, however, know how to relate all of these numbers. It is extremely easy. It is also very helpful, as you quickly begin to understand why a circuit breaker pops or a fuse blows.
The conversion formula is simply this: Watts = Amps x Volts. So, in numeric form, 1,800 watts = 15 amps x 120 volts. Is it beginning to get less fuzzy?
Your bathroom breaker pops if you try to operate your hairdryer, mirror lights, and curling iron all at the same time. Too many watts at one time are trying to get past the breaker! Watch those watts!
The following books and publications all deal with residential electricity, wiring techniques, tools, methods, materials, etc. in some fashion or another. Some are basic, while others are more advanced. Some have excellent photographs, while others are not so good. Your best bet is to take your time at your local bookstore and look through as many as possible.
See if the book or publication covers in clear, understandable English just what you are trying to figure out. If not, keep looking! In any event, my guess is that you quite possibly will need several books to fully understand the subject. Remember, residential electricity can be both dangerous and deadly. DO NOT underestimate its ability to hurt you or your family members. If you are the slightest bit unsure as to working with electricity, hire a professional! Good luck and work safely!
Wiring Simplified: Based on the 2008 National Electrical Code (42nd Edition) Creighton Schwan & Herbert P. Richter Park Publishing, 2008
House Wiring Simplified Floyd M. Mix Goodheart - Willcox., Inc., 2005
The Complete Guide to Home Wiring: A Comprehensive Manual, from Basic Repairs to Advanced Projects Black & Decker Home Improvement Library, 2001
Advanced Home Wiring Black & Decker Home Improvement Library, 1992
Quick Guide Wiring Creative Homeowner Press, 1996
Fine Homebuilding magazine has had several articles in past issues which also deal with electricity and residential wiring. Fine Homebuilding is, in my opinion, one of the finest magazines that deals with the professional installation of building and remodeling products. The workmanship of talented craftspeople is featured in each issue. The articles which appear are well written, edited and have excellent illustrations and photographs.
Fine Homebuilding is published by The Taunton Press. They also publish other books which are compendiums of several related articles. Click on their web site and check out their publications.
PLUS, Check the manufacturer of your existing circuit breaker panel. Almost all manufacturers of circuit breakers make secondary lightning arresters which fit inside their panels.
Manufacturers of Transient Voltage Surge Suppressors
Prior to 1980, lightning was not quite the nuisance that we find it today. Because of the widespread proliferation of electronic devices which are sensitive to voltage surges, lightning has taken on a new dimension. Aside from being a very real and dangerous threat to life, lightning is now a very real and dangerous threat to electronic equipment.
Computer chips found in TV's, VCR's, radios, computers, modems, telephones, answering machines, garage door openers, etc. can be permanently damaged by relatively minor voltage surges. Lightning can induce tremendous voltage surges in household wiring. It can do this in many different ways.
Lightning can create voltage surges in several of the following ways. Lightning can score a direct hit on your house. It can strike the overhead power line which enters your house, or a main power line that is blocks away from your home.
Learn how you can protect your home from damage caused by lightning. This book provides plenty of diagrams and photographs to easily understand the topic. CLICK THE IMAGE to get the book now.
Lightning can strike branch circuitry wiring in the walls of your house. Lightning can strike an object near your home such as a tree or the ground itself and cause a surge. Voltage surges can be created by cloud-to-cloud lightning near your home. A highly charged cloud which passes over your home can also induce a voltage surge.
Voltage surges can also be caused by standard on and off switching activities of large electric motors or pieces of equipment. These surges can be created by a neighbor, or by a business or manufacturing facility some distance from your house. These surges are insidious and for the most part are silent. They can occur with little or no warning.
When a voltage surge is created, it wants to equalize itself and it wants to do it as quickly as possible. These things seem to have very little patience. The surges will do whatever it takes to equalize or neutralize themselves, even if it means short circuiting all of your electronic equipment.
The method of providing maximum protection for equipment is quite simple. Create a pathway for the voltage surge (electricity) to get to and into the ground outside your house as quickly as possible. This is not, in most cases, a difficult task.
The first step is simple. Create an excellent grounding system for your household electrical system. The vast majority of homes do not have an excellent grounding system. Many homes have a single grounding rod and /or a metallic underground water pipe which are part of the electrical grounding system.
In most cases, this is inadequate. The reason is somewhat easy to explain. Imagine putting a two inch fire hose into your kitchen sink and opening the nozzle to the full on position. I doubt that the drain in your sink could handle all of the water. Your grounding system would react in the same way to a massive voltage surge.
Just as the water jumps out of the sink, the electricity jumps from the grounding system and looks for places to go. Frequently it looks for the microchips in your electronic devices. They are an easy target. They offer a path of least resistance.
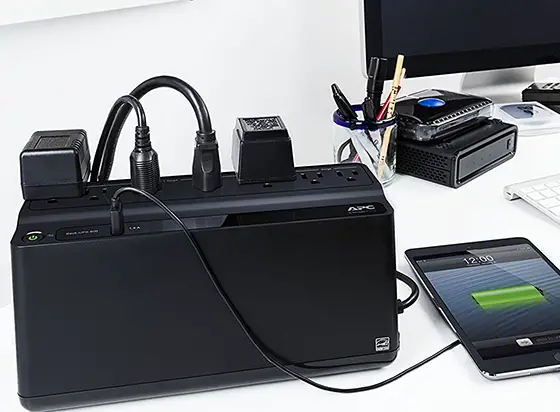
The final line of defense, a battery backup surge protector will keep your electronics safe from damaging power surges. CLICK THE IMAGE to keep your data safe.
Voltage surges want to be directed to the grounding system, and when they do, they want to get into the ground around your house in a hurry. You can achieve this by driving numerous grounding rods into virgin soil around your house.
These rods should be UL approved and connected by a continuous heavy solid copper wire which is welded to each grounding rod. This solid copper wire begins on the grounding bar inside of your electrical panel and terminates at the last grounding rod. Avoid using clamps if at all possible.
Over time, the connection at the clamp can corrode or become loose creating tremendous resistance. This will act as a roadblock to the electricity trying to get into the ground around your home.
The grounding rods should be at least ten feet apart from one another. They should be located in soil which readily accepts electricity. Moist clay soils are very desirable. Rocky, sandy, or soils with gravel generally have high resistance factors. Electricity has a tough time dissipating into them. Resistance readings should be in the range of 10 to 30 ohms. The lower the better.
The second step in household surge protection is to install a lightning arrester inside of your electric service panel. These devices can be extremely effective in intercepting large voltage surges which travel in the electric powerlines. These devices capture the voltage surges and 'bleed' them off to the grounding wire which we just spoke of.
If for some reason you do not have a large enough grounding wire, or enough ground rods, the arrester cannot do its job. It must be able to send the surge quickly to the ground outside of your house. These arresters range in price from $50.00 to $175.00.
Almost every manufacturer of circuit breakers makes one to fit inside their panel. They can be installed by a homeowner who is experienced in dealing with high voltage panels. If you do not have this capability, have an experienced electrician install it for you.
The final step in the protection plan is to install 'point of use' surge suppression devices. Often you will see these called 'transient voltage surge suppressors'. These are your last line of defense. They are capable of only stopping the leftover voltage surge which got past the grounding system and the lightning arrester.
They cannot protect your electronic devices by themselves. They must be used in conjunction with the grounding system and the lightning arresters. Do not be lulled into a false sense of security if you merely use one of these devices!
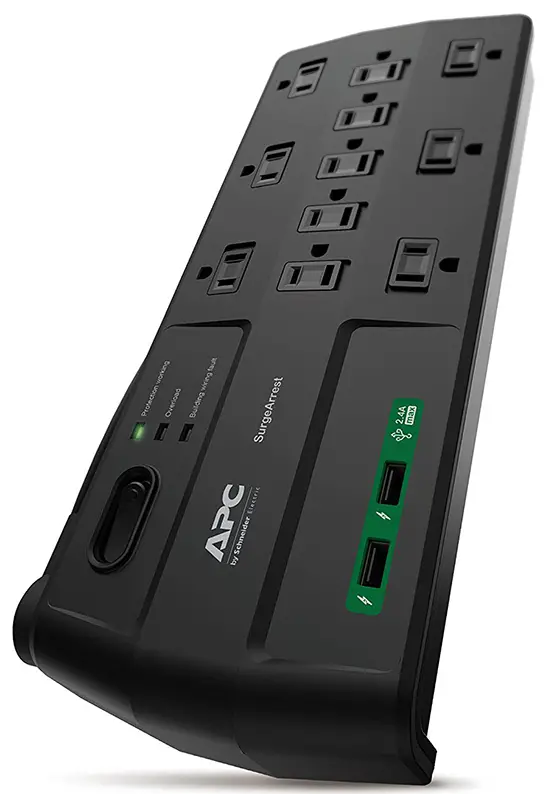
The simplest way to protect your electronics from damage. CLICK THE IMAGE to get a new Surge Protector.
The 'point of use' surge suppression devices are available in various levels of quality. Some are much better than others. What sets them apart are several things. Generally speaking, you look to see how fast their response time is. This is often referred to as clamping speed.
Also, look to see how high of a voltage surge they will suppress. Make sure that the device has a 500 volt maximum UL rated suppression level. Check to see if it has an indicator, either visual or audio, which lets you know if it is not working. The better units offer both, in case you install the device out of sight.
Check to see if it offers a variety of modes with respect to protection. For example, does the device offer protection for surges which occur between the 'hot' and neutral, between 'hot' and ground, as well as between neutral and ground. There is a difference! Check to see if it monitors the normal sine waves of regular household current.
Surges can cause irregularities in these wave patterns. Good transient surge suppression devices 'devour' these voltage spikes. Finally, check the joule rating. Attempt to locate a device which has a joule rating of 140 or higher. Electrical supply houses often are the best place to look for these high quality devices.
Some devices can also protect your phone equipment at the same time. This is very important for those individuals who have computer modems. Massive voltage surges can come across phone lines as well. These surges can enter your computer through the telephone line! Don't forget to protect this line as well. Also, be sure the telephone ground wire is tied to the upgraded electrical grounding system.
Additional Reading
Lightning Protection for People and Property Marvin M. Frydenlund
Van Nostrand Reinhold New York 1993
Standard for the Installation of Lightning Protection Systems (NFPA 780) National Fire Protection Association 2008
Lightning Protection
J.L. Marshall
John Wiley & Sons New York 1973
Lightning Protection R. H. Golde Academic Press 1978
Just wanted to share my opinion with you, I have down loaded the checklist I purchased from you. I have to say you knocked the ball out of the park. Thank you for a excellent job, my gain.
- Jim Richardson
Order Safely 24 Hours a Day ONLINE
Customer Support Available: M-F 8:00 a.m. - 2:00 p.m. ET
Replacement windows can save you money and add value to your home. That is if you buy the right ones! This Contractor Hiring Guide & Checklist helps you do just that.
My Window Replacement Contractor Hiring Guide & Checklist costs just $7.00.
My Checklist can and will save you heartache and lots of money.
DELIVERED INSTANTLY
HOW WOULD YOU LIKE?
Valuable tips for finding the best contractor
Instant Download in Adobe PDF File Format
My Window Replacement Checklist costs just $7.00.
We found the checklist very helpful. Using the checklist, we knew what to ask bidders and understood their replies. We knew what to ask for also, since we had informed ourselves. Our project is completed now and we are very pleased with the results. Thank you for being somewhere to go for information.
It is delivered to you the instant your credit is approved in the common PDF format that can be viewed with free Adobe Acrobat Reader software. Click the Adobe graphic just below to download the latest version of this free software. Many modern computers already have this software installed at the factory. You simply double click the Download URL link in the email that is sent to you and the Checklist automatically opens.
Purchase my products online at my AsktheBuilder Store. Online ordering is secure.
Expert Advice For Your Home
Subscribe to the FREE Ask the Builder newsletter to receive professional advice for your home. Complete the form below and each week you'll get:
DIY Tips
Tool Reviews
Project Guides
Product Discounts, Giveaways & more.
Unsubscribe at any time. We respect your email privacy.