Insect Identification

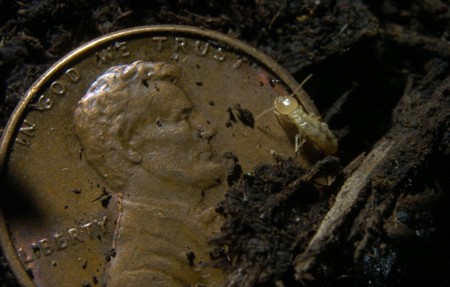
These termite pictures were taken by a very good friend of mine, Michael Keating. I helped him during the process as it took lots of patience to get these little guys to walk near the penny you see.

The penny is there for scale. Termites are not big. In fact, if you were to measure one, they might be half the length of an average grain of uncooked white rice.

The termites in these photos are of the eastern subterranean variety. This termite type is the most common type found east of the Mississippi River.

The body of the termite is really pretty fragile. They need moisture to keep their skin or shell nice and supple. If they dry out, they die pretty quickly. This is why wet soil around or under your home is a favorite place for them to thrive.

As a termite colony matures, it sends out mature termites to form other colonies. These are the termites with wings. So if you see lots of winged insects, capture some, put them in a plastic zip-lock bag and put them in the refrigerator. Once they have stopped moving around, see if their body shape doesn't match what you see below.

If you suspect termite activity in your home and take apart some wood and see small white insects like in the following photos, they are probably termites. Don't panic, but do call a great exterminator who can inject new chemicals in the soil around your home that will kill the termites.


Lighthouse Restoration

DEAR TIM: In the log books of our historic light station, the lighthouse keepers mention whitewashing, painting, and something called calciuming. I have tried in vain to discover what that might mean. All I know for sure is that it's something they did to the interiors of their dwellings. The keepers' houses are brick and the interiors have horsehair plaster directly on the brick walls, and plaster on the framed interior walls. Can you tell me anything about calciuming? What was it? Why do it? How do you do it? Should I still be doing it? Ellen Henry, MFA, Curator of Collections and Education, Ponce de Leon Inlet Light Station, Ponce Inlet, FL

DEAR ELLEN: As much as I hate to say it, I believe the term calciuming might be peculiar to those particular lighthouse keepers. It probably is a slang term for a particular type of whitewash or plaster treatment applied to the inside of the walls of their dwellings and possibly the actual lighthouse.

The brilliant white finish on the Tawas Point lighthouse on Lake Huron could be a coating of pure lime. It dries pure white. There is a possibility pure lime was also used inside the house next to the lighthouse. PHOTO BY: Tim Carter

The brilliant white finish on the Tawas Point lighthouse on Lake Huron could be a coating of pure lime. It dries pure white. There is a possibility pure lime was also used inside the house next to the lighthouse. PHOTO BY: Tim Carter

Because of the extremely harsh marine environment, they needed a wall treatment that would not disintegrate. The constant humidity and heat in your location would quickly cause regular finish materials to fail in short order.

The biggest clue is the word calcium that happens to be the first part of calciuming. Calcium is the principal element in lime. Lime is, of course, the principal ingredient in whitewash, older mortars and plaster. Lime is created by heating very pure ground-up limestone. The chemical formula of limestone is CaCO3. The heating process disturbs the chemical makeup of the limestone and drives off carbon dioxide. The resulting powder is CaO or quicklime and is chemically unstable.

The lighthouse keepers could line the inside of the dwellings with limestone rock, but something tells me they wanted a smoother finish. What's more, installing solid rock walls is costly and labor intensive. But, if you systematically apply layer after layer of thin liquid limestone that hardens on interior walls, you get a smooth surface, it is hard as rock and it requires minimal skill and labor.

This is the famous Ponce de Leon Inlet Light Station in Florida. It is a massive structure built to withstand all the ocean can throw at it. PHOTO COURTESY OF: Ponce de Leon Inlet Light Station - Ms. Ellen Henry, MFA - Curator of Collections and Education

This is the famous Ponce de Leon Inlet Light Station in Florida. It is a massive structure built to withstand all the ocean can throw at it. PHOTO COURTESY OF: Ponce de Leon Inlet Light Station - Ms. Ellen Henry, MFA - Curator of Collections and Education

Limestone is a very hard and durable rock. It can withstand tremendous punishment from Mother Nature. By reversing the chemical reaction once you have quicklime, you can make man-made limestone. Quite possibly this is what the lighthouse keepers did.

The quicklime wants to react with other chemicals so that it can once again be stable. The humidity in water vapor, regular liquid water and carbon dioxide in the air around us readily satisfy the quicklime's desire for the lost oxygen and carbon that left the limestone when it was heated.

So if the lighthouse keepers regularly mixed lime with water and possibly some very fine sand, they would be periodically adding layer after layer of very thin durable limestone to the inside of the lighthouses. I think this is what was happening and when you stop and think about it, it makes perfect sense.

Spray on Siding

The following is an email I received from a homeowner who stumbled across my Liquid Siding column after he had a miserable experience with a company that made promises that they did not keep. It seems the only thing they kept was the money they got from the salvage yard for Ted's gorgeous copper gutters!


DEAR TIM: I just read the articles on your site about the spray on siding. I too consider myself a victim of the spray on siding. I went through a lot of pain to make sure what they were telling me was true. I met with the salesperson 3 times to convince myself that I would not have to paint again, at least not for 25 years as they would guarantee. I also took a look at a house they said they painted with the system and although it was rough looking, I justified that by it being an old house.

Since my house was only 10 years old with an already smooth painted finish, I assumed it would stay smooth and look like the painted sample the salesperson carries with him to show what the finished product will look like.

My concerns started when it took so long to start the job after paying a 10% deposit. My first concern was finding that the company does not do the work but subs it out to (in my opinion, to anyone) after seeing the crew sent to my house. There was one fairly nice looking young man who was in charge. He had two helpers who seemed to have just arrived in the USA. The one in charge (OIC) said he had been doing this for three months and today was the first time for the helpers. The OIC said this as he showed me the equipment he had just purchased to work with.

My second concern was watching him power wash from 20 feet away (not much power left for cleaning from that distance). Back to the sales pitch, I expected the power washing to take place, drying for a day or so and then sanding and prep work but I guess it is faster to do it all at once. I let that go on but had to say something when they were sanding the top of our columns while spraying at the bottom of the same column. Over the course of the work it was not unusual to for them do two or three things at the same time on the same piece of wood. I questioned the OIC and in his broken accent tried to make me believe that when it is finished it will be right.

When the salesperson was in my house, I took pains to explain about my copper gutters. These special gutters can be removed from the cradles to avoid damage. I have a written note from the salesperson that the gutters would be removed and replaced so to paint behind them.

Can you imaging me looking over the deck one afternoon and seeing the copper gutters folded and mangled in a heap on the ground? I asked one of the helpers what the hell was going on and he replied that they were going to take them to which I replied, the hell you are and they are not to be removed from our property. The downspouts were still mounted to the house completely out of the way of any painting and they took those also.

Now, can you imagine my surprise when the next day on my way home, I was told at a local store that these guys had stopped in and in the back of their truck were my gutters going to the scrap yard? I reported the gutters stolen to the Sheriff's department and a report is on file. I pretty well have confirmed that they put the price of replacing your gutters in the paint price. They tear them down and you pay to replace them. I bet if I had not been so keen on these guys that I would have had aluminum gutters put back.

The sales pitch also was that the brick would be masked off as well as the shrubbery and so forth. There was no masking of the brick walls or the shrubbery and paint brushes and rollers were washed at the outside tap against the house leaving paint that has still not came off the brick. They did use a dropcloth on the porch. I even put a newspaper under the door that one of the helpers was painting and he moved it saying he didn't need it, now I have paint on the hardwood floors.

Being in the fiberglass business for over 30 years and spraying gelcoat 20 to 25 mills I know what it takes and to keep a uniform surface and thickness. I have photographs of the OIC spraying 25 feet off the ground standing on a ladder rung on his left foot, his right foot wrapped around the ladder upright bar leaning to the left on at least a 50 degree angle, holding a 4 foot edger with a probably 5 foot handle in his left hand trying to spray paint the eaves from 5-6 feet away. None of this spraying should have been done from more than 12 - 18" from the surface.

The company did send a company superintendent to the job site a few times and he assured me that the gutters would be replaced. I had to replace them months later to avoid more water damage at a cost of $4700.00 +. While standing with the superintendent in the front yard watching his OIC painting on the eaves of the A frame I pointed out brush marks on the vinyl siding from smearing out drips of paint and he told the painter to paint all the vinyl siding to make it uniform which he did.

It wasn't long after that I read the Richmond, VA newspaper and lo and behold there is an article on the paint system and a statement saying it can be applied to any surface except vinyl, silicone and glass. I wonder why the superintendent and painter didn't know about this?

When it's all over I was left with broken roof shingles from them putting the ladder against them, paint on the roof shingles, paint on the window sills, overspray on the brick walls, paint on the deck, paint on the grill cover, paint on the shrubbery and painted vinyl siding . I have checked the thickness in places and have found none close to the thickness of a credit card as they advertise except maybe where they did their finger painting.

I can see that if my house were wrapped in a uniform thickness of a credit card it would probably last 25 years, it just makes sense, and that is what I was told it would be and what I expected to get.

This is my first and last experience with this type of system. I would never again use it myself or recommend anyone using it. I figure that for three times the cost of paint, I could also guarantee regular house paint for 25 years and show up to fix the cracks and peels whenever they occur at my convenience. But instead of having patches from repairs over 25 years I would rather have a freshly painted house every 7-8 years. While writing this I just remember that the cinder block walls of our factory were painted 23 years ago with masonry paint and it still looks good.

One last comment, just this week after a long absence the new superintendent from the company wanted to inspect the house. I showed him one area where the paint is blistering along with all the other screw ups and he had the nerve to ask me if this side gets more sun. This paint is supposed to be indestructible, what kind of question is that? Are you going to tell me now to keep it out of the sun?

My advice is this:

1) Write your own contract.
2) Pay the deposit when they show up to start.
3) Have yourself or someone to constantly watch the process.
4) Make sure they have at least 5 years painting experience.
5) Don't assume they have sent experts to do the job.
6) Know for sure the job is done right before paying the balance and only if 100% completed and satisfied.
7) Check the job from close up since everything looks good from the ground.
8) Make sure all promises made by the salesperson are put in the contract.

Ted Mentz
Mechanicsville, VA
Flag Pole Manufacturers and Companies

Flagpole Manufacturers and Companies

Here is just a small list of the many companies out in the USA that sell factory made flagpoles. I did an Internet search and came up with no less than 50 companies. I think you will find that there are probably less than 10 actual flagpole manufacturers and that many companies that sell poles actually are selling the same product. Be sure to find out WHO actually makes the pole.

Pay attention to sidewall thickness. This is a measurement of the amount of metal that is in the pole. More metal usually means greater strength. Also ask about stainless steel hardware. You want metal that absolutely will not rust. The halyard and the trucks are also very important. Price is almost always a good barometer of quality. High quality components simply cost more money.

SunSetter Products
This company makes a unique pole that telescopes up to a height of 20 feet. It has no ropes since you raise and lower the flag by simply clicking the pole up and down. This is worth a look.

Quinn Flags & Banners
This company has a full line of aluminum and fiberglass flagpoles in any size you want. They also have a fantastic selection of historical US flags. I am getting ready to buy one of the First Navy Jack flags that has a serpent with the words "Don't Tread on Me".

Concord Industries, Inc.
This company has a full line of great aluminum flagpoles. But they do not sell direct. You must deal with one of their distributors.Visit their website to find out who sells them in your area.

Hennessy House
This is a very unique company. They make historical wooden flagpoles! If you want to keep your colonial home totally authentic, then you might want to contact these folks. I found other companies that make wooden poles while I was doing my search so if you want comparative pricing, be sure to do an extensive web search.

American Flagpoles & Flags
This company has a wide variety of flagpoles and flags. They have a neat telescoping aluminum pole. These telescoping poles are the latest in flagpole technology. If you have one of these you can easily take down your flagpole if you need to for any reason. Traditional poles, once set, are pretty tough to take down.

Related Column: Flagpole Tips

Column B381

Closet Organizers

Closet Organizers - Cubbie Closet Storage Plans

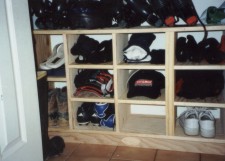
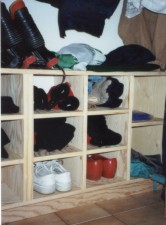
Closets, at least in my house, are the black holes that capture anything and everything. In just a matter of weeks or months there can be a big mess just behind the bulging door. To compound the matter, myself and many of my family members are pack rats. I contracted the disease from my mother, bless her heart! But I have started to solve the problem at my home the way I did it for years for some of my customers: simple closet organizers made from scrap plywood.

Factory Made Systems

You don't have to go to all the trouble to build your own setup if you don't want to. There are all sorts of companies that fabricate closet organizers and you can even buy factory made ones at most of the home centers and larger chain retailers. But the trouble with factory made units is that you get what they build and design. If you want custom sizing, you need to do it yourself or go with a local fabricator. Fabricated units made with melamine or laminate covered particle board can be very expensive. The price of larger setups may take your breath away.

Layout Tricks

Looking at the simple plan, the cut sheet requirements and the photos that are part of this bulletin will give you an idea of how to build this unit. The method I prefer to use incorporates mortise joints or grooves that can be found on some of the different parts. These mortise joints align the shelves and vertical dividers. They also make for solid connections between the parts so that you don't have to rely on mechanical fasteners such as nails or screws. The trouble is, it takes a router and a little layout skill to create these grooves. In fact, it is the most difficult part of the job. You don't have to do it, but it does aid, to some degree, the assembly of the closet cubbie system.

The trick to getting the grooves in all the correct places on the dividers is to make the marks at the same time on all of them. You can lay different dividers next to one another so that the two interior surfaces that face each other are aligned just like two pages in a book. When you open a book and lay it on a table the pages are flat but once the book closes they face one another.

Some Critical Measurements

I used 3/4 inch thick plywood to make my cubbies. One of the reasons is that I like to create a 1/4 inch deep mortise groove. If I were to use just 1/2 inch thick plywood for my system this would cause huge problems when two grooves would be next to one another. There are several places where this happens. Look at the photos and see how several shelves are at the same level and they both connect to one vertical divider. You can use thinner wood and go with a more shallow mortise say 1/8 of an inch, but that is often impractical.

Knowing that you are going to have a 1/4 inch deep groove, you need to always keep this in mind as you measure. As I have noted in the Cut List, not all vertical dividers are the same length. The inner dividers are 1/2 inch longer than the end ones because they extend 1/4 inch into the top and bottom shelf.

Router Layout

I used a hand held router to create my mortises. You can buy a 3/4 inch wide router bit. A 1/4 inch deep groove can be made in one pass with the router. To keep the lines straight, I clamp a framing square to the wood piece and glide the router along the framing square edge. It works perfectly. The trick is to determine the offset. My router starts the cut 2.5 inches away from the outer ring of the router. Yours will be different! Do a test on a scrap piece of lumber to determine the offset.

Closet Cubbie Cut List

Below are the dimensions of some of the pieces I used to build my closet cubbie system. Keep in mind that the most critical pieces are actually the vertical dividers. The overall width of the unit will change depending upon your closet! But, you can have some excess space if you like at each end. I built mine so it fit almost perfectly within the total available width of the closet.

If you look at the photos, each inner vertical divider is 20 inches tall. The vertical piece at each end and in the middle where you see the extra wide cap molding are only 19.5 inches tall. Why? Because I wanted the top and bottom to overlap the sides. Keep in mind that I built two units and butted them together. The extra wide cap molding that hides the rough plywood edge hides this joint. So, each cubbie unit of mine has two vertical pieces of each height since there are four vertical pieces per unit. The top and bottom of each unit in my setup were simply 30 inches long. All pieces, including the small shelves, were the same depth -- 11 and 3/4 inches. I made them this size so I could confidently get four 8 foot long pieces of material out of each sheet of plywood.


Assembly

I assembled the units by building the outer shell first. I used three 2 inch long drywall screws at each corner. Remember, the top and bottom overlap the sides. Once the outer box was built I slid the two vertical dividers into position and used small 4d finish nails to hold them in position. The last things that are installed are the small shelves. I actually determined their width only after the unit was built. Since I wanted a tight fit for each shelf, I custom cut each one ONLY after the unit was assembled and I could get a crisp measurement at each shelf location. Precutting these shelves is a mistake in my opinion. It is safe to cut the top, bottom and vertical pieces since they work out. But if you don't have the depth of your mortise router bit just right, you may create a shelf that is too tight or too loose. You don't lose any time by cutting the shelves last.

Closet Cubbie Plans

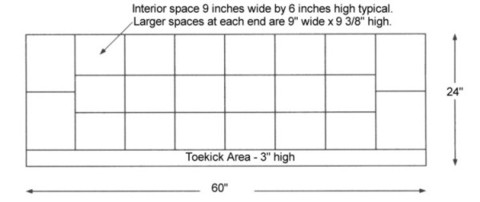
Front View

The beauty of this system is that you can make the interior spaces whatever you want. The only two limiting factors are the closet width and the height you wish to go. Keep in mind that I wanted to use the top of my setup as a shelf. Therefore, I kept it about 10 inches below were average coats hang from the closet rod.

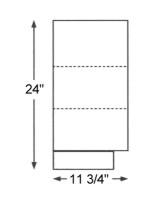
Side View

The dashed lines are the horizontal shelves within the unit. I didn't show the dashed line for the shelf at each end that is actually centered between the top and the bottom of the unit.

The toe kick was just made out of scrap plywood. I felt that it would be better if the unit was not just sitting on the floor. I recessed the toe kick in from the front just about two inches. The closet cubbie ;unit just sits on the toe kick and is not permanently attached. The weight of the unit will easily hold the toe kick in place. The toe kick is just 3 inches high.

Related Articles: Shoe Storage, Adding Closet Storage Space, Two Closet Plans - Materials, Two Closet Plans - Build

Column B388

Use Crown Molding to Make Decorative Shelves

Crown molding is a popular building material. Trust me, I know! Perhaps the most common use of the material is at the intersection of a wall and a ceiling. Crown molding really adds a nice touch to a room or hallway.

But this molding can also be used to create a nice decorative shelf to display trinkets, plates and other knickknacks. To easily accomplish this task you need a few special saws and a few hours of time.

Photo Essay

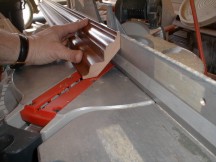
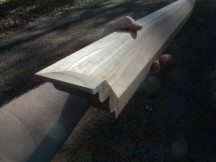
I say we get started building one of these shelves. The first thing to realize is how the crown molding fits in a miter saw in order to produce the correct mitered cuts. Look at Photo 1. The crown molding is actually upside down in the photo. This is correct.

.

Photo 1

Photo 1

Why? The molding needs to be positioned in the saw the way it will sit on the wall. The table and fence of the saw simulate the 90 degree intersection of a typical wall and ceiling. The vertical saw fence is the wall and the flat saw table is the ceiling. Since the simulation is upside down you must hold the molding this way.
.

Photo 2

Photo 2

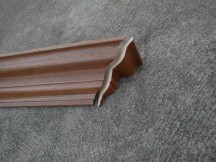
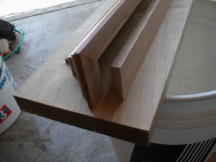
You cut your shelf so that the longest points of the shelf are the top of the molding. Look at Photo 4 to see an exploded view of a corner of the shelf. The molding is oriented top side up in this photo and you can see the small return piece that makes up the finished corner.
.

Photo 3

Photo 3

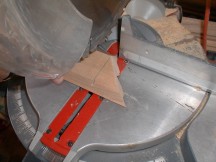
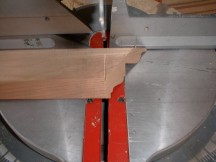
How do you cut that small triangular corner piece? Simple. You cut the crown molding as if you were going to run it around an outside corner in a room. But in this case you have to clip the small piece. Look at Photos 2 and 3. I have cut the miter for the return piece and now I have flipped the molding so it lies flat on the saw table. It is OK to do this for the final cut.
.

Photo 4

Photo 4

The saw cut in Photo 3 just kisses the intersection of the angled face and the back of the foot of the molding. If you cut past this intersection, then the small triangle piece will be too long. Cut into the angled face and you will have a gap. Cut a trial piece and you will see exactly what I mean when you dry fit the corner to the main piece of crown molding that makes the front of the shelf.
.

Photo 5

Photo 5

The Flat Top - Once you have assembled the two corners to the main piece of crown, you should have a semi-completed shelf similar to what you see in Photo 5. Note how the small triangle piece, once glued and nailed, is flush with the back foot of the main run.

Your challenge at this point is to simply cut a piece of wood that will fill the void at the top of the crown molding. Look at Photo 6 to see what I mean. I have cut the piece and have held it out so you see that it can drop into the crown molding to make a flat top surface.

It just so happened that my molding had a 45 degree angle to the rear sloping face. This made it easy to cut my top shelf. I simply set my table saw blade at 45 degrees and cut the top rear shelf. The sides of this piece also get clipped at a 45 degree angle.

.

Photo 6

Photo 6

This top rear piece gets glued and nailed to the back of the crown molding. You can use small brad nails.
.

Photo 7

Photo 7

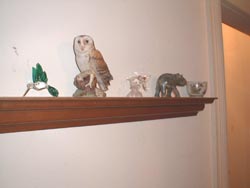
The final piece of the shelf is a small cleat that gets attached to the wall. This piece of wood might also have to have an angle cut depending upon the size of the molding you use. In my case I had to cut my wall cleat at a 45 degree angle. I nailed this to the wall and then set my shelf on top of it. Small screws were used to go down through the top rear shelf piece into the wall cleat. You can see the finished shelf in Photo 7.

If you REALLY want to discover how to install Crown Molding, you need my Crown Molding eBook or Installing Crown Molding DVD..

Column B399

Pre-Finished Crown Molding

Pre-Finished Crown Moldings

I used a pre-finished crown molding for a decorative shelf. These are often available at traditional lumberyards, hardware stores and home centers. If you want to see some superb crown moldings with very different profiles, then visit a kitchen cabinet store. Sounds crazy, but they have many exquisite prefinished crown moldings that are used to finish off the tops of cabinets.

The crown molding I used happened to be part of an entertainment center in my basement. The cabinets were made by Merrillat - a major manufacturer of kitchen, bath, home office and home entertainment cabinetry.

In fact, the molding I used has a space for an accent molding. Once the crown molding is in place, there is a small vertical face. Merrillat makes a small twisted rope molding that fits perfectly in this space. After it is added, the molding looks as if it might have been hand carved. Hunting around for moldings such as this makes all the difference in the world

Column B399

Custom Crown Molding

Custom Crown Moldings

If you want a really special look, why not have your own crown molding made? If you live in a sizable city or town it is usually quite easy to find a woodworking mill that will make any crown molding you can draw.

If you can't find a woodworking mill, you might find a woodworker who has equipment that can make moldings. The trick to finding woodworkers is to visit fine lumberyards where these folks buy their raw materials.

The woodworking mill or individual woodworker use basically the same tools. But the woodworking mills almost always have better equipment, large capacity and the ability to grind cutting knives in a short period of time.

The best part is that the woodworking mills often save the sharp steel knives used to cut the profiles. An older mill might have 100 or more knives in stock that they can use to create a truly custom look. All you have to do is ask to see the different profiles they have already produced.

If you want to have your own personal style, you need to consult with them so they can help you draw a profile that will be easy to cut. It is possible to copy different elements from several crown moldings and combine them into one new profile. Simply use your imagination and start to draw. It helps to have small sample lengths of existing crown molding handy. You can trace the profiles on a piece of paper.

Column B399

House Settling Cracks Information

Literature for Settlement, Shrinkage and Foundation Problems

There are lots and lots of books out there about foundation settlement, cracks, expansive clay soils and lumber shrinkage. Most of them are somewhat technical. If you live in a town that has an engineering college or school, this is the place to start. Libraries will very likely have these books as well if they have a strong science section.

If you do have a college or university in your area, it is always a good idea to call and see if you can find a professor who is willing to talk to you. Most are very nice people who have an affection for books! This works to your advantage.

Two Winner Books

In talking with several structural engineers in my own town, both of them pointed me to a swell book about residential foundation problems. One of the engineers, Bob Becker P.E. said, "It is the Bible of the engineering industry."

The particular book is titled Foundation Repair Manual (McGraw-Hill Portable Engineering). It was authored by Robert Wade Brown. Mr. Brown's book is simply the best. Find a copy and read certain chapters if you have foundation problems. Some chapters are way over my head, but most are readable.

Book cover

The other book you should look at deals with cracks caused by lumber shrinkage. It is titled Design of Wood Structures - ASD by Donald E. Breyer. It is also a McGraw-Hill book. This book is heavy into mathematics, but it tells you all about lumber shrinkage! Even at the steep price, it is a solid investment. Just one or two chapters of this book will possibly save you hundreds of dollars in consultant fees whose advice may lead you astray!

Column B288

Wet Bar – Plans and Construction Tips

Certainly you have sat or stood at someone's basement or family room bar and wondered about having one for yourself. As you might imagine, I have built many bars over the years for customers. In fact I remodeled real bars in drinking establishments! Finally, I have one of my own!

Simple Job

Building a wet bar is fairly simple. The tough part of the job is selecting finish materials. There are just so many possibilities! I happened to select cherry wainscoting for the front of my wet bar. This product matched perfectly some wonderful cherry Merrilat cabinets that I have in the same room. The wainscoting was supplied by New England Classic. This is a wonderful company that has all sorts of natural wood and paint grade wainscoting that is custom designed for your personal application or job. You simply send them the dimensions of what you want to do and they come up with a design using their standard parts.

A wet bar wall needs to support a top and shelves that might be on the bartender side. It is not a big deal. The biggest hazard or challenge is offsetting the possibility of tipping the bar over. A U-shaped bar is obviously the best design. A curved wall is also very strong but presents all sorts of challenges to build. My L-shaped bar with a short wing wall turned out to be very stable.

Critical Dimensions

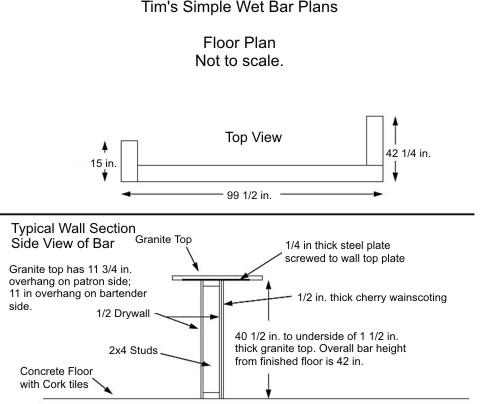
The finished height of a bar should be 42 inches. Try not to deviate from this too much. The front overhang for the patron side of the bar should be 12 inches if you intend to have bar stools. If it is just a standing only bar, a 6 or 9 inch overhang will work fine.

The overhang for the bartender side is a function of your overall design. But keep in mind the rotational force of the bar top if it is a heavy stone product! If the top is not balanced to a large degree, it can exert a force on its own that would make the bar want to lean or tip over. I centered my top on the bar wall for the most part.

Wall Thickness

If you can afford the space, construct the bar wall from 2x6's or better yet 2x8's. I had to use 2x4's because of space problems at my home. The wider the wall the more stability you produce.

Electrical Needs

Don't forget to plan for electrical appliances, mixers, refrigerators, phones, etc. Make sure you have outlets at the right places for anything you intend to have behind the bar.

Lighting

Indirect lighting, hanging fixtures, recessed lights, etc. are all possibilities. Creative lighting can really enhance a wet bar. Visit a true lighting showroom, not a big box store, and get some suggestions from the salespeople. I'll bet they can give you plenty of ideas!

Granite Tops

I love natural stone! My granite bar top gets all sorts of compliments. It is a deep green granite with large quartz crystals. There is a hint of blue in my top as well. Dark granites are easy to care for. If you decide to go with granite you MUST meet with the granite fabricator before you build your walls! The granite supplier will tell you how he intends to mount the top and what the rough height of the wall should be.

In my case, I had to attach a special 3/16 inch thick solid steel plate to the top of my wall. This steel plate was screwed to the wall and the granite was epoxied to the steel. The advantage of the steel is that it supports the stone and makes it virtually impossible for the stone to crack as people lean against it. I have thick granite, but you never know how many high school football players might lean against the edge of the bar or foolishly sit on the edge! You must plan for these crazy events.

wet bar

Column B410