Precast Concrete Walls

Precast concrete technology is undergoing an explosion in growth. It has been used in commercial and industrial construction for years and has now entered the residential market. I can assure you that in many respects, it is the ideal way to build. There are simply too many things that can and do go wrong in the field when you build a foundation on-site using conventional block or even poured walls.

Square, Plumb & Level

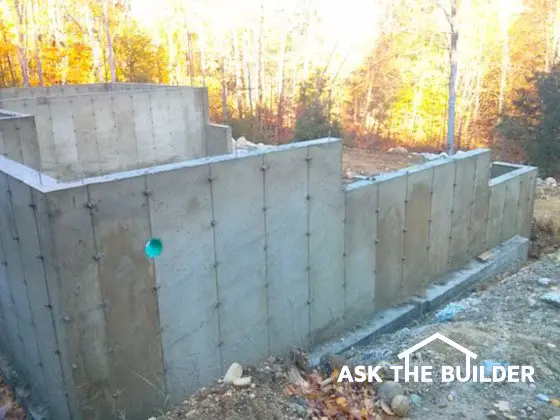
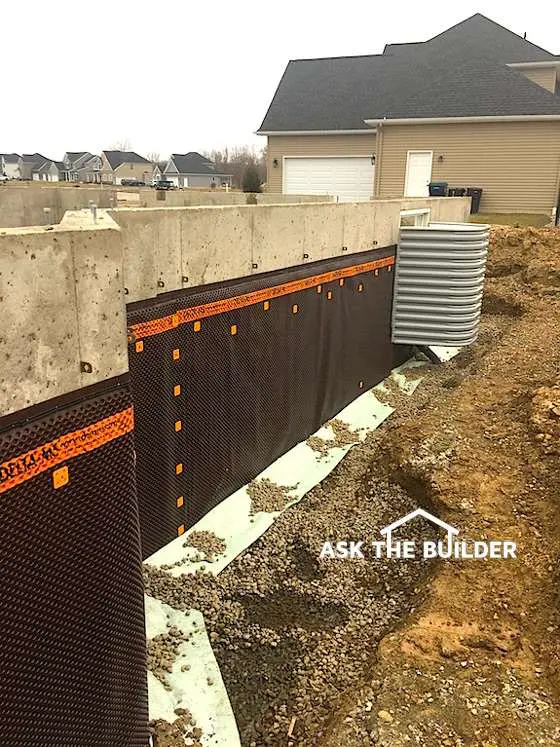
Most conventional poured concrete or block foundations are NOT square, plumb, and level. The reasons are numerous. Precast concrete foundations, by their very nature, should come out nearly perfect each time. The panels are poured in square and level template forms in a controlled factory environment. If the foundation designer has all of the dimensions right so the foundation is a perfect rectangle or square, and the builder in the factory follows the designer's plan, then assembling the finished product at the jobsite is like using the fashionable children's toy Lego™ blocks. The only challenge at the jobsite is getting the compacted gravel base level. That is so easy to do with today's laser levels, that it is no wonder a complete foundation can be set in just one day.

Energy Efficiency

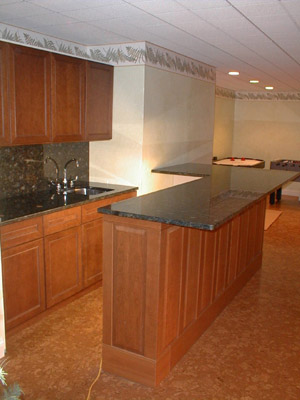
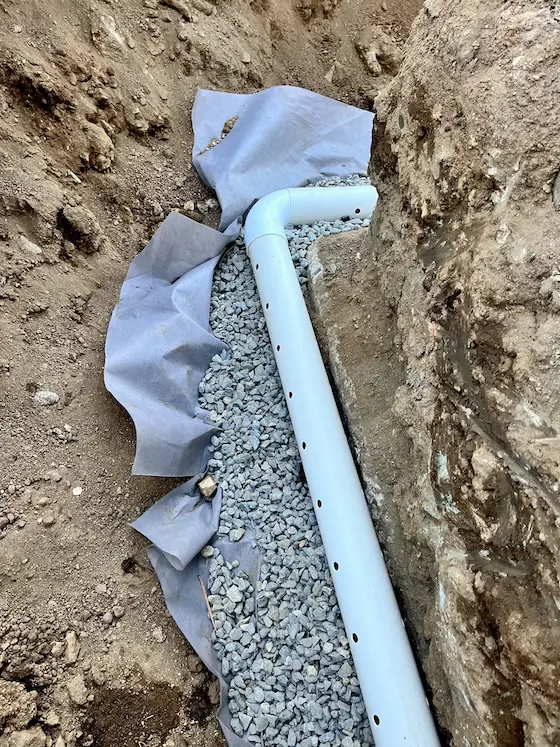
When I first saw a precast poured foundation wall, I was amazed at how well it was designed to incorporate energy efficiency. All of the systems include closed cell foam insulation panels on the inside of the foundation. These are poured into the concrete. The foundation walls actually have concrete ribs or studs every 2 feet or so. These cavities between the ribs can be filled with additional fiberglass batts once any plumbing, electrical or other mechanical systems are in place. Your foundation will not waste much energy, that is a fact!

Vertical Steel

These new precast systems are heavily reinforced with steel rods. Steel has enormous tensile strength. The steel that is in a foundation allows the foundation to resist the formation of large cracks that can result from soil pressures on the side of the walls, and poor soil conditions under a wall.

Unfortunately, many traditional poured concrete foundations have no vertical steel rods. Most foundations simply have four rods running horizontally in a continuous manner around the foundation. Two of these are near the bottom of the wall and the other two are near the top of the wall. Horizontal steel bars help to minimize cracks that can develop from poor soil beneath a footer and a wall. They do little or nothing to prevent cracks that can form from soil pressures on the side of a concrete wall. After all, a backfilled basement wall is simply a retaining wall, right? Vertical steel should be used in all poured basement walls. It is standard equipment in the precast systems.

No Footer - Strange but True

Traditional cast concrete footers spread out the concentrated loads of the house onto the soil. The problem is that if stressed, they can and will crack. Most footers are not poured 10 to 12 inches thick. This is the thickness, in my opinion, necessary to provide additional support in poor soil conditions. The actual primary purpose of most traditional 6 or 8 inch thick concrete footers is to provide a level working surface for the foundation panel crew or concrete block masons.

The compacted crushed gravel that is used beneath precast walls will transfer concentrated house loads to high quality, strong soil. If you are building on fill dirt or have poor soil conditions, you need to involve a soils engineer and a structural engineer in your foundation planning. Don't get cheap on me during this aspect of your job.

Limited Availability

The residential precast concrete foundation business is in its infancy. It may not be available in your area. If it isn't are you in luck! Here is a perfect business opportunity for you. Seriously, look at the different companies and see if it isn't time for you to make a career change.

Companion Articles: Precast Concrete Foundation Walls, Precast Concrete Foundation Companies, Precast Foundation Wall Illustrations

Column B266

Wet Bar Photos

Wet Bar Photos

The two photos on this page pretty much tell the tale. Basically, my wet bar consists of two work surfaces. The actual wet bar is behind the serving bar where guests will sit and enjoy a drink or two. The serving bar is basically L shaped, but it has a small return leg that you can clearly see in the first photo. This leg is vitally important to the overall stability of the bar. Without this short wall a person standing or leaning at the end of the bar could easily push/pull the end of the bar to the floor. The little wall is covered with 3/4 inch plywood just below the cherry wainscoting. The plywood is screwed to the 2x4 framing. The bottom plate of the little wall as well as all others, are anchored to the floor with 1/2 inch diameter stud bolts. These things are enormously strong. They have a nut and washer and the tighter you crank the nut, the tighter the plate is pressed to the floor.

The end wall is important, as it supports the bar.

The end wall is important, as it supports the bar.

The actual dimensions of the bar walls were determined by the cherry wainscoting. I wanted the vertical stiles at the ends of the walls to be the exact width of the stiles in the field that you see between each raised panel. So I ordered the wainscoting and took delivery of it before I built the walls. I dry fit the wainscoting on the floor to see just how it went together and what the true dimensions of the system would be once assembled. As you might imagine, it looks superb since the pieces of wood are perfectly balanced. You can do the same thing with many other building materials.

The wet bar has an undermount stainless steel sink. The tops are Brazilian granite - Verde Peacock.

Granite backsplach and counter add a gorgeous touch.

Granite backsplach and counter add a gorgeous touch.

Column B410

Precast Concrete Foundation Companies

poured foundation

Here's a traditional cast-in-place concrete foundation. I watched them build it. It took four days total to set the footing forms, pour them, set the wall panels, pour the wall panels and remove the forms. A precast foundation system would have taken one day at the job site to erect. Wow! Copyright 2018 Tim Carter

Precast concrete foundations are made in controlled conditions inside a building. Most precast concrete foundations can be set in one day.

Precast Concrete Foundation Companies

There are two main companies that make and license their precast systems. Be sure to check out how close each manufacturing plant is to your job site. Transportation of the precast panels can be a significant cost and the greater the distance from your future home to the place the panels are made will impact what you pay.

They are:


I visited the Thermal-Krete website to locate a list of their licensed plants at the time I created this document. I had no luck. They say at the bottom of their website home page:

"Kistner Concrete Product Inc. operates four NPCA nationally certified manufacturing facilities." However, they don't provide an easy link as to the location of these mysterious plants.

I filled out their contact form on March 31, 2018 to see if they respond. Here's a screenshot of my request:

Thermal Krete Form

If they respond, I'll be sure to put up a list of their plant locations for you.

Superior Walls Precast Foundation USA Map

This is a map taken from the Superior Walls website on March 31, 2018. Look at the legend at the top of the graphic so you understand the colors.

superior walls plants

The following is a list of licensed companies who use the Superior Wall's patented technology.

  • Superior Walls by Advanced Concrete Systems
    55 Advanced Lane
    Middleburg, PA 17842
    800-521-3788
  • Superior Walls by Carr-Mitchell Inc
    44 Industrial Drive
    Cadiz, KY 42211
    877-522-9255
  • Superior Walls of Central Virginia
    10101 Superior Way
    Amelia, VA 23002
    866-350-9255
  • Superior Walls by Collier Foundation Systems
    1500 Ellsworth Avenue
    Suite 210
    Heidelberg, PA 15106
    888-817-5537
  • Superior Walls of East Tennessee
    10146 Sparta Highway
    Rock Island, TN 38581
    877-836-9255
  • Superior Walls of Eastern Iowa
    2395 Tech Drive  #9
    Bettendorf, IA 52722
    866-560-9255
  • Superior Walls of the Great Lakes
    4555 134th Avenue
    Hamilton, MI 49419
    800-486-2932
  • Superior Walls of Greater Atlanta
    703A Corinth Road
    Newnan, GA 30263
    866-538-9255
  • Superior Walls of the Hudson Valley
    68 Violet Avenue
    Poughkeepsie, NY 12601
    800-639-4033
  • Superior Walls by Jointa Lime
    1762 Central Avenue
    Suite 301
    Albany, NY 12205
  • Superior Walls of New Jersey
    92 Reese Road
    Millville, NJ 08332
    866-699-2557
  • Superior Walls of North Carolina
    3570 South Main Street
    Salisbury, NC 28147
    877-896-9255
  • Superior Walls of NW Pennsylvania
    9391 West Main Road
    North East, PA 16428
    888-725-8575
  • Superior Walls By Precast Concrete Solutions
    300 S Martin Luther King Drive
    Springfield, IL 62703
    866-522-8565
  • Superior Walls by Precast Systems
    5877 Bullitt Road
    Greencastle, PA 17225
    866-369-3773
  • Superior Walls by Setwright Precast
    11 Mechanic Falls Road  Ste 5
    Oxford, ME 04270
  • Superior Walls of Upstate New York
    7574 East Main Road
    Lima,NY 14485
    800-273-0127
  • Superior Walls of the TriState
    3425 Grant Drive
    Lebanon, OH 45036
    888-840-9255
  • Superior Walls of the Twin Cities
    580 Schommer Drive
    Hudson, WI 54016
    800-467-8279
  • Superior Walls by Weaver Precast
    824 East Main Street, PO Box 759
    Ephrata, PA 17522
    800-352-8196
  • Superior Walls by Weaver Precast of Florida
    350 Thorpe Road
    Orlando, FL 32824
    800-291-2213
  • Superior Walls by Weaver Precast of South Carolina
    8 Hudson Drive
    Spartanburg, SC 29303
    877-542-1213

Companion Articles: Precast Concrete Foundation Walls, Precast Concrete Walls, Precast Foundation Wall Illustrations

Column B266

Concrete Wall Repairs & Concrete Epoxy

Concrete Wall Repair Cements & Epoxies

The rain was pouring. It had been doing it for several days. However, at this particular moment, it was torrential rain. I was in the basement of a little house I had purchased. It needed some work and I thought I could fix it up and make a small profit.

I went into the basement to check on something and water was squirting out of a crack in the wall. Not only that, water was shooting four inches high up from a crack in the floor! I was panic stricken.

The house was in the middle of a hillside. Massive quantities of water were flowing above and beneath the surface of the ground. Needless to say, I had my work cut out for me.

Patching Cracks

Cracks in concrete or concrete block walls are very frustrating. I believe this is so, because both building materials represent permanence. It isn't unreasonable for these materials to possibly last 50 to 100 years. Cracks, however, transmit a failure sign. What's more, if the crack actually widens, it is a sign of a big problem. Soil movement, poor soil, or faulty design may cause expensive repairs to be undertaken.

Crack Repair Products

Years ago cement companies developed products that have the ability to fill cracks in concrete and block walls. These products worked so well that they were able to resist a hydrostatic head or the weight of a water column. These special cements expand as they dry. In contrast, ordinary Portland cement shrinks as it dries.

If you are willing to put a little work into a repair job, these materials are very effective at stopping leaks. The trick is to chisel the correct profile in the crack. You need to undercut the crack. This means that the the crack would look like a dovetail joint in a drawer when viewed from the side.

Making the crack into a simple V shape is the worst thing to do. As the special cement dries, it actually pushes itself out of the crack!

Super Glue!

Yes, there are glues for concrete. In fact there are many different types. You can bond old concrete to new concrete, old to old, and new to new. This is done by using special concrete epoxies.

These glues are similar to any standard household epoxies. However, they are formulated with special chemistry that allows them to bond to the concrete and withstand any chemical attack from the alkaline chemicals in the concrete itself. Some of these epoxies have tremendous strength characteristics. They can actually 'weld' concrete back together in certain situations.

These epoxies can be applied by serious DIY'rs or applied by professionals. Here in Cincinnati, there are several companies that will inject epoxies into cracked walls. They will even offer lifetime warranties in certain cases.

Brush - On Compounds

You have probably seen commercials about magic brush-on compounds that will make your wall leak problems disappear. Well, that may take some black magic! There are numerous brush-on waterproofing compounds in the marketplace. I have used many of them. In certain instances they can stop water. However, most manufacturers insist that they be applied on the side of the wall where the leak originates. This can be a tall order to fill, as often this requires an enormous amount of digging. In some instances it may be nearly impossible to excavate one side of a wall.

Furthermore, these compounds rarely have any give. If the wall crack opens or moves, the brush-on compound will crack.

On many of my jobs, we did successfully apply it to the inside of a basement wall or the outside of a retaining wall with great success. I'm convinced that this success was directly related to following the directions on the label.

Surface preparation is critical. Wall surfaces need to be squeaky clean and moist. The thickness of each coat needs to be closely monitored. Apply too much and it can pull itself from the wall. Often people want to glob it on a wall. Two thinner coats usually work much better than one thick coat.

These products also can be used as a decoration. If you are artistic, create a texture!

Column B119

Curtain Drain Tips

! ! ! See Author's Notes at Bottom of Column ! ! !

Geology - We Interact with the Earth

My college major was geology. I was very interested in the subject. I learned much about the movement of subsurface water in my clay mineralogy class, hydrology and geomorphology. WOW! I can't believe I remember those cryptic names.

The point is this: very few parts of the USA have well drained soils (sandy). A majority of the soils are rich in clay, especially in the Midwest, East and West. Generally, as you dig deeper in a clay soil, it becomes more dense. There is less space for air. The portion of the soil that has the most air provides the best route for water movement.

Just as water flows down your driveway, it flows downhill beneath the surface of the ground. Retaining walls, basement walls, etc. can often try to block this movement. If the wall has no cracks, the water might go around the wall. If there is a crack, the water may find it is easier to enter than to go around. You know, the path of least resistance.

A curtain drain can capture and divert this subsurface water. A previous Bulletin, #70 - Linear French Drain, goes into great detail as to how to construct these wonderful devices. They consist of a narrow trench, a four inch perforated pipe, and massive quantities of large rounded gravel.

When I built my house many years ago, the rear of my lot was extremely wet. I was 'receiving' water from uphill. I installed a curtain drain to intercept this water. It has worked every spring. My neighbor's yard is spongy, while mine is dry! They are excellent DIY'r projects.


Author's Notes:

You may wonder if my advice is worth anything. Well, read what Jim Sanders wrote to me when he was at the end of his rope:

"Hi, I just wanted to write to give you the results of my "Trench Drain". I have had a wet crawlspace for 15 years. Water would fill the crawlspace at times, so we actually had to drill weep holes at the base so that it would enter the basement and eventually, the sump pump.

I have tried everything. Several contractors said that the only thing we could do was to bring the water into the house via drainage tile and let it enter the sump pump. That would work, but because I live on a 6' elevation, there is no reason that I should have water problems. It became like clockwork...when it rained, we would rush home from the lake or wherever we were vacationing so that we could be prepared to start the backup generator, in case the power failed. We even had our alarm company put a sump alarm on our system, so they could notify us if we had a power failure. Battery backup was not an option, because sometimes we lose power for days and during any rain, our sump would run every 7 minutes...just like clockwork.

I found your site and read the article on the trench or French drain. At first, it sounded a bit like "holistic healing" to me. I failed to understand why a 2 ft. deep trench, 4 ft. away from the house would do any good. How could this simple thing correct an extreme water problem that has plagued me for years, cracked my foundation, settled my garage floor and ruined almost every vacation?

The Linear French Drain trench running from the house. PHOTO CREDIT: Jim Sanders

The Linear French Drain trench running from the house. PHOTO CREDIT: Jim Sanders

I decided "what the heck". I had to dig by hand using a trenching spade and a pick-ax, because the builder back-filled our property with brick and blacktop. It took quite a bit of time. Because the ground level varies so much on that side of the house, I was not able to achieve exactly 2 ft. deep. It varied from 18" to 30" in spots, but the slope was downhill. The trench is about 80 ft. long. At times, I thought about filling it all in, because I just didn’t believe that it would work.

I stoned it, put tile in, and filled it with #1 round stone. I socked the pipe just for safety measure and I also used geotextile fabric on top, so I could cover with dirt and grass. I also ordered some clay and pitched from the house to the drain.

After a short rain, water is running away from the house. PHOTO CREDIT: Jim Sanders

After a short rain, water is running away from the house. PHOTO CREDIT: Jim Sanders

Result? For the last month, we have had 7 or 8 torrential rains, the worst of which was last night. It rained so hard, that our lawn washed out in spots because of the high clay content. Our sump pump, that normally ran every 7 minutes during and after rain, has not turned on for 4 weeks. The silt at the bottom of the sump well is now dry and cracking. Our crawlspace has not shown a trace of water or even moisture.

Since I couldn’t see correcting the foundation cracks or the garage floor settling and tilting until I corrected the problem's source, I waited to see if the trench drain worked first.

This week, I had a company come in and perform sort of a "mud-jacking" technique on the garage floor, which worked perfectly. Also, during the past few weeks, I parged the cracks in the foundation.

A dry sump pump. PHOTO CREDIT: Jim Sanders

A dry sump pump. PHOTO CREDIT: Jim Sanders

I just wanted you to know how this worked. I stressed for many years over this issue and the solution was nowhere near as difficult as I thought it would be.

As a side note, I went to the end of the drain tile during a hard rain to see what was happening. Water was running out of the drain tile in about the same exact volume that it previously ran out of the weep holes in my crawlspace. This winter will be interesting, because last year, the ground next to the house was so saturated that during a thaw, my sump would run constantly. I'm guessing that the ground between the trench and the house will probably be drier now going into this winter."

- Jim Sanders, Upstate area - New York

CLICK HERE to get FREE & FAST BIDS from local drainage expert contractors.

Column B119

Concrete Epoxy & Masonry Epoxy Repair

Concrete Epoxy & Masonry Epoxies

Possibly you have used an epoxy to mend a broken plate or some other object. Well, there are incredible epoxies to mend concrete or concrete block. There are many specialized epoxies for special purposes. Almost all require that the crack to be repaired is dry.

These products require some effort to work with. Often you need to chisel out the crack, install a gel coating to act as the outer form, install little injection ports, and then squeeze in the epoxy. With a little practice and the right tools, you can successfully fix cracks.

Some epoxies are actually stronger than the concrete when properly applied. It is similar to the welding process with metal. These products can almost never be found a a home center. They are sold at specialty supply houses where concrete contractors purchase their supplies.

Check your yellow pages to see if there is a listing that says "Concrete Products - Retail/Wholesale." This is a good place to start! There are also professional applicators in many cities who will epoxy your cracks and offer a guarantee. So, if you hesitate to try it yourself, consider having a pro come into your home.

  • Epoxy Systems
  • Chemrex
    Concresive Paste LPL
  • Sika Construction Products

Column B119

Brush-on Waterproofing Compounds

Brush-on Waterproofing Compounds

I have used these products for years. Many of them do a fantastic job of damp proofing a wall or providing a unique textured surface. Some of these products claim to be waterproof, however, you need to read the language carefully!

To achieve true waterproofing, you sometimes must apply the product on the positive pressure side of the wall. This means that you need to apply it on the side of the wall where the water first enters, not where it comes out. This can be tough on a basement foundation wall or a retaining wall. It may require some digging.

Also, the application process is very important. The walls must be clean. The walls must be wet down before you apply the compounds. Also, two thinner coats often work much better than one thick coat. Applying these compounds over paint is a mistake. They will simply delaminate. They will just pull the paint from the wall, or not stick well to the paint. If your wall is painted, you must remove the paint. Consider sandblasting or pressure washing to remove paint films.

My experience with these products has been very good. They do a fantastic job of stopping water when the directions are followed, even on the negative side of a wall. Often the products come in a grey color and a pure white. The texture is sandy. If you use a stiff brush with a handle, you can create very attractive decorative swirls.

There is only one drawback with these products. They do not stretch. If there is continued movement in your wall, the crack will reopen. If you have this type of problem, you need to stabilize the wall, use the epoxies, then coat the wall.

  • ChemMasters
  • Chemrex
  • Master Builders
    Masterseal 340 FA510
  • Quikrete
    Heavy Duty Masonry Coating

Column B119

Plumbing Books & Publications

Illustrated Plumbing Books & Publications

There are many good books which explain in great detail the particulars of plumbing drain and vent systems. After reading or reviewing some of the books, try to visit a house or large project under construction before the drywall or plaster is installed. Look at the drainage and vent system.

Pick out a fixture in the basement or first floor area. Note where the vent pipe begins. Follow that vent pipe until you see it interconnect with other vent pipes or until it exits the roof. You will quickly determine that in a standard house, there is almost as much vent piping as there is drainage piping!

If you have other questions, feel free to write to me as well.


Column B036

Foundation Drain Tile & Backfilling Tips

Foundation Waterproofing - You Might Not Have It!

Did you know that there is a big difference in exterior foundation waterproofing treatments? I'll bet that you think that your new home foundation has been waterproofed. Yes, you saw that black stuff sprayed on so you are in good shape. Isn't that right? WRONG! Fewer than one in 50 houses in the Greater Cincinnati housing market have waterproofed foundations. Most are damp proofed. What do you think is happening in your city?

delta ms foundation waterproofing

This system connects to the drain tile. It's a great waterproofing solution. I'd add more gravel and no matter what the MS Delta people say, I'd cover the gravel with a foot, or more, of straw. Copyright 2025 Tim Carter

What's the Difference?

Concrete soaks up water. If you place moist earth around an unprotected foundation, your basement will be damp. Surely, you have been in an older basement and smelled this moisture. Older homes rarely had any treatment on the concrete or stone.

Beginning in the 1950's, there was widespread use of asphalt on new foundations. This was hand-brushed or troweled onto a new foundation by laborers. The asphalt did a great job of minimizing water soaking into the foundations. However, it did not possess the ability to bridge or fill a crack that may develop in the foundation. You see, after a period of time, asphalt becomes somewhat brittle. When a foundation treated with asphalt cracks, the asphalts cracks too!

Approximately 25 years ago, Owens Corning modified standard asphalt by adding some rubberized compounds. The result was a compound that had a certain amount of flexibility. Other companies developed synthetic rubber compounds that have far greater elasticity than the modified asphalt. Even before either of these products were available, commercial builders used cardboard panels filled with bentonite for waterproofing. Bentonite is a special natural clay product that swells when wet. Water carries the clay into the crack, it swells and plugs the leak! The bottom line is that you can truly waterproof your foundation. It just takes a little homework on your part to select the right product for your particular building situation.

Drain tile - REALLY Important

If you decide to have your new foundation waterproofed, the company doing the work will most likely insist that they install or monitor the installation of your drain tile system. Very few builders that I'm aware of take the time or interest to adequately install drain tile.

foundation drain tile perforated pipe and useless filter fabric

This is 4-inch-diameter perforated drainpipe. Everything about the installation, but one thing in this photo, is wrong. Copyright 2024 Tim Carter

Water naturally flows towards your foundation. This is especially true if you live on a hillside or even a slight slope (which, by the way, most of us do!). Much of the movement of water is horizontal through soil. Water occupies the void spaces between the particles of soil. The deeper you go into a soil, especially if it is clay, the less space there is for water.

To make matters worse, the soil that is used for backfill around your house is rarely compacted. When it is dumped around your house, it has huge amounts of air in it. This dirt was fluffed up and pumped full of air when it was dug from the ground. It can takes years and years for this ground to naturally compact. In some case, where overhangs protect the dirt, it may never truly compact. It can always have more air in it than soil only five or six feet away. This can spell BIG trouble for your foundation if it is not waterproofed AND if you have a bad drain tile installation.

From the above discussion, you can see why drain tile is important, I hope. The point is this: the backfill soil has the capacity (because of the large volume of air) to hold large quantities of water. You need to collect this water rapidly and get it away from your foundation. That is the job of the drain tile.

Another Quality Installation

That is a phrase I used to use to tease my coworkers after we would finish a task. It was an inside joke. However, the phrase applies to drain tile. You generally only have ONE chance to put it in. It gets buried deeply. It can clog up if not installed right. It's expensive to redo. For these and several other reasons, you need a quality installation.

I always like to install the drain tile on the side of the foundation footer. Many builders simply install it on top of the footer. Installing the drain tile on top of the footer means that your water table will be at the top of the footer. My method puts the water table about six inches below the top of the footer. You want the level of water as low as possible.

foundation drain tile illustration

I recommend that the drain tile be installed the day after the footers are poured. I used to help strip the forms and then put a one to two inch layer of one inch gravel along side the outside of the footer. I would then install the drain tile continuously around the footer. Finally, we would cover the drain tile with one inch gravel flush with the top of the footer. This would complete phase one of the operation.

There are advantages to doing the job this way. First, the space between the side of the footer and the wall can fill with collapsed dirt and/or concrete overflow from pouring the foundation wall. This stuff is tough to dig out and remove once the basement walls are poured. Besides, it is tough to work in the narrow area left along the foundation after the walls are up and poured.

Once the foundation is waterproofed, you can continue the drain tile installation. I recommend that you install an additional two to three feet of one inch gravel cover above the footer. On top of this, install tar paper or a six inch thick layer of straw before installing any backfill dirt.

The elimination of the straw or tar paper is a huge mistake. The backfill dirt is fluffed up. When it gets wet, small silt particles will be carried into the gravel. This will clog the gravel. If your soil has enough fine particles, you may clog your drain tile! All of your work will have been for naught!

Seeking Daylight

So where does the drain tile water go? Good question! If you are lucky, it drains out somewhere on your lot. Here is what I mean. If you are building on a sloped lot, maybe you are lucky enough to have enough fall within your property line whereby the drain tile can daylight. There is no need for the pipe to have a slope. It can be laid virtually perfectly level from the footer until it daylights. The net result is that you are simply providing a resistance-free path for the water around your foundation to escape.

If you are unlucky, like me, you need to install a sump within your basement. The drain tile pipe gets to the sump either through or under your footer. I always install a six inch pipe under the footer right where I know I will install the sump. I actually install this pipe before the footer is poured. It's tough to tunnel!

An electrical pump pumps the water from the sump to either the outside of your house or into a storm water drainage system. Never allow the sump water discharge pipe to dump the water along side your foundation. This simply soaks the soil again!

Battery backup sump pumps are available to assist the regular pump in the event of primary pump failure or a storm-related electrical outage.

Backfilling Basics

Many a foundation crack is related to backfilling. Very few homeowners realize the risk of backfilling a foundation too quickly.

Don't forget that your foundation walls are simply beams or retaining walls. The walls act as a beam once the basement floor and the first floor subfloor are attached. Without these two elements, a foundation wall can tilt inwards, crack or even slide off the footer! Don't allow your builder to backfill until these floors are in place!

Also, did you know that it takes approximately 28 days (under ideal conditions!) for concrete to reach 75 percent of its design strength? I know of builders who backfill foundations within four days of being poured!! I have seen huge cracks develop from foundations that were backfilled prematurely. Don't let it happen to you!

Column B113

Exterior Foundation Waterproofing Systems

Exterior Foundation Waterproofing Systems

The following companies make exterior foundation waterproofing compounds. Some are modified asphalts (Tuff n Dry), some are rubber (Rubber Polymer Corporation), and some are bentonite clay products (American Colloid Company).

I recommend that you research as many as possible and get product literature. Then discuss the systems with your builder. See what products he/she has had the best success with. Good luck on your project!

  • Certainteed Form-a-Drain
  • Grace Construction Products
  • Mar-Flex Waterproofing
  • Mer-Kote
  • Tuff-n-Dri Waterproofing
  • Wall Firma

Column B339