Illustrated Concrete & Concrete Block Publications

Illustrated Concrete & Concrete Block Publications

Following is a partial list of many fine books, pamphlets, magazine articles, etc.

These books and publications are available from the Portland Cement Association (www.cement.org). They also publish a wonderful catalog of all of the books, pamphlets, tapes, etc. that they produce. It is free for the asking. Section three of the catalog has a special division devoted entirely to books, pamphlets, etc. for residential construction. Some of the publications are technical and may not interest a homeowner. However, many of them are very understandable and provide you with valuable insight as to just how concrete and concrete block perform. These books can be purchased from their website. Here are two of my favorites:

  • The Homeowner's Guide to Building with Concrete, Brick & Stone
    Excellent book describing concrete & concrete block building techniques.
  • Concrete Masonry Handbook for Architects, Engineers, Builders
    Slightly advanced material for building with concrete block. Contains just about everything you would ever want to know about building with concrete block.

Fine Homebuilding Magazine has published numerous excellent articles on both concrete and concrete block foundations. These articles are well written and often have excellent photographs or drawings showing just what the author is talking about. Taunton Press, the publisher, has past issues available for sale. They also publish various books that are compendiums of certain articles. Visit your local library to see copies of this fantastic monthly magazine or the books that they publish. Their books can be purchased from their website also. You can obtain a catalog of their publications by calling 1-800-888-8286 or visiting their web at www.taunton.com/finehomebuilding. Consider purchasing their Index for Issues 1 - 85. This Index lists subjects in great detail and the issues which address these subjects. The following is a partial listing of some articles:

  • Concrete Foundations:
    disadvantages of, Issue 12 page 34
    repairing of, Issue 4 page 9
    cracks in, repairing, Issue 48 pages 68-69
    and earthquakes, Issue 29 pages 34-38
    earthquake resistant, Issue 40 page 44; Issue 63 page 102; Issue 64 pages 64-65
  • Concrete Block Foundations:
    backfilling to, Issue 15 pages 44-48

    cracks in, repairing, Issue 81 page 16; Issue 83 page 14
    failure of, avoiding, Issue 81 page 16
    repairing, Issue 61 page 24

Column B46
Tips to Minimize Water Infiltration

Tips to Minimize Water Infiltration

Almost all manufacturers of waterproofing compounds mandate that their systems be accompanied by a high grade drainage tile system. This is very important. Common sense should tell you that the quicker and faster you get water away from your foundation, the less chance you have of developing a water infiltration problem. I discuss drain tile installation in great detail in Builder Bulletin #14 Foundation Drain Tile Installation. The drain tile system collects the water and channels it away from your foundation. Very few builders install these systems properly.

Water infiltration can also occur if your foundation develops a serious crack. Thus, it is paramount that your foundation be as strong as possible. Consider consulting a structural engineer to advise you as to the steps you can take in your area to minimize cracking. Adding reinforcing steel, thickening the foundation, proper curing, bracing and delaying backfilling all play a part. Remember, ordinary concrete generally attains about 70 percent of its design strength after 7 days, and 95 percent of its design strength 28 days after it is poured! If you backfill too soon, or too aggressively, you could produce stresses which will later cause cracking.

Be sure that downspout drain lines are not placed in the backfill dirt! This dirt is generally never compacted. It takes years for this soil to completely settle. Drain lines placed in this soil can easily develop reverse slope and/or crack from differential settling. This allows rainwater to flood the soil around your foundation. This just invites trouble. Have your builder install these drain lines in the undisturbed soil just outside of the excavated area created for the basement. Never let downspouts dump water at the base of the foundation. Pipe this water away from the house.

Be sure that all of the ground around your house slopes or falls away from the foundation. Never allow water to pool against or drain against the house. It is generally a good idea to slope the ground 1/2 inch per foot for a minimum of 10 feet away from the foundation. You can never have enough slope.

Water discharging from sump pumps should also be piped away from the foundation. If this water discharges at the base of the foundation, it eventually re-enters the sump and you pay to pump it again and again and again.

Always consult with the waterproofing contractor. Have this person approve the drain tile system and method of backfilling. Just like you, this individual does not want a problem!

Never hesitate to ask your builder questions! If you are not comfortable with the answers, ask someone else, go to the library or search the Internet. Ask your builder to support his techniques with written documentation. The literature is full of accepted building practices based upon results! Make sure that your project is not an experiment! Good luck!

Column B15

Waterproof Foundation & Damp Proofing

foundation waterproofing

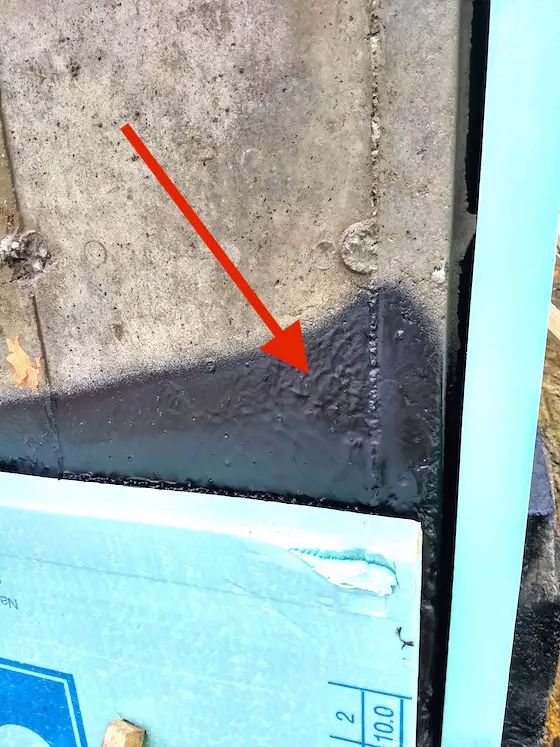
The black goo is foundation waterproofing. The red arrow points to the thick coating where it's sagged. Damproofing is much thinner like a simple coat of paint. Copyright 2018 Tim Carter

Exterior Foundation Waterproofing Compounds

Foundation waterproofing is probably one of the most confusing aspects of residential construction. Thousands of homeowners think they have a waterproofed foundation, when in fact they do not.

Waterproofing is generally not used by a majority of builders, due to its higher cost. In an effort to stay competitive, some builders will cut corners in areas where the homeowner cannot easily see the finished product.

Waterproofing is a prime example of this, due to the fact that it is generally covered early in the job by the dirt around the foundation. However, the higher initial cost of waterproofing is well worth it. Interior waterproofing methods used after a leak has developed are generally not as effective as a compound applied to the exterior surface of the foundation.

Related Links

Drain Tile Installation - 98% of Builders Do it WRONG

Drain Tile and Foundation Backfilling Tips

Damproofing - Not The Same as Foundation Waterproofing

Foundation waterproofing is often confused with "damp proofing." Damp proofing is a process which retards or slows water penetration into foundations. Damp proofing is usually performed by applying unmodified asphalt coatings to the foundation surfaces.

Free & Fast Bids

CLICK HERE to get FREE & FAST BIDS from local foundation waterproofing companies.

Most of these products become brittle when dry. Some of them can actually be dissolved by groundwater. Virtually none of them have the ability to bridge foundation cracks.

However, damp proofing compounds are generally very effective in stopping water vapor transmission. Untreated concrete or other masonry products readily absorb water from the soil around your house. This water travels through the concrete and evaporates from the inside surface of the basement wall.

Water Vapor Passes Through Concrete

Frequently the walls will appear dry, however, the water is still being transmitted into your basement. Unless a water vapor barrier was installed beneath your floor, this same thing is happening with your basement concrete slab. That is why older houses frequently have "damp" feeling basements. The widespread use of damp proofing methods did not begin until the 1950's.

Waterproofing, on the other hand, is very different from damp proofing. Waterproofing compounds are designed to stop water infiltration.

These compounds or membranes can be extremely effective when applied to the exterior of a foundation system. There are a wide variety of waterproofing products available to homeowners.

Wide Variety of Waterproofing Methods & Products

They are vastly different in their composition. Some of these products are urethane based, others are modified asphalts, some are clay based and some are rubber polymers.

If you’re interested in learning more about foundation waterproofing cost I have an article here.

Most of these compounds have the ability to bridge cracks that might later develop in a foundation. This is extremely important. Some compounds can bridge much bigger cracks than others. When installed properly, these waterproofing compounds can keep a basement dry for many, many years.

CLICK HERE to get FREE & FAST BIDS from local foundation waterproofing companies.

Column B15

Structural Alternatives for House Foundations & Footings

Foundation Alternatives

In the event that the site you choose to build upon has poor soil conditions, you have alternatives. There are several methods that you can employ. However, I highly recommend that you consult with a competent structural engineer to assist you. The calculations which are required to determine the proper structural alternative can generally be performed only by a trained professional. Do not attempt to do this by yourself!

One method to consider is the use of "piles." Piles are structural elements (steel columns, wooden timbers, etc.) which are mechanically driven into the soil. These elements act in soil much the same way as a nail acts when driven into wood. The piles attain a certain "skin" friction as they are driven into the soil. The deeper they are driven, the more friction they produce. You can illustrate this very easily. Drive a small finish nail 1/8" to 1/4" into a piece of pine. Generally, you can readily pull this nail out with your fingers. Reinsert this nail into the same hole, and now drive it 1" to 1 1/4" into the piece of pine. I think you get the picture. When the pile is driven sufficiently deep enough, it attains enough friction to hold the weight of your structure.

Another structural alternative is a pier. Piers are simply columns. They are created by drilling a shaft in the soil until you reach a layer of rock or soil which will be strong enough to support the weight of the structure. These shafts are then filled with concrete, usually reinforced with steel. Generally, a specialty contractor with very large drilling equipment is required to perform this work. It is risky and dangerous. The shafts can be very deep and the sidewalls can collapse without warning if unsupported. Drilling piers is not to be performed by an amateur.

Structural engineers can offer even more alternatives given your specific soil conditions. You will never regret hiring one. They can relieve your anxiety. In a difficult building situation, only a fool would proceed without the advice of a competent engineer.

Column B10

Forces Harmful to House Foundation & Footers

Gravity, soil swelling, soil collapse, frost heaving, hydrostatic pressure, etc. are forces of nature which can cause serious harm to footers and foundations. In the event that a footer or foundation has a structural failure, this failure usually transmits to the rest of the structure. Cracks or separations can begin to develop within your home or structure. These failures can be very serious and actually lead to the ultimate collapse of your home or structure.

Gravity & Your Foundation Walls

Gravity works against your foundation walls. In the case of a typical full basement foundation wall, the foundation wall not only acts as a beam to support the weight of the structure, but also acts as a retaining wall to keep the earth around your house from entering your basement. This can be a tall order to fill, in the event your house is built into a hillside. Think of all the soil that your foundation wall is holding back! Gravity is pushing the dirt or earth against your foundation constantly. During periods of heavy rainfall, the situation intensifies. Many soils absorb vast quantities of water and this added water, combined with the soil, pushes against your foundation wall. This force is commonly referred to as hydrostatic pressure.

Certain soils exist which expand and contract depending on whether they absorb or lose water. This property can be extremely harmful to footings and foundations. If a foundation is constructed on two different soils - and this is a very common occurrence - one soil may expand when saturated while the other soil remains stable. This situation can cause tension to build up within the footing and foundation. This tension, if great enough, can and will crack your footing and foundation. You can combat expansive and contractive soils quite easily. The key is to keep them in a state of dynamic equilibrium. That's a fancy word for tricking the soil. Simply put, if you keep the soil around your footing and foundation constantly moist, the soil will generally not expand and contract. It will not expand or contract because the soil reacts to changes in moisture content.

Frost Heaving

Frost heaving is a condition which occurs when the moisture in soil freezes and expands. Due to the fact that it takes extended cold weather for soil to freeze, this phenomena rarely occurs in warmer climates. Frost heaving in certain soils can cause a volume of soil to increase by as much as 25 percent. A volume change of this magnitude beneath a footer or against a foundation wall could be catastrophic. I personally have witnessed concrete slabs lift three to four inches due to frost heaving. For this reason, when you construct footings and foundations, you should always be sure that the bottom of the footing is below the "frost line" in your area. You can determine the "frost line" in your area by consulting your local building department officials. The frost line can vary widely. For example, in the southern United States, the frost line is measured in inches below the surface. In the northern Midwestern states, the frostline can extend to several feet below the surface.

Soil Collapse

Soil collapse can occur in soils which have very large voids within the soil. Loose sandy soil is an example. Footings and foundations placed upon these soils can "sink," which subjects them to tension. As we have discussed, this tension can lead to cracking and failure.

Cutting and filling activities can also act as an indirect force which can harm footings and foundations. These activities occur anytime you move undisturbed soil from one location to another. Many new home subdivisions are subjected to cut and fill earthmoving activities. When you cut a soil, its natural compaction is disturbed. It becomes "fluffed." It has large voids and requires compaction to make it suitable for construction purposes. If you place dirt or soil on a site without properly compacting it, you are inviting disaster. This "fill" dirt will eventually compact itself through the actions of gravity, vibration and water infiltration. Footings and foundations placed on uncompacted fill dirt or soil will, in all likelihood, crack and fail.

Column B10

House Foundations & Footings

Footing & House Foundation Systems

Foundations are one of the most important aspects of construction. This is the part of the structure which interacts with the earth. At first blush, this "interaction" may not appear to be significant. However, one must realize that the surface of the earth is covered by many different materials (soils). These materials (soils) have vastly different properties and react quite differently when loads are placed upon them. The problem is further complicated when we disturb these soils and move them from one location to another. This practice is generally referred to as "cutting and filling." Read this article for more information on cutting and filling.

Footing and foundation systems, when properly designed and constructed, allow us to construct buildings which will withstand the powerful forces of nature. Some of these forces are quite impressive. Gravity, soil swelling, frost heaving, hydrostatic pressure, etc. are just a few of the subtle hidden forces that can affect your house or building. These forces are powerful and should not be underestimated. For example, I have witnessed firsthand the ability of a 2' x 2' area of soil to raise 1,200 lbs of steel and concrete 1/2". This occurred after the soil underneath a column footing had been saturated with water after a moderate rainfall. I was quite impressed. You must respect these forces.

What Are Footings?

Let's start with the basics. Footings are the structural members which transmit the concentrated loads of the structure to the soil. These members come in various shapes and sizes and are generally constructed of steel-reinforced concrete. The footings are generally a minimum of two to three times wider than the width of the foundation wall. The thickness of the footer is a function of the weight of the structure above and the strength of the soil below the footer. A thicker footer (10 -12") will be stronger than a thinner (6 - 8") footer. The footer is usually installed immediately after excavation. The foundation is then constructed on top of the footer. Generally speaking, the footer is constructed independently of the foundation.

Foundations are also structural members. They basically are nothing more than giant beams. They carry loads, similar to structural steel I-beams. Foundations can be constructed from a variety of materials. They can be made from concrete, stone, concrete block, wood, steel, etc. Since they are difficult to replace, it is a wise idea to construct foundations using strong, durable, water resistant materials. The design criteria concerning foundations is very technical. You should consider consulting a structural engineer prior to building a foundation. This person will properly size the foundation and specify the materials from which it should be constructed.

Additional Reading

The following books offer a wealth of information concerning footings and foundations. In the event you cannot locate these books, your local library will probably have many similar books on the same topic. Good Luck!

  • Residential Foundations
    Jim Carr

    Home Builder Press, 2000
  • Simplified Design of Building Foundations, 2nd ed.
    James Ambrose
    John Wiley & Sons, Inc. 1988
  • Foundations and Concrete Work
    Fine Homebuilding Magazine

    Taunton Press, 2002

Column B10

Shower Membrane Installation

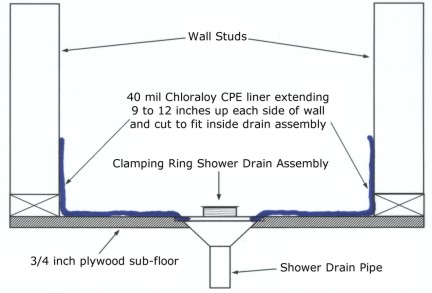
Cross Section of Typical Shower Membrane Installation

If you have ever gone swimming inside an above ground pool, you will easily understand the concept of a membrane shower pan liner. The vinyl swimming pool liner does a great job of keeping water inside the pool. You want your shower pan liner to act in the same manner and keep water within the confines of the liner and subsequently direct it to the shower drain.

The drawing below shows an interesting detail that many plumbers and tile setters fail to do.

Note how the top of the clamping ring drain assembly is flush with the top of the sub-floor plywood. In order to achieve this, the plumber (or jobsite carpenter) needs to rout out a recessed area in the actual sub-floor. Most plumbers don't carry routers in their truck, unfortunately! I used to go to this detail since I had all of the tools. This is an important step. If you don't do this, about 3/16 inch of standing water will always be present in the pan.

shower membrane sketch

Note the top of the adjustable shower drain inlet that rises above the subfloor. This part of the drain assembly screws up and down in order to compensate for the thickness of the cement mud base and the thickness of the finished tile. It is critical to have this drain part in place when you pour the cement mud base. For sake of illustration, I have not shown the cement base or the pea gravel that sits on top of the CPE liner.

Before the mud hardens, you screw it up and down to cut threads into the soft cement mixture. I always make sure that the cement mud mixture is poured below the top of the finished drain an amount equal to the finished thickness of the ceramic tile. You really don't want to crank the drain up and down once the cement mud has dried. Don't forget to install the washed pea gravel above the drain holes in the drain assembly. If you forget this, you may develop a leak.

Related Articles:  Shower Pan CPE Membranes, Waterproof Ceramic Tile Floors

Column B253

Shower Pan CPE Membranes

CPE Membranes

When you purchase your shower pan membrane you will need to be careful. The different liner products on the market all appear to be somewhat similar. You will find the CPE membranes at top quality plumbing wholesale houses that sell to plumbers and often at ceramic tile specialty stores.

The brand name CPE membrane I have had the best luck with is called Chloraloy. Visit a plumbing supply house or a real ceramic tile store and ask for a small sample. Note how supple and soft it is. The real McCoy - if you locate it - will have the words CHLORALOY 240 CPE written on it in numerous places. It will also state that it is 40 mils thick.

Once you get your hands on some Chloraloy, note how easy it is to bend the material. This will be important when you start to form inside corners. You will appreciate this flexibility as the material needs to fold back over on itself at each inside corner.

Certain situations require you to cut the membrane. For example, you will want to extend the CPE over your shower curb. When you cut the material you often will have to cut a patch or a small piece to wrap over/around the cut area. Be sure to purchase the special welding solvent made by the folks that make the Chloraloy. Don't try to use some other glue or adhesive. It won't work! The special solvent actually welds the pieces or patches together into one solid piece of CPE.

Pay attention when cutting out the round hole that allows the membrane to fit into the clamping drain assembly. If you cut the hole too big, you will have problems. Remember, you can always trim a little more off! Be conservative on your first attempt. Once you are sure of the fit, use an adhesive caulk on both sides of the membrane where it contacts the drain assembly. This acts sort of like pipe dope. Do NOT apply so much that it clogs the drain/weep holes around the top of the clamping ring. Pay attention to this detail - to be sure!

Related Articles:  Shower Membrane Installation, Waterproof Ceramic Tile Floors

Column B253

Bathroom Mildew Removal

Bathroom Mildew Removal

Ceramic tile is very attractive. Its glass-like surface makes it easy to keep clean, and you can do many decorative things with the material. It is the grout that causes people to become disenchanted with this building material. The porous grout is simply cement that looks like a sponge under a microscope.

All sorts of bacteria, organisms, etc. can soak into and hang out within the grout. The grout can also absorb and hold moisture. These qualities make it the perfect breeding ground for mildew. Well, it can run but it can't hide!

Siege Tactics

If you are a military historian, you know that it is a common practice to try to starve out an enemy. Cut off their food or water supply and it is only a matter of time before they surrender or become too weak to fight effectively. Mildew is no different. If you want to stop or minimize mildew, then you need to cut off its water and food supply.

Once you have an outbreak of mildew in your home, it is tough to totally eliminate it. Why? The mildew sends out airborne spores or seeds to start a new colony within your house. These spores can be just hanging out waiting for enough water and food to show up before they start to grow aggressively.

A common source of mildew spores is actually in the tub or shower drain. There is often a horrible black buildup of mildew and other bacteria on the side walls of the drainpipe that is between the chrome drain strainer and the trap where the standing water is. You can remove all of this buildup by cleaning it periodically with chlorine bleach.

Be a Doer!

I have found that there are talkers out there and there are doers. Doers get things done. Talkers talk about it and frequently make excuses. It requires more discipline and work to be a doer. If you don't want mildew in your shower or tub area, you need to spend an extra 30 seconds each time you take a shower. You need to rinse off the wall and floor surfaces and then squeegee them to send as much water down the drain as possible.


stain solver logo Cleaning grout is easy with Stain Solver. Click to discover how to clean grout - quick and easy.


You can buy decorative shower squeegees at better hardware stores. They even come with a handy holder that attaches in the shower area.

Regular Cleanings

Mildew also needs food to eat. It doesn't take much to satisfy them, but unfortunately we offer them more than they need. Body oils, soaps, etc. all contain food for mildew and other bacteria. If you clean your ceramic shower or tub area on a regular basis, you cut off the food supply.

Regular Cleaners

In a few moments you will read about regular cleaners you can buy at any grocery store. Most of these do a swell job of removing dirt, soap film, etc from ceramic tile and grout surfaces. I didn't list every cleaner as there were simply too many. The next time you buy one, look at the ingredients. Keep in mind that the chemical name for chlorine bleach is sodium hypochlorite.

Read Ceramic Tile Cleaner Products for these cleaners.

Hard Water Stains

Friends of mine have complained that they can't get tough stains out of their shower. When they describe them to me, I realize they are not mildew but light colored hard water stains. These are some of the easiest things to deal with. Common white vinegar will dissolve hard water stains and deposits. It may take repeated soakings and scrubbings, but faucets, sinks, toilets, tile, etc. will look brand new.

Abrasive Cleaners

Cleaners that contain mild abrasives can harm just about any surface, even ceramic tile. Use them often enough and they will de-gloss shiny glass surfaces. The abrasives are work savers. They help you to cut through dirt. If you clean on a regular basis, you usually don't need the help of the abrasives.

Never use abrasive cleaners on plastic, fiberglass, acrylic, etc. type surfaces. They will remove the gloss from these surfaces. Refer to the care instructions that usually come with products for safe cleaners.

Companion Articles:   Oxygen Bleach Tile CleanerCeramic Tile Cleaner ProductsRemoving Mildew from Grout

Column B284