CSST is New and Revolutionary

Corrugated Stainless Steel Tubing (CSST)

Install gas lines like electric wires? You must be nuts! If you would have made that statement 20 years ago, I would have thought you were nuts. After all, natural gas was meant to pass through rigid iron pipe, copper tubing, or steel mains, right? Well, that is the way it was done for years until someone got tired of threading pipe or forgetting to install the flare nut before you flare the pipe!

A Revolution

If you have ever installed black iron gas line on a hot or cold day, you know what an effort it can be. Threading pipe by hand will build biceps! The cutting oil gets everywhere and it is simply hard work. Working with copper tubing is easier, but even soft copper can be tough to bend without crimping the tubing. The new corrugated stainless steel tubing (CSST) is easy to cut, bends readily and requires no threading. Different systems require different fittings, but most are simple to work with. CSST is a revolutionary product and will be widely recognized as such within a matter of years.

Different Systems

Not all CSST is the same. It looks the same, even upon close inspection, but it is not. The difference is in the brass connections at each end of a tubing run. Some of the fittings have more parts than others. I happen to prefer the fittings that do not have split rings within them. Fewer parts, in my opinion, mean fewer problems.

Working With Black Iron

I love to install black iron pipe. So does my best friend, Richard Anderson - Cincinnati, Ohio's best HVAC man. The work is challenging and when you run several hundred feet of pipe with countless fittings and pass the pressure test, the satisfaction is enormous.

You need special tools to work with black iron pipe:

  • A pipe vise or tripod to hold the pipe
  • A heavy duty cutter to slice the pipe
  • A rachet and assorted pipe threading dies
  • A reamer and cutting oil

You can rent all of the above tools for a small job. If you plan to buy your own tools, be prepared! You will easily spend hundreds of dollars.

One of the biggest problems rookies make with black iron is getting the right length for a particular piece of pipe. You must always keep in mind that a certain amount of pipe disappears into each fitting. Usually 3/8 to 1/2 inch of pipe threads into a fitting.

You don't want to over-tighten black iron pipe. 1.5 to 2 complete turns of the pipe, after it is hand tight, is usually sufficient to produce leak free joints.

Pipe Dope

Black iron pipe joints need to have a sealing compound applied to the threads to make them leak free. I have never liked using Teflon tape - an approved sealer. I prefer using a pastelike substance called pipe dope. Traditionally, this material was messy to work with. However, a new pipe dope hit the market about 18 months ago that is easy to clean from your hands and any other surface it touches.

You apply pipe dope to oil free, or nearly oil free, male pipe threads. Don't put it inside a female fitting.

Threading Pipe

Pipe thread dies cut amazingly crisp threads on bare black iron pipe. As you might imagine, this creates enormous friction. You must use a special thread cutting oil to lubricate the die as it rotates around the black iron pipe. Failure to do this will cost you big bucks. Without oil, your cutting die will overheat and burn up. Capture the oil in a basket, strain it and reuse it!


Author's Notes:

On November 8, 2005, I received the following email.

In regard to your article on the CSST systems being installed in new homes. If you care to, read an article that was published in April of 2003 in the Dallas News regarding banning this installation in the city of Frisco, Collin County, Texas. Lightning strikes have caused numerous fires in residential homes as a result of CSST failing. Although the manufacturer states that it is completely safe, in fact safer than ridged black pipe, it has some serious issues. I have seen three fires in our own community as a result of CSST failure. The manufacturer accepts no responsibility for improper installation, and does not provide in any great detail, of detrimental or catastrophic failure if done so. I just saw your article and thought I would provide feedback. If you have questions on the article I mentioned, you may contact the Dallas News. Thank you for your time.

Maxwell J. Brunner
Lieutenant
Menomonee Falls Fire Department
Email- [email protected]

I responded to this very interesting email with a few thoughts of my own. My first suspicion would be that the tubing acts like a lightning rod of sorts. The thin walls of CSST might not seem to handle as much of a strike as black iron. Black iron is so much thicker that it may actually take a lightning strike better.

I suggest you look up the article in the Dallas News if you want more details.

February 2007

We received a notification from Jack Tracy of Houston, TX, about the ban having been lifted. Read about it in the Dallas News Archives - Publish Date: July 16, 2003.

We have only read the title and summary and have not purchased the article from the Dallas News.

Column B296
Manufacturers of CSST

Manufacturers of CSST Tubing

This industry is basically a newborn. The CSST (corrugated stainless steel tubing) material has only been approved for use since 1988! That is a blink of an eye in terms of marketing and brand/product awareness. Even though little time has passed since the debut of the unique material, there are still a significant number of players in the field. I expect this wonderful piping material to eventually knock black iron pipe on its butt. It will take a while as it always does. Plumbing distributors have to be convinced that there is a market for the material before they stock it. It is a Catch-22 type of scenario.

You find CSST at plumbing supply houses. These are wholesale stores that sell pipe and materials to plumbers. Look in your Yellow Pages under "Plumbing-Supplies". Stroll into the stores and look at the CSST displays and literature. You will be amazed at how nifty it is!

  • Gastite

  • OmegaFlex
  • Parker Parflex
  • Tru-Flex Metal Hose Corp.
  • Ward Wardflex

p>Column B296

Cost Comparison: CSST, Copper, Black Iron

Cost Comparisons

You are faced with a large gas line installation project. What is the most cost effective method? Well, it depends. If you have a reasonable plumber in your area who has been trained on how to use CSST, then it might be the hands down winner. The type of job also makes a difference. If there are lots and lots of bends, twists, and turns, then CSST and soft copper might massacre black iron.

You will have to get bids and see how it all turns out. One thing is for sure. As CSST becomes more and more accepted by professionals, the cost of the material will drop and this will benefit you the consumer. You will also find that improvements will allow homeowners to install the material with relative ease. Many companies who now make CSST do not want the average homeowner to install their product. They want plumbers to attend special, and necessary, training sessions.

Following is a cost comparison of four different jobs. Look at the numbers closely, especially the material and labor differentials. There are four different situations: House A is a small house with just a furnace and hot water heater. House B is a medium-sized house with a furnace, hot water heater, and two other gas appliances. House C has mid-level pressure - 2 PSI - a furnace, hot water heater and 4 other gas appliances. House D has mid-level pressure, two furnaces, two hot water heaters and six other gas appliances. CSST will usually only save money on larger jobs. Table Data courtesy of Omegaflex:

 
House A House B House C House D
Copper
Material
$51 $90 $98 $148
Labor
$133 $253 $400 $720
Total Cost
$184 $343 $498 $868
Black Iron
Material
$50 $87 $100 $149
Labor
$160 $300 $500 $880
Total Cost
$210 $387 $600 $1,029
CSST
Material
$134 $216 $250 $306
Labor
$100 $160 $220 $420
Total Cost
$234 $376 $470 $726
Savings with CSST
.
($50) ($34) $28 $142

p>Column B296

Earth Auger Sources

Sources of Handy Earth Augers

Earth augers are not as easy to find as you might think. Those living in the country probably will have more luck than those living in a big town. Augers are a common farm implement and a farm supply store will most likely carry them.

If you have a county soil conservation office, they may have some catalogs as well. Soil testing companies will also know people who make and sell earth augers, as these scientists need to probe soil on a daily basis.

Garden centers have earth augers you install in a regular power drill. But these augers are made for vertical mulching of trees and for planting bulbs. Unless you have a very shallow sewer line, they will not work. The primary reason being that they usually only drill 18 inches deep. I have yet to see one of these garden augers that comes with extensions.

Here are a few I found while doing a search:

  • Little Beaver, Inc.
    This company has a full range of hand operated or gasoline powered earth augers. Visit their website, especially if you are looking for hand augers with extensions.

  • Ardisam Inc.
    These guys make a 2 inch powered auger called the Earthquake Auger. It looks like it is a nifty unit.
  • Stihl Incorporated
    Stihl makes durable gas powered augers.
  • Hoffco Outdoor Power Equipment
    Hoffco had been producing equipment spanning five decades. They offer one and two man, gas-powered earth augers and earth drills.

Column B326

Stop Tree Root Growth in Sewer Lines

Installing PVC Casings to Stop Tree Root Growth

Stopping tree roots that invade a sewer line requires a little investigative work. You somehow need to find out the position of the sewer line. The older the house is, the tougher this can be. Why? Because old sewer lines were built using 3 or 4 foot lengths of clay pipe that can easily be installed in sweeping curves, not necessarily a straight line. Your best bet is to hire a company that can send a camera into a sewer line and use an electronic sensing device to determine the location and depth of the sewer line as it passes beneath the ground.

Sewer Department Records

If your indoor plumbing connects to a municipal sewer system, I always start the process by visiting the sewer department. Most have good records and they can tell you the location of your sewer tap. This distance is measured quite accurately from the center point of the nearest manhole. Most sewer taps then extend at a 90 degree angle from the main sewer towards the property line. From here it can get a little tricky. Take my sewer line for example. The developers of my subdivision decided to save money. Instead of digging separate trenches for each house, they dug one wide sewer tap trench for two adjoining lots! My sewer tap and my neighbor's are next to one another right at our shared property line. I had to install a 45 degree elbow followed by a 22.5 degree elbow immediately off the tap to be able to get to the center of my lot. Once there I had to install the same fittings to be able to head in a straight line back towards my house. See the problems? And my house is only 15 years old! But armed with sewer tap records, you can at least have an idea where the sewer line ends at the edge of your property.

Drilling

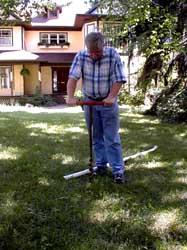
If you have any buried wiring, gas lines, water lines, sprinkler lines, etc. be sure you get these marked if possible. A sharp earth auger can damage these lines and if it is electric or gas, you might cause serious injury or death! Be sure to use the right sized auger for the job. I prefer to use one that drills a 2.5 inch diameter hole, since 1.5 inch diameter PVC pipe has a 2 inch outer diameter. You want the hole a little bigger than the pipe so that the casing slides into the hole with minimal resistance.

Location and Depth

If you can determine the exact entry point of the roots into the sewer line then you can spot a casing pipe directly over that location. If you can't find the exact spot, you may need to install a series of casings spaced at 6 foot intervals along a stretch of sewer line that is under or adjacent to the tree or trees that are causing the problem. Remember to stop the casing about 18-24 inches above the top of the sewer line. You want gravity to help you distribute the copper sulfate solution. Drill too deeply and you are simply wasting your time. Keep in mind that the sewer department records will tell you the maximum depth of the sewer tap. Use this information and the estimated depth of the sewer pipe as it leaves your house to get an idea of how deep the sewer line is as it makes its way across your yard.

Access

The top of the casing needs a simple threaded plug that screws into a female adapter. This allows you to add copper sulfate crystals and hot water at periodic intervals. If you don't want to see white dots in your yard, consider painting the plug green to make it blend in with the grass. It is also a good idea to create a little map of the casings, measuring the center point of the plug from two fixed points of your house. This triangulation method allows you to pinpoint the casing if it should sink into the soil over time. Place a copy of the map in a plastic freezer bag and attach this bag to the water line in your basement or utility room.

Repeated Treatments

The copper sulfate will need several months to work initially. You then might want to add more every 6 months.

Column B326

Avoiding Sewer Back Ups From Tree Roots

Nothing is more disgusting than 4 to 6 inches of raw sanitary sewage in a basement or crawl space. Often the cause of backup problems can be traced to tree roots that have invaded a sewer line. The tree roots are drawn to sewer lines as they constantly and randomly search for food and water resources. The roots enter very small cracks in the pipe joints and when they find the water and nutrients in sewage, they go crazy. In the process, they drive homeowners like you and me crazy as well.

Solving the Problem

There are all sorts of concoctions you can put into your plumbing system that claim to solve root problems. A few work, but many do little to solve the problem. Any product that is simply a liquid or a solution that is flushed down the toilet will often do little. Why? The roots often grow down from the top of the pipe. The chemicals may burn the tips of the roots or any portion that the solution touches as it passes by the roots. The better chemical products are those that create a foam that fills the pipe void and contacts all of the roots. But keep in mind that the tree continues to grow and makes every attempt possible to re-establish root growth in the pipe.

Stop Them Before the Pipe

I have always thought the best way to stop basement water leaks is to stop the water BEFORE it gets to the basement. I have solved hundreds of chronic basement leaks by installing simple linear french drains around the perimeter of houses. These devices capture sub-surface water and redirect it around a house instead of into the basement.

You can apply the same thinking to tree roots in sewer pipes. Why not stop the roots BEFORE they get to the pipe? To achieve this all you have to do is poison the soil above and around the sewer pipe. Even if you only are able to treat several inches of soil around a sewer pipe, this method will be highly effective. The problem is, it is nearly impossible to deliver chemicals with that degree of pinpoint accuracy, especially to a pipe that is buried under tons of soil.

Dr. Pryor's Class

I majored in geology while in college. One of my favorite subjects was soil science and hydrogeology. I learned that water moves through soils in two directions. It moves down, then it moves sideways. Dr. Pryor, you would be proud of me. I did pay attention in class!

If you combine this knowledge with a delivery system that gets you close to sewer pipes, you can effectively treat soil above and around a sewer pipe so that it becomes distasteful to tree roots.

First Hand Experience

The second house I owned had a tree root sewer infestation. With the help of a professional sewer cleaner, I was able to determine a fairly accurate distance from the house where the tree roots entered the sewer pipe. I also found out where my sewer line entered my property. When I combined these two pieces of data I was standing right beneath two maple trees in between the sidewalk and the street.

I borrowed an earth auger and drilled a hole 10 feet deep. I glued a female adapter onto the end of a 1.5 inch PVC pipe and inserted the other end into the hole. With minimal effort I was able to extend the pipe into the earth so that the threaded end of the fitting was flush with the grass. I then poured 4 pounds of copper sulfate crystals into the pipe. Five gallons of hot water was then poured down the pipe. To make a long story short, the sewer never again backed up. I had nailed the problem. The placement of the pipe was obviously perfect and I was undoubtedly lucky, but the bottom line is that the trees continued to thrive, they just got their water and nutrients from someplace other than my sewer pipe.

Multiple Pipe Casings

You may not be as lucky as I was. You may have to sink 4 or 5 pipes into the soil in a line directly above or very near where you think your sewer problem is. You must also be patient. The copper sulfate takes months to poison the soil. The roots didn't plug the pipe in just one day and you are not going to dissolve them that quickly. If you combine a professional sewer cleaner, PVC pipe casings and copper sulfate, you absolutely can solve your tree root problem. Remember, patience...

Column B326

Chlorine Bleach vs. Oxygen Bleach – Drain Cleaning

Chlorine Bleach Alternatives for Drain Cleaning

Some people are actually highly sensitive to chlorine bleach and the fumes it produces. Even if you are not, if you get a strong whiff of it in its pure form, it absolutely gets your attention. What's more, this product should not be used if your house is connected to a septic system. Why? Chlorine bleach is a fantastic sanitizer. It quickly kills bacteria. The trouble is, septic systems are filled with beneficial bacteria that break down waste. Pour chlorine bleach or products that contain chlorine bleach into a septic system and you can cause the septic system to malfunction.

Chlorine bleach can also deteriorate fabrics and immediately take color out of them. I once was wearing some nice sweat pants as I was cleaning my shower one day. It was a quick cleaning and I thought I would be OK. Well, somehow I got a splotch of chlorine bleach on the pants and bingo, the navy blue pants have a nice magenta splotch right on the left thigh.

An alternative product that works just like chlorine bleach, but not as fast, is oxygen bleach. Oxygen bleach is color and fabric safe. It is also safe for use in septic systems. In fact, it helps septic systems by adding needed oxygen within the actual tank.

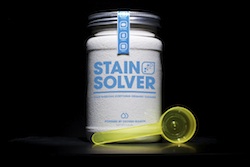
SS02 Black Small imageYou can buy oxygen bleach in many places. It is sold on cable TV, I have seen it in membership stores, and I have recently seen it in a large grocery chain in my city. I also sell it.

The trouble is not all of the products are the same. Many of the ones sold on TV and in the stores have fillers in them to extend the product. My Stain Solver oxygen bleach is 100 percent pure. You need less of my product to achieve the same results you get with the also-rans.

You can get oxygen bleach by going to:

www.stainsolver.com

Or by calling: 513-407-8727.

Message from Tim:

Years ago while researching a column about cleaning decks, I discovered the wonders of Oxygen Bleach. It is perhaps the 'greenest' cleaner I know of as it uses oxygen ions to break apart stains, dirt and odor molecules. There are no harsh chemicals, and it works on just about anything that is water washable.

I decided to create my own special blend using ingredients made in the USA. In fact, the raw materials in the active ingredient are food-grade quality registered with the FDA. I call my product Stain Solver. I urge you to use it to help with your cleaning needs. You will be amazed at the results!

Column B347

Cleaning P Traps, Tailpieces and Drain Lines

Cleaning out drain lines is not my favorite job by any means. But sometimes it is a necessary task to rid a drain of clogs or to stop odors from drifting out of sinks. We have a small extra sink in our kitchen next to the refrigerator. My kids constantly pour milk and other drinks into the sink. They also drop food into it. That is not so bad but what they don't do is rinse it out. After a while the bacteria in the milk and food start to grow on the tailpiece that leads from the sink down to the trap. This produces a foul odor. Every now and then, I have to disassemble the trap and the tailpiece to clean it. It is nearly impossible to get a brush past the small holes in the sink strainer.

Doing Plumbing

Taking apart drain lines beneath a sink is perhaps the first place that many people start their DIY plumbing careers. It is relatively safe to do compared to working with water supply lines that are pressurized. If you goof up and can't get the drains back together, you can always put a bucket under the trap or the pipes. If you goof up a water line connection, you can have a Niagara Falls simulator in your house in no time flat.

Required Tools

If you want to take apart drain lines, you just need a few tools. A 12 inch or possibly a 14 inch pipe wrench is a good start. A large channel lock pliers or fancy locking type wrench found at Sears stores will do as well. If your drain lines are tubular plastic and you have a strong grip you can often loosen the nuts without any tools.

If you are working in an old home, be careful of the pipe that connects to the desanko fitting in the wall. Sometimes these pipes were directly leaded into the joint! If you disturb that pipe you can create a leak that is nearly impossible to fix without tearing into the wall.

Dicey Work With Old Pipes

Anytime you work on old plumbing, it can be a challenge. Pipes wear out and threaded joints that originally went together with ease can become welded together with deposits or rust. Anytime I decide to work on old pipes, I always figure a worst case scenario. In fact, if you are planning to live in the house for a decent period of time, it is always best to replace old piping with new so as to have trouble free plumbing for years.

No Stretching Please

When you are working with P traps and tailpieces, watch how you measure. A tailpiece normally fits into a P trap about one and one half inches. I have seen drain lines where a homeowner only had the tailpiece sticking into the P trap about one quarter inch. All someone had to do was bump the P trap and the drain line would fall apart. If you need a longer tailpiece to get deep into the trap, then get it. I always carry assorted lengths with me so I am prepared. They are inexpensive, so buy different ones when you are working on your drain lines.

Preventative Maintenance

To keep drain lines running free and clear, I periodically fill a sink to the brim with water. I then pull the plug and let the water rush down the drain. The weight of the water in the sink creates a decent amount of pressure and often completely fills the branch line from the sink to the main drain completely with water. This is good as the sides and the top surfaces of the pipe get a little cleaning. It is also a great idea to do the same thing with the main drain from time to time. Fill all of the sinks, tubs, etc. with water and then get everyone in the family to pull a drain plug at the same time. Flush the toilets at the same instant and the main drain line gets a huge slug of water going through it.

Column B347

Custom Hose Bib Photos

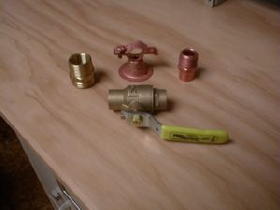
Here are the only parts you really need to build a custom hose bib. A ball valve, the special hose thread adapter and a male adapter that converts 1/2 inch copper to the special brass hose adapter.

The funny looking clamp holds the new hose bib securely to the wall. Remember, if you live where it gets cold, you MUST install a separate valve inside to cut off water to the outdoor faucet. The outdoor piping must be drained and the valve left open all winter.


These simple parts combine to create a custom hose bib.

These simple parts combine to create a custom hose bib.


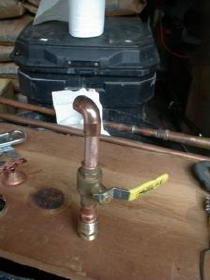
Hose bib prior to soldering.

Hose bib prior to soldering.

Here is the hose bib before I soldered it together. The valve is in the closed position. Always do this when soldering. Open it only after the valve body has cooled. I love how my valve works. I get full water flow and no valve noise.

Column 362

Avoid Water Line Problems – Installation Tips

The feeling is so satisfying - much like sneezing - you turn off the torch, cool the joint and then turn the valve on. You hear the water race through the pipe. It is looking for the tiniest place to escape. The pressure builds. Within moments the hissing rush of water stops. It is silent. BINGO! No leak! Your soldering job is a success! Yes, it is a great feeling, especially when you consider the alternative.

Minimizing Down Time / Water Outages - Plan the Job - Get the Right Stuff!

There is nothing more aggravating than working under pressure. Especially if you need to get water turned back on to flush a toilet or resupply an entire house. Trust me, I have been in these situations on jobs before. What happens if you are missing a critical fitting? What then? You run to the supply house - they just closed or don't have it. Accckkk!

This can be avoided. Take some time before the job and draw out what you are going to do. Put it on a piece of paper. From this drawing, you can determine how many and what type of fittings you need. Copper fittings are very inexpensive. Order extra ones. Why? Because there are always obstacles when you get down to it. You may need to use some extra 90 degree fittings. You may have to cut a pipe to thread it through something. So, get extra couplings and even special repair couplings. A repair coupling is used when you can not move either of the two pieces of pipe that result from a cut. Believe me, this can happen!

Install New Piping Before Old is Taken Out!

In many instances you can install vast amounts of a new piping system before the old system is taken out of service. You can run the new copper piping parallel to the old system. Every hour of labor you invest in doing this is one less hour that the system will be down. This procedure is done all the time when cities and municipalities install new water mains in your streets. It is a great idea. Heck, where do you think I got it from?

It's Late - Time to Quit - Not Finished!

What happens if you simply have to quit? Well, hopefully you restored water to the most important fixtures or fixture groups. Did you remember to buy those nice ball valves? You know, the ones that don't have washers, allow for full water flow, and last forever? Well, if you did, you can install a valve at each branch that you have not completed. Be sure to solder a one foot piece of pipe coming out of the other end of the valve. Why? Because if you don't, you will not be able to get the valve hot enough the next day to solder. The water on the other side of the valve will suck every bit of heat from your wimpy torch. A one foot piece of pipe beyond the valve is plenty of buffer. It will permit you to successfully continue the job.

By the way, don't forget to solder ball valves in the closed position! If you don't you can distort the inner plastic seat and it will not shut off. Also, after you have soldered the valve, cool it with water or a water soaked thick towel. Retained heat can also damage the inside of the valve. Old fashioned valves with rubber washers must be soldered in the open position. However, be careful of the valve seat orientation. Add too much solder and it can settle on the seat!

Column B362