The toilet is quite possibly the most frequently used mechanical device in most homes. If you have a spouse and children I can say this for a fact. Think about it. How many times a day is a toilet flushed in your home? The only other device that gets as much use might be a lavatory faucet or a kitchen faucet. This heavy use means that the odds of breakdown or problems are great. Fortunately the mechanical devices in most toilets are simple, time tested and very reliable.
When Problems Happen
When a toilet problem does happen, it can be minor or major. Flushing problems are often more irritating than catastrophic, although a clog can have catastrophic results IF the toilet continues to run while the clog occurs! For this reason, it is always a good idea to watch the flushing action to make sure water and waste is moving on its way down through the drainage system.
Click here to watch a video on how a toilet works.
Don't Panic
To avoid problems before they happen and panic sets in, it is a good idea to learn how a toilet works. When you get a chance, remove the lid from your toilet tank and lay it flat on the floor. Lids tilted against walls have a tendency to slide and then break.
Note how the toilet works. The decorative handle on the outside of the tank is attached to a lever. At the end of the lever is a chain that connects to a rubber flapper valve. When you activate the handle, the lever lifts the chain and the flapper valve magically begins to float. With the flapper valve open the water within the tank can flood down into the toilet bowl. This rushing water is what flushes the toilet. Once about 80 percent of the water has left the tank, the flapper valve drops on its own to stop the flow of water into the tank. But as you watch, note that water is still running into the bowl. This water is coming from the fill valve that is now refilling the tank. As it fills the tank, it also sends water via a small tube down the overflow tube that leads to the bowl. This water flowing into the overflow tube is necessary, as it is the water that brings the toilet bowl water up to the filled level. Once the tank water reaches the fill line the fill valve should stop the flow of water into the tank and the bowl. It sounds complicated, but in reality it is very simple.
By observing a working toilet, you will now be mentally equipped to handle problems as they occur.
Parts are Cheap
You can replace all of the moving and mechanical parts inside a toilet tank for under $15 in most cases. What's more, you can get high quality parts for this small investment. The biggest challenge in removing the old parts is shutting off the water to the tank. If the valve under the toilet does not work, you need to shut off all the water to the house. If you have an opportunity to replace valves anywhere in the house, be sure to install ball valves. Ball valves cost maybe $2 more than a regular valve with a washer but they are far more reliable and rarely do they not work.
Backup Plan
Don't start working on a toilet at 9:00 pm. Don't do it if you are a rookie and don't have a second toilet in the house. What happens if something goes wrong? If you need to call a professional to bail you out, will they be available? Keep all of these things in mind before you start!
The Five Gallon Bucket
Do you need to flush the toilet without using toilet tank water? It can be done! Simply fill a 5 gallon bucket with water and pour it into the bowl. You get the same results as if you had tripped the handle. It is a nice trick to know.
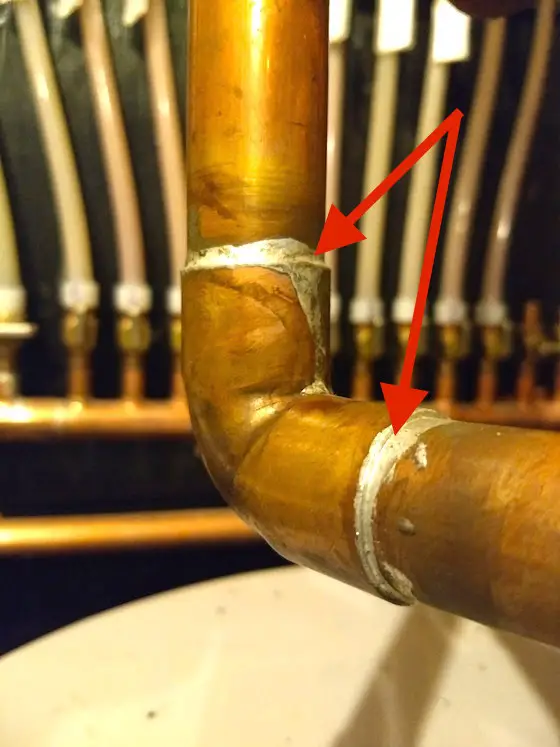
How to solder copper pipe - You do this when you melt the solid solder and allow it to flow into the tiny gap between the tubing and the fitting. The red arrows point to the silver-colored solder. Copyright 2018 Tim Carter
"The biggest mistake a rookie makes soldering copper is they allow the heat of the torch to melt the solder. Do NOT do that."
How to Solder Copper Pipe Checklist
The copper tubing and fittings must be clean
Stir up the flux paste
Use lead-free solder
Copper must be heated so it melts the solder NOT the torch flame
Watch the following video:
How To Solder Copper Pipe - MOST IMPORTANT TIP OF ALL
The biggest mistake a rookie makes soldering copper is they allow the heat of the torch to melt the solder. Do NOT do that. You must heat the copper tubing and fitting for about ten or fifteen seconds before touching the solder wire to the hot copper.
The HOT copper will melt the solder, not the torch.
To solder copper pipe you must heat the copper pipe and the fitting to be soldered to a sufficient temperature. When the copper is hot enough, it will actually draw the solder into the joint by capillary attraction. Believe it or not, the solder will actually flow uphill.
What is the Best Torch to Use?
A simple propane torch that uses screw-on bottles will adequately solder pipe up to 3/4 inch in diameter.
This is a great torch kit. This one is MAP gas which burns hotter than propane. A regular propane tank will fit the torch. CLICK on the photo to have this delivered to your home in days. WATCH the video of it below.
Plumbers generally use acetylene torches for two reasons. The acetylene burns hotter than propane allowing for faster solder times. The acetylene is available in larger tanks which attach to handy hoses and lightweight torches. If you want acetylene, you just need to go to a large plumbing supply house or a place that services welders.
What Types of Solder Can I Buy?
Solder, which is available in leaded and no-lead versions, attaches to the pipe on a molecular level.
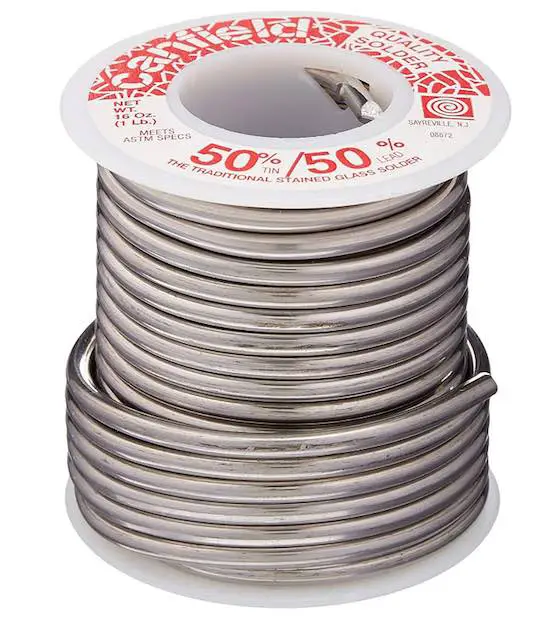
This is solder that has a 50 percent lead content. Look at the numbers on the end of the spool. Do NOT use this solder for water pipes for drinking water. CLICK THIS PHOTO to buy the solder for use in leaded glass, soldering wires, and other projects.
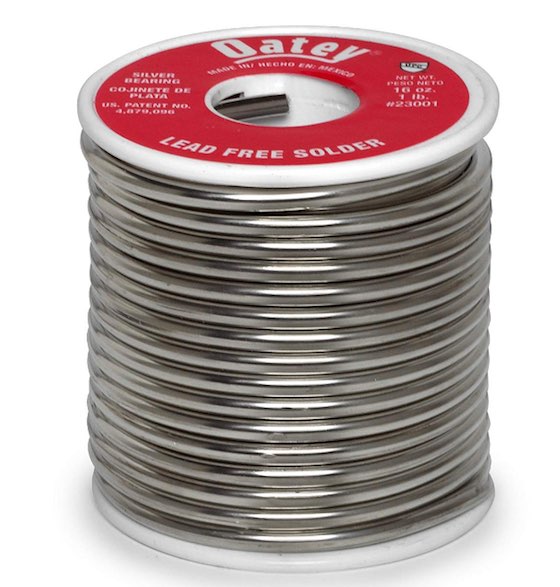
This is lead-free solder. Use THIS SOLDER for a copper pipe that drinking water passes through. CLICK THE PHOTO NOW to have it delivered to your home in days.
How Does Solder Work?
Solder works by bonding to the copper pipe when it's heated. It's very similar to how two pieces of steel get welded together.
The surface of the soldered joint actually becomes an alloy where the copper and solder intermix.
Why Does the Copper Need to Be Clean?
The copper pipe needs to be clean so the atoms of copper can easily bond with the atoms of molten solder. The solder WILL NOT BOND if the copper is oxidized or dirty.
For this to happen, the copper must be very clean and free of oxidation. You can clean copper pipe in any number of ways. You can use coarse steel wool, sandpaper and/or a wire brush. Special round wire brushes come in a variety of sizes to clean the inside of copper fittings and valves. Simply twist the brushes or pipe to clean them. Even if you purchase a new copper pipe, it should also be cleaned. You only need to brighten the area which is to receive solder.
Why Do I Need to Use Flux?
Flux is a chemical which helps you solder. Flux prevents the copper from oxidizing as you heat the copper with the torch.
It actually finishes up the cleaning job you started with the sandpaper and brushes. In addition, it prevents the pipe from oxidizing as you heat it. You can solder without flux, but it is really difficult! Flux is applied to both the pipe and the fitting with a handy miniature paint brush. You do not need massive amounts to be effective. Besides, once you start to heat the pipe, 90 percent of it boils off and evaporates.
What are the Different Types of Solder?
Solder is available in generally three types: 50 percent lead/50 percent tin; 95 percent tin-antimony/5 percent lead; and lead-free solder.
Any water supply pipe should be soldered with solder that contains no more than 5 percent lead. If possible, use the lead-free solder. The 50 percent lead solder is used for copper drain lines. It melts at a lower temperature and is able to bridge larger gaps as it cools. This is handy when working with large diameter (up to 4 inches!) copper pipe and fittings. You MUST pay attention when you buy solder. The 1 pound rolls look very much alike. Carefully look at the label as you might purchase the wrong one.
How Do You Light a Torch?
Plumbing torches can be lit with matches, lighters or preferably a flint striker. Some torches have built-in igniters. Watch this video:
Matches and lighters can be dangerous, as you might not put them out. A flint striker makes sparks which ignite the flame. Plus, a single flint in a striker can last a homeowner 10 years or more! Flame temperature is important. You need to set the flame on medium or high to generate enough heat to melt solder. If your flame is adjusted correctly, it will burn different shades of blue. You will notice at the center of the flame a darker blue section that comes to a point. This is the hottest part of the flame. You apply this part of the flame to the copper pipe.
How Do I Heat the Copper Pipe?
Don't be afraid to heat both sides of the pipe. Rotate the torch around the joint for even heat distribution. When I use my acetylene torch and I am soldering 1/2 inch pipe, I can usually heat the pipe to the correct temperature in 10 seconds or less. A propane torch may take 15 to 20 seconds.
How Do I Prevent a Fire When Using the Torch?
You prevent a fire by using a thin piece of sheet metal as a heat shield. Place the shield in between the copper tubing and anything flammable.
Always look beyond the pipe. Extremely hot temperatures extend out beyond the visible portions of the flame.
You can easily scorch lumber or wires. If you are soldering near old lumber or in joist spaces near vertical walls, you can start your house on fire easily. Be careful and use flame shields. These are flame resistant fabrics or simple pieces of sheet metal which absorb and/or deflect the heat.
Always have a 5-gallon bucket of water handy in case you do start a fire. If you have water still on in the house and can have a charged garden hose right next to you, that's the best thing.
As you heat the pipe and fitting you will see the flux begin to boil and evaporate. Once the flux stops boiling the pipe is generally hot enough to solder. Move the torch away and touch the solder to the pipe.
It may take 2 to 3 seconds for the solder to melt. If the pipe is horizontal, apply the solder to the top of the pipe. The solder will roll around in an instant.
If you have done the job right, a droplet of solder will be at the bottom of the joint. You can flick this molten solder away with an old rag.
Blowing on the joint will allow it to cool. It will be hot, but rub the joint quickly with an old rag to remove flux residue. This will also polish the solder. Check the joint closely to see if you see a silver colored band around the entire joint. If so, your first solder joint may be perfect. As I would say on a job, "Another quality installation!"
Here are some photos that may help you visualize the way you hook an icemaker up. Visit a REAL plumbing supply house or an old hardware store to get really good parts and advice. They will show you how all of the parts fit together. You don't always get this service at the big box home improvement stores!
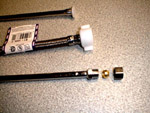
This photo shows the 1/4 inch soft copper line coming down from a 1/2 inch copper tube. In between is a brass adapter that screws into a 1/2 inch female copper adapter - you can see the white Teflon tape at this joint. The 1/4 inch tube connects to the brass adapter using a nut and a brass ferrule. The soft copper tube fits perfectly inside the ferrule - it resembles a ring on your finger. You can see those two parts just to the right of this line in the photo to the right. As you tighten the nut on the adapter, it compresses the brass ferrule to make a tight joint.
In this photo, there is a flare fitting coupling. This allows you to connect two pieces of soft copper to one another. The top of the fitting accepts a flared piece of copper. See the nut on the other end? As you tighten it, it makes a tight joint on the rounded machined face you see at the top of the fitting.
Assorted compression type fittings. The top & middle ones are toilet tubes. Bottom one is a Delta tube.
Connecting an icemaker is really not a tough job. You need some basic plumbing tools and supplies and a little bit of patience. It also helps to have an ample amount of coiled soft copper tubing behind or under the refrigerator. It is not uncommon for a good intentioned appliance repair person or a mover to create a minor flood when a refrigerator is moved and a short supply line pulls out of its fitting!
The Best of the Best
When connecting water supply lines, you have two options. You can make a permanent connection by using solder or you can create leak proof connections that can be taken apart at a later date. You can't easily take apart a soldered joint. The two most common connection methods that allow you to take them apart are compression and flare. The flare fitting is considered by the industry to be a more leakproof connection. But flare fittings are a little harder to create if you are the average homeowner. Why? Because to create a flared joint, you need a flaring tool that shapes the end of a soft copper tube so that it works inside a flare fitting.
Compression fittings are different. You do not need to flare the end of a pipe or tube. You simply cut it to length and slide it into the compression fitting. This is pretty simple. But, pull hard enough on the supply tube or copper line and it will pull out of the compression fitting. As you might expect, a leak will happen.
Which One?
I have installed many icemakers using compression fittings. They are safe as long as there is no pulling pressure or tension on the copper supply line. Compression fittings and connections are used every day to connect toilets and sink faucets to valves and water supply lines. They are great as long as you understand how to install them properly.
So How Do You Do it?
The trick to a leak proof compression connection is simple. First, make sure the tube or pipe is long enough to extend to the bottom of the compression fitting. Second, make sure that when you start to tighten the compression nut that the pipe or tube coming out of the fitting is straight. The brass ferrule that tightens around the pipe or tube must be seated perfectly around the pipe and it must be seated snuggly in the compression fitting. If it is at an angle, I guarantee you that you will have a leak. No matter how much you tighten the nut, the leak will not go away.
Flush the Line First
Anytime you are getting ready to connect an icemaker or even a faucet or toilet, always flush out the water supply line first. All sorts of debris like solder beads, flux, wood chips, pipe burrs, etc. can be in the line. They can really mess up the valves and faucet cartridges. It often takes two people to flush the line as you might have the valve in a remote location from the end of the pipe or tubing. I would let at least 3 or 4 gallons of water run.
Slow Leaks
Compression fittings are notorious slow leakers. You may think you have a tight joint but a drop of water can develop every 4 to 8 hours! I always place a paper towel or a newspaper under the connection and check it on an hourly or daily basis to make sure the joint is perfect.
If you have a slow leaker and are frustrated, you can place a large jelly pan under the leak with paper towels in it. The paper towels distribute the drip and it evaporates before the next drip. Be careful about this low quality solution! It can cause a potential mold problem! Trust me, I have found these Rube Goldberg devices on more than one occasion!
A couple hired me to look at some problems in their year old home. They had numerous complaints. The main reason I was there was to determine the source of water which was pouring through their brick walls.
At one point in our discussion, the homeowner indicated how frustrated he was with the whole house. He even mentioned his dislike of the toilets! Evidently the toilets required more than one flush to rid themselves of waste products. The homeowner was dissatisfied. His problem is shared by many homeowners.
Interesting Facts
Once I started doing my research, I found out some very interesting things. Older toilets used up to five gallons of water to flush. Not only that, they used additional water as the tank filled. Engineering requirements were at a minimum since there was so much water to do the job. Further research found that the siphon and swirl action of toilets was an engineering innovation that helped to clean the bowl. Toilets made prior to WW II didn't have this feature. The water would rush straight down from the bowl rim. As a plumber, I have serviced many of these straight flush toilets.
Furthermore, the more water that sits in the bowl prior to a flush, the more energy is required to replace this water and get it moving towards your sewer or septic line.
Water Shortages
Water shortages in the mid 1980's in various parts of the country caused local officials to institute water conservation measures. It had long been known that toilets consumed the greatest amount of water each day in the average home. The pressure was on to reduce this water usage. Regional changes in the plumbing codes caused plumbing fixture companies to create low flush toilets. These dudes only were to use 1.6 gallons of water per flush. The manufacturers weren't prepared.
Big Changes
Two things immediately changed in the toilets. The quantity of the water in the bowl and the size of the trapway in the bowl were reduced. This led to two problems: the water "spot" or surface area of water in the bowl shrank, and solid matter was more prone to clogging in the bowl. The manufacturers had to play catch-up baseball. Their engineers started putting in some long nights.
Click here to watch a video on how a toilet works.
The reduced amount of water per flush also brought another problem: less energy. 1.6 gallons of water dropped from the same height as 5 gallons of water can only perform about 1/3rd the work. Yikes!!!!!
Using Available Resources
Every plumbing system I'm aware of uses pressurized water lines to get the water to your faucets and toilets. A few engineers thought to use this available resource. They designed a simple tank which begins to fill with water. Soon the pressure of the waterline can force no additional water into the tank. The tank now holds a certain volume of water (never more than 1.6 gallons) and pressurized air. As soon as the tank lever is pressed, the water is rapidly forced from the tank into the bowl. It has lots of energy. You have seen this happen at most commercial bathrooms. The result is dramatic. Water and waste are jettisoned into the sewage system.
Function vs. Form
The toilet company engineers have been working hard to match the performance of these pressure assist devices. They are making progress. We are now in the third generation of low flush, gravity 1.6 gallon toilets.
Both toilets have their pluses and minuses. The gravity flush toilets are quiet. They often have a sleek profile. The pressure assist toilets make a brief loud rush of noise. They get the job done. They are available in a wide range of designs, both one and two piece. The good news is this. If you have a poorly performing first generation toilet, you can possibly retrofit a pressure tank to make it work properly.
Water conservation is important. Take your time to acquaint yourself with the two types. See which one will work best for you. Time will continue to supply us with better models.
HELLO TIM: I consider myself very handy around the house with everything from electrical to plumbing. However I feel like this problem is getting the best of me. The problem is we often (not everyday) have a very strong sewer odor that comes from the sink drain in our Master bath. It only occurs during the first use in the morning and seems to be emanating from the overflow hole entrance of the sink.
I have cleaned the drains (P-Traps) and do find residue from toothpaste and stuff but nothing that explains this. We do ever so often get the same smell from our walk-in shower too! I have heard that if the problem is a clogged vent pipe on the roof it will make a gurgling sound and also it would smell other than first time we use the sink of a morning. We never hear these gurgling sounds. If you have any suggestions I would appreciate it. We have black plastic pipes and the house is 4 years old, this started about 1 year ago. Thanks, Jim
DEAR JIM: I know exactly what the problem is. The odor is caused by bacteria that is breeding and multiplying in the bio-film that is coating the vertical drain pipe / tailpiece between the fixture trap and the actual drain outlet in the fixture. It is not the vent pipe unless you know for a fact the trap is being siphoned. The gurgling / suction noise is unmistakable and you have indicated you never hear it.
The reason you smell this when you first use a fixture is simple. The motion of the water first hitting the bio-film releases some of the bacteria molecules into the air.
Remove the drain strainer in the shower and I guarantee you will see a layer of slimy goo on the side of the pipe leading down to the trap. Clean off this goo. Do the same in the sink. You will have to remove the sink stopper to gain access to the vertical tailpiece.
The overflow tube that leads from the top of the sink to the tailpiece can also be a contributor to the problem. It is tougher to clean. I have had success using a turkey baster filled with a solution of Oxygen Bleach to kill the bacteria. You have to squirt the solution into the overflow tube vigorously several times and let it sit to try to coat the entire lining of the tube.
Message from Tim:
Years ago while researching a column about cleaning decks, I discovered the wonders of Oxygen Bleach. It is perhaps the 'greenest' cleaner I know of as it uses oxygen ions to break apart stains, dirt and odor molecules. There are no harsh chemicals, and it works on just about anything that is water washable.
I decided to create my own special blend using ingredients made in the USA. In fact, the raw materials in the active ingredient are food-grade quality registered with the FDA. I call my product Stain Solver. I urge you to use it to help with cleaning projects. You will be amazed at the results!
DEAR TIM: I have a toilet that flushes very slow. It seems to just swirl around and whatever is in the bowl takes two, sometimes three flushes to go down. Any suggestions? Terry R. Minor New Eagle, PA
DEAR TERRY: The first thing I would do is pour a 5 gallon bucket of water down the toilet as fast as possible. If the toilet and drain line are free of clogs, the level of the water in the bowl will not rise as you rapidly pour the water into the bowl. The water from the bucket will leave the bowl faster than a speeding bullet.
Once you are certain there are no clogs, take the tank lid off the toilet and lift up the flapper valve in the tank with your hand. Open it fully and keep it open until all the water leaves the tank. If you get a good flush, then this tells me the flapper valve is not opening fully and/or it is closing too quickly before all water leaves the tank.
If the toilet still flushes slow, then you may have a lime buildup in the holes under the bowl rim or the siphon jet hole in the base of the bowl.
Project delays can occur for many reasons. Some are avoidable and some are not. You should focus on the avoidable reasons when you are getting ready for your next project. Include in your scheduling some type of contingency for unavoidable delays.
Excellent plans and specifications are a necessity. Generally speaking, if you have an excellent set of plans you will avoid surprises and change orders. Both of these can create havoc in scheduling, especially change orders. Change orders usually can be traced back to poor planning, because you or the architect did not explore or think out all possibilities. Most contractors hate change orders.
In the bidding stage, quiz all of the contractors about the length of time your project will take. Ask them to produce, along with their price quotation, a simple project time line chart. Tell them it does not have to be fancy. Compare the charts and make your judgment. If a submitted chart is incomplete or inaccurate, how well do you think that contractor will perform?????
You have a responsibility to make timely material selections. Look ahead on the time line chart and give yourself plenty of time to make decisions. Don't underestimate this process, especially if your project is large and you have many things to select. Believe me, you can spend 3-4 hours just looking at sinks, faucets, and countertops. Selecting cabinets can take days.
Chart the progress of your project. Quiz your contractor as to whether or not things are on schedule. If a problem develops, ask what is being done. Ask if there is a way to get back on schedule. Openly communicate with your contractor. If he has a problem, try to be understanding. Remember, he is already under pressure. If you turn up the heat, it probably will only make things worse. However, delays caused by inaction by the contractor should be dealt with immediately. Tell him you're HOT!
One way to help minimize or eliminate project delays is to create an accurate and realistic project time line. This timeline lists all major aspects of your project. These aspects include both tasks and key materials needed to complete your project. It is vitally important to ensure that all tasks and materials are listed. The Checklists that I market list these aspects in great detail.
The successful creation of the project timeline depends upon accurate information from your contractor, his sub-contractors and material suppliers. Professional contractors must create a time line so as to accurately calculate the length of a project. You can create a time line yourself by just asking your contractor some simple questions. Some of these questions are as follows:
How many work days will each task take to complete?
What is the order in which tasks will occur?
What tasks must be completed in order for other tasks to begin?
What tasks can take place at the same time?
What materials must be special ordered?
How long does it take for specific special order items to arrive?
What is a realistic time frame to select materials?
When you have the answers to these questions, you can begin to create your project time line. If you have not done this before, you will need the assistance of your contractor. His input will be necessary with respect to those tasks which can take place at the same time. This aspect of a job is probably the most important, because it is here where you can compress your schedule and get the most amount of work done in the least amount of time. The number of tasks that can take place at the same time depend on many things. Scope of job, weather conditions, type of tasks to be completed, etc. all play a part.
The creation of the time line begins by using a large piece of graph paper. List the project tasks, in the order in which they occur from beginning of project to the end of the project, on the left side of your graph paper in a column starting at the top and proceeding to the bottom. Before you proceed any farther, you should have a general idea as to how many total days your project will last. This total should include days off and holidays. make sure that your graph paper from left to right has enough spaces or boxes equal to or greater than the amount of days you have calculated. Tape on an extra piece of graph paper if you need more spaces. You are now ready to begin your timeline. The tasks are listed on the left side of the paper vertically. The days of the week are listed across the top of the paper.
It is important to determine whether or not your contractor intends to work on weekends. You need to know this for a simple reason. If the workmen do not work on the weekends remember not to include these days as a part of your calculation. For example, let's say your contractor tells you that the demolition phase will take '7 workdays' and that his employees do not work on weekends. If the job begins on the first Monday on the chart, you would put a small circle in the 'Monday (M)' square of the first week and draw a line to the 'Tuesday(T)' square of the second week. It's that simple.
If your project is more complex, your chart simply gets bigger. You just have to list all of the tasks and the proper amount of days and/or weeks. If your project will take more than 2 months, you may choose to list weeks in place of days on the chart. When you do this, however, you tend to loose some detail in your planning. Beware, this will come back to haunt you.
One important aspect that many people forget to include on such a timeline chart is notation of when certain special order items must be ordered. This error is responsible for many project delays. You can overcome this error very easily. As I mentioned earlier, you must know the 'lead' time for special order items. That is, how long does it take to get the item.When you know this lead time and you know when the item must be on the jobsite from the completed time line chart, simply count back the number of days or weeks it takes to get that item and make a note in red on that day or week. For example,on our chart above, let's say that it takes 3 weeks for the particular carpet you selected to be delivered. That means that you must place the order for the carpet on the first Friday in the project while the demolition is occurring. What's more, your contractor should have informed you of this prior to the start of the project, so that you had enough time to go to several carpet stores. Can you imagine how you would react if the contractor came to you that Friday morning and said, "Oh, by the way, you need to select your carpet today so that I can stay on schedule." I'm sure that you now see the value in having one of these charts filled out at the beginning of a project!!
There are several ways to compress your job schedule so that you can finish your project in the minimum amount of time.The primary factor to consider is that of task overlap. This is where the professional contractor really shines. On any given project, certain tasks can occur at the same time. The ability of a contractor is measured by his or her ability to make this happen in a coordinated and timely fashion. For example, in a room addition project, the roof can be installed while the plumber and heating man are installing pipes and ducts below. These tradespeople generally won't be in each other's way. Also, just as soon as the roofer is completed working overhead, the brickwork or exterior siding can be applied as the electrician is working inside. I'm sure you get the picture.
Once you are convinced that you have an accurate time line chart, you must use it. You put it to use by printing enough copies for all sub-contractors and material suppliers. Highlight in color when each particular sub or special order item is needed. Give the appropriate copy to each person. This simple act puts them on notice as to when they are expected to arrive and work on your job.
In the event something goes wrong and you must adjust the schedule, you must inform all parties and 'push' all dates forward.If you do not do this, tradespeople and materials will arrive before you need them. This is very important to remember.
Although it may seem like a lot of work to make up a time line chart, it really is not. Believe me, when you have a realistic chart and people see that they are expected to be on your job on a certain day, they usually make it a point to be there. That's why they disappear from the other jobs!!! Make a timeline chart for your next project to make sure that your tradespeople don't disappear!!!
Did you know that many construction projects finish on schedule? Have you ever wondered what they do to make this possible? Usually, the key to this type of success is good planning and subsequent jobsite organization. Jobsite organization on residential projects can be accomplished very simply and easily. It is just a simple matter of assembling all of the information concerning the project and keeping this information handy for all people who are involved in the job. A method that has worked very well for me over the past few years uses a simple 8 1/2 " x 11" loose leaf 3 ring binder.
Delays and problems often occur on projects when a question cannot be readily answered. For example, imagine the electrician shows up to the job to install rough wiring. Let's say that the plan calls for wall sconce light fixtures on either side of the bathroom medicine cabinet. The electrician asks the contractor what type of medicine cabinet and lights will be installed. Will the medicine cabinet require electricity for a self-contained light? How large are the wall sconce fixtures? I could easily list three more questions. The point is, if the items have not been pre-selected and all information concerning these items, including dimensions and catalogue photographs, is not readily available, the builder or the homeowner will not be able to definitively answer the questions. This same scenario can occur with every sub-contractor. It can become a nightmare.
The Solution
I have always encouraged clients to make selections of items either before the project begins, or as soon after the start as possible. When clients make their selections at the various supply houses, the salespeople mail to me the next day all technical information and photographs, if possible, of every selected item. I then begin to assemble this information in a binder which stays at the jobsite at all times. This binder becomes almost as important as the plan.
The creation of the binder is very simple to do. Purchase a 3 ring binder, some loose leaf paper, a set or two of dividers with colored tabs, and a simple 3 hole punch apparatus. The 3 ring hole punch will come in very handy. There will be copies of many things that have to go into the binder which do not have holes in them.
The first step in assembling the binder is to try to determine how many categories or areas you wish to create divisions for. This is not extremely critical, because you can always easily add a divider or a section. For example, a common set of categories for a project might be the following:
Contract
Specifications
Change Orders
Electric Fixtures
Plumbing Fixtures
Kitchen Cabinets
Counter Tops
Appliances
Hardware Selections
Notes of Meetings
Sketches
Depending upon the scope of the project, you could easily have more categories or fewer categories.
Once you have decided upon your categories, begin to label the colored dividers and arrange them in a logical fashion, if at all possible.
Now for the fun part. Simply begin to assemble copies of all information concerning all of the items you have selected. Use a colored highlighter to draw attention to various items on any given page. Often, technical data sheets have information for many models. Find the specifications or dimensions for your model and highlight them. This will help to minimize any confusion. Be sure to obtain catalogue photographs of fixtures.
The more information you gather prior to the start of your project, the better. The reason for this is very simple. For example, would you think it important to select a medicine cabinet while the foundation is being poured? Many of my clients could not understand the urgency. They did not realize that in just a matter of days, the carpenters would be framing the bathroom walls. They need to have the proper dimensions of the cabinet so that they can create the correct rough opening. The same thing goes every item.
Binder Benefits
If you decide to create a binder for your next project, your efforts will be rewarded. The job is guaranteed to go smoother. Clear lines of responsibility will have been created. Virtually nothing will be left to speculation. All information will be in writing in black and white. You, as the homeowner, will minimize or eliminate the possibility of a dispute concerning material selections. This should be important to you. Disputes take all of the fun out of jobs. They can almost always be avoided. Often, disputes arise out of poor planning or reliance on verbal agreements. A jobsite organizational binder takes care of problems like these.
Because these binders can be assembled usually for less than $10 each, I suggest that 3 identical copies be made. One should be the homeowners, one the contractor's and the third one should be left in a safe, secure and dry place on the jobsite.
Many projects do not have a full-time superintendent. Sub-contractors can arrive on a job and work unsupervised. If they know that a binder is on the jobsite, they can refer to it to obtain answers to questions they may have. They will not have to call the contractor. This can save valuable time.
A binder which has all contract and change order information is invaluable. Imagine a jobsite meeting between you and the contractor. In the course of discussion, you fail to agree with the contractor on a particular point. If you have a binder with all contract documentation, the disagreement can be settled on the spot, not the next day. It is a good practice to 'white out' all financial information on the contracts and change orders. This is personal information and the jobsite binder could easily be reviewed by many individuals. Financial information such as this is none of their business.
Smooth-running projects do not occur by chance. They are usually the result of organization and attention to detail. A jobsite organizational binder can achieve this goal. Try one on your next project!
Column B18
Expert Advice For Your Home
Subscribe to the FREE Ask the Builder newsletter to receive professional advice for your home. Complete the form below and each week you'll get:
DIY Tips
Tool Reviews
Project Guides
Product Discounts, Giveaways & more.
Unsubscribe at any time. We respect your email privacy.