Asphalt Shingle Alternatives

davinci synthetic slate brava asphalt shingle alternatives

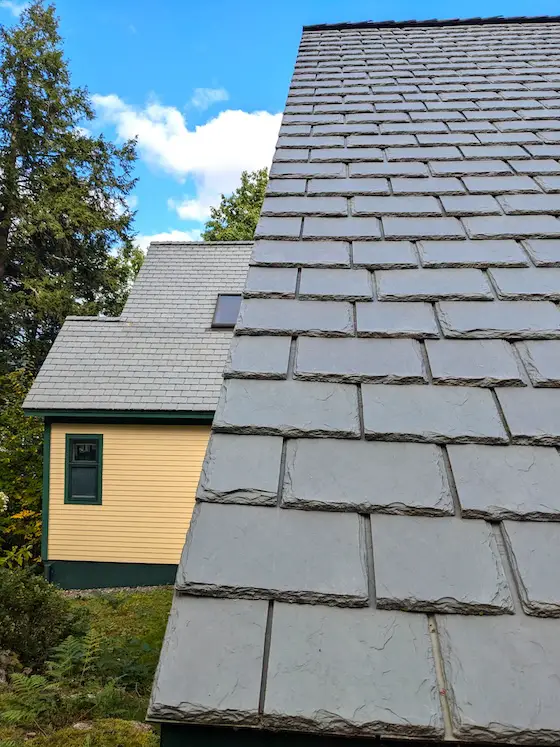
Asphalt Shingle Alternatives - This is not a slate roof but there’s a good chance you may be fooled thinking it is one. This is the DaVinci Roofscapes synthetic slate roof on my house. Copyright 2024 Tim Carter

Asphalt Shingle Alternatives - They Cost More But are Worth It

Are you about to install a new roof on your home or small business? The odds are you’ll be giving serious consideration to asphalt shingles. This building material has dominated the USA residential roofing market for just about 100 years. Go back farther in time and other, more durable, materials were the standard. Tin, slate, fiber cement, and tile could be found on even the most humble of houses.

Europeans Scorn Asphalt

European builders and roofers have reached out to me over the years. They’re shocked that we Americans even consider asphalt shingles. Some have told me that they’d not install asphalt shingles on the roofs of their dog houses.

Asphalt is scorned in many parts of the world because the people know how a roof is the second-most important part of a house just after the foundation. Those Europeans who reached out to me all said, “Asphalt shingles are a disposable material. Why would your homeowners even consider it?”

Asphalt is Cheap

The reason asphalt shingles are the king of the hill is simple. They’re cheap and if you can fog a mirror you can probably install them.

My Own Asphalt Roof FAILED

I was a fan of asphalt shingles for decades until I purchased my most recent home. I moved to New Hampshire and bought an eight-year-old house with a 30-year-guaranteed asphalt shingle roof. I thought at the time, “Well, that’s the last roof I’ll ever have.” Five years later, the roof started to experience a catastrophic failure.

Colored granules tumbled off my roof in the slightest breeze. After a rain shower, an avalanche would be on the ground. The shingles were curling and crumbling. I grew angrier by the day. Are you experiencing the same thing?

defective shingles on Tim's house

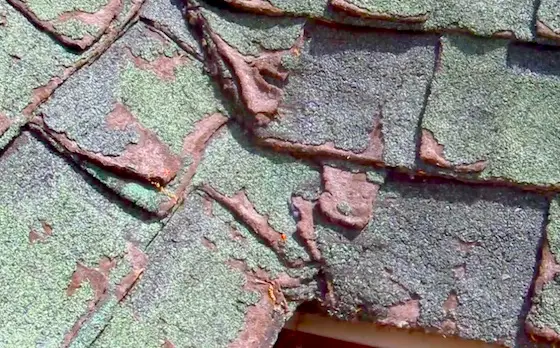
These are the defective shingles on my own home. Photo by: Tim Carter - Founder - AsktheBuilder.com

You may remember I did a national survey about failing asphalt shingles in the spring of 2015. I wrote a similar column back then sharing my tale of woe. A person deep inside the asphalt roofing industry saw my column, emailed me, and we had a one-hour phone conversation.

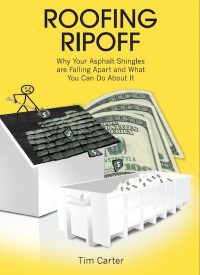
This person told me the deep dirty secrets of what was going on in the roofing industry at the time. He shared exactly why my asphalt shingles were falling many years before they should. This conversation gave birth to my Roofing Ripoff book that you might want to read.

I decided I would never again trust the asphalt shingle industry. You get just one bite off the apple with me in most instances. I wasn’t about to take a chance on my next roof. I wanted a material that would last for 100 years, or more.

Metal and Plastic Alternatives

I had lots of options to consider after I had kicked asphalt shingles to the curb. I already knew that metal roofing was superb. There are many different styles. Interlocking metal shingles made from rust-proof aluminum caught my eye. A neighbor just down the street from me used them on his house and they look great.

Synthetic slate is what I decided to use. There are two USA manufacturers of this stunning material: DaVinci and Brava. The virgin vinyl used to make these shingles is thick. The colors and styles you can choose from will stun you. If you like the look of a shake roof, it’s available in this virgin-vinyl material.

I installed my 42 squares of DaVinci Roofscapes synthetic slate shingles myself. The synthetic slate installs just like regular asphalt shingles. In some ways, they’re easier to install than asphalt. You need to create a 3/8ths inch space between adjacent shingles. This spacing is required for expansion and contraction. It doesn’t need to be perfect. In fact, if the gap is a bit wider or a fraction less, it makes the roofing look more realistic.

Watch this video to see my completed roof.

Every person who has visited my house, including those making deliveries, says the same thing, “Holy cow, that’s a gorgeous slate roof.” I have an extra shingle next to my garage door I show them. Each person is stunned when they discover the roof is plastic.

My newsletter subscribers followed my re-roofing adventure years ago. Many have reached out to me asking how the roof has held up and how it looks with almost a decade of wear.

The roof looks as good as the day I installed it. In fact, it looks better in my opinion as the vinyl looks more like real dusty slate each day. The harsh ice and snow has done nothing to harm the roof.

I was a real estate broker in Ohio for 20-plus years before moving to New Hampshire. I know for a fact my synthetic slate roof will add tens of thousands of dollars of value to my house when I do sell. Re-roofing costs are in the stratosphere. The next owner of my house will never have to install a new roof.

The new owners will be shocked to discover I installed an ice and water barrier over the entire roof area before installing the synthetic slate. I know I’ll never have an ice dam leak or a leak from a wicked Nor’easter that blows several times a year.

grace ice and watershield on tim carter garage

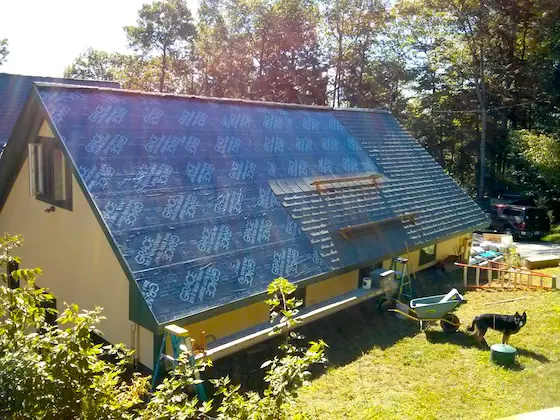
This is my garage roof. I installed Grace on the entire roof. Photo credit: Tim Carter Copyright 2024

Column 1579

Bath Vent Fan Facts

bath vent fan in wall

Bath Vent Fan - This is an inexpensive bath vent fan installed in a wall to meet the building code requirements for fresh air when no window is in the bathroom. Copyright 2024 Tim Carter

Bath Vent Fan Facts - Your Roof is Not Leaking

You may have had the good fortune to live and work inside old homes. I’m talking about houses that were built over 100 years ago. The architects who designed them and the builders who built them were wise.

I started my building career in Cincinnati, Ohio. My good friend John and I started a small handyman business in college. One day while hanging out in the student center at the University of Cincinnati, we saw a help-wanted posting and applied for the job. Karl was hiring laborers to help rehabilitate foreclosed houses. Each one of these houses was built in the late 1800s or early 1900s.

Each house we worked in had a window in the bathroom. Some bathrooms had two windows. The house I grew up in had a wretched leaky steel casement window in the sole bathroom in the house. Architects knew that bathrooms needed fresh air for a host of reasons. The windows also provided wonderful natural lighting.

Some New Architects Ignore History

Some young architects decided windows in full and half-bathrooms were old-fashioned. They kicked bathroom windows to the curb. The building codes responded by requiring mechanical ventilation in bathrooms.

A tug-of-war ensued in the late 1990s, in my opinion, as houses and windows became more and more airtight. The building code strove to keep up as less and less air leaked into homes. The houses of old had windows that leaked lots of air. It was rare to come across an up-down sash window that had weatherstripping.

Mold and mildew issues rarely were a problem in old houses, but soon became a major problem in newer homes. The air leakage in old homes helped dry out bathrooms in minutes or hours before mold and mildew could grow.

The Building Code is a Set of Minimum Standards

It’s important to realize the building code is a set of minimum standards. If your house just passes the code, it’s like getting a 70 percent on a test. You can always build better than the code requirements. This is true with bathroom fan ventilation. You can purchase powerful bathroom vert fans that will exhaust more air than is required by the current code.

I’ve shared in previous columns that I’m helping my son finish his basement. This past weekend we installed three fans in the basement. One was in the full bathroom we’re adding, one was in a bedroom, and the third fan was in an open area that extends throughout the basement.

The current building code requires this much mechanical ventilation when you don’t have windows that can open and provide enough old-fashioned air exchange. Keep in mind the code officials know that even the best windows do leak some air. Basements that have some windows do provide some fresh air even when closed.

The Water Dripping From Your Fan is Not Rainwater

Water might leak from your bathroom fan. You may think it’s a roof leak when, in fact, it’s condensation flowing down the vent pipe back into your bathroom. Insulated vent pipes will prevent this condensation. This is the best way to flash a bath vent fan.

The condensation happens when uninsulated bathroom vent pipes pass through cold attic spaces. The pipe gets cold in the winter months. The moist warm air sucked from your bathroom as you shower starts to flow through the cold pipe. Condensation starts to form on the inside of the cold pipe just as it forms on the outside of cold soda or beer cans in the summer months.

Bath Vent Fan Must Exhaust Outdoors

You could have a much bigger problem. Your builder or remodeler may have terminated your bathroom vent fan into the attic space. The moist humid air dumps into the attic. If you live where it gets cold in the winter, this moisture will condense on the underside of the roof and on the roof-framing timbers or trusses. Mold and wood rot will cause huge issues over time.

The best way to exhaust bath fans to the outdoors is through a wall. Never exhaust them in soffits as the moist air can drift up through soffit vents into an attic.

dryer or bath fant vent hood on vinyl siding

This is the ideal way to vent a bathroom fan. The exhaust air is exiting through a wall. You want to eliminate the possibility of moist air entering an attic space. Photo credit: Tim Carter Copyright 2024

Remote Bath Vent Fan is Quiet

You may not like your noisy bathroom fan. Remote bathroom exhaust fans can be located ten, or more, feet away from your bathroom.

bathroom exhaust fan attic

The off-white, overweight flying saucer is really a quiet bathroom exhaust fan. You can see the flexible insulated exhaust pipe that prevents condensation. The humid bath air goes out the roof. © 2024 Tim Carter

These fans work similar to your heart. Just as your heart draws blood back from your fingers and toes, these remote fans pull air out of bathrooms. The fans then push the air outdoors via outlets in the side walls of gable ends. They can also connect to roof outlets so long as snow doesn’t accumulate on your roof.

The Best Pipe and Tape

I feel the best exhaust pipe to use is either aluminum or galvanized sheet metal. Do NOT use the plastic material that looks like a slinky. Be sure the longitudinal seams in the pipe always point to the sky to ensure condensate doesn't leak out of the pipe.

You should use real metallic duct tape, which the pros use to seal the pipe joints and the pipe at the fan and outlet.

I urge you to do lots of research about bathroom fans before you build or remodel. There are remarkable fans available that will do a great job of exhausting moist air. Be sure your builder or remodeler tapes all the seams of the metal vent pipe. Use real metallic duct tape that HVAC professionals use to seal their ducts. This tape is affordable and easy to apply.

Column 1578

Building Code Tips for Homeowners

exposed house foundation sloping soil meets code

Building Code Tips - The ground slopes away from the house in both directions as it should. The siding is level and you can see how there is more exposed foundation on the left than on the right. Copyright 2024 Tim Carter

Building Code Tips - Code Officials Should Consider Doing More to Help Homeowners

I’m helping my son on the weekends finish the basement in his 3-year-old house. He’s adding 1,300 square feet of finished living space.

We met with the local building inspector a few days ago. Dawn gave us the thumbs up on the rough framing, plumbing, and electrical installations. She’s been doing inspections in Nashua, New Hampshire for eighteen years. Dawn and I exchanged some building code tips.

She discovered I was the Ask the Builder guy towards the end of the inspection. “Oh, I read your columns and watch your videos all the time!” I thanked her and mentioned that if her small four-person building department ever needed a speaker, I’d be happy to stop by and share some stories.

Dawn thought that might be a good idea and said she’d talk to her boss about my suggestion. I pondered about the most helpful things to share with building inspectors in Nashua and all over the USA as I drove north back to my home after the inspection.

Building Code Sections Ignored by Some Builders

The top three problems I solve week-in-week-out seemed worthy of discussion with building inspectors. I've become a quasi-ombudsman between homeowners, code officials, and manufacturers for 30+ years, being Ask the Builder. You might be one of the many homeowners I’ve talked with on the phone, or I might have answered your email trying to help you. The top three problems I deal with each week are:

  • wet leaky basements, crawlspaces, and soggy yards
  • roof leaks
  • water leaks under doors and leaks caused by inferior deck attachment to a house

You may not know this but your local building code enforcement officer has the ability to make the building code more robust in your city or town. The building code you see online is a model code. Most cities and towns adopt it because they can’t afford to invest the time to develop their own code.

A one-size-fits-all building code works for many things but not for all things. This is why local officials can modify the code to suit their housing stock, the local conditions, and ingrained customs.

Foundation Height Often Wrong

The code addresses foundation height. There’s a small section that discusses how high a foundation must be above the ground next to it. Keep in mind that the distance the code mentions is a minimum. I feel the distance should be double what the code says.

The building code also requires the ground around a house must slope away from the foundation. Try to visualize your house being at the top of a hill. In reality, it’s easy to achieve this requirement but too many builders put foundations too low into the ground causing major drainage issues.

foundation height above grade sketch

The issue is these mission-critical items don’t seem to be enforced in many situations. Based on the number of houses I see that don’t have the ground around the house at the right height and sloping away from the foundation, it’s clear to me inspectors all across the USA are not holding builders’ feet to the fire in this area.

Roof Leaks Caused by Poor Flashings

Roof leaks in a large majority of cases can be traced to defects in the installation of flashings. Flashings are roofing products that connect a roof to something that’s not a roof. You’ll find them around chimneys, skylights, plumbing vent pipes, turbine vents, dormers, valleys, etc.

tin chimney flashing

This is a typical flashing found around chimneys that poke through roofs. Photo credit: Tim Carter Copyright 2024

I feel building inspectors should do some heavy lifting in this area. I know they can’t be up on the roof acting as quality-control folks as the roofers work, but maybe it’s a good idea to force builders and roofers to take continuing education classes like other professionals.

Asphalt Shingles Falling Apart

I also feel code officials should help homeowners baking facts into the building code that will help houses last longer. Asphalt roof shingles are the first place to start.

Adding a copper strip across the tops of roofs can triple the life expectancy of asphalt shingles. I was the first person in the world to discover this fact. I cover this discovery and why asphalt shingles fail in my Roofing Ripoff book. I urge you to read the first few chapters for FREE.

copper strips on roof ridge

I applied these copper strips on my daughter’s new home five years ago. Invisible atoms of copper wash down onto the shingles each time it rains. This can add 40, or more, years worth of service life to the roof. Copyright 2024 Tim Carter

copper preserves asphalt shingles

What would you say about a roofer who looked at this photo and denied that copper ions washing off the cupola roof extend the life of asphalt shingles? Would you trust or hire him? Copyright 2024 Tim Carter

Leaks Under Doors & Windows

I solve water seepage under door thresholds many times a month. Once again, the root cause for this, in my opinion, is that builders and carpenters don’t receive bullet-proof training in this skill.

The required flashings to make door thresholds waterproof could be installed just after the roof is completed. Building inspectors doing the rough-framing inspection could verify if the door and window flashings are correct at this time since they’re already looking at the framing.

A house is the average person’s biggest investment in their life. People need to know that the most problematic areas of a house are built correctly. There has to be a way to get building departments and inspectors to help out in this respect since they have the power to issue a certificate of occupancy once the house is complete. I’m open to your suggestions and will pass them along to Dawn.

Column 1577

Best Exterior Nails and Screws

rusty nails in exterior wood trim

Best Exterior Nails - Inferior nails were used to attach all of the exterior trim on this house. Rust not only looks bad, but it’s also a harbinger the fastener is rotting away. Copyright 2024 Tim Carter

Best Exterior Nails and Screws are Double Hot-Dipped Galvanized or Stainless Steel

I was blessed by God to learn my craft of building and remodeling in Cincinnati, Ohio. The first few years of my career had me working on houses that were close to 100 years old. I have no recollection of seeing rusty roofing nails on any of the jobs where we had to strip off roofs. I had to spackle exposed nail heads on house siding and trim, but none of them were rusty.

Today, I see rust stains on houses where I live in New Hampshire. Some of these structures are less than ten years old. I had to replace my own asphalt shingle roof a few years ago. It was only thirteen years old and many of the roofing nails were rusted and badly corroded. Fasteners used on roofs should always outlast the actual roofing material.

Builders of Old Used Double Hot-Dipped Galvanized Nails

Go back in time and you’d discover old builders and carpenters knew all about rust. They knew the best exterior nails and screws to use.

This is why most, if not all, of them used double hot-dipped galvanized nails to secure any exterior product to a house. These superior fasteners worked very well for decades so long as the building was not near a body of salt water. Salt water, spray, and mist will cause corrosion to steel and iron if it doesn’t have the absolute best coating of zinc. Stainless steel fasteners are the gold standard in marine environments.

Hot-dipped galvanized nails and many screws were sacrificed on the altar of speed and productivity. The nails of old I saw were nailed by hand one-by-one. The nail guns used today by many carpenters don’t play will with nails that have a thick uneven coat of zinc. This type of coating causes nail guns to jam.

Nail Gun Nails are Questionable

You can purchase some nails for nail guns that claim to have a hot-dipped coating of zinc. I’ve used them and don’t doubt their claim, but I can tell you the coating is not anything like the old-fashioned nails that look like nails coated in a thick gray gravy.

Most nails used in nail guns have a thin zinc coating applied in either a chemical or mechanical process. Nails are manufactured in a machine that’s has a huge spool of wire that feeds into the machine. It’s much easier to chemically coat this wire with zinc than any other method.

The thin zinc coating can wear away in just a few years if you leave the nails exposed. In the manufacturing process when the wire is clipped to create the nail, bare steel can be exposed at the head and tip of each nail. This doesn’t happen in the hot dip process.

Nails dipped in molten zinc have already been created. The zinc coats all surfaces on the nail. I’ve opened a box of roofing nails to find some that are bonded to one another much like cold macaroni and cheese. That’s how much molten zinc can cling to the nails.

The bare steel nails are cleaned and chemically treated before they get dumped into a container of molten zinc that looks like silver stew. The 420-450 F temperature creates a strong chemical bond as the zinc atoms interlock with the nails’ steel and iron molecules. The resulting layer is a zinc-iron alloy.

Stainless Steel Nails & Screws are the Gold Standard

Stainless steel nails or screws are the best fasteners to use for all exterior applications. You’ll vanquish rust from your home if you use them. They are more expensive, but you’ll never have to deal with rust stains. You’ll not lose sleep worrying if the nail or screw is corroding deep in the wood.

Richard, who lives in La Quinta, California, read this column in his local newspaper. He emailed me the following valuable tidbit:

"Your Sunday article recommended stainless steel screws for outdoor use as they don't rust.  You might want to look into the iron content of some of the screws made in Asia.  As we found out in the aviation industry, most stainless screws made in Asia, mostly China, have too much iron in them and will rust when used outside of a plane.  I am sure the building industry screws will have the same problem."

Beware Treated Lumber - High Copper Content = Corrosive Stew

You must be very careful about all of the metal you use when building an exterior deck or structure that’s made with treated lumber. Today’s treated lumber can have very high amounts of copper in the wood. Copper is a natural biocide, and the fungi that cause wood rot can’t survive in the presence of copper.

All of the joist hangers, metal framing connectors, nails, bolts, screws, etc. that will penetrate the treated lumber must have a coating rated for direct contact with the lumber. Many top-quality fasteners will have labeling on the boxes to show you how much exposure they can take.

The problem arises when the treated lumber and fasteners get wet from rainfall, dew, or contact with fresh or sea water. The water leaches out some of the copper into solution creating a corrosive brew. The corrosion of the metal can lead to deck collapses causing serious injury or death.

My daughter worked with a woman in Puerto Rico who broke her neck and had to have her spleen removed when a deck she was standing on crashed to the ground without warning. Don’t think you’re immune from a tragedy like this.

You should perform a thorough inspection of your deck. Check for rust and corrosion on every metal joist hanger, framing connector, and the bolts or nails used to attach all of the metal.

Column 1576

House Settlement Debunked

hybridized 4x6 timber large growth rings and old growth 2x4

House Settlement Culprit - Note the vast differences in the thickness of the growth rings on the two pieces of lumber. The old-growth timber with the narrow bands experiences much less movement as it reacts to changes in moisture content. Copyright 2024 Tim Carter

House Settlement Debunked - Lumber Shrinkage Often, the Culprit

Roy subscribes to my free newsletter and reached out to me about a month ago for one of my phone consult calls. He needed help engineering a drainage system around his house to stop water from infiltrating his basement. I offer a house-drainage design service. I do a phone consult call and draw the plan to stop water infiltration into your home.

My college degree is in geology, with a focus on hydrogeology and geomorphology. Hydrogeology is the study of groundwater movement, and geomorphology is the study of the earth’s surface, where we walk and build things.

I shared how to stop the water infiltration. Roy emailed me a few weeks later to report my advice yielded a dry basement. He was very happy. He asked for additional advice based on some information given to him by a neighbor. All of a sudden we were on the topic of house settlement. His neighbor wandered into the murky depths of a topic that’s misunderstood and mis-diagnosed perhaps tens of thousands of times a day across the USA and the world.

It’s important to realize I could write a book about the topic of house settlement. It’s impossible to give it the respect it deserves in this tiny column. Years ago I wrote a column about house settlement you should read. I’ll attempt now to cover some of the most important aspects of the topic.

I pulled out my trusty paper dictionary and found that one of the many definitions of the word “settle” is “to cause to pack down.” This explains why many feel their house settles or sinks into the ground after it is built.

Bad Soil is Possible

Houses and buildings rarely sink or settle. Most soils are very strong. When a house or part of one sinks, it can be caused by landslides, earthquakes, uncompacted soil, buried vegetation that rots, expansive clay soil movement, glacial clays that ooze like toothpaste, etc.

Roy’s neighbor said settlement causes cracks in foundations that permit water infiltration. This is a true statement. However, most foundation cracks in poured concrete foundations are caused by shrinkage, not settlement. Concrete shrinks 1/16th of an inch for every ten feet of length as it cures over time. You’ll often see the cracks radiating at an angle from the corners of basement windows or any other hard 90-degree angle in an opening in the wall.

Concrete block foundations often develop horizontal cracks between layers of block, often about 4 feet up from the basement floor. These cracks are rarely caused by settlement. The cause can be traced to the inability of the thin mortar to withstand the tension forces applied to the wall. Remember, basement foundation walls are simply retaining walls holding back the earth outside.

The earth presses sideways against the walls and causes them to want to bend inwards. This bending force creates tension or stretching. If the block mason had filled the hollow cores of the concrete block with pea-gravel concrete and put a steel rod from the top of the wall to the footing in every other vertical core void, there’s a good chance there would not be a horizontal crack. Read this in-depth column about how to reinforce concrete block walls.

Mother Nature Compacts Soil on Her Own

Keep in mind that Mother Nature is very good at compacting soil. She uses both rain and gravity. Most soils are very strong, as evidenced by the countless hundreds of-year-old houses and buildings that have no structural defects related to soil movement.

I recall a job in Cincinnati, Ohio. Forty years ago I had to build a room addition on a home. The house was so old it had a stone foundation. My room addition floor had to be lower than the existing basement. I carefully dug along the old stone foundation trying to locate the footing. There was none. The builder just laid the first row of stone on the dense clay soil. The house was over 100 years old and had experienced no settlement of the foundation even with the concentrated load of the house on the soil.

Many new homes' cracks in the floors, ceilings, tile, drywall, woodwork, etc. are often blamed on settlement. In almost all cases, the cracks can be blamed on hybridized lumber. Trees are a crop not much different than soybeans and strawberries. The only difference is harvest time. Lumber companies, I believe, have engineered trees to grow faster so stands of timber can be harvested faster.

Spring Wood Causes Expansion and Contraction

Trees grow the most in spring. The wood produced at this time is lighter in color. The dark bands of growth you see at the end of a stick of lumber are summer wood. Summer wood is denser as the tree slows down its growth most often from a lack of rainfall in the summer. Old growth timber is markedly different. The spring and summer-wood growth bands are almost always the same size.

The more spring wood in a piece of timber, the more it wants to expand and contract as it experiences changes in moisture content. As the timber in a new home loses moisture, it shrinks causing the same tension cracks as happens in concrete. Things attached to the timber in your home then start to move creating cracks. These are shrinkage cracks, not settlement cracks.

Column 1575

Water Loss Causes Shrinkage Cracks

treated lumber deck post with shrinkage cracks

Water loss has caused shrinkage cracks in this new deck's wood. They could have been minimized by sealing the wood just after it was installed. Copyright 2024 Tim Carter

Water Loss Causes Shrinkage Cracks & More

Paula asked me a question about shrinkage cracks affecting her new deck. She sent me three photos showing all sorts of cracks in the handrails, railing posts, and decking. The cracks were in brand-new treated lumber installed in April 2023. The wood has not been sealed since then.

Paula asked, “I’m wondering whether it will turn into a problem anytime soon.” I’d say soon has already come and passed. Deep cracks are now in the wood. These cracks allow rainwater to penetrate into the wood. This water causes the wood to swell. Each time the sun comes out, or the wind blows, the water leaves again, causing repeated shrinkage. These swelling/shrinkage cycles cause the cracks to get bigger and bigger.

This is not the best analogy, but are you aware of the Centennial Light? It’s cared for by the Livermore-Pleasanton Fire Department in California. The light bulb was first turned on in 1901 and still burns today after being turned off briefly for a few times to be relocated.

Where is the Care Tag on Treated Lumber?

Imagine if the treated lumber manufacturers stapled a small plastic care-instructions label on each piece of treated lumber. The label would tell you that you should seal the wood as soon as possible after installation. It would also inform you that keeping the wood sealed would allow it to last for many many decades much like the light bulb.

You can speculate why this label is not attached to the wood. The cynic in me screams that the wood industry is not overly upset their wood cracks, twists, and warps. That way more new treated lumber might be purchased faster. I have no proof whatsoever this is their motivation, but a similar thing happened in the asphalt shingle industry. I cover this in my Roofing Ripoff book.

Roofing Ripoff Cover

Download the first three chapters for FREE now.

Water containing dissolved copper is injected under pressure into the wood when it’s converted from regular wood to treated wood. This causes the wood to swell. The wood cracks when the water leaves the wood too fast. Sealers allow for a slow steady release of the water. Cracks are minimized or eliminated. The application of the sealer just weeks after the treated lumber is put out in the sun and wind will keep it looking brand new.

Shrinkage Happens in Many Materials

The shrinkage happens in many building materials. It happened to me in the past ten days. I applied blacktop sealer to a small patch of cold-patch asphalt. A small one-quarter-inch depression was in the patch. The water-based blacktop sealer was too thick in this spot. That spot was riddled with shrinkage cracks two days later.

blacktop sealer shrinkage cracks

These are classic shrinkage cracks in blacktop sealer. The asphalt is emulsified in water. When the water evaporates from sealer that's too thick or deep, cracks like this appear. The orange object is a Volvo key fob about 1.5 inches wide and 2 inches long. Photo credit: Tim Carter Copyright 2024

Water loss in concrete causes shrinkage. The shrinkage creates tension, or pulling, forces within the concrete. Jagged random cracks in concrete will occur to relieve this tension unless you coax the concrete where to crack.

Control Concrete Cracks

Concrete shrinks 1/16th inch for every ten linear feet you pour. Expert concrete masons know to cut control joints in new concrete. The depth of these cut lines should be a minimum of 1/4th the thickness of the slab. The cut lines do the same thing as happens when you crease a piece of paper with your fingernail. The creasing action tears microscopic fibers in the paper. When you pull apart the paper carefully, it separates on the creased line.

Cracks in walls, woodwork, countertop backsplashes, and tile grout in new homes can all be traced to shrinkage caused by water loss. Seasonal cracks in plaster and crown molding happen because of water loss. Squeaking wood floors that mysteriously stop or start squeaking are also victims of water-related swelling or shrinkage.

Shrinkage cracks can be minimized or eliminated in most cases. Product installation instructions must be followed to the letter. Pay attention to wording about minimum and maximum temperature ranges.

Fill and Seal Exterior Wood Cracks

You may find yourself in the same situation as Paula. Your outdoor lumber has cracked and water penetrates into the wood as fast as it goes into a sponge. I suggest you fill the cracks with an exterior spackling compound. Do a test and find one that matches the wood as closely as possible in color.

Seal or stain the spackling compound once it’s smooth and dry. Coat all the wood at the same time. Apply sealer at least every two years or when you see water fail to bead up on the wood.

You would do well to spend some time at my www.AsktheBuilder.com website. Discover more about concrete shrinkage cracks. All of my past columns and many answered emails are curated on my website. You can save money and time by getting up to speed on topics before you even think of calling in a contractor.

Column 1574

Nails Guns Save Time and Money

Paslode framing gun

Nail Guns Save Time - This is a Paslode nail gun. This one operates using compressed air. My favorite Paslode guns have fuel cells and a spark plug. Copyright 2024 Tim Carter

Nail Guns Save Time & Money - Use Them Wisely

Are you a serious DIYr? If so, you know that the quality and type of tools you use will not only determine when the project gets done, but they’ll also play a major part in quality level of the job.

In my opinion, one of the biggest time savers happens to be nail guns. These tools have a rich heritage dating back to the late 1700s. A nail gun using compressed air was introduced several years before the US Civil War. Nail guns, as you might know them today, stepped on stage in the 1950s during the economic explosion following the great World War II.

Framing Walls in My Son's Basement

If you’ve never used a nail gun, this recent story should greatly interest you. Two months ago, my son and I started to finish off 1,300 square feet of space in his basement. We’re building a small house under his house sans all exterior finishes.

Step one of the process was to frame over one hundred feet of 2x4 walls. Some were parallel with the concrete foundation walls, while others were partition walls separating rooms.

My son’s neighbor is a mechanical engineer who has never seen wall framing up close. I invited him to help us one morning, even though I knew it would slow us down. I spent a lot of time explaining all the steps one has to take to frame the walls.

I was using my Paslode framing nail gun. This amazing tool shoots nails using a tiny combustion engine. A gas cartridge contains the fuel, and an onboard small lithium-ion battery provides the energy to the spark plug, which ignites the gas each time you squeeze the tool’s trigger.

paslode framing nail gun

This is the exact Paslode nail gun I used in my son's basement job. One fuel cell has driven thousands of nails. CLICK HERE to purchase one now. You'll not regret it. Copyright 2024 Paslode, Inc.

The neighbor was astonished at the nail gun's speed and accuracy. He often exclaimed that he’d purchase one should he decide to tackle his own basement project. He mastered using the tool in seconds.

Nail Guns Drive All Types of Nails

Nail guns are made to drive nails for just about any purpose. I’ve had finish nail guns for decades that drive nails through trim boards like baseboards, door and window casing, and crown molding. The tools automatically countersink the nails, saving a vast amount of time. In the old days, a carpenter would have to carefully tap a finish nail using a nail set to drive the head below the surface of the wood.

Twelve years ago, I used a nail gun to attach asphalt shingles to a shed roof. The gun saved my thumb and hours of time. It’s easy to adjust the tools so the nails are driven the correct depth, as the shingle manufacturers call for.

I started using air-powered, pneumatic nail guns in the late 1970s. One of the largest manufacturers at the time, Senco, was based in Cincinnati, Ohio, not too far from my house.

Nail Guns Started My Ask the Builder Career

My Ask the Builder media career started not long after I met Senco’s marketing manager at an Irish dancing fest both our daughters attended. He found out I was a carpenter and asked me if I used nail guns. I responded, “Oh yes! I use Senco guns, and they save me hours of time and wear and tear on my body.” I had no idea at the time he worked for Senco.

After that chance meeting, the corporate executive nominated me as one of the Big 50 Remodelers in 1993. That national award launched this syndicated newspaper column. But I digress!

Pneumatic Air Gun Cons

Pneumatic nail guns are still made, but they have a slight disadvantage. You need an air compressor and hoses between the machine and the nail guns.

DeWALT D55154 Air Compressor with handle

You'll need an air compressor similar to this to power a pneumatic nail gun. Finish guns require much less air. A small pancake compressor will do. A crew of two, or more, framers will need a large compressor to power multiple framing nailers at once. Photo credit: Tim Carter Copyright 2024

It takes time to set all this up and stow at the end of a work day. My gas tool is ready to go when I open the case and place it in my hand. The same is true for all of the electric-powered nail guns.

Serious Injury and Death

Old-fashioned hammer-driven nails can hurt you. I’ve been struck in the face by nails that received a glancing blow from a hammer and then bounced up off the wood. Nails driven by nail guns can be lethal. The Internet is littered with X-ray images of long-framing nails that have been driven into worker’s skulls.

A serious nail gun accident happened at one of my jobs. A carpenter was working too fast and drove a 2-5-inch nail through the center of his big toe bone. We had to cut out the piece of the subfloor his foot was nailed to and transport him and it to the emergency room.

Years ago, when framing a roof, I almost drove a long framing nail into my chest one day. It’s a long story, and the nail missed penetrating my rib cage by an inch. It was aimed directly at my heart. I share all these grim stories to alert you to the power and danger of the tools. When you decide to use a nail gun, remember what Spiderman said, “With great power comes great responsibility.”

Column 1573

Concrete Deck and House Piers

plastic concrete pier form in hole

Concrete Deck and House Piers - This orange tube is going to be filled with concrete. The bottom of the hole is below the New Hampshire frost level. The bottom of the plastic form flares out to spread the concentrated load from above. Copyright 2024 Tim Carter

Concrete Deck and House Piers - Think of Your Legs

Mother Nature is so smart. She taught us to build strong buildings, decks, docks, etc. Just look at your own body, for goodness sake. Your legs and feet do the same thing that concrete piers do in the construction world.

Your legs are vertical columns that the rest of your body rests upon. Your feet spread out the concentrated load that’s above your narrow ankles. The foundation industry borrowed the term footing from human anatomy. The spread footing of a building is the lowest structural element, and it contacts the earth just as your foot does when you walk or run.

My First Piers Like Table Legs

I installed my first piers forty years ago. I was building a very nice paver-brick patio in the rear yard of my second home. I needed to pour a concrete slab and ensure the patio wouldn’t twist or turn from frost heave in the soil.

I used a post-hole digger to create 24-inch-deep 6-inch-diameter holes in the ground. The holes were spaced on 6-foot centers both ways under the patio. I installed a 1/2-inch rebar in the center of the slab, making sure the steel crossed the top of each pier hole.

Wet plastic concrete flowed into the holes as each wheelbarrow was toted down to the patio. The slab resembled my dining room table, although there were six piers under it, not four like the wood table up in the house.

That patio is still in perfect shape today. The couple that purchased the house from me told me they never had issues, and the patio never tilted or moved. My patio was different from a deck because the slab's weight was spread out over the ground.

Deck Piers Support Concentrated Loads

Decks that way several tons often only have two or three support columns that press down on the earth. This concentrated weight should have a wide spread footing under each deck post.

Most architects and structural engineers will specify a 2-foot-diameter concrete footing for a concrete column or pier that supports a deck. The concrete doesn’t have to be poured all at the same time, but it’s a good idea if you can make that happen. If you have to pour the footing separately, then stub up some 1/2-inch diameter steel rods about 18 inches high that will connect the pier to the footing.

More Load = Larger Diameter

As the load above the pier increases, the diameter of the pier and the footing below must also get larger. It’s never a good idea to guess. Piers that have tons of weight should be designed by a structural engineer.

You can use concrete blocks to construct piers. I’ve built many. It’s always a best practice to stub out steel rods from the footing that enters the center of the hollow block cores. The cores should be filled with concrete to make the pier solid. Install additional vertical steel rods in the wet concrete extending to the pier's top.

In my opinion, the easiest way to pour a concrete pier that’s buried in the soil is to use a plastic pier form. The ones I use snap together in seconds. They come with a large, wide bottom section that acts as the footing. The best part is that the 1/2-inch rebar for the footing and the vertical column come precut with the forms.

I set the form in the correct position, ensuring the concrete's top will be about four inches above the grade. I brace the form with a few 2x4s. The next step is to install all the fill around the pier. I compact that fill and often add a little water as I do it. You can remove the braces once the fill is about halfway up and the plastic form is stable.

Within a few minutes, the hole around the pier is filled and strong enough to accept the weight of a loaded wheelbarrow full of concrete. This method is also safer. There’s no hole for a person to fall into while you try to figure out how to shovel concrete into a traditional cardboard form.

Add Reinforcing Steel

Avoid the temptation to save money by eliminating the steel rods in piers. Concrete is a very strong material when compressed. Tension, or bending, forces can snap concrete piers like a dry twig. Concrete usually only has one-tenth the strength in tension as it has in compression.

Steel is a magical material with tremendous tensile strength. The average piece of steel rebar you buy at a home center has 40,000 pounds of tensile strength, compared to concrete, which may have 400 pounds of tensile strength on its best day.

Column 1572

Lochmere Ted Bilodeau Sr Tuesday Golf League

Lochmere Ted Bilodeau Sr Tuesday Golf League

Lochmere Country Club in Tilton, New Hampshire, is one of the best golf courses in the state. It's challenging, and the course superintendent does a magnificent job maintaining it. The greens are cut short and quite fast.

I've played in the Lochmere Tuesday afternoon golf league for two years. My partner and I won the league championship in 2023.

I got off to a very rough start in 2024. My poor play resulted in us winning no matches for many weeks.

lochmere country club hole 14

You're looking up the fairway of hole 14 at Lochmere Country Club. The ball at the bottom of the photo hit the green three inches to the left of the cup and rolled ten feet to this spot. It traveled 146 yards in the air. I choked on the birdie putt but did manage to make par.

How the Lochmere Tuesday Golf League Operates

League play begins around the middle of May. There are thirty two-man teams that play just nine holes each week for fifteen weeks.

The fifteen matches end on the second week of August. Three weeks of playoffs follow regular season play to determine the league championship team.

Two flights of fifteen teams swarm over the entire course starting at about 3 PM. One flight plays the front nine, and the other flight plays the back nine.

Each week you alternate which nine holes of the course you play. It's not a shotgun start, so if your opponents show up late, you might not get home until 7 PM. The Wednesday league is a shotgun start.

USGA Rules Apply

The league plays using the official USGA rules. The USGA lost ball and out-of-bounds rule can cause minor conflicts. Some league members are unfamiliar with the lost-ball rule and think they can just drop a ball back in play where it's thought to be lost. The rule states you must go back to where the ball was hit before it was lost.

The official USGA rule talks about a local rule for casual play. This rule states that a player who has lost a ball can drop no more than two club lengths into the fairway and no closer to the pin forward of where the ball is thought to be lost. A two-stroke penalty is applied if the player chooses to do this. Once again, the local rule must be in place; otherwise, you must go back to where you struck the ball before it was lost. Check with the Lochmere Pro to see if this local rule applies. As of 2024, this local rule did NOT apply at Lochmere.

The league played from the white tees at Lochmere during the 2024 season.

Scoring Points

Each hole counts for one point. If both team members are present to play, that team gets one point. Eleven points are up for grabs if all four players in a match are present. The most points a team can score in a round is 10, assuming the other team shows up to play. A team would have to win outright all nine holes to score ten points.

A team wins a hole outright when one team member scores a lower net score than any other player on the other team. That team gets one point, and the other team cards a zero for that hole. If a player on each team has the lowest net score, resulting in a tie, each team gets a half point for that hole.

In a typical match, one team might finish with 6.5 points and the other 4.5 points. I've seen matches end with one team scoring 8.5 points and the other 2.5 points.

Lochmere Tuesday Golf League Handicaps

Handicaps are used to try to equalize the skill level of the league members. The handicap range is tight. The lowest handicap is 8, and the highest is 14. League members are not required to maintain an official GHIN handicap.

If you have a GHIN handicap in excess of 28, you play in the Lochmere Tuesday golf league at a disadvantage. This league handicap system favors players with a low GHIN handicap, as they don't have to give away as many strokes as they should.

For example, in one match during the 2024 season, a player with a 12 handicap on the official league scorecard had seven pars in nine holes. In another match, a player with a 10 handicap on the official scorecard scored 38 in nine holes. Any math expert will tell you both outcomes, while possible, are extremely rare.

The narrow band of handicaps creates additional inequity. All players must hit from the white tee box. The league is comprised of members ranging in age from 76 to 31. The senior players can't hit the ball off the tee as far as the younger players.

At the very least, the Lochmere Tuesday golf league organizer should use the white/gold tee box option for any member who is 60 years of age or older. There are four holes on the front and back nine where the older players should be allowed to hit from the gold forward tee boxes. This would help equalize the age difference.

Hole 7 is an excellent example. This par-5 hole is 480 yards from the white tee box. It's a very narrow shot. There are wetlands and trees on the left and dense forest down the right side. If you slice, you're toast from the white tees. The gold tees on this hole are forward at least 50 or 60 yards. Look at this satellite photo. An older golfer who doesn't have power will just barely make the fairway. If a wind is blowing from the southeast, forget it. Your ball will be in the rough just over the cart path.

hole 7 lochmere country club nh

The white arrow points to the white tee box. The gold arrow points to the gold tee box. The distance between them is no less than 50 or 60 yards.

lochmere score card

You can see why the white/gold tee box option should be used. Look at how far back the white tees are on those eight holes. CLICK the image above or HERE to see the LARGE SIZE scorecard at the Lochmere Country Club website.

Lack of Transparency

The league organizer offers no transparency concerning the scoring. Each week an email is sent to the league members showing the standings of each team and their total points. The league organizer doesn't share the actual scores posted by each player.

There is no transparency as to how the handicaps are tabulated.

The Lochmere Wednesday League is the exact opposite. The organizer for this league offers full transparency. Each member of the league can see the score of all the other members for each match. The handicap calculation is visible for all to see.

Summary

As of 2024, the Lochmere Tuesday golf league is weighted for players with a low handicap. There is a lack of transparency with respect to players' scores and how handicaps are tabulated. If you just want to go out and play golf on Tuesday's and don't care about scores and handicaps, then by all means consider this league. The course itself is the best one I've played on in New Hampshire. The grounds and greens are always in excellent condition.


How to Avoid Arguments With Contractors

outdoor patio under construction

See the electrical conduits poking up out of the ground? What happens weeks from now when they’re not exactly right? Copyright 2024 Tim Carter

How to Avoid Arguments With Contractors

How many times have you hired contractors in your life? My guess is quite a few. If you had to rate each experience much like you might a meal how many 5-star ratings would you have doled out? While I’m not a betting man, I’d say fewer than five percent.

I’d wager most of your ratings would be in the 2 to 3-star range. Remember the arguments you’ve had in the past? Do you recall your disappointment when the contractor didn’t show up for days at a time? How about the time when the materials delivered turned out to be wrong and another two-week delay stacked up on top of a job already a month overdue?

Allow me to share a few true stories and let me know if it reminds you of one of your experiences. Over the past six weeks I’ve witnessed a slow-moving train wreck. A person I know decided to put a patio in their backyard. Early on, I knew problems would crop up as the job concluded. I had a tough time being a bystander.

Outdoor Electrical Conduit Under Patios

One of the first things that happened on the job was the installation of underground electrical conduit. This was put in to provide power to a future hot tub and a fancy outdoor kitchen. As you might suspect, I’ve had to do this on my jobs for decades. You get one chance to get it right and installing a future conduit under a finished patio is nearly impossible unless one of your ancestors happened to be a POW in Poland that dug the real Great Escape tunnel out of Stalag Luft III.

Perhaps I’m a strange builder. I’m always thinking of the future. I always installed conduits that were one size larger than required. I always installed a pull string with the cable that’s in the conduit. Who knows, maybe an additional cable needs to be pulled in the future? The pull string makes this possible. The electrician on this job I was watching did neither.

A few days after the hot tub was installed, the electrician showed up. He direct-wired the hot tub. The homeowner discovered this at the end of the day and was none too happy. He had wanted it wired a different way. The outdoor kitchen is not yet installed, so I don’t know what will happen with that.

Let’s move on. Five years ago I was installing all of the plumbing, radiant heat, and electric in my daughter’s new home. She and her husband were constantly frustrated with the progress being made by the young brash builder.

 Builder Ignores Detailed Plans

The plans for the house were as detailed as any I had ever seen. I had worked with my daughter for months helping her with the drawings. I knew it was important to include very precise enlarged detail drawings showing how something should be installed. Most of these were ignored by the builder and his employees. It turns out they “did things a different way”.

I’ll never forget the day they came to rip off all of the house wrap and spent hours hammering in thousands of non-approved staples into the wall sheathing rather than remove them. It turns out they had installed the wrong house wrap. When they installed the correct product, they failed to follow the instructions and some of it peeled off requiring a third installation.

Homeowners Must Do Frequent Quality Control

Each week I receive countless emails from homeowners like you describing nightmare encounters with contractors of all types. When I do autopsies on the issues, the cause for the misery is almost always the same. The homeowner placed far too much trust in the contractor hoping all would go well. Quality control on the part of the homeowner doesn’t happen as frequently as it should.

It’s not always easy to get what you want. You have to take ownership in almost all situations. This means you need to have meetings with the contractor, or his subs, at the beginning of important phases of work. You can’t assume the workers know exactly what you want done. It’s foolhardy to think verbal conversations held at your dining room table will transform into your dreams months later. You can’t assume the workers have read and understand the plans.

Just because you told the contractor what you wanted a month ago in a meeting, or even if it’s on the plan, you can’t assume it’s going to get done. You must have numerous conversations and you must check the work in progress during these critical times.

I know, this seems to be far too much work. Or perhaps you don’t know what needs to be done. I’m sorry to say if you want happiness at the end of your job, you need to get plugged into the process. It’s never been easier than now to get a full understanding of how products should be installed. Many manufacturers have clear and helpful videos on their websites showing what needs to be done.

On big jobs you need to do your own quality checks. You need to make sure measurements are correct. You need to get proof the correct products have been ordered. You need to check products when they arrive on the job site.

I can hear you now. “Tim, this is too much work! I’m hiring the contractor so I don’t have to do all this!” Well, decades ago there were far more great contractors than there are now. It’s sad but true. Roll up your sleeves and be prepared to help run your job.

Column 1571