Small Retaining Wall Tips

small stone retaining wall

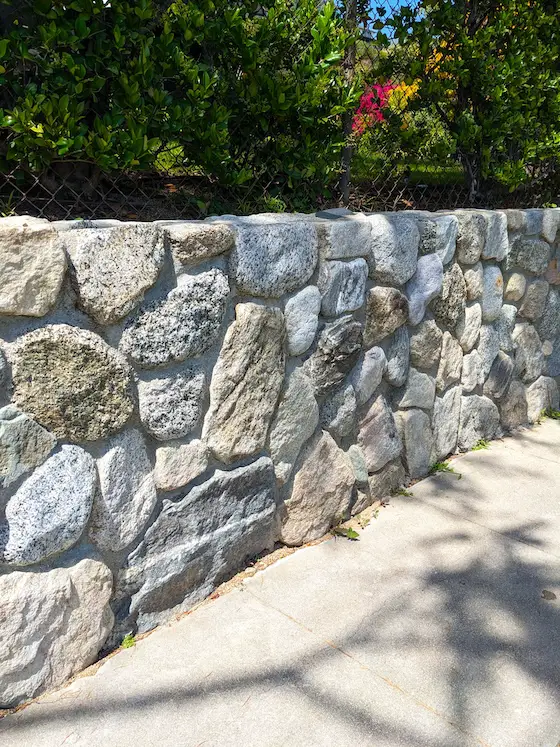
Small retaining wall tips: This retaining wall was rebuilt recycling all the original stone. The original wall stood for over 110 years! Copyright 2024 Tim Carter

Small Retaining Wall Tips - What is Considered Small?

Last week I shared with you the news about my recent trip to southern California. I was fortunate to spend time with a dear friend and his wife. I don’t know that I’ve ever met a person who’s more in love with a home than him. Believe it or not, he’s lived in the same home for all of his seventy-two trips around the sun. It’s a stunning Craftsman home that was built in 1910.

This gorgeous wood-framed house is built on a corner lot in a community that is snuggled in the Crescenta Valley just below the towering San Gabriel Mountains. His lot has about eight feet of downward slope across its 150-foot depth. The original builder wanted a fairly level front yard. A four-foot-tall retaining wall was built along the south side of the lot to achieve this goal.

The San Gabriel Mountains contain a wide variety of granite rocks. Flash floods roaring out of the canyons have tumbled these rocks like clothes in a dryer rounding the sharp edges. There are countless wonderful boulders the size of extra-large watermelons, cantaloupes, and grapefruit you can harvest from nearby streams. They’re the perfect material for building a durable and attractive retaining wall.

Stone Step Treads

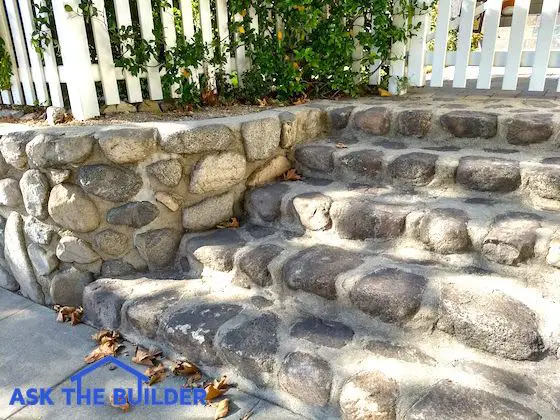
These stone steps are on Rockland Place in Montrose, CA. The stones come out of the nearby San Gabriel Mountains each time there's a heavy rain. These treads would be horrible in a climate that gets snow. Copyright 2017 Tim Carter

You may not have granite where you live, so make use of any suitable durable stone at your disposal. Coarse fossil-filled limestone was abundant in my hometown of Cincinnati, Ohio. There are thousands of retaining walls in the Greater Cincinnati area built using this dense strong stone.

Gravity and Tree Roots Tip Over Walls

My friend’s wall started to slowly succumb to gravity over the decades. Several years ago it was leaning so much the city condemned the wall. A public sidewalk next to the wall was not safe to walk on as the wall could collapse without warning.

I was able to view the wall a few years ago before it was condemned. I was amazed that this wall was only one rock-width from top to bottom. This was the primary reason the wall failed. Had the builder constructed the wall so the base was two or three rocks wide tapering to only one rock wide near the top, I’m quite sure I’d not be writing this column.

An Old Stone Mason

A local elderly stone mason rebuilt the wall and it looks as good as new. He salvaged each of the pieces of granite. My friend didn’t take my advice to change the design. The wall was rebuilt exactly how it was done originally. “Tim, the wall stood for over 110 years with it just one stone wide. I won’t be around in 100 years when it fails again.” I didn’t have a plausible objection to his reasoning.

How does this relate to your home? In many respects, my friend’s reasoning is somewhat sound. Earthquakes do happen in southern California and his old wall survived quite a few. Frost is not an issue as it rarely drops below 32 F at my friend’s house. Build his wall at my home and within a few years the deep frost in New Hampshire would start to push over the wall.

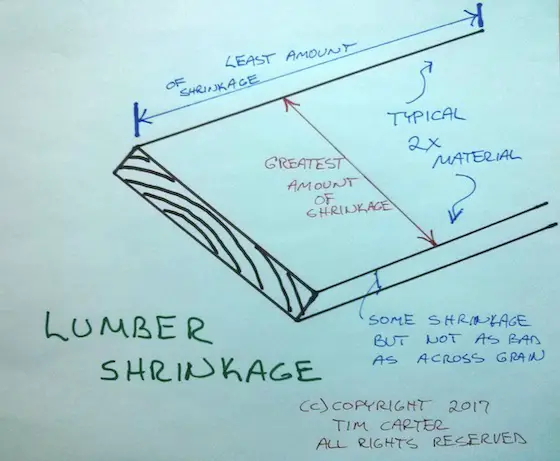
Tipping Force is Logarithmic

Retaining wall design is quite complex. As a wall gets taller, the tipping force increases in a dramatic fashion. Double the height of a wall and the force pushing against it can be 3 to 4 times that of the shorter wall. Any retaining wall taller than 3 feet can produce significant tipping forces. This is one reason some retaining walls have a batter or backwards lean to offset this force.

Beware much of what you might see from homeowners and some DIY warriors on YouTube. I’ve watched many retaining wall videos that are filled with very bad advice. I urge you to seek the advice of a structural engineer for any wall taller than 6 feet.

Consider the characteristics of the soil you’re trying to hold back. A well-drained sandy soil is much easier to deal with than a dense-clay soil. Steep hillsides uphill from your wall can be problematic. Soil creep is real. Gravity is working nonstop at pulling all the soil uphill from your wall down to the nearest sea or ocean. Never forget that Mother Nature bats last. Your strong wall design will take you into extra innings but in the end she will win the game.

Leverage physics into your design. An inside curved retaining wall acts much the same as an arch above an opening. Curves also add eye appeal. Don’t feel everything has to be a straight line.

Don't Trap Water Behind the Wall

Provide for excellent drainage behind your retaining wall. Backfill it with rounded gravel the size of walnuts if possible. Water flows through this rock as it does a colander in your kitchen sink. Trapped water behind a retaining wall can add thousands of pounds of weight that is working to topple it.

I have several in-depth columns about retaining wall heights, the four primary types of walls, and detailed installation instructions. Just type “retaining walls” into the search box on this page: https://askthebuilder.com/search

Column 1560

Decorative Exterior Tile

decorative ceramic tile surrounding sewer drain

The decorative ceramic tile transforms a dull storm drain into a festive feature at this condo property. Copyright 2024 Tim Carter

Decorative Ceramic Tile Creates Happiness

I just returned from an eight-day trip to southern California to visit my youngest daughter and several dear friends. I saw some amazing decorative ceramic tile. The weather was excellent, and although I knew about the June gloom, I discovered there was also the May gray. The sun heats the high desert east of the Los Angeles basin, causing air to rise. This movement pulls moist marine air eastward, blocking the morning sun.

It had been a few years since I’d been to this part of our great nation. I traveled alone giving my wife a break from me being around the house here 24/7/365. She calls these adventures little-man self-discovery trips.

If you’re a traveler, one of the first things you notice is that other people and cultures do things differently. I’ve always encouraged my children to travel to open their eyes to what’s possible about everything.

Table Rock Laguna Beach

Here’s an example. One of my friends owns a condominium on the shore of the Pacific Ocean. It’s a very large building and he wanted to show me how the residents access the beach.

We traveled down a series of staircases and concrete paths cut into the cliff above the roiling ocean surf. Just above the beach, there was an outdoor shower and concrete slab with a storm drain. Festive decorative ceramic tile created a border around the dull storm drain. This same tile was also set into the wall below the shower head.

decorative exterior tile on outdoor shower wall

It's not recommended to take a shower here in your birthday suit. People just below on the beach will see your buffiness. Copyright 2024 Tim Carter

The colorful tiles caught my eye and immediately made me smile. I think you’d agree that it’s impossible to have enough happiness in your day. Stop and think about how you can incorporate colorful things in any number of your outdoor facades or horizontal hard surfaces.

Tile or Stone Medallions

You can install colorful tile or natural stone in concrete patios, sidewalks, and driveways. Exterior stone medallions are also possible. Search online and you’ll discover in seconds a vast array of medallions. My favorite ones are those that have a compass rose. Using a real compass, you can install your new medallion so it points to the cardinal compass directions.

Inlays

Don’t hesitate to use simple natural stone inlays. Thin pieces of granite can be purchased with ease at many big box retailers. Slate is another good choice. You can use these to create stripes or borders in concrete flatwork.

If you’re having trouble visualizing this, jump online and search for photographs of what material you’d like to use. I typed “granite border concrete patio” into the search engine I use. I then selected the Images link and was overwhelmed with the creativity of others who have used granite to make a dull concrete surface come alive.

Clay Paving Brick

Don’t discount exterior clay paving brick. Purchase ones that are rated for severe weathering and they can create a eye-catching border for a sidewalk, patio, or driveway. Your concrete mason just has to adjust his forms to create the lowered platform so the finished brick is flush with the adjacent concrete.

clay paving brick old brick road florida

This is a real clay paving brick made by the Southern Clay Brick Company. It's 8 and 5/8ths inches long, 4 inches wide, and 3 inches thick. It was salvaged from the Old Brick Road in central Florida.

If you decide to do this, be sure you incorporate reinforcing steel rods in the concrete. I recommend creating a grid pattern with the 1/2-inch bars set at 2 feet on center in both directions. The steel needs to have a minimum of 1.5 inches of concrete under them. Do not just lay the steel on the compacted earth and pour over it.

Tear a page from a few talented teenager graffiti experts’ playbooks. Think of how colorful spray-painted graffiti on retaining walls, bridge abutments, railroad boxcars, etc. grabs your attention when you drive past the artwork. What’s stopping you from hanging some colorful item on your outdoor fence or the rear of your home?

You might purchase an old stained-glass window at a garage sale. The frame may just need to be repainted to make it look great. You can hang this on an exterior wall or fence just as you hang a painting or mirror inside your home.

Attach a piece of cement board to a wooden frame. Install colorful ceramic tile over the cement board. Once again, get inspiration from photos you see online. You’ll be stunned by what others have already done.

The best part is you can often do this without cutting any tile. You just need to lay out the tile on a flat surface to determine your exterior dimensions. Nothing about this is hard. There are numerous videos online, including my set of four step-by-step videos, that show you how to grout tile.

Have some fun. Think outside the box. Do quirky online searches like “ceramic tile on exterior walls” or “tile inset into concrete” or “colorful tile inlays”. You’ll be stunned by what you see. Be sure to send me photos of your completed projects!

Column 1559

Exterior Paint Peeling

exterior wood steps paint peeling

The paint on these steps and the wood porch above it lasts for only two years. I believe I know why it fails. Copyright 2024 Tim Carter

Exterior Paint Peeling - Water, Water Vapor, Dust, Dirt, and Oil

Are you frustrated with peeling exterior paint peeling? Maybe it’s a fence, a picnic table, a bench, your house siding, a shed, outdoor furniture, or a pergola. You might also share Jan’s misfortune. She visited the Ask Tim page of my AsktheBuilder website requesting help.

Here’s what Jan sent to me:

“Our problem now is our front porch that is subject to the elements here in Des Plaines, Illinois. I am SO tired of repainting every other year or at a minimum, touching up worn spots every Spring. The paint flakes off the railings, stairs, and even floorboards. We have gone as far as stripping it down to bare wood, using primer and then two coats of oil base porch paint. Unfortunately, it lasted no longer than the water-based paints, which were easier to work with. The snow and rain hits the stairs and railings but not usually the decking. Although, a few times the snow has blown up the five stairs to our door. Any idea what we can do to save our backs and knees?”

Jan sent me a set of photos that allowed me to diagnose her exterior paint peeling problem in just seconds. She lives in an older home. The porch is raised above the soil as are her wood steps.

covered front porch exterior wood steps

This is Jan's front porch. It's no wonder paint won't adhere to the wood. Copyright 2024 Tim Carter

The underside of the porch has little or no ventilation. Walls, covered with the same wood shingles as the house, extend from the porch down to the soil. Illinois is east of the Mississippi River and gets quite a bit of rainfall each year. Invisible water vapor wafts up from the soil and enters the wood. The paint doesn’t stand a chance. Here’s why.

John Pendrey the Chemist

I started a summer business with a good friend after I graduated from high school. We painted houses in the summer. John went on to get a PhD in chemistry. He spent his entire career working in a lab for one of the largest paint companies in the USA.

When John was in graduate school, he started gravitating towards a career in the paint industry. One day we were eating lunch together and he handed me a scrap of paper with a chemical formula on it. He asked, “Do you have any clue what this common item is?” I was a geology major not a chemist, “I’m clueless. What is it?”

John responded, “It’s the formula for common yellow carpenter’s glue you use all the time. Now look at this other formula.” He handed me a second scrap of paper with a long formula.

I looked and it was nearly identical to the glue one. I said, “Well, this must be the white glue kids use in school.” John said, “No. It’s the chemical formula for a very standard water-base exterior house paint.”

At that instant of time, a light bulb went off in my head. Why of course, paint does stick to things like glue. It’s hard to get out my clothes, it’s hard to get off my paint brush ferrules as well as ladders. Paint is just colored glue.

Paint Expands and Contracts

Paint expands and contracts. So does metal, plastic, and wood. But different materials have different expansion and contraction rates. Of all the common things you have in and outside your home, wood and plastic move the most. Heat causes plastic vinyl siding to expand. Water, or water vapor, causes wood to grow in size.

Water Vapor and Vapor Pressure

It gets worse. Water can travel with ease through wood. If you recall some of your high school physics, you might remember a class on vapor pressure.

In Jan’s case, water vapor from the soil is entering the underside of all the wood that makes up her porch and steps. The odds of the original carpenter painting and sealing all the sides of each piece of wood before he built the porch are as high as you guessing the Mega Millions lottery numbers.

Water seeps into Jan’s porch wood and works its way to the underside of the paint. When the sun hits the painted wood and warms it, it creates a difference in vapor pressure. The vapor must get out so it pushes the paint off the wood.

If your wood gets wet from rainfall or lawn sprinklers, it can swell. The swelling may be greater than what the paint can expand. If so, the adhesive bond between the paint and the wood fails. This is but one reason paint peels.

Read Paint Can Labels

Other common reasons for peeling paint are on the paint can label. Can you recall the last time you read the label on a paint can? Most say, “Apply to a clean, dry, dust-free, and oil-free surface.”

Adhesive tape doesn’t stick well to dusty or dirty surfaces. I’m sure you’ve had tape fail. It’s no wonder paint will fail if a thin coating of dust or dirt is on the surface you’re trying to paint.

Always clean things you’re about to paint as you would your car. Get a bucket of soapy water and rub the surface with a sponge or brush and then rinse and dry. Good luck!

Column 1558

Architects Design Flawed Garages

two car garage wood-grained doors

Architects Design Flawed Garages - You might think this is a spacious garage allowing you to store many things and get in and out of cars and trucks with ease. You’d be wrong. Copyright 2024 Tim Carter

Architects Design Flawed Garages Time and Time Again

Two weeks ago, on a whim, I recorded a 60-second video that I uploaded instantly to YouTube.com. I wanted to share one of the biggest mistakes I’ve ever seen in the common garage. I’m willing to bet you’re a homeowner who suffers from this oversight by architects and those who draw house plans. I stand by this claim based on the hundreds of thousands of garages I’ve driven by that sport this design flaw.

In less than 24 hours, this short unscripted video was watched over 8,400 times. There were quite a few comments from folks who lamented about having a garage with this same defect. A United Kingdom homeowner said, “Same in the UK. No way you can get the car in and open the car door, even without stuff stored there. Glad architectural mistakes are universal.”

What’s the common flaw? The vast majority of garages are not nearly wide enough. One would think that architects would have eliminated this error long ago, but every new garage I drive by is too narrow. I look at house plans each week for my DrawPlumbingPlans.com business and I see the exact same mistake duplicated time and time again all over the USA.

The 2-Foot Space

For whatever reason, architects continue to create plans where the distance from the corner of the foundation to the beginning of the garage-door opening is just 24 inches. If the garage is framed with standard 2x4s, the distance from the interior drywall covering the wall to the door opening is less than 20 inches.

When you park a full or mid-size car in the garage you might have about 30 inches from the side of the car to the drywall. That’s not enough room to fully open the average car door. My wife’s Volvo XC-90 requires 36 inches of space to fully open the driver’s door.

Garbage Cans, Recycle Bins, and Bicycles

Think about all the normal things you might store on the side walls of your garage. A standard round garbage can is 22 inches in diameter. My stackable recycling bins project 16 inches out from the wall. There’s only 14 inches of space in my garage between the gleaming paint of my wife’s car and the reclining bins. To prevent scratching the paint on her car, I only transfer cans and bottles into the bins when she takes the car out on errands.

I knew all about these issues when I helped my daughter design her home. She followed most of my advice and thanks me each time I see her. Her garage has two separate doors, both of them 9 feet wide and 8 feet high. I begged her to make one of the doors 10 feet wide but she resisted this as she wanted the doors to be balanced. You need a 10-foot-wide door to accommodate a standard full-sized heavy-duty pickup truck.

My daughter’s garage is 28 feet in total width. The distance from each outside corner to where the garage door opening begins is 4 feet. I had suggested she make it 5 feet but the zoning setback lines prevented this.

two car garage with custom doors

This is my daughter's garage. It would have been perfect had the garage been just 4 or 5 feet wider. Copyright Tim Carter 2024

The distance between the two garage door openings is just 2 feet. I had recommended 3 feet. Her home was shoehorned onto the allowable area within all four setback lines. Had more room been available, a 32 or 34-foot width would have created a garage with plenty of room for a big workbench, lawn tractor, snow blower, etc.

Do you own a full-sized pickup truck like I do? If not, perhaps a neighbor has one. My guess is you see it parked outdoors most of the time. I have to fold back one of my big mirrors to squeeze my Ford F-250 into my garage. It’s important to realize I didn’t build the house I live in.

When architects specify garage doors, the final finished opening is never what you see on the door-size callout. For example, let’s say your architect has specified a 9-foot-wide by 8-foot-tall door. The foundation contractor creates a notch in the cast concrete that’s 9 feet wide. Once the slab is poured, the carpenters place the bottom of the beam that passes over the slab at 8 feet off the concrete.

When the finished trim and door weatherstripping is added on the side wall jambs, you lose about 2 and 1/4 inches in width. This means the clear distance between the weatherstripping face is 105 and 3/4 inches. A Ford F-150 will squeeze into this door as the outer distance from mirror to mirror is 96 inches. But my F-250 will not fit. The current width of a new F-250 with the mirrors extended is 106 inches.

Don’t skimp on the depth of your garage. Think about how long cars and trucks are. My wife’s Volvo is 16 feet long. My F-250 is almost 20 feet long. You might want 2 feet of space between the vehicles and the garage door. At the far end of the garage, you would probably want at least 8 feet of space so you can store things on the wall and have plenty of space to walk next to the vehicles. This means the depth of your garage should be at least 30 feet deep.

Column 1557

Room Addition Foundation

room addition roof framing

This room addition is bigger than the original house. Sometimes it makes sense to go to all the effort. Copyright 2024 Tim Carter

Room Addition Foundation - Get it Square and Level

Are you feeling pinched by the current economy? I know I am. I shop for materials each week at the grocery store giving my lovely wife a break. She did it for the previous 45 years. Gasoline, food, insurance costs, interest rates, etc. are all way up with no end in sight. Your plans to move to a larger home may now be on a cool back burner.

The good news is you might be able to create the space you so desperately need by building a room addition. It’s important to realize room additions are small houses and in many ways much harder to build than a new stand-alone home. You need special skills or you need a seasoned remodeling contractor who has deep experience. Allow me to share a few true stories of what happens when you don’t have the right person.

Fixing Out-of-Square Foundations

When I first started in the construction business back in the mid-1970s, I got a job as a fix-it expert for a small local remodeler. Each day I was tasked with righting all the wrongs created by the unsupervised subcontractors. Most of what I did centered around disguising out-of-square and out-of-level foundations. I can’t stress enough how important it is to have strict supervision of the foundation process. It must be square and level.

Carpenters don’t tolerate these conditions and will build a square shell on top of an out-of-square foundation. When this happens, some of the wood framing will overhang part of the foundation and you’ll discover the foundation sits proud of the framing on the other side of the room addition.

My job was to cut long tapered wood shims on one side and add a cement-stucco finish on the other side of the foundation. All this was to disguise the mistake. Some homeowners never said a word, others knew the fix was in and complained to me. I just shrugged it off and did my job telling them to call Dan, the owner of the company.

Foundations must be square and level. It’s not hard to do. I used an optical builder’s level back when I was building my own room additions and homes. These are accurate to within a 1/16th of an inch in 50 feet. You can now download a simple app on your smart phone to give you the necessary diagonal measurements to square a foundation. I used to do those using algebra, a pencil, and a piece of paper.

Stop trusting your contractor. Before you even sign the contract for your room addition, you can already have the diagonal squaring measurement. Some great architects automatically generate it for you on the foundation plan. Here’s an example.

Let’s say your room addition foundation projects out from your home 14 feet and the foundation is 22 feet long. That rectangle is square when the diagonal measurement from two opposite corners is 26 feet and just under 1 inch. You can go online and use any number of websites to generate diagonal measurements in seconds.

You can also rent a laser level if need be for a few hours. If your room addition foundation is made from concrete block, check it for level as soon as half of the block are laid. If four or five courses of block are still to be laid, it’s going to be very hard to correct an out-of-level mistake of just an inch or so.

An optical or laser level can be used to check the pour line inside concrete forms. I know you think I’m crazy to ask you to do this. If you don’t want to do it on your own, then put it in your contract that your builder has to help you with all of this.

It’s imperative the contractor gets the height of the foundation correct. This math needs to be done by making sure the finished flooring height matches where you will walk from your current house into the room addition. Your calculations may show that the room addition foundation needs to be higher or lower than the existing foundation. Don’t guess for goodness sake hoping all will work out.

Room Addition Cost Estimator

I recommend you demand a detailed cost estimate for each phase of your room addition. You want to ensure enough money has been allocated for each task to complete the job. With inflation raging, you can’t afford to run out of money before the job concludes.

Years ago I developed a spreadsheet that helps you do this. It lists every major task and most of the minor things that need to be done from start to finish. This magic spreadsheet can provide you with a rough estimate of the final cost of your room addition if you just know the actual cost of a few of the aspects of the job.

This room addition cost estimator works for room additions just as it does for a new home. It takes into account regional cost differences too.

You can get a copy of this spreadsheet here.

Column 1556

Algae and Lichens on Composite Deck

algae and lichens growing on composite decking

No deck is maintenance-free. You can see algae and lichens that thrive in the shadows on this composite deck and rail system. Copyright 2024 Tim Carter

Algae and Lichens Grow on Composite Decks and Rails - Easy to Clean

You might be one of the countless homeowners frustrated with the annual, or every-other-year, task of cleaning and sealing your wood deck. I’m right there with you as I have to deal with my wood dock and the stairs leading to it. It’s a wretched job that can span days. It’s no wonder you might be drawn to the composite decking displays at local home and garden shows like a sailor to a siren’s song.

Over the past three decades I’ve been lucky enough to obtain inside information about exterior wood sealers. Add to this the knowledge I discovered while researching my Roofing Ripoff exposé book. You probably know that the sun’s ultraviolet (UV) rays are harmful, but you might not know the actual mechanism. Once you do, you grasp why deck sealers are doomed from the start.

UV Rays Contain Destructive Photons

The UV rays can contain active photons. Think of these tiny things as miniature cruise missiles. When the photon crashes into your outdoor flag, wood deck, house paint, metal roof or flashing, etc. it splits molecules apart and rips atoms off objects. These photons have so much energy they can blast atoms of copper or zinc from your roof. It’s child’s play for them to destroy thin deck sealer films that sit up on top of the wood.

To make matters worse, your deck is horizontal and gets a point-blank blast from the UV rays in the middle of the day. The rays have to pass through the least amount of protective atmosphere at midday. Have you ever wondered why your deck railing balusters don’t look so bad? They receive a harmless glancing blow from the UV rays at noon. In the morning they receive a direct hit from the UV rays, but the photons have to pass through so much atmosphere their energy is dissipated. This is why you struggle to get sunburned at sunrise and sunset.

As if this isn’t enough torment, the wood you’re using outdoors is hygroscopic. This means it expands and contracts in response to moisture content. Sealers prevent this movement because they don’t allow water to enter the wood. If you stop sealing wood, within a few years it looks like a neglected fishing pier with cracks large enough to swallow a handful of BBs.

These cracks start off small. They’re very tiny checking cracks. The cracks allow water to penetrate deeper into the wood. As the cracks get wider and deeper, the swelling and shrinking forces become stronger. This is why it’s imperative you keep outdoor wood sealed so water doesn’t rip your lumber apart.

cedar decking with checking cracks

This is 1-inch-thick cedar. They make up my dock panels. You can clearly see how the wood starts to crack and water can enter with ease. Copyright 2024 Tim Carter

I think you can see why a new industry was born four decades ago. That’s when the first composite deck products hit the market. As time marched on, improvements were made and more exterior products were made from plastics so you wouldn’t have the constant job of painting or sealing them.

I have 1,700 square feet of composite decking here at my own home. I didn’t build the house I live in now. The homeowner had the original Trex decking installed. I remember when it was introduced to the marketplace. It had an antiseptic appearance and only resembled wood by its shape. Seven years ago, I ripped it all up and installed Trex Transcend for the decking and railing system.

old trex decking being removed

This is generation one Trex decking. It had no wood grain, was 1-inch thick, and mushrooms could grow from it in moist conditions. Copyright 2024 Tim Carter

My wife, who dislikes all wood-imitation products, was amazed at how realistic the product looks. I’ve never cleaned the decking and it looks as good as the day I installed it. Algae, pollen, and lichens do accumulate in shady areas. The good news is all of these things are easily washed off using a soft brush that you might use to clean your RV.

trex transcend decking

This was my deck just months after it was installed. All the decking that's in the sun looks this good seven years later. The shady areas do have algae and lichen growth. Copyright 2024 Tim Carter

If you decide to free yourself from the chore of cleaning and sealing your wood deck, be aware that composite decking requires great attention to detail when installing it. Add to this the price. The top-line composite deck products are expensive.

Composite decking products, while not hygroscopic, expand and contract. The movement can be substantial. You must take this into consideration when installing the decking or you’ll have a huge mess on your hands. Read the installation instructions and follow them to the letter.

If you decide to install composite decking on a treated-lumber undercarriage, read the installation instructions. The composite decking products can sag if you space the floor joists too far apart. By default this happens if you decide to install the decking at a diagonal on your deck.

You’ll also want to protect your investment by using the newer joist tape products. This tape is applied to the top of the joists before the decking is installed. It prevents water from entering the wood. Without this protection, water can enter tiny cracks created by the decking fasteners. As you already know, these cracks can get bigger over time. When this happens, the fasteners holding down your expensive composite decking lose their gripping power.

Column 1555

Secret Hiding Places

kitchen pantry secret door

Secret Hiding Places - Is this just a small pantry or do all the shelves roll out and rotate to the right giving you access to a tiny room behind the wall? Use your imagination. Copyright 2024 Tim Carter

Secret Hiding Places in Your Home are Everywhere

I’m in the final stages of writing a book that contains hundreds of hacks that you might want to incorporate into your existing home or a new one you’re building. I got lots of help from many of my newsletter subscribers, who shared some of their best ideas. It’s been a fun project.

The two categories that received the most response were electrical and secret storage. Thousands of homeowners need help with electrical outlets and switches they feel are in the wrong place. The original electrician didn't consider the best locations for outlets and switches. You, or a more clever electrician, can rectify some mistakes.

Hidden Staircases and Secret Passages

You may be a homeowner who desires to hide small and large things in your home. You may even take it to another level altogether and be like me. I dream of having at least one secret staircase and any number of hidden passages in the next home I build. Think of the game of Clue™. If you’re in the kitchen, you can magically be across the board in the study. Yes, it’s possible to incorporate secret passages in houses, but that’s a column for another day.

clue game board

Here's a real-life secret passage in a kitchen.

kitchen countertop

There's a better way to disguise the seam on the countertop. This, done by an expert, would fool 999 people out of 1,000.

I’ll share with you a few of the ideas that my subscribers sent to me. The best ideas, of course, will be in the pages of my book. I think you’ll enjoy what I’m about to reveal. It’s important to note that you need to get in the mindset of a magician to conjure up the most creative secret places.

Void Space Between Walls

One of the easiest ways to create a small hidden space is to create a void between two walls. This needs to be done so that when you’re in each room, you think the wall you’re looking at is a common wall with the room next door. I have this situation in my own home now, where two large metal chimneys pass through the second floor up to the roof.

One of the walls is the back wall of the second-floor bathroom. The other wall is inside a closet in the bedroom next to the bathroom. You automatically think the two rooms share a wall. You’d be wrong. There’s a space about 24 inches wide between the two walls! The builder could have created a cutout in the hallway to this space. You could cover this opening with a large wall hanging or picture. A French cleat is best for holding the artwork against the wall.

False Bottom in a Window Seat

Window seats are an ingenious way to conceal long items that might only be 3 inches tall lying on their side. You can create a false bottom in the seat. Imagine flipping up the hinged window seat and seeing the bottom. Who’s to say there’s not another six or eight inches of space under this bottom? There are many ways to hinge the false bottom so it flips up when you need access.

small corner window seat dog

Mayonnaise Safe

Do you need to hide some cash, jewelry, or other bibelots that have sentimental value? You can store them in your refrigerator. Did you know you can get a small can of latex paint the same color as mayonnaise? Carefully clean an empty jar. Be sure you don’t ruin the label. Let it dry, and then pour some paint into the jar. Roll it around to coat the inside. Let it dry well, and alakazam, you can store valuables in the last place someone might look.

WorkBench Drawer

Do you have a workbench in your garage or basement? Is the top supported by a ring of 2x6s? If so, transform the front or side piece of lumber into a drawer front. Think of how the drawers work in the metal tool cabinets mechanics use. That same heavy-duty hardware can support the weight of a vast amount of thin, heavy items.

build a workbench

This simple, yet sturdy workbench was cut and assembled in less than 30 minutes! Photo Credit: Tim Carter

Paint Roller Safe

Here’s one of my favorite ways to hide small items of value in plain sight. Purchase a cheap paint roller with a 3/8-inch nap. Get a crappy roller frame and paint pan while you’re at it. Pour some paint into the pan and roll it around as if you had painted a room. Get paint on the roller frame handle. Create the illusion that you used the tools.

Brush out any paint from the pan as you would if you were going to clean it. Remove the roller cover from the frame. Stand it up on end and allow everything to dry for days or a week or two. Start to slide the roller cover back on the frame and look at how you have a tube to hide rings, small jewelry, cash, etc. Just be sure no one throws away the roller and cover that you now place on a shelf and throw other crap on it to hide it.

The Old Book Trick

Go to library book sales. You can often get thick hardback books for a dollar or less. Do what you’ve seen in the movies. Glue the pages together and cut out the book's center to create a void space. Complete the illusion by stacking this book with 30 or 40 others you purchased at the sale. I have a stack like this out in my garage on a shelf.

I challenge you to come up with some creative ideas. If you want to share them to help others, I can include your idea in my book and give you credit. Just share it via the Ask Tim page on my website. Happy Hiding to you!

Column 1554

Wood Shrinks and Expands

buckled wood top of vaulted ceiling

Wood shrinks and swells - This sunroom ceiling is suffering from expansion issues. Copyright 2024 Tim Carter

Wood Shrinks and Swells Unequally - Not Like Fine Leather Gloves

Wood is a true gift from God. It’s not much different than tomatoes, wheat, or corn in that wood is really a crop. Any farmer that’s lucky enough to have a stand, or bush, of maple trees on his farm will tell you that his first crop of the year is maple syrup. Trees are routinely harvested here in my great state of New Hampshire, but the growing season is not 120 days like most fruits and vegetables, it’s decades.

We are lucky enough here in the USA to have countless trees. The lumber harvested from them allows us to build durable homes, outdoor decks, pergolas, play sets, forts, furniture, and countless other indoor and outdoor projects.

While wood has many positive attributes, it also has one negative quality that causes homeowners like you enormous frustration, pain, and money. Wood happens to be hygroscopic. This means it can absorb liquid water or water vapor. It can also release both much like you squeeze water from a sponge.

The issue with wood is that when it absorbs or releases water in either state, it can swell or shrink. As if this movement is not bad enough, the swelling or shrinkage is not at all equal across the length, thickness, and width of any given piece of lumber.

Lumber Shrinkage Illustration

Imagine this is a 2x4 or a 2x12. It's a crude 3D drawing I made, but I think you can make sense of it. (C) Copyright 2024 Tim Carter

I’ll share two stories to drive home this point. Almost forty years ago I built a stunning three-story Queen Anne Victorian replica home for my family. The joists used for the first and second-story floors were 2x12s cut from Southern Yellow Pine trees. The third-story floor was framed with 2x10s.

I also had two very tall chimneys that extended all the way from the basement up through the roof. When we roofed the house, I had to install tin-coated steel flashing to prevent leaks. Some of this metal was embedded into the mortar joints of the chimney and the rest of the flashing was attached to the wooden roof sheathing.

The metal counter flashings attached to the chimney were cut so a 1/4-inch gap remained above the step flashings on the roof. Ten years later I was up on the roof installing a solar-powered attic fan that ended up being a waste of time and effort. I happened to look at the chimney flashing and was stunned.

Horizontal Crack in a New Chimney

Metal counter-flashing can be seen in the far corner of my chimney.

The gap between the two flashings was now 2 inches! This meant that the chimney grew taller or the house dropped. Builders and remodelers blame cracks in houses all the time on settlement making you think your entire house is sinking into the soil.

If this were the case at my home, there would have been no gap as the chimney footing and the house footing would have both dropped into the soil. Yes, I know as a college-trained geologist, some houses can sink into the soil, but that’s not the cause of most cracks and it most certainly was not the cause of the huge gap between my roof flashing!

The cause was lumber shrinkage. My 2x12 and 2x10 floor joists from the lumber mill were no longer as wide as they were when I nailed them all together. It turns out lumber shrinks or swells the most across the width, or face, of a board. It shrinks the least along its length.

Just days ago I employed this knowledge to help a woman in Ohio. She purchased one of my phone coaching calls. It turns out her new beautiful room sun room addition had a serious issue with the ceiling made from real wood. It was tongue-in-groove maple beadboard. It’s important to realize this room had a steep vaulted ceiling.

She sent me photos of the buckled wood up near the peak of the vaulted ceiling. It was a huge mess. I requested a photo of the floor of the room. I suspected this woman was like my wife. My hunch was right as the room was filled with many large plants.

I asked about the roof ventilation and the insulation used in the ceiling. It turns out the builder made two huge mistakes. First, he used closed-cell spray insulation. This product does not allow water vapor to pass through it. Second, he didn’t create a pathway at the peak of the roof for air to escape out to the roof ridge vent.

The house plants in the room were belching water vapor into the air. This water was concentrated in a layer of very warm air at the top of the vaulted ceiling. I’m sure you remember from your high school physics class that warm air can hold more moisture.

The wood at the top of the ceiling was absorbing all of this water and expanding. It’s easy to solve the problem. She just has to remove the last row of beadboard on each side of the vaulted ceiling. To hide this gap, she can nail the same stained beadboard to a piece of plywood that will form a flat surface up at the peak of the ceiling.

This flat piece will have beveled edges and it will be secured to the roof ridge board. It’s vital this flat board not be secured to the beadboard. The beadboard ceiling will now have a generous 3-inch space on each side of the ceiling to expand and contract as the seasons change.

Column 1553

Install Exterior Ceramic Tile

exterior ceramic tile popping off concrete step

Exterior Ceramic Tile - Freezing water under the tile caused the tile to lift off the concrete. The tile setter made one, or more, mistakes. Copyright 2024 Tim Carter

Exterior Ceramic Tile - Best Way to Install It

A fellow amateur radio operator reached out to me several days ago. My vanity call sign was coined after my Ask the Builder business. It’s W3ATB. The W3 stands for www for my AsktheBuilder.com website. This operator knew I’d be able to answer his question.

He lives in Coeur d’Alene, Idaho. Thirty years ago a tile contractor installed ceramic tile outside this man’s house. Some of the tile is protected by a generous roof overhang, but some of it is exposed to every drop of falling rain. Many pieces of this tile are no longer attached to the concrete. This man needed to know how to re-attach them so they will not pop off again.

Northern Idaho experiences bitter cold weather in the winter months. It’s not uncommon for the outside temperature to drop below zero for days at a time. My radio friend told me that he guesstimates they have at least ninety days a year when the temperature drops to 27 F.

You may or may not know that water expands by about nine percent when it freezes. This expansion is so powerful it can split apart metal water pipes. Ice can lift entire buildings. This is why foundation footings must be placed deep in the soil where the local frost doesn’t penetrate. Knowing this, I think you can see how it’s child’s play for ice to pop tile off a concrete slab.

I had a few back-and-forth emails with the homeowner as I wanted to get as much background information as I could about the original installation. It turns out the tile contractor had great intentions, but he very likely made a few critical mistakes.

The Tile Council of America (TCA) publishes an in-depth handbook that shares exactly how tile should be installed. If you intend to invest lots of money in ceramic tile in your home, it would be very prudent to purchase this handbook and discover exactly what questions to ask your tile contractor before you sign a contract. You want to probe the depths of his ignorance as my historical geology professor would exclaim before handing out test papers.

Cement Paint - The Magic Adhesive

Allow me to share what I would have done had I been the tile contractor in Idaho all those years ago. I happen to have a very unfair advantage because I had the good fortune back fifty years ago to talk with an old retired concrete mason. He decided to share a secret tip and not take it to his grave. Cement paint. I’ll bet you’ve never heard of that.

Exterior tile is installed on concrete using Portland cement. Modern tile setters and manufacturers call it thinset mortar. In its most basic form, it’s just Portland cement and fine silica sand. Some thinset manufacturers add dry boding agents to their products to enhance adhesion.

Fortunately, I’m old enough to have seen exterior tile installations on the door stoops of old buildings in Cincinnati, Ohio. All of this tile had experienced many decades of exposure to harsh winter weather. I remember the tile looking as good as the day it was installed. The tile setters back then didn’t have access to fancy modern thinset. So how did they prevent their tile from popping off the concrete below?

It’s simple. They used cement paint and lots of cement in their mortars. When you add water to Portland cement, you start an irreversible chemical reaction. Countless tiny microscopic crystals start to grow. These crystals lock onto anything the cement paste touches. It's why the stones and sand in concrete are transformed into a solid artificial rock.

Think of the worst burr you’ve ever gotten on your pants when hiking. Think of brand new Velcro™ and how hard it is to pull the two pieces of fabric apart. This is how strong a bond cement can make to things if you do everything right.

Installing Exterior Tile

The first step is to make sure the concrete substrate is clean and dust-free. This is just common sense, but often it’s in short supply around job sites. Older concrete should be pressure washed to ensure it’s free of all debris. It’s important to realize the tile you use must be rated for your climate. Refer to the TCA handbook for guidance.

If you’re going to use a modern thinset, consider adding an additional amount of pure Portland cement to the mix. I’d blend three parts of the bagged thinset into one part of Portland cement. You want as many crystals to grow as possible.

The tile needs to be set in a solid bed of mortar. You can’t have any air spaces between the tile and the mortar. Liquid water passes through the grout in between tiles. This water can collect in any void spaces. When it freezes, it will act like a giant hydraulic ram and either lift the tile or crack it.

The secret cement paint is made by mixing clean water with Portland cement. Apply this to the concrete and immediately cover it with the thinset mortar. Never allow the cement paint to air dry. Brush it on and cover it within seconds with the bedding mortar the tile will rest on. For extra holding power, have a helper brush on a thin coat of cement paint on the underside of the tile before you set it in the mortar.

Once the grout has cured after 30 days, apply a silane-siloxane water repellant to minimize water getting down into the thinset. Do all of this and your exterior tile should never come up except when the building is demolished.

Column 1552