Water Ponding Against Foundation

water ponding next to house foundation

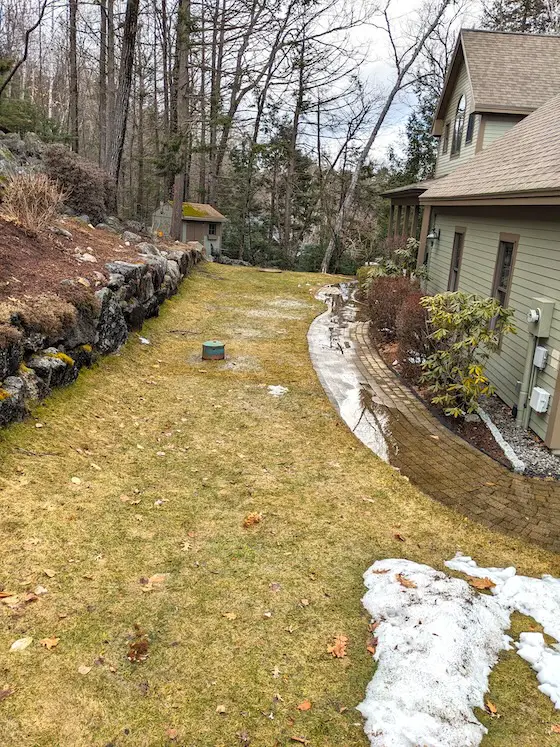
This ponding water in front of the house foundation can cause many problems. There’s an easy way to prevent it. Copyright 2024 Tim Carter

Water Ponding Against Foundation - It Doesn't Always Cause Wood Rot

Two days before writing this column I saved an Ohio homeowner $30,000.00. Fortunately, he stumbled across my website and found out that he could talk to me on the phone. He was suffering from water ponding against his foundation and was considering signing a contract with a waterproofing company for the above amount.

Once I studied the photographs he sent me, I said, “Are you sitting down? That ponding water is NOT causing the problem you’re having. If you would have signed that contract, you would have wasted all that money.”

There was stunned silence at the other end of the phone. I discovered moments later I was hearing the sound of relief! This man had been suffering angst about the huge cost for over a year! A wave of gratefulness was washing over him knowing I had helped bolster his retirement income.

It’s important to realize that ponding water is not a good thing. I’ll deal with that in a moment sharing how to prevent it or deal with it should you have the same problem. For now, let’s talk about the problem he had.

The man shared he had discovered, quite by accident, the bandboard that caps the ends of his floor joists was rotting. I could see from his photographs the bandboard was at least 16 inches above the soil around his foundation. The ponding water was not able to leak into his house and contact these boards.

I asked if he had any signs of water leaking into his basement. His answer was “No.” After asking a few other questions I said, “The wood rot you’re experiencing is caused by condensation that’s forming in the winter months on the cold wood. The moisture can’t easily evaporate because of the 6-inch-thick pieces of fiberglass insulation that are placed in contact with the wood.”

My advice was to remove all the fiberglass allowing the wood to dry. I then shared a few ways to repair any severe rot. Once the wood was dry and all repairs were complete, I instructed him to install 4 10inches of closed-cell foam insulation. This rigid material must be custom cut and fit tight between the floor joists, subfloor, and sill plate. Once in place, a spray can of expanding foam should be used to fill any small cracks between the wood and the foam. The closed-cell foam will prevent water vapor from contacting the band board in the future.

We then discussed why the water was ponding against his house. He admitted he caused part of the problem at the front by installing raised landscape beds. I told him this was not a good idea. Unfortunately, many landscapers don’t understand the minimum requirements set forth in the uniform building code.

The minimum grading standards in the code state that the ground must slope down and away from each foundation wall at least six inches in the first ten horizontal feet of distance away from the foundation wall. What’s more, the code states that a minimum of 6 inches of foundation must extend above the ground that touches the foundation.

Do the math. This means the top of a foundation wall should be a minimum of 12 inches higher than the ground that’s 10 feet away from the foundation. Houses built on hillsides have a difficult time meeting this requirement on the uphill side of the house.

More fall is better. Try for nine or twelve inches of fall instead of six. Remember, the building code is a set of MINIMUM standards of building. When you build your home to code, it’s like getting a 70 percent on a test. You just barely pass. You can always build better than the building code.

My suggestion to him was to install one of the linear french drains I’ve talked about for over thirty years. My college degree was in geology with a focus on hydrogeology. That’s the study of groundwater.

french drain pipe cross section

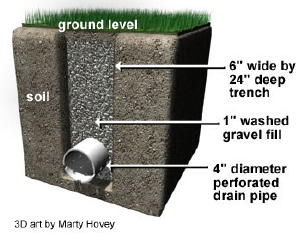
Cross-section of a Linear French Drain including the all-important perforated french drain pipe. Copyright 2017 Tim Carter ALL RIGHTS RESERVED - Do NOT COPY this graphic.

This man’s house is located in a region where the subsoil is a dense clay. Rainwater enters the top soil and then only goes down about four inches before it encounters this clay. The water then starts to move along sideways across the top of the clay.

A linear french drain is like a gutter in the ground. It’s a narrow 6-inch-wide trench that only needs to be 24 inches deep. In some cases, it can be less, and in other cases more. Most of the time 24 inches is plenty.

You install two inches of clean gravel the size of white grapes in the bottom of the trench. Then you install a perforated pipe on top of this gravel. The pipe acts like a high-speed highway transporting the water to the lowest part of the lot. Once the pipe is installed, you fill the trench to the top with the same grape-sized gravel. Never use gravel with sand in it. Do not line the trench with filter fabric. Do not install a filter sock on the pipe.

I have videos and in-depth columns on my www.AsktheBuilder.com website all about linear french drains, downspout drain lines, and getting foundation heights correct. I suggest you immerse yourself in all of them.

Column 1551

Bad DIY Videos on YouTube

new house framing 2x6s engineered lumber beam

Bad DIY Videos - This new home in central New Hampshire has 2x6 exterior walls. Minimize air leakage and your heating bills will be very reasonable. Copyright 2024 Tim Carter

Bad DIY Videos on YouTube Can Cost You Thousands of Dollars

You may think that YouTube is an oasis of helpful home improvement videos. After all, anyone with a smartphone can upload a video in seconds. Each week I scour YouTube for videos I feel may help you save time and money. With each passing day, I’m convinced that YouTube is a cesspool of bad advice. For every decent video that contains good information, I see twenty or thirty bad DIY videos that are created by fools.

Here's a screenshot from a YouTube Short. This worker is applying a treated 2x4 under the metal threshold of an exterior door.

youtube short treated lumber under door threshold

CLICK HERE to watch this 15-second video. Note there is no flashing under the door as it sits on a slab. Rain will come off the door, travel down the threshold, travel back across the 2x4 and very likely flow UNDER the door. This is wrong on so many levels.

1/2-Inch Threaded Rod vs Huge Tree

Here's a second example of what NOT TO DO. Look at these two screenshots from this YouTube Short:

man drilling through tree

Here's a man boring a hole between the two massive trunks of a tree.

1/2 inch threaded rod in tree

This is the finished installation. Do you really think those tiny washers and the small amount of metal on the rod threads can resist the tens of thousands of pounds of leverage the tree can exert?

You may not be old enough to remember the Kansas City Skywalk Collapse that killed 114 people. An inferior design just like what you see above caused the collapse.

Talk to any seasoned arborist and she/he will tell you the BEST way to prevent the tree from cracking is to cable it up about 15 or 20 feet in the air.

More Examples of Bad Videos

Allow me to share a few examples. There are a disturbing number of videos showing an easy way to create concrete walkways, sidewalks, and door stoops. The uninformed folks on the video purchase bags of dry concrete mix from a local hardware store, lumber yard, or big box store.

Do NOT Do Dry Mix Concrete

They pour this dry concrete mix into forms and drag a board across the forms to make the top surface smooth. Some folks do fancy imprints or designs in the dry powder. They then lightly mist the surface of the powder to start the chemical hydration reaction. This reaction causes microscopic crystals to form that act like Velcro™. These crystals, when allowed to completely coat each individual piece of sand and stone, are the glue that holds the aggregate in concrete.

After an hour or so, the uninformed video hosts start to flood the top surface with water. It begins to soak into the dry powder just below the surface. My guess is the video hosts never took a geology course. The heavy water grabs onto the ultra-fine cement powder and starts to transport it down into the mix.

Have you ever seen what happens in a rainstorm that falls on dry dusty soil? The heavy rainwater captures the ultra-fine silt and begins to move it down and through the soil. This is why creek water turns muddy just after the storm. Go to the creek hours after the storm and the water is magically clear.

Think about it. How do you know if you’ve added enough water to the concrete mix? How do you know if you added too much? How strong is the concrete just under the surface where most/all of the cement powder has been carried away by the water?

I’m currently working with the Portland Cement Association and the National Ready Mix Concrete Association and their scientists to prove that this method of pouring concrete is perhaps the worst way to do it. Mixing concrete the traditional way with the proper amount of water coats the sand and stone with the cement paste. This is the best way to pour concrete hands down.

2x6 vs Double 2x4 Exterior Walls

Perhaps the worst videos are those I see that tell you how to create thicker wood-framed walls when building a home or room addition. Many pooh-pooh 2x6 walls and urge you to build two separate 2x4 walls separated by an inch or so. These super-insulated walls are supposed to save you big money on your heating bills. Not one of the videos I’ve watched bothers to do the math for you.

If you follow the advice in these videos without doing the math, you’ll be in for a huge surprise. It’s all about payback. Whenever you spend money on something that claims will lower your utility bills, you must determine how many months/years it will take to claw back in fuel costs what you spent up front on the improvement. Only after you get back all this money do you then start to finally save money.

I decided to do the math on this double-wall method of construction. My imaginary two-story house was 50 feet wide and 26 feet deep. It had standard 8-foot ceilings on both floors.

My calculations showed you would need 228 extra 2x4 studs, 40 2x4x16s for the top and bottom plates for the extra walls, clear pine for the window and door extension jambs, and 50 rolls of 6-inch fiberglass. The total cost of these materials in 2024 here in New Hampshire, with no sales tax, was $6,125.00.

It’s safe to say the extra labor, overhead, and profit to install all of these things might be around $10,000.00. The total upcharge for the super-insulated exterior walls would be about $16,000.00.

Look online and you’ll discover the 2023 average heating cost in the USA for homeowners was the following: $931 for natural gas, $2,354 for heating oil, and $1,359 for electricity.

The heat loss through the windows, doors, attic, and floor will be the same. You’ll reduce your heat loss only through the walls. A twenty-percent savings projection would be generous. This means you might save $186 per year if you heat with natural gas, $420 if you heat with oil, and $271 if you heat with electricity. If you use air-conditioning, you’ll save maybe an extra $150 per year.

It’s your turn to do the rest of the math. Tell me how many years it would take you to break even. If you heat with natural gas, it would only take you 86 years to break even. The break-even calculation is much more complex because of interest and investment income you could have achieved had you not spent the money. The bottom line is BEWARE of what you see on YouTube.

Column 1550

Egotistical and Closed-Minded Contractors

copper preserves asphalt shingles

Egotistical and Closed-Minded Contractors - What would you say about a roofer who looked at this photo and denied that copper ions washing off the cupola roof extend the life of asphalt shingles? Would you trust or hire him? Just below is a close-up photo of the worn shingles on the right. CLICK HERE for a high-resolution copy of the above photo. Copyright 2024 Tim Carter

Beware Egotistical and Closed-Minded Contractors -Nothing But Bad Happens

Just three weeks ago, I shared a true story with you about my failed asphalt shingle roof. If you remember, it had a thirty-year warranty and after just twelve years, it began to experience catastrophic failure. Looking back now, I shared the wrong photograph with you. I showed you a picture of my daughter’s new roof with copper strips on it. I should have shown you the photo of the Tilton, NH, post office roof. That photo should be just above.

Just two days ago, I received an email from a man who runs a roofing company in a suburb of a large Midwestern city. He was quick to point out his credentials. “Tim, I run a roofing company in (fill in the blank) and have been in this industry for over twenty-eight years. I was reading through the local paper and noticed an interesting segment on ‘Copper Strips Help Keep Asphalt Shingles Young’.” This man said, “Please keep in mind this is from pure hands-on experience, and I’m not looking to start anything. I don’t agree to say the least.”

It’s important to realize I returned a lengthy reply to the roofer. I shared with him an online file folder filled with photos proving that copper ions react with asphalt molecules.

worn asphalt shingles

Look at how most of the colored granules are missing on the shingles. They are now unprotected from the photons in the ultraviolet light. How can one deny that copper ions extend the life of asphalt shingles after seeing this photo? This is but one of the photos the roofer was able to view. Even still, his ego prohibited him from accepting new facts. You may be like the roofer when it comes to other issues in your own life. Copyright 2024 Tim Carter ALL RIGHTS RESERVED

The copper washing over the shingles with each rainfall acted like the Fountain of Youth. I also shared that three intelligent physical chemists confirmed my theory. The roofer rejected all of this evidence. I go into detail about all of this and more in my Roofing Ripoff exposé book. I recommend you read it.

roofing ripoff book cover

This is the cover of my Roofing Ripoff book. CLICK THE IMAGE NOW TO ORDER IT.

The roofer painted himself into an ego corner that only Spiderman might escape. Think back on all your interactions in the past with contractors. How would you rate their egos? These individuals tend to reject new ideas and data contradicting all they have been exposed to. In fact, how would you rate yourself on this scale when presented with new facts that challenge your core beliefs?

Jordan Peterson has sage advice should you be in the same situation as the chest-pounding roofer. Jordan says, "Always assume the person you're talking with knows more about the topic than you do."

A Humble and Open-Minded Contractor

Five years ago, I was lucky enough to meet a rare insulation contractor with a generous amount of humility and reasoning power. I shared his story in a past column you may have missed. My interaction with this man was so remarkable and life-changing for him, that I devoted an entire column to it. You can dip yourself in the magic waters of this fantastic story by clicking here.

One day, while working at my daughter’s new home, the insulation contractor showed up with his crew. He was about the same age as the roofer that emailed me a few days ago. It turns out, the insulation contractor had been installing insulation wrong his entire career. That morning, I taught him the correct way to install it beneath radiant heating tubes.

At first, he didn’t say anything. Realize he was in shock. I’m sure you would be, too, after discovering something you thought was true for thirty years was false. Several hours later, the insulation contractor told my son-in-law he was eternally grateful for meeting me that day. I had enlightened him about his craft, and now his work would be perfect.

If I had to guess what you’re thinking at this point, it would be, “Tim, those are two fascinating stories, but what do they have to do with me getting my new concrete sidewalk installed or my house painted? I’m not quite sure what your message is.”

STOP Trusting Contractors

My message is you need to stop trusting contractors. Stop thinking they know the right way to do things. Often they don’t. Unfortunately, many contractors have egos bigger than the Empire State Building. These contractors will almost always reject your input when you challenge their myopic work experience.

Years ago I saw an older concrete mason adding gallons of water to ready-mixed concrete. He did this to make it easier to install. When I shared the added water dilutes the amount of cement paste in the mix, making the concrete weaker, he replied, “Well, I’ve been doing it this way for over thirty years.” His ignorance created untold suffering and unnecessary financial loss for hundreds of homeowners like you.

I know you don’t want to hear this, but the onus is all on you regarding getting things done right at your home. You must invest the time reading the installation instructions provided by the manufacturers of products used at your home. Think about it. When was the last time you read the label on a paint can? Do you, or your painter, do all the things it says to do?

Do You Really Know What Clean Means?

For example, do you know what clean means? Have you ever taken your filthy car to a self-car wash where you spray it with a high-pressure wand? You get the wand as close to the paint as possible, applying the soapy water. Moments later, you rinse it with clear water and pull out of the bay. If you just let your car air dry for a few moments, you’ll discover it’s not clean. There is still a thin, stubborn film of dirt bonding to the paint. Yet, thousands of painters feel pressure washing your home gets it clean.

I could go on and on and on. It’s your job to discover precisely how things should be installed the right way. You then treat each conversation with a bidding contractor like a job interview. You own the frame, not them. You tell them exactly what needs to be done. I know it’s not going to be easy. At the end of the day, it’s only about money. Perhaps you have an unlimited supply.

Column 1549

Low Water Flow in Luxury Shower

luxury shower with body sprays

There's water flowing from the large shower head. However, as soon as you turn on the three body sprays water dribbles out of every orifice in this luxury shower. The East Coast plumber was a dunce. Copyright 2024 Tim Carter

Low Water Flow in Luxury Shower - Pipe Size is Too Small

Each week, I extract quite a few homeowners like you from wretched remodeling or home-building quagmires. I do it with a phone or video call. Feel free to set up a phone call with me here. In almost all cases, the root causes of the dilemmas are poor plans, sketchy or non-existent specifications, and misplaced trust.

A week ago, a middle-aged woman was lamenting about her luxury master shower remodel. The walls were covered in breathtaking marble. Step into this private oasis, and you will see a large rain shower head, three body sprays, and a hand shower wand.

What the woman didn’t have was water flow. A somewhat decent flow would come out of the shower head on its own, but if you turned on any of the other accessories while water was flowing from the shower head, the water flow and pressure would drop. It was pathetic and unacceptable. Sadly, she didn’t discover this until after the entire shower was complete. When she entered the shower to enjoy it for the first time, she exited the shower wet and disgruntled.

rain shower head

Low Water Flow - Luxury shower heads, body sprays, and hand showers gulp water faster than thirsty horses. Plumbers who fail to do water-flow calculations might be paying a tile contractor big money to re-install the marble or tile. Copyright 2024 Tim Carter

Low Water Flow Excuses by the Contractor

As you might imagine, she complained to the remodeling contractor. The project superintendent and the plumber immediately said the water pressure in the house was too low. They were sure a booster pump would solve the problem.

Perform a Pressure Test When Bidding

Just like doctors order scans, x-rays, and other tests before performing surgery, the plumber should have performed a pressure test before he cut open the walls. It was his professional obligation to determine if the existing conditions would support the new fixtures that have an insatiable appetite for water. You can purchase an accurate pressure gauge that connects to a hose bib or laundry-tray faucet to see what the pressure is in your home. The luxury showers work best with a pressure of about 70 PSI. Any pressure below 50 PSI will produce less than vigorous water flow. Keep reading how to test to see if you get the desired result.

water pressure gauge

This gauge cost lest than $10 in 2024. Get one now. CLICK THE PHOTO

Low Water Flow Usually Means Pipes are Too Small

I’ve been a master plumber for over four decades and knew immediately what was causing the low-pressure and volume issues.

tim carter master plumber

Yes, it's me, Tim Carter! I'm taking a break from installing a garage floor drain in my daughter's home on Mt. Desert Island in Downeast Maine. Go HERE NOW if you need to hire me to solve your low water pressure and flow problems.

The woman was smart enough to take photos of the job's progress. Several photos showed the plumber installed 1/2-inch PEX water lines with flow-restricting hard 90-degree fittings. This PEX fed water to all the accessories.

It’s important to realize before the work began the water pressure and flow in the original tub and shower was fine. An independent inspector verified the incoming water pressure was 70 pounds per square inch (PSI). The woman shared that prior to the remodeling, she could take a wonderful shower with plenty of water. Her tub spigot gushed water if she wanted to soak in a bath. The tub and shower were piped with 1/2-inch copper tubing.

If you don’t want to be frustrated with your new fancy shower, please pay attention. All of the pain the woman has endured could have been avoided with a pencil, paper, and ten minutes of time. The plumber failed to do the simple calculations that would have shown him the correct pipe size to feed the bathroom and the size of the pipes that extended to each accessory. Low water pressure can be caused by many things.

You can view the Uniform Plumbing Code online. Within this large document, you’ll discover a table showing load values for all the common fixtures in your home. The load values are stated in water supply fixture units (WSFU). It just so happens that one WSFU equals one gallon of water a minute of flow.

Calculating Water Supply Fixture Units a Must

A normal residential bathroom like the woman had before the remodeler showed up has 2.7 WSFU of cold and 1.5 WSFU of hot water. Since you don’t use all the fixtures at the same time while in the bathroom, the blended total is 3.6 WSFU. A normal shower head has 1.4 WSFU. A seasoned plumber would almost always run a 3/4-inch diameter cold and hot water line to this bathroom. He’d branch off this larger pipe with a 1/2-inch pipe to each fixture. It’s quite possible the woman’s shower, once the calculations were run, might require 1-inch hot and cold water lines to be extended from the basement up to the second-floor bathroom.

All five of the new fixtures in the shower consume 11 gallons of water per minute if you turn them all on at the same time. That’s just about ten times the water flow the original shower head consumed! The gallon-per-minute (GPM) flow of each accessory can be found in seconds in the product brochure or online specification sheet.

It doesn’t end there. A diligent plumber will also calculate the pressure loss from the height of the bathroom above the water meter, the pressure loss through the water meter, a backflow preventer, and any other pressure regulators.

PEX Tubing Has a Smaller Inner Diameter

Here’s another factor the woman’s plumber probably didn’t take into consideration. He replaced the copper tubing with plastic PEX. One-half-inch PEX tubing has a slightly smaller inner diameter than one-half-inch copper. The plumber made the situation worse by using the smaller diameter PEX.

Get on a Bathing Suit

Here’s what you should do when you get ready to install a luxury water sports arena in your home. Include in your contract with the builder or remodeling contractor the plumber must produce all the pipe-sizing calculations. You can easily find webpages that allow you to determine pipe size once you know the total WSFU load in your job.

All that said, don’t hope it’s all going to work. Put it in your contract that you get to test the new shower before the marble or tile is installed. It would take just a few hours for the plumber or remodeling contractor to cover the walls with 6-mil plastic that’s taped to the shower drain. Be sure to put down a rubber mat or two because wet plastic is as slippery as wet ice. Give the new shower a test drive before the expensive tile and marble is installed. You should only hope for things you can’t control, like the weather and lottery numbers.

Column 1548

LVP Flooring Installation Tips

lvp flooring and red area rug

LVP Flooring Installation - This is a new luxury vinyl plank floor that looks like travertine stone. The area rug adds a delightful splash of color and helps to absorb sound. Don’t be afraid to introduce bold colors or patterns. Copyright 2024 Tim Carter

LVP Flooring Installation Tips & Area Rugs

By: Tim Carter

Several months ago, I shared a story about my first experience with luxury vinyl plank (LVP) flooring. I installed the LVP in a basement room that experienced water damage caused by a leaking water pipe. The product was affordable, it was easy to install, and after six months, it looks as good as the day it was put down.

My son saw the floor and was amazed. He purchased a new home two years ago. For some odd reason, the builder installed wall-to-wall carpeting in a sunroom at the rear of the house. An exterior door leading to the backyard is in this room. Keeping the carpeting clean had become a constant battle. LVP flooring installation was in his immediate future.

“Dad, let’s rip up the carpeting and install some of the LVP like you did at your home. What do you think would be a good look for this room?”

“Well, your mom and I were torn between the walnut plank we have and a large-format beige travertine product. I vote for the travertine one for your sunroom because you’ve got two walls of windows. The sunlight streaming into the room will enhance the lighter LVP. The large format and light color should make the room feel bigger too.”

Area Rugs Add Accents

My wife agreed 100 percent and offered up a suggestion that took this room to the next level. She said, “Once you guys install the new LVP, put down a colorful area rug that leaves about a two-foot border around the room. You’ll still see the LVP, but the area rug will add texture, absorb sound, and look spectacular.”

We jumped into the project on a Saturday morning. It took just a few minutes to cut the carpeting into strips about 3 feet wide. We rolled them up like sausage links, wrapped a strip of painter’s tape around them, and pitched them into the back of my truck. An hour after that we had the tackless strip up, all the carpet pad staples removed, and the floor was vacuumed clean. We were ready to install the LVP in the room that measured 12 feet by 12 feet.

Install Underlayment

The manufacturer recommended installing a thin foam underlayment. We did this. Unfortunately, the installation instructions for the LVP were sub-standard. The video skipped a few very important steps.

We had to use my vibrating multi-tool that works just like a barber’s hair clippers. This tool has a very thin blade that allowed me to undercut the door trim that extended down to the subfloor. We wanted a clean look where the LVP slid under the wood trim. I placed a piece of the LVP upside down next to the wood casing, and the thin blade cut just enough off so the LVP slid under the trim creating a professional look.

My LVP flooring had interlocking ends. In my case, you placed the next piece of flooring tight to the previously installed piece and then whacked it with a rubber mallet to snap the two pieces together.

Not All LVP Installs the Same

My son’s LVP was different. It’s important to realize his LVP panels measured 1 foot wide by 2 feet long. I discovered you had to lock in the long edge first. The trick was to keep the short edge about 1/16th inch away from the previously installed piece. Once you had the long edge tight and flat on the underlayment, you then used a special block to tap the short edge into place.

It’s mission-critical that you maintain a 1/4-inch space around the outer edge of the LVP. This is required for expansion and contraction. The best way to do this is to purchase innovative spacers that are shaped like the letter T.

The spacer has hard plastic squares 1/4-inch thick at the end of a longer thin strip. One of the squares disappears when you place the first piece of a row against the wall or a baseboard. The spacers prevent the LVP from moving when you start to tap the short edge with the hammer to get the second piece to interlock with the first piece. Without the spacers, you’ll end up tapping the entire row tight to the wall or baseboard.

We installed all the LVP in just four hours. The first and last rows consumed 80 percent of the time because of the required cuts. Each full piece that required no cutting was installed in a minute or less. You only need minimal skills and a few tools to install LVP.

The subfloor needs to be in the same plane so the LVP interlocks and stays locked when you walk on it. Low spots can be filled in with floor leveling compound.

Cutting LVP can be done with a sharp razor knife. Once you cut about 1/4 of the way through the material with repeated strokes, you flip it over and snap it the same way you break a piece of drywall.

Once the LVP was installed, we installed a discreet toe strip around the room to hide the required 1/4-inch gap. It was now time to unroll the stunning red and gold area rug. Once again, my wife’s advice was stellar. The area rug made all the difference. I never doubt her wisdom! Maybe that’s why we’re about to celebrate our 50th wedding anniversary in six months!

Column 1547

Asphalt Shingles Curling and Crumbling


copper strips on roof ridge

I applied these copper strips on my daughter’s new home five years ago. You must have a minimum of 10 inches of solid copper above every 25 linear feet of shingles below the copper strip. The copper weighs 3 ounces per square foot. You can purchase it here. It's VITAL you blind nail the copper strips. If you don't know how to do this, CLICK HERE and SET UP A PHONE CALL WITH ME. Invisible atoms of copper wash down onto the shingles each time it rains. This can add 40 or more years' worth of service life to the roof. The bright copper changes to a dull nut brown within a year. You can't even see it from the ground. Copyright 2024 Tim Carter

Here is the proof the copper works. Look at this photo I shot of the vacant Tilton, NH post office:

copper preserves asphalt shingles

What would you say about a roofer who looked at this photo and denied that copper ions washing off the cupola roof extend the life of asphalt shingles? Would you trust or hire him? Copyright 2024 Tim Carter

Asphalt Shingles Curling and Crumbling - How to Prevent

This is a true story about asphalt shingles curling. I live in central New Hampshire, and my house was built in 2001. I didn’t build it. The plan was for me to live in this home for just two years while I built our dream home on a tract of land we own just six miles west of here. All of this was put into motion in May of 2008 when the real estate bubble was as big as a bulbous hot-air balloon.

I moved from Cincinnati to New Hampshire in July of 2008 with my oldest daughter. My wife and youngest daughter remained in Cincinnati until August of 2010. By then, I was supposed to have the new home ready for occupancy. But then things went south in September of 2008. You, like me, took a huge financial hit as the real estate market collapsed. The new home never happened because we lost too much equity in the Cincinnati home.

30-Year IKO Shingles Fail in 12 Years

I share this with you because when I inspected my New Hampshire home, I just gave the roof a cursory look. The original homeowner had the shingle brochure, and it clearly showed the roof had a 30-year warranty. At that point, there were at least twenty-three years worth of life left in them. I didn’t care as I only planned to be here for 24 months.

Several years after the economic collapse, I knew this house was going to be my home for quite some time. One day, while sitting out on the deck, I noticed the shingles were starting to develop a slight curl. I also noticed more and more green ceramic granules on the ground and deck after each rain. My roof was on the glide path of going bad long before it should. Does this sound familiar? Do you see premature wear on your asphalt shingles?

defective shingles on Tim's house

These are the defective IKO shingles on my own home. Photo by: Tim Carter - Founder - AsktheBuilder.com

Photons in UV Light Blast Apart Asphalt

Soon the wear started to accelerate. I could see bare patches of asphalt mat where the protective granules no longer existed. The purpose of the granules is to stop the sun’s ultraviolet (UV) light from hitting the asphalt. Some UV light rays contain active photons. These are like invisible cruise missiles. When they strike an object, they blast apart the molecules. This is why fabrics become weak and tear easily if left in the sun. It’s why the color fades on many things left out in the sun.

UV light was destroying my shingles. Several years ago it got so bad I had to replace my roof. Before it happened, I noticed advertisements in our local weekly newspaper. A roofer was advertising his services to help homeowners file warranty claims for defective shingles. This caught my attention. The problem must be widespread here in New Hampshire. It was way worse. It was a nationwide problem.

I bit the bullet and started to replace my roof. There was no way I was going to install asphalt shingles again. I decided to use a virgin vinyl product that looked exactly like real slate. It’s a stunning product. Two companies in the USA produce this roofing material: DaVinci and Brava.

brava slate shingle and davinci roofscapes slate shingle

Here's an interesting photo. The shingle on the left is made by Brava. This company is the primary competitor to DaVinci Roofscapes. The Brava shingle is their Washington model. The dark streaks on the DaVinci shingle are caused by melting snow. Copyright 2024 Tim Carter

One particular blazing hot day I was working and became agitated. I was furious that I was suffering from the heat and financial loss when the shingles should not have been going bad. I did get a very small settlement from my shingle manufacturer, but it didn’t even cover three percent of the cost of installing the new roof.

DaVinci Roofscapes Color Fade - Why It Happens and How Bad Is It?

I decided to find out what was causing the problem. I wanted to know why my shingles, and those of hundreds of thousands of other homeowners, were failing. With the help of a deep-throat source within the asphalt shingle industry who was ethically challenged, I discovered the root cause. Too much air was being blown into the asphalt in the manufacturing process. The air caused the shingles to think they were twenty years old before they were even installed!

roofing ripoff cover

This is the cover of my Roofing Ripoff book. CLICK THE IMAGE NOW TO ORDER IT.

I continued my research and then wrote a small book about all that was happening. It’s called Roofing Ripoff - Why Your Asphalt Shingles are Falling Apart and What You Can Do About It. You can purchase a PDF version from me or get a paperback version on Amazon.com.

As I was finishing the book, by chance, one day, I discovered how to extend the life of asphalt shingles by 40 or more years. Exiting a restaurant, I looked across the street to the empty Tilton, NH, post office. I saw a strip of asphalt shingles under a cupola that had a copper roof. The shingles under the cupola looked brand new. The rest of the roof was the worst I’d ever seen. All the shingles were curled and missing most of their granules.

Tilton Post Office

Look at how the 8-foot-wide strip of asphalt shingles looks nearly perfect. The other shingles on either side have lost their granules and are curled as can be. The copper ions washing off the cupola roof STOP the oxidation of the asphalt. When asphalt oxidizes, the molecules cross-link and become brittle. CLICK THE PHOTO NOW TO ORDER AFFORDABLE COPPER STRIPS THAT WILL SAVE YOUR ROOF.

I knew the copper washing off the cupola roof was protecting the shingles, but didn’t know why. I reached out to the tens of thousands of subscribers on my free newsletter, trying to locate a physical chemist. Three subscribers got back to me. Once I shared what I saw, they all agreed on what was happening.

The shingles degrade because the UV rays break apart the asphalt molecules. The broken molecules grab oxygen from the air and begin to cross-link with one another. When there are too many cross-linked molecules, the asphalt becomes brittle. This is why the curl you see can’t relax and lay flat. The brittle asphalt can’t hold onto the ceramic granules.

The copper prevents cross-linking. The UV rays blast copper ions off the copper, and these wash onto the shingles. The copper bonds to the asphalt and prevents cross-linking. When this happens, your roof thinks the rain is the fountain of youth. Put copper strips on top of your roof to slow the aging process to a crawl. Be sure to blind-nail the strips.

Column 1546

DaVinci Roofscapes Color Fade

Davinci Roofscapes Color Fade - Looks More Like Slate

I installed Davinci Roofscapes Single-Width Slate shingles on my home during the summer of 2015. I did this just before I wrote my exposé book Roofing Ripoff.

I created this post at the bequest of one of my newsletter subscribers who is considering purchasing DaVinci Roofscapes for her home. She asked me about color fade, cracks, wear, etc. She also wanted to know if there were any other companies that made shingles like DaVinci.

Fortunately, I ordered extra shingles when I re-roofed my home in 2015. I've stored these shingles in the original packaging and under a cover. The extra shingles have never been exposed to sunlight. I was stunned at the color fade.

house being re-roofed with davinci roofscapes slate

The old wretched green asphalt shingles are on the left. The new DaVinci Roofscapes Slate is on the right. I had to do the roof in manageable sections since I was working alone. Copyright 2024 Tim Carter

Why I Switched to DaVinci Roofscapes

My 30-year warranty IKO asphalt shingle roof started to experience catastrophic failure after just 12 years.

defective IKO on Tim Carter's house

These are the defective IKO shingles on my own home. Copyright 2024 Tim Carter - Founder - AsktheBuilder.com

Never again would I use asphalt shingles. I decided to use a material that I knew would outlast me and perhaps not need replacement for 75 years. High-quality plastic meets this requirement. That's why I decided to use DaVinci Roofscapes single-width slate. You can see my roof in the following video:

Do DaVinci Roofscapes Slate Shingles Fade in Color?

My slate shingles have experienced significant color fade. Active photons in ultraviolet light cause the color change. The photons are tiny invisible missiles that blast apart the molecules of the pigments in the virgin vinyl shingles. Fabrics, house paint, plastics, fiberglass, wood, etc. all suffer from color changes caused by UV light. It's normal.

How Powerful are UV Photons?

The photons are so powerful they can blast atoms from metal. Zinc coatings on metal roofs are destroyed by UV photons. This is why you see rusty metal roofs on barns, warehouses, and other utility buildings that often use zinc-coated metal panels.

Zinc atoms are blasted from the roof surface much like dirt and mud files through the air when an artillery shell explodes after hitting the ground. The zinc atoms are lying dazed and confused on the roofing.  Rainfall washes the dislodged zinc atoms to the ground. After a decade or two of attack, enough zinc has washed off now exposing the steel to the elements.

Copper and lead flashings surrender atoms to the relentless photon attack. You often see a roof very clean beneath these metal flashings. Copper ions that wash across a roof act as a natural biocide to kill the ugly black roof algae you often see on roofs that have no copper on them.

Can Copper Extend the Life of Asphalt Shingles?

Copper can also extend the life of asphalt shingles. I was the first person in the world to make this discovery. I go into great detail about this in my Roofing Ripoff exposé book.

davinci roofscapes slate color fade

My finger is touching a Davinci Roofscapes slate shingle that has been hidden from the sun since it was manufactured in 2015. I did nothing to enhance or color-correct this photo. I shot the photo on February 7, 2024. The Davinci shingles to the right of my finger were installed in August of 2015. This roof surface gets intense sun after Noon each day. By 4 PM, this roof surface is in the shade created by huge oak trees just 40 feet to the west. Copyright 2024 Tim Carter

My Original Davinci Color Was Gray/Green

My original DaVinci shingles had a darker gray-green color. Now they've changed to a medium gray color like real slate. The roof now has a rich patina; each season it looks more and more like real slate.

davinci roofscapes slate shingle color fade

Here's the full DaVinci Roofscapes shingle surrounded by others from the same manufacturing batch. I slid the darker shingle up under the row above so it wouldn't slide to the ground. The shingles show no other signs of visible wear. They're not cracked, curled, or brittle. No color correction was done to this photo. The photo was taken on February 7, 2024. Copyright 2024 Tim Carter

Brava vs DaVinci

You may have been considering installing DaVinci Roofscapes on your home. That's why you're here on this page.

After reading this, you may be saying, "Jeesh, with the color fade I don't know. Maybe I'll consider a different synthetic slate." If that's you, your attention may be drawn to Brava. To the best of my knowledge, they're the only real competitor to DaVinci.

The issue is since the Brava product is also made from plastic with pigments like DaVinci, it will undoubtedly fade under the relentless attack of the photons in UV light.

I'll repeat myself once more: My DaVinci roof looks stunning after eight years. I can't see any signs of wear. I'd reinstall it again, no doubt about it. That said, if you're looking at DaVinci, you may want to look at Brava just as you'd compare any other products with a competitor.

brava slate shingle and davinci roofscapes slate shingle

Here's an interesting photo. The shingle on the left is made by Brava. This company is the primary competitor to DaVinci Roofscapes. The Brava shingle is their Washington model. Keep in mind the Brava shingles will experience color loss, as did my DaVinci shingles. The photons in the UV light are powerful. What we don't know is at what rate it will happen. The dark streaks on the DaVinci shingle were caused by light snow that had gotten on the shingle moments before. The snow rapidly melted in the bright New Hampshire sunshine. Copyright 2024 Tim Carter

Tiny Houses are Big Bad Ideas

tiny house on a trailer

This is a tiny house built on a trailer frame. It’s nearly identical to any common travel camper. Think about that. Copyright 2024 Tim Carter

Why Tiny Houses are Big Bad Ideas

By: Tim Carter

I live in central New Hampshire (NH) on the west shore of Lake Winnisquam. This is the third-largest lake in NH. I kayak on the crystal-clear blue water as often as possible. The state of NH owns the 7.2 square miles of water but citizens own any islands that dot the lake.

Due east of my boat dock is a very small island that is less than 2,000 square feet in size. It’s about 50 feet in diameter. On this island is a tiny house. Several years ago I was kayaking on a glorious summer day and saw the owners outside eating lunch sitting at a picnic table near their dock.

“Hello! I’m Tim Carter. I live just across the lake from you. In the winter I often see a glow coming from your window that faces my house. Do you live here year-round?” The older couple invited me to come sit with them. They were like teenage sweethearts and had a strong glow about them. We chatted about how they do live on the island year-round. I was astonished, to say the least.

Their tiny house measured only 12 feet by 20 feet as best as I could estimate. That’s 240 square feet. It was smaller than a two-story shed I had built the previous year up above my leach field. I built my shed so it could be converted into a tiny house. I sell the Deluxe Two-Story Shed plans to folks on a regular basis. CLICK HERE to order my EXACT SHED plans.

SamplePlan Shed Plans Tim's

This is but one of the MANY PAGES of my Tiny House plans. Look at the winder steps going to the second floor! Copyright 2024 Tim Carter

After sharing a drink with them, I departed and kayaked around the other two larger islands. I couldn’t get my mind off how two people could live 365 days year in a nothing more than a very small cabin. As I paddled back to my dock, I decided to research how big the average log cabin was that settlers constructed in the 1700s.

It turns out the average size of a log cabin built in the Northeast was 16 feet long by 14 feet wide. That’s 224 square feet of living area.

Casting a Spell on You

Are you entranced with the concept of downsizing and moving into a tiny house? Think of how small your heating and cooling bills would be. Imagine how fast you could clean your entire house! Ponder how long it might be before you’d strangle your significant other unless you were constantly bumping beaks like the lovebirds that live across the lake from me.

There are all sorts of advantages to living in a tiny house. We already know it’s possible as our ancestors did it. There are also many disadvantages of compacting your lifestyle into a space not much bigger than a motel room.

The best way, in my opinion, to test your ability to survive in a tiny house is to rent a travel camper for a week. Take it to a local campground and hook it up to the on-site utilities allowing you all the comforts of electricity, running water, and sewer. Keep in mind not all campgrounds have a sewer connection. Without this important convenience, you’ll be stunned by how fast you’ll fill up your onboard sewage holding tank.

The Tiny House Experiment

My guess is you’ll discover the first day is somewhat fun and interesting. You’ll marvel at how the camper designers have made use of every cubic inch of storage space. This is very important to do in tiny houses as well.

If you conduct this test solo, you’ll have a much better chance of survival. If you have a partner, I predict by the late afternoon of the second day thoughts will cross your mind about what excuse you can make to take a hike or make your sixth trip of the day to the campground general store.

Google Search: How to Poison Someone

By midweek a large tear will develop in the social fabric of your relationship. The smallest character flaw will balloon into grounds for a divorce. Your mood will darken like the black clouds that barrel towards you just before a violent severe storm strikes.

My guess is that on the fifth day, you’ll be calling the camper rental office to see if you can get a discount for returning the camper two days early. Your nerves will be as raw as a fresh trout you snagged from the campground lake.

What are you going to do with all your stuff? Do you park your car and pickup truck outside because your garage looks like a hoarder’s Paradise? When you make the decision to live in a tiny house, all your stuff becomes flotsam and jetsam as you hand the keys of your large traditional home to the new owner. Think long and hard about how you can live without all your books, memorabilia, countless clothes, shoes, Christmas decorations, etc.

The Dream Crusher

You now know why my moniker around the Carter home is the Dream Crusher. I didn’t come up with the nickname, my kids did. Every time they’d float some idea at the dinner table, I’d start to ask questions. It was the realist in me.

I’m also old enough to remember the craze about geodesic dome houses, A-frames, and several other housing fads. If you notice, you don’t see many of those around where you live. There’s a reason. I believe the tiny house fad has also floundered on the reef of silly ideas. If I’ve crushed your dream of living in one, trust me, you’ll thank me at some point.

A-frame house

Here’s an eye-catching A-frame house on Mt. Desert Island, Maine. (C) Copyright 2024 Tim Carter

Column 1545

Chimney Might Be Roof Leak Location

stone chimney with leak and efflorescence salts

This chimney is not watertight. Look at the huge efflorescence stain. Water is entering the chimney higher up and then leaking out just above the white salt deposits. Copyright 2024 Tim Carter

Your Chimney Might Be Your Roof Leak Location

Roof leaks plague countless homeowners each year. Talk to experienced roofers and they’ll be the first to tell you the vast majority of leaks happen at flashings. A roof flashing is a transitional material. It connects your roof to something that’s not your roof.

Plumbing vent pipes, dormers, turbine vents, chimneys, pot vents, powered attic ventilation fans, solar-array-panel brackets, etc. are all examples of things that are not a roof but found on roofs. Experienced roofers know how to flash around all these things. What’s more, they know the best flashing material to use.

Flashings should be made from materials that will last longer than the actual roofing material. Caulk is not in this list. Tin-coated steel used to be the flashing material of choice by roofers for well over 100 years. But restrictive EPA laws have kicked that wonderful material to the curb because it contained lead. Sheet lead and copper are excellent flashing materials and I find it quite curious that sheet lead is readily available while tin is not. Go figure!

Brick Chimney Mortar Joints

Two weeks ago I had a business conversation with a peer. She owns two homes, one on Cape Cod and the other one in Connecticut (CT). At the end of the conversation, she told me her CT home has a roof leak. “Tim, I have this pesky leak seven or eight months out of the year. The ceiling area near my brick chimney gets wet. I never see moisture in the deep winter months. A roofer looked at the chimney and found two small holes in the counter flashing where nails had rusted away. Perhaps that’s the source of the leak.”

Her simple statement of the facts gives all sorts of clues as to what the source of the leak might be. Did you pick up on any of them? My leak radar was immediately set off by the fact it’s a brick chimney.

This smart woman is also a semi-professional photographer. She used a telephoto lens to take close-up photos of the chimney from the ground. I could see she had a very nice metal chimney surround that appeared to be in very good condition. For me, this meant the leak was probably not caused by the chimney crown.

Think of your chimney as a tiny house that sits up on your roof. It needs a roof of its own. Chimney crowns are roofs for a chimney and the vast majority of them are installed incorrectly. The Brick Industry Association (BIA) developed years ago the most authoritative set of instructions that show exactly how to make a chimney crown waterproof. Go here to see the full index of all the BIA Technical Notes. Scroll down to locate any that deal with chimney crowns.

I shared with this woman my thoughts about her roof leak based on the evidence she provided. Keep in mind this is a 200-mile-away diagnosis since I wasn’t about to drive to her home and get up on her steep roof in the middle of winter to do an on-site inspection. A drone with a high-resolution camera could do this inspection and I can assure you if I was still in the home repair business I’d own one.

I told my friend that my money was on her chimney bricks and mortar. Based on the three-little-pigs fable, you may think that brick is the ultimate building material. While a brick home can resist the powerful exhalation of a wolf, it’s no match for wind-driven rain served up by a wicked Nor’easter.

Water Passes Through Brick Mortar

You can view videos on YouTube showing water pouring down the backside of brick veneer. A house just one mile from my own house has a stunning stone chimney. It’s leaking water. Each time I drive past it I see the growing snow-white patch of efflorescence salts. These salts show exactly where water that is entering the stone above is seeping back out to the surface. The water evaporates and leaves behind the salt it dissolved from the mortar used to cement the granite stones together.

Think of wind-driven rain like a hammer and nail. Each time a raindrop slams into the mortar between the brick and stone, it drives the water from the previous raindrop deeper into the chimney. Add to this the force of the wind blowing against the chimney face and you can have pints of water entering a chimney during an extended storm.

The vertical joints in between two bricks are called head joints. This is the primary place water enters brick in modern brick-veneer construction.

The best way to prevent water from entering a chimney from wind-driven rain is to make sure the mortar is in great shape. You may have to tuck-point the chimney first. I suggest you read these two past columns:

Matching Mortar

Secrets to Match Mortar Color and Texture

on my www.AsktheBuilder.com website about tuck-pointing. I share how to ensure the new mortar you use matches the existing mortar.

You should also inspect the chimney crown. Be sure it is in great shape and is constructed per the BIA guidelines. You may discover it makes more sense to purchase a high-quality chimney crown surround.

Finally, apply oil-based silane/siloxane water repellent to your chimney. Read the label instructions. Wait too long in between coats and the first coat may prevent the second coat from seeping into the mortar.

The sealing process works best with two people. One person applies the sealer using a hand-pump garden sprayer. A second person operates a backpack leaf blower aimed at the chimney. The air from the blower drives the sealer deep into the brick and mortar.

Column 1544

How Much Electricity Does an EV Consume When Charging

How Much Electricity Does an EV Consume When Charging?

The following was published in the January 21, 2024 issue of the AsktheBuilder.com newsletter. You can get your free subscription by clicking here.

Future Electric Brown & Blackouts at Your Home or Business

I'll bet you think of electricity like you do oxygen. It's just there. Your lungs go back and forth and you live because there's air all around you.

It's the same with electricity. This magic invisible power source is alive inside the walls and ceilings in your home or business.

Your refrigerator works without you doing a thing. Your electric oven bakes delicious cakes and blueberry, pumpkin, and pecan pies without you hoping it's going to heat up. It just does each and every time.

How would you feel if your utility company took away your electricity?

You know, they make it scarce.

What happens if it is 0 F or 105 F outdoors when they decide they need to give your electricity to someone else?

You couldn't go online to complain as your Wifi would be dead. It needs juice to work in addition to being connected to the cable or phone company.

You could use your cellphone, but do you think the utility company is going to magically restore your power because you complain?

BWAHAHAHAHAHAHAHAHAHAHA

Without electricity, your life GRINDS TO A HALT.

Events swirling around you right now that could make brown and blackouts a real possibility in your life. Not just one, but maybe several a day or many each week.

I want to thank John, Doug, and a handful of other fellow subscribers who have supplied information about this topic.

How Much Juice Does Your Home Consume?

Do you know how much electricity you consume each day? I'm willing to bet you don't.

This past Friday, January 19, 2024, my house gobbled up 54.13 kWh (kilowatt hours) in twenty-four hours. A kWh is a unit of energy. Utility companies sell energy. To determine how much energy you use measured in kWh, multiply kilowatts by hours.

Here is a bar chart of the usage per hour:

bar chart of tim carter electric usage in one day

You can readily see that between 3 and 4 PM we used the most electricity. In those 60 minutes, we were sucking about 3.2 kW per hour from the grid.

A considerable portion of that is being used by the many grow lights my dear sweet wife Kathy has on to keep her hundreds of orchids blooming and growing.

She also has four humidifiers running. What's interesting about the chart is you can clearly see when the grow-light timers turn on and off. Those lights are responsible for half our usage each month!

Happy wife happy life!!

Other than that, the refrigerator and freezer are chugging away and two desktop computers are sending massive amounts of blue light into our eyes. I do have a small oil-filled radiator up in my man cave to keep that tiny room warm.

My guess is you consume about 1.5 kW per hour(kWh) at your home on average.

Keep in mind that kW shouldn't be confused with kW hours (kWh). A kilowatt is 1,000 watts. If you turn on ten 100-watt light bulbs, you're consuming 1,000 watts at that instant of time. Keep those ten bulbs burning for an hour, and you'll get charged for 1 kilowatt hour (kWh) of power usage by your utility company.

How Much Electricity Does an EV Consume When Connected to a Fast Charger?

Do you own a Tesla, Ford Lightning pickup truck, or similar electric vehicle (EV)? Just a few days ago I saw my first EV Rivian pickup truck.

Have you seen any news reports about how much electricity it takes to recharge the massive batteries that are under the seats in these vehicles?

I know I haven't.

To be honest, I never gave it much thought but my gut told me massive amounts of electricity were required to recharge those huge batteries in a short amount of time.

What I'm about to tell you will stun you. I know because it made my eyes open as big as silver dollars. A subscriber sent me a short video of a man charging his EV at a typical charging station.

Look at this screenshot taken from the video. The video was created while an EV charging station was injecting electricity into the battery of an EV like a 2.5-inch firehose spews water on a fire:

ev charging station screen showing kW demand

Assume to get a full charge this car will be there for about an hour. If so, it's going to suck 137 kWh from the grid. That same amount of power could have kept the lights on and refrigerators running for one hour in 91 houses.

That SINGLE charging station, not unlike the ones you see in your city or town, is capable of delivering 350 kW PER HOUR.

In this situation, the charging station was dispensing electricity into the man's EV - a vast amount of electricity. If the 137 kW charging rate stays constant and the car stays connected for one hour, 137 kWh worth of electricity will be dumped into the battery.

This is just ONE charging station for ONE EV. There were six stations, I believe, at this charging location.

Has that 137 kW number bounced around in your tiny gray cells like a shiny silver ball in a pinball machine?

The electricity being SUCKED from the grid to charge that ONE EV would power 91 houses like mine if the grow lights weren't on.

If there were six EVs at that location all charging up at the same time, those SIX CARS would take out of the grid the electricity that was destined to go to 546 houses.

One of those houses could be yours.

Do you see where this is headed?

I have five Tesla charging stations in my town of Meredith, NH. Here's the label from one of them:

tesla charging station label

I was taught volts x amps = watts. If that's the case, this charger is capable of delivering 175,000 watts. If it does that for one hour, the amount of energy put into the vehicle would be 175 kWh. Copyright 2024 Tim Carter

A Texas Congressman does. WATCH THIS 60-second video where he exposes how you are being bamboozled.

Watch this video to see Andrew Boyle, an expert, share stories about how planned projects would require more power than an entire city:

What happens if you try to charge 100 EVs at once in your city? How about 1,000 EVs?

How many cars and pickup trucks are in your city or town?

Do you live in a big city? Have you seen how many cars fly down the interstate highway in an hour?

How many millions of cars are in Los Angeles?

How much POWER would it take to charge just 10 percent of them at once?

If you're already awake, fantastic. If not, please

WAKE UP NOW!

How Many New Power Plants are Being Built Across the Fruited Plain?

You don't have to be an Einstein to realize that if this EV unicorn-and-rainbows panacea the government is ramming down your throat comes to fruition there WILL BE brown and blackouts.

Numbers don't lie.

Each small city or town would have to have its OWN power plant! Do the math yourself. Just imagine that 10,000 EVs need to be recharged each day in your city or town.

I'll do the math for you. Without new power plants being built to handle this vast demand, 910,000 houses would NOT GET electricity.

That smart meter out on your exterior wall would remotely SHUT OFF your power.

Too bad so sad.

I can hear some of you now, "Tim, you're a fool. Solar and wind will save the day."

Please don't patronize me. I'm not an idiot.

Solar panels don't work here in New Hampshire 16 hours out of 24 in December. It's pitch black outside!

The wretched windmills in Rumney, NH that ruin the view often are not spinning.

Power plants MUST OPERATE 24/7/365.

Have you had enough?

STOP TRUSTING the government.

STOP TRUSTING your NEWS sources. They are LYING TO YOU about EVs, climate change, Russian collusion, etc.

They have not been telling you the whole truth about EVs.

A half-truth is a whole lie.

START questioning everything.

START USING YOUR GOD-GIVEN GRAY CELLS.


The following was sent to me after this page was published. Judi, one of my subscribers, packed lots of other information about EVs into a very small space:

"Thank you for this article on EV's and the power grid. The current Administration's shortsighted mandate on EV's (among other things!)  is ridiculous and out of touch with the cross-section of America!

We simply don't have the infrastructure in place to support it, not only from the perspective of the power grid but from the very fact that most Americans cannot afford an EV and don't have the luxury of having an in-home charger. Think of the number of apartments, condos, and townhomes that lack personal parking spaces and the ability to just plug in their vehicles!

And think, too, of the cost of installing these charging stations and who will pay for them! Does anyone pay for my gasoline or provide me with a personal gas station? My HOA has looked into this issue and has found that older homes often don't even have the electrical capacity to support these chargers.

And let's not forget the time component needed to charge these vehicles! We live in a fast-paced highly mobile society where time is money! How many times have I looked at my fuel gauge and realized my gas was low? But with a myriad of gas stations in my area, it was no problem. I could stop and be on my way in 10 minutes! Not so with an EV charge!

There's also a ton of other EV considerations that nobody wants to talk about: the weight of the vehicles, which drags down the distance one can go in a charge and makes it difficult to locate a repair shop that can lift it.

Here's a short list of other issues with EVs:

  • The weight of the battery wears down tires (all tires need to be replaced in only 30-40k miles), an issue for Goodyear is currently trying to develop an EV-specific tire
  • There is a lack of space, especially in urban areas, for the necessary number of chargers
  • The cost of replacing an EV battery (several thousand dollars) after a rather limited number of miles
  • The fact that mechanics aren't needed for these cars, results in job loss across the country
  • The fact that our auto industry is built on service, which is where the dealership makes its money;
  • The fact that getting technicians skilled in EV vehicle maintenance will lag behind the mandated demand

I could go on and on but you know the issues...

We can only hope that many souls who are asleep wake up soon!"