Geologic Hazards When Building

topographic map west paris ky quad karst topography

This topographic map should get your attention. The red arrows point to sinkholes that can cause serious structural damage to the average home. Copyright 2024 Tim Carter

Avoid Geologic Hazards When Building or Buying Land

You probably don’t give much thought to the ground under or around your home. What follows are a few true stories that may change your perspective. If you’re in the market to purchase land to build your dream home or are looking to move to purchase an existing home, what I’m about to share could prevent financial ruin. My college degree is in geology and the knowledge I attained allows me to look at building lots through a different lens than you might use.

Less than a week ago a woman hired me to do a one-hour video call. She recently purchased raw land in the heart of the Bluegrass region of Kentucky just east of Lexington. I happen to know this part of Kentucky is one of the top places in the USA for Karst topography. This translates to sinkholes that can cause serious structural damage to homes.

Before the call, I asked for the address. I wanted to locate her land on a US Geological Survey topographic map. You can get high-resolution PDF copies of these for free online for any land in the USA. Sure enough within a half-mile radius of her land there were no less than ten sinkholes. You can clearly see these on a topographic map as circles or ovals that have small lines pointing to the center of the circle or oval.

Does this mean her new home will sink into the ground? Not necessarily. That said, it might be a good idea to chat up the local building inspector or folks at the Kentucky Geological Society. I’d also inspect the land to see if there was evidence that a sinkhole had been filled in to disguise it.

Building on Buried Trees

Topographic maps can shed light on many things. My friend Ed purchased a lot in a new subdivision in Cincinnati, Ohio about twenty years ago. The developer had to do lots of cut and fill. Ed’s lot was land that was fill dirt. The dishonest excavator dumped dirt on fallen trees to bury them. Within a year after Ed’s house was built, it started to crack in half. The basement floor looked like a dough bubble on a pizza. The entire foundation was dropping but the floor was not falling at the same rate. Ed now knows to never again build on fill.

Flash Flood in Amberley Village, Ohio

About thirty years ago neighbors of mine were almost killed in a flash flood. They purchased a home in a nice subdivision nestled on rolling land. Their home was right on top of an old dry creek. Under their driveway was a hidden 5-foot-diameter storm sewer that was installed when the farmland was converted to residential property. My neighbors had no idea this pipe was in the ground.

One day a huge storm caused storm water to completely fill the pipe and then run across the land to a depth of 8 feet in my friend’s driveway. It completely flooded their basement in a matter of minutes. Had they studied a topographic map before buying this home, they could have seen from the contour lines how much land above them collected water and then funneled it to their lot.

New Madrid Earthquake 1811-12

Active geologic faults can be found all over the western USA. The center of the USA is not immune from tremendous earthquakes. In 1811-12 the New Madrid earthquake caused massive damage where western Tennessee touches southeast Missouri and northeast Arkansas. If you live near here or intend to build there, talk to your insurance agent about an earthquake rider on your homeowner’s policy.

usgs earthquake hazard map for usa

This is the 2024 US Geological Survey earthquake hazard map. CLICK it for a bigger version and more information. You can see the risk of huge earthquakes is high in the western Tennessee area. Public Domain Usage - Created with US taxpayer $$$

Landslide Causes a Propane Explosion

Landslides can also cause nightmares and death. Just three years ago two friends of mine died when a propane explosion destroyed their home. CLICK HERE to read one story about the tragic event.

propane explosion jim and audrey landford

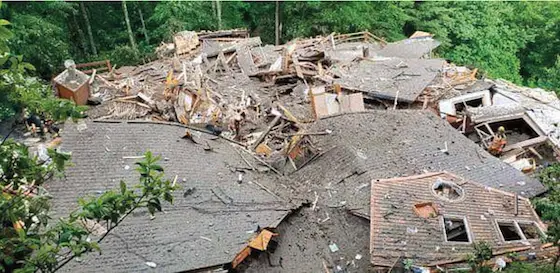
A propane explosion leveled this home in less than five seconds killing Jim and Audrey Landford. They were friends of mine. Copyright Boone NC Police Department Fair Use Doctrine Public Property

Heavy rain caused a landslide that dislodged their propane tank resulting in a gas leak in their home. This was preventable to a large degree but the average person would never think about the relationship of a propane tank to a hillside.

Cincinnati Landslides

Humble Cincinnati, Ohio is the epicenter of some of the highest landslide damage in the USA. The media darling for landslides is California where each winter we seem to see houses falling into the ocean during fierce winter storms. But in Cincinnati, the bedrock geology is such that thousands of homes are built on unstable clay soil that can be found on the hillsides all around the Tristate region. Watch this documentary film about Cincinnati Landslides.

Dry Land - No Water

How disappointed would you be if you purchased raw land only to discover there’s no water? Yes, this happened to friends of mine in Washington state. They had to stop drilling after boing a hole 700 feet. This might have been avoided had they talked to well drillers before buying the land. The drillers might have told them land to avoid and the places where water is discovered at a shallow depth.

You may place your trust in government officials in situations like this. That would be a grievous error on your part. There are neighborhoods in many cities in the USA that get flooded in periods of heavy rain. These old creek beds should have never been allowed to be developed by not-so-wise government officials.

You can make the best decision when buying land by hiring a professional geotechnical engineer or a professional geologist. These folks can look at raw or developed land and produce a report indicating any potential issues that could affect your major investment. I wish you the best of luck!

Column 1543

How to Stay Warm in Cold Weather

electric radiant floor mat

The gray fabric mat contains electric heating cables. Finished flooring is installed on top of the mat after it’s covered with a thin coat of sand and cement. It’s but one way to keep your feet warm. Copyright 2024 Tim Carter

How to Stay Warm in Bitter Cold Weather - It's So Easy

You may be one of the tens of millions of folks like me that live where it gets cold in the winter. If you’re blessed to live in the south or southwest, I do know there can be some cold waves that force you to put on a sweater. With inflation raging out of control, it’s so very important to spend the least amount of money to be comfortable. I can help you do just that.

To be honest, I could write a book about this topic. I know I’ll get emails about leaving this or that idea out of this column. Right now I’m going to serve up to you slices of juicy low-hanging fruit. Let’s get started.

As crazy as this sounds, the easiest way to save money and stay toasty warm inside your home is to wear more clothes and turn down your thermostat. I do this each winter. I’ll wear flannel-lined jeans and sometimes insulated coveralls. It’s not uncommon to find me donning a hoodie sweatshirt. I often put the hood up to keep my head and neck warm. I wear wool socks. You may think this is nuts, but when I’m dressed like this indoors I’m toasty warm with my thermostat set between 62 and 65 F.

Think about how you can compress your lifestyle in the winter. Can you close off rooms and just direct your heating to a few rooms instead of your entire house? If you were lucky enough to have a zoned heating system installed, it’s easy to send heat to the rooms you live and sleep in as well as the rooms that have plumbing water lines that must remain above 35 F to prevent them from bursting.

Several years ago I converted some attic space above my garage to a man cave. I decided to heat it using a fiberglass mat that has electric cables built into it. The mat was custom designed at no extra cost to match the size of the room and the heat loss of my space. It’s vital you do this. If my man cave was in southern Tennessee instead of central New Hampshire, far fewer cables would have been installed in the mat.

Another simple way to take the chill off a room is to use an oil-filled portable electric radiator. I’ve tested several that cost less than $100 and they do a remarkable job of heating an unheated space. Many of these are programmable so you can turn them down when you’re not in the space. Then, have them turn on magically 90 minutes before you come into the room so it’s up to temperature.

The largest source of heat loss in the average home is air infiltration. Check all your doors and windows to make sure they’re locked. Locking them pulls the sash tight against the weatherstripping.

If air is leaking under a door, consider using a felt weatherstrip that attaches to the bottom of the door with small nails, screws, or adhesive tape. You have the skill to install this in minutes. Stopping cold drafts can significantly lower your heating costs and you won’t feel like you’re in a wind tunnel.

Keep in mind that the placement of insulation is vital to ensure all the heat produced by electric coils or radiant heat tubing is directed into the living space. Years ago while I was helping build my daughter’s new home I educated an insulation crew leader. He was the rare person that listened to me and hours later admitted he had been installing insulation wrong in hundreds of houses for over twenty years.

When he arrived at my daughter’s house to install the fiberglass batts under the radiant floor tubing he asked me, “How much air space do you want between my insulation and the tubes? We normally do 1 to 2 inches.” I responded, “I don’t want any air space. Put the insulation in direct contact with the radiant heat tubes and do whatever is necessary to ensure it never falls down.”

This middle-aged man just looked at me and said, “Okay, but we’ve never done it that way before.” I politely said, “Are you the same crew that put the insulation in the walls here? I see that there’s no air space between the warm drywall and your insulation. If an air space is so important, then why did you eliminate it in all the walls?” He just blinked at me and walked away. Hours later he came up to my son-in-law and said, “Your father-in-law taught me something. I’ve been installing insulation under radiant tubes wrong my entire career.”

The reason you want the insulation to be in contact with the tubing or the OSB subflooring under an electric mat is simple. You want to drive all the heat up into the living space. If you have an air gap, some of the heat goes down not up.

If you’re planning on building a room addition or a new home soon, you have a unique opportunity to design a zoned heating system that will allow you to keep your heating bills to a minimum. If you can’t find a pro to talk to about this, I’m happy to consult with you.

Imagine using a simple water heater to create all the heat you need for a simple room addition. I can’t begin to tell you how comfortable a floor is that’s heated by hot water. It’s dreamy heat. If you lay down on the floor, you don’t want to get up.

Column 1542

Cork Flooring is Marvelous

jesup memorial library bar harbor maine

This is the Jesup Memorial Library in Bar Harbor. You can go there next week to see and walk on its cork flooring. The flooring has not been maintained as well as it should have been, but it's still in service. It was installed in 1911. Need I say more? Copyright 2024 Tim Carter

Cork Flooring Should Be on Your Radar - It's Magical

What I’m about to share with you might amaze you. I’ve heard it said before that one doesn’t know what they don’t know. To me, that infers you may be unaware of something that previously had been hidden from you. It’s happened to me numerous times during my life.

One odd example happened to me about twenty years ago. For decades I spent all my time in the USA. A business trip had me travel to Toronto, Canada. It’s a huge city and while being driven to a television station, I looked at the traffic signals at a busy intersection. Much to my surprise there was no separate green light turn arrow. After several seconds, the green light began to flash. Instead of having an extra light, the clever Canadians told their drivers to turn against traffic when the light started to flash!

I’m about to do the same with you right now. I’m willing to bet you two cheese coneys that you’ve never seen cork flooring and what’s more had the pleasure of walking on some. Tell the truth. Did you even know cork flooring existed?

When I saw cork flooring for the first time, it put my head on a swivel. It was the most unique flooring I had ever seen. My father-in-law took me one day to visit Carl, his investing partner. Carl had built a stunning ranch home on a bluff that overlooked the great north bend of the Ohio River.

The cork flooring was in his kitchen of all rooms. It was plank flooring about 8 inches wide. The color was a rich medium brown and the pattern or grain was mesmerizing. I had never seen such material before in my twenty-three years on the planet.

“What in the world is the floor made from?” I asked. “Why, it’s cork.” Carl responded. “Aren’t you worried about the water from the kitchen ruining it?” Carl just chuckled. He knew that cork was waterproof. He also knew that under typical residential use installing cork was like putting sheets of iron on your floor. It’s nearly indestructible.

As time passed, I discovered cork was the flooring material used at the main public library in Cincinnati, Ohio. Its closed-cell structure contains about 100 million air cells in each cubic inch of material. This allows it to absorb shock as well as sound. It’s the perfect flooring material for so many rooms in a home, church, busy office space, or other place where peace, quiet, and comfort are commodities in high demand.

I decided to try cork flooring in my own home. It was the perfect material to use in my basement recreation area and office space. It glued down with ease over the smooth concrete floor. I wanted a waterproof material in case the basement flooded. I also wanted flooring that hold up to rambunctious teenagers and office chairs. It excelled at both challenges.

Visit a home center big-box store and you’ll see them pushing luxury vinyl plank (LVP) flooring. I just had my first hands-on experience with that this past summer. Cork, in my opinion, is a superior material. It’s not as fussy as LVP with respect to humps and bumps in the floor. Cork is quieter and doesn’t expand or contract to the extent of LVP.

If you’re all about the environment, you’ll love cork. Cork is a renewable resource. The material is generated by harvesting the bark from cork trees. The bark grows back after ten years or so and the average cork tree lives for 150 years.

My most recent experience with cork was in Bar Harbor, Maine of all places. Several years ago I was in town to meet my sister. I had some time to kill before meeting her and decided to visit the historic Jesup Memorial Library.

This stunning building was built in the early 1900s. As soon as I walked through the front door I saw it. A magnificent cork floor covered the entire main floor of the library. Master craftsmen were installing it in the late winter or early spring of 1911 as the library was dedicated on August 30, 1911.

I was walking on a floor that was installed 107 years earlier! While it was in need of a little tender loving care, the floor was still in remarkable shape after all that time. Imagine how many people had walked across that flooring in all those years! You can install it in your home knowing that it will outperform any other flooring you can purchase.

If you want a flooring material that is easy to maintain, will get you compliments from your friends and visitors, is easy on your back and legs should you have to stand up on it, cork should be on your radar. When you see the different styles, sizes, patterns, and colors, I’m convinced you’ll then say, “What other building materials don’t I know about?” Well, keep reading me each week and I’ll do my best to share them with you!

Column 1541

Storage Boxes for Hardware and Parts

assorted plastic storage boxes for hardware and parts

Storage Boxes with Clear Lids - These are just a few of the innovative parts storage boxes I use to keep everything organized in my workshop and garage. Are you a fisherman/woman? Do you make crafts as a hobby? These boxes are perfect for anyone who has lots of small things they need to have at their fingertips. Copyright 2023 Tim Carter

Storage Boxes for Hardware and Parts - Innovative & Useful

Author's Note: This column appeared in over 60 USA newspapers. If you read it there and are looking for all the photos of the many boxes, CLICK HERE. This opens to a new page. CLICK HERE for DeWALT organizer boxes. CLICK HERE for the orange Klein Tools Organizer Boxes.

I need you to be honest with me. In the past few months, how many hours have you spent looking for some nut, bolt, screw, wire nut, or any other small part that you KNOW you have somewhere in your garage, basement, or workshop?

How angry or frustrated did you get as each moment passed? In the dim light above your cluttered workbench you were opening and closing five, ten, or twenty small cardboard boxes, old plastic 35mm film canisters, or glass baby food jars, weren’t you? I know as I used to do the same thing.

Do you do crafts or partake in a hobby that has lots of small parts? Do you have lots of small beads, spools of thread, or electronic parts stored in poorly marked boxes? How much time have you wasted looking for something you need now?

Clunky 1x6 Pine Storage Boxes

Decades ago when I was a young carpenter/remodeler I discovered that each day I needed an assortment of nails and screws with me each day. Back then, you purchased these at a hardware store or lumber yard. They were often put in paper bags. If you bought 50 pounds at once, they came in a large cardboard box.

I decided to build my own storage containers that had segregated compartments. I used 1x6 pine lumber for the sides and 1/2-inch plywood for the top, bottom, and inner compartments. Empty, these boxes were somewhat heavy. Once you loaded them with assorted screws, nails, nuts, and bolts they were comparable to dumbbells used by bodybuilders.

A few years later, I was building a room addition for an engineer. He saw my boxes and said, “I think there’s a better way. Look at these plastic bins we use where I work.” The open containers were marvelous. They measured about 4 inches wide, 7 inches deep, and about 3 inches high. They were stackable. The best part is they fit perfectly on the inside shelves of my utility-body truck.

Akro Bins - Storage 2.0

I bought 100 of them and one weekend I transferred all my hardware, plumbing fittings, electrical connectors, etc. into the back of my truck. I was a traveling hardware store and always had what I needed, even in an emergency. I rarely had to stop work to go get the perfect part or fastener. The bins increased my productivity and added to my profitability.

But the bins had a drawback. If you knocked one over, the parts would scatter. If you needed multiple fasteners or parts, you’d have to carry into the house multiple bins. Dropping them was always a risk. Going over bumps or hitting deep potholes caused parts to jump out of the containers inside the back of my truck.

Modern Clear-Lid Storage Boxes

The good news is modern parts storage boxes have eliminated all of the above problems. Over the past few years, tool manufacturers have introduced a wide variety of storage boxes that I could have only dreamed of having.

The best design feature, in my opinion, is the tough crystal-clear top lid of these storage boxes. You can immediately see the exact part you’re looking for. Inside these boxes are small plastic bins that allow you to store different fasteners and parts. The inner bins come in all sorts of sizes too.

It gets even better. The lids of the boxes are designed so the things stay in the small bins. You can tumble the boxes around, tip them over when closed, or throw them down a hill and the contents inside each of the plastic bins stay put. The underside of the lids creates a seal encapsulating each of the parts bins.

Oh, did I say that many of these boxes are designed to interlock one on top of another as a system? Did I share that some have the ability to connect to an integral two-wheeled hand truck to transport them to a job site?

What astounds me is that each month or so a manufacturer unveils yet a newer model that fixes tiny bugs that might have been present with an earlier model. In the past two months I’ve outfitted my truck with two boxes that work perfectly to store plastic fittings I use to install PEX water tubing.

Just last week I took ownership of a very unique storage box that’s less than 2 inches thick. It’s about the size of a white-collar worker’s briefcase. It's the Klein Tools Short Component Box Full Width. The link opens in a new window. It’s perfect for tiny screws, fasteners, electronic parts, colorful beads, or any other small part or widget you might use in your hobby or craft.

There are so many of these cool and useful storage boxes it’s impossible to list them all here. I’ve created an exhaustive list of many of them with photos on my website. Just go to www.AsktheBuilder.com and type “storage boxes” into my search engine. You’ll be stunned at the variety. I guarantee you your days of frustration and anger will be over. Your workshop, hobby room, etc. will be so well organized and you’ll find things in seconds, not hours.

Column 1540

Opening a Remodeling Can of Worms

missing piece of osb subflooring in attic trusses

This unfinished space will soon become a man cave. Installing plumbing pipes, electric cables, and other mechanics often requires floors to be opened up like you’d do to a can of beans or worms. Copyright 2023 Tim Carter

Opening a Remodeling Can of Worms - Start with Great Plans

My start in the construction business happened in Cincinnati, Ohio in the early 1970s. The knowledge I obtained in those first few formative years doing remodeling work made me, in my opinion, a better builder.

Early on I deconstructed houses that were 100 years old. I was blessed to see how master craftsmen of old built things. Many were so proud of their work, they signed it. What a shame I didn’t take a photograph of each signature I uncovered on a wall stud or up in an attic!

With a new year on the threshold, one of your resolutions may be to start a remodeling project that’s been on the back burner. High housing prices may have shoved you out of the market and instead of moving to a bigger nicer home, you’re now forced to fulfill your dreams using your existing home.

My goal is to prevent you from suffering emotional and financial pain should you be on the cusp of starting a major remodeling project. The following tips should prevent sleepless nights, arguments with contractors, and anguish caused by cost overruns.

Each week I do consult phone calls with homeowners just like you. Often their remodeling projects have gone off the rails. Each and every time I perform an autopsy, I discover the root cause of the problem is a set of inferior plans. Bad plans open the door to a host of problems not the least of which is a lack of communication between you and the contractor.

You probably know what you want in your head. You’ve dreamed of the perfect new bathroom, kitchen, room addition, or whole-house remodel. You’ve looked at hundreds of stunning inspirational photos on different websites. But your plans are two-dimensional line drawings that communicate only a small part of what you want. Your first, and most important, job is to take the time to create an accessory document that contains the necessary photographs that show the contractor exactly what you want.

The plans and the photographs should be so good that the contractor never has to ask you any questions. It’s possible to achieve this goal. The best part is these two simple documents form the core of the contract between you and the contractor.

Your contract simply states that all the work will be done in accordance with the two documents and that you’ll pay the contractor in stages as the work progresses. Nothing about this is hard. Contracts can be simple one-page documents for the most part.

It’s important to realize remodeling work is messy. You should think about all this in advance. Lead paint should be on your radar if your house was built before or just after 1978. Demolishing, sanding, or scraping painted surfaces that are coated with lead paint can create serious health issues. Don’t rely on lead-paint test kits as you could get a false negative result. Lead paint may be lurking underneath coats of non-lead paint applied in the past forty years!

Are you doing a major kitchen remodeling job? If so, weeks before the job starts, I want you to do your dinner dishes in your bathtub. You’ll quickly discover that you’ll want to ask your contractor to set up a temporary kitchen in your garage or some other place in your home. This can be a bare-bones galley like you see on a commercial jet or in a submarine. The last thing you want is to be on your knees doing dishes in a tub.

What about a bathroom remodel job? I clearly remember one of the first jobs I ever did was a bath remodel for a friend. His wife was quite pregnant and we set up a temporary shower and sink in their basement over the floor drain. Fortunately, the original builder back in the 1920s had installed a toilet in the basement. This makeshift bathroom sufficed until I presented them with their spiffy new bathroom.

A major remodeling job may offer you a rare opportunity to make your home more comfortable. Many older homes had inferior heating systems that lacked sufficient return-air ducting for modern air conditioning. Currently the rage is the mini-split. While these work well with open floor plan homes, they don’t work well for isolated rooms. I know this for a fact because I slept in an ice-cold bedroom in a brand-new apartment building equipped with a mini-split.

A seasoned HVAC mechanic can cut a hole in the wall above bedroom doors and create a return-air pathway that connects to ductwork in a hallway soffit. This return air can often make it back to the air handler via a chase in a corner or in a closet. Talk to several different contractors, or me, if you need help figuring this out.

Good luck with your remodel and remember, you can’t invest too much time in great plans!

Column 1539

Electrical Hacks for Your Home

smart plug outdoor electric outlet and christmas lights

The odd white rectangle is a smart outlet. It is able to turn on and off via the WiFi in your home allowing you to control when power flows through a cable to lights, a fountain, or any other object powered by electricity. Copyright 2023 Tim Carter

Electrical Hacks for Your Home

Eight months ago a woman hired me to be her virtual general contractor. She was about to start to rebuild a home in remote northern Maine at the south end of Moosehead Lake. She’s the boots-on-the-ground person and we communicate via email, video calls, and texting.

Last week we started to discuss the rough-in electrical work on the large home. She intends to help the rough carpenter install all the boxes and cables. I knew she had never done this work before and I was unsure of the skill level of the carpenter. I’ve come to understand that many tradesmen in that part of Maine are cross-trained in several disciplines. It’s not easy to find skilled labor in a place where the closest road east of the main road leading into town is over 100 miles away!

I decided to share much of my conversation with you in case you plan to build a home soon, build a room addition, or do some remodeling. What you’re about to discover might make your life easier and safer.

It’s important to realize you can wire a house according to all the tenets found in the most recent edition of the National Electrical Code but the wiring job may not be perfect. This code is a standard published by the National Fire Protection Association. It’s all about your safety and reducing insurance losses. Keep in mind that this code, like all building codes, is a set of minimum standards. You can always exceed the requirements of a code.

Early in the discussion with the homeowner, I shared how I had incorporated a simple trick when wiring my daughter’s home four years ago. She lives in Downeast Maine where wicked Nor’easters cause frequent power outages. Having been through quite a few of these myself in central New Hampshire, I know that one of the most miserable aspects is the lack of lighting in an outage.

Did you know you can safely wire the light fixtures in your home on a few separate dedicated circuits? When the power goes out and your generator starts up, you can have light in all or many rooms. Lights don’t draw that much power and you’ll stop using flashlights or dangerous candles.

The woman and I next discussed the gauge of the wire in her new home. I suggested she consider using nothing but 12-gauge wire for all the normal circuits. In her case, it would cost less than $400 for this invaluable upgrade. Twelve-gauge wire is rated for 20 amps giving you an abundance of power on circuits that normally would be strained or pop the breaker when you plug in a tool such as a table saw.

I then shared all sorts of stories about how electricians and homeowners don’t think through the placement of switches and outlets. For example, my lovely wife is left-handed. She holds her hair dryer with her right hand and brushes her hair with her left hand. Placing the outlet on the right side of the sink prevents the dryer cord from crossing over the sink.

Next up I told her about my son-in-law’s command-center closet in the entrance hall of his home. This turned out to be a perfect place to hide his WiFi router, Internet modem and the controls for his interior sound speakers spread throughout the house. We placed outlets up high in strategic locations where we knew the electrical equipment would be on shelves.

I also installed three blank 1-inch-diameter conduits from the basement up into the closet terminating in blank 4-inch-square boxes. This allowed the cable TV technician to run his cables with ease. It also allows for fiber optic cables to be installed in minutes when it becomes available.

My son-in-law and I also installed two extra circuits in his attic and two down in his basement. The junction boxes were out in the open as required by code. Can you imagine how happy a future homeowner will be to discover they already have power installed for some future purpose? It took less than one hour to install all four of these circuits.

You may love to do holiday lighting but dread having to deal with the extension cords that might snake all across your lawn and the front of your home. I’ll bet you grumble each autumn wondering why an electrician didn’t install boxes at key locations. Imagine having a few switches inside your home that allow you to turn on and off outdoor lights without having to go outdoors on a cold night to plug in an extension cord.

The switching problem was solved several years ago with smart outlets. These very handy devices allow you to control outdoor and indoor power without having to use the old-fashioned timers. Smart outlets work via your WiFi and an app on your smartphone. You can program each outlet to follow different on-and-off schedules. Smart light bulbs are also available that do the same thing.

Think about all the things in your home you wish the electrician had done differently. I’d love to hear back from you. I can share your complaints in my latest book all about things your builder and subcontractors forgot to do. Just visit my Ask Tim page at www.AsktheBuilder.com to share your story.

Column 1538

Open Web Floor Trusses

open web floor trusses

These are open web floor trusses. Can you see how advantageous it is to use them? Do you see how they save time and money when installing ducts, pipes, and electric cables? Copyright 2023 Tim Carter

Open Web Floor Trusses - They're Superb

I’m sure you’ve driven across or seen large steel truss bridges that are made by combining any number of huge steel beams into right triangles that interconnect. When viewed from the side they look like open boxes with a diagonal piece of steel extending from one corner of each box to the opposite corner. Imagine how strong this design is to be able to hold countless tons of concrete roadways, cars, trucks, and even giant train locomotives!

Did you know this same technology can be used in your home, room addition, light-commercial building, etc? You can have these same trusses built using wood. I had my first experience with open web floor trusses made from standard 2x4s about forty years ago. Ever since that day when we installed these in a room addition, I was sold on the many benefits.

These magnificent trusses spanned almost 24 feet with no bearing walls beneath them. The homeowner wanted a giant basement recreation room with no silly support posts in the middle of the room.

The homeowner got involved in the design early in the planning stage. He was a giant of a man. He insisted that there be no bounce in the floor as he didn’t want to feel like he was walking on a spongy trampoline. The room above the basement recreation room was his master bedroom. He told me he wanted that floor to feel like he was walking on a thick concrete floor.

open web floor trusses home on mdi

These trusses are almost identical to the first ones I used back in the mid-1980s. These trusses form the second floor of my daughter's home in Downeast Maine. Copyright 2023 Tim Carter

The software used by the engineers at the truss manufacturing plant allowed the designer to make the trusses stiffer than an old-fashioned starched shirt collar. To achieve the desired strength with virtually no deflection, the trusses ended up being about 26 inches tall. The homeowner had a huge grin on his face when he walked across the plywood subfloor and there was no bounce whatsoever.

Another advantage floor trusses bring to the table is their flatness. Each one is a clone of the other. Normal dimensional floor joists are not always the exact same dimensions and often they have crowns in them. A crown is a hump in a floor joist. Problems arise when you install one floor joist that is flat next to a floor joist that has a 1/2-inch-tall crown. All of a sudden the floor is not flat once you apply the sub subflooring.

All of the mechanical trades love open-web floor trusses. You never have to drill any holes. HVAC installers and plumbers are able to install pipes and ducts just about anywhere in the trusses since the vast majority of the cross-section of each one is wide open space.

You don’t have this flexibility with other engineered floor joists. I draw plumbing riser diagrams each week for homeowners, architects, builders, and plumbers. Several times in the past year I’ve had to call the customer and tell them that it’s virtually impossible to pipe a bathroom as drawn by the architect. The plan calls for wooden truss joists and these products don’t allow holes to be drilled in specific locations close to where they rest on a bearing wall. You never ever have this problem with floor trusses.

To put some of this in perspective, allow me to share a more recent story. Months ago a woman hired me to be her virtual general contractor for a house that’s being rebuilt in the northern forests of Maine. I was able to get involved in the early stages of planning and recommended using floor trusses for the lower level of the house.

These trusses were very long and rested on the foundation walls and two huge steel i-beams. Because she couldn’t find a plumber she trusted, she talked me into installing all the plumbing in this house. The vast majority of the plumbing is on the first floor and the required pipes are nestled within the trusses.

I can tell you that the trusses have saved many days of labor since I didn’t have to drill through any joists. The open design allows for faster installation of the pipes. What’s more, without the tall trusses, many of the pipes would have had to hang below the ceiling in the garage. Normal dimensional lumber or i-joists wouldn’t have provided enough room to accommodate the pipes and the required pitch to get them to drain.

Using trusses saved this woman thousands of dollars and she gets to have a nice smooth drywall ceiling in the garage with no exposed pipes. The alternative would have been clumsy soffits built at an extra cost to hide the pipes that hung below traditional floor joists or engineered floor joists. The radiant heat installer and electrician are extremely happy. The trusses will allow them to work much faster.

Fire Fighters, Trusses, and Engineered Lumber

Firefighters dislike floor trusses, roof trusses, and just about all engineered lumber. Houses built with any engineered lumber product are frowned upon by firefighters because they fail and collapse much sooner in a fire than traditional dimensional lumber. When these products fail in a fire, firefighters can become one with the fire. The Internet is littered with sad stories of those who have died when floors and roofs have collapsed.

My suggestion to them is to stay outdoors and do their best to fight the fire. Everyone knows just about all firefighters would go into a burning home to save a person still alive even if the house had engineered lumber products. That said, sound judgment needs to be used to risk more loss of life if the fire is roaring and the chance of survival from heat or smoke is minimal or non-existent.

Fire departments can have the building department notify them each time a new house has these products. If it takes longer to extinguish the fire using a defensive posture, it just becomes a greater loss for the insurance company.

Firefighters know they have a moral obligation to rescue someone who is alive and trapped inside a burning building built with engineered lumber products. Should they do this, they do it at great personal risk.

Building departments are aware of all engineered lumber in new houses. They should notify fire departments of what is in each new home. This information can be logged and as a fire crew is in transit to a fire, they can check the database to decide how they're going to fight the fire to ensure the firefighters are as safe as possible.

Column 1537

Hold Down Anchors and Through Bolts

hold-down anchor bolting wood post to concrete pier

Hold-Down Anchor and Through Bolts - This is a hold-down anchor. You can use one to make a secure connection between a deck post and a concrete pier. After the photo was taken, the curved washer under the bolt was removed and turned upside down and sideways. These anchors work well to secure a garden shed preventing it from blowing away. Copyright 2023 Tim Carter

Hold Down Anchors and Through Bolts - Strong Connections

I live in rural New Hampshire. When I drive to town, I pass by a house that has a very tall outdoor shed. Every now and then impressive Nor’easters lash us with high winds and rain. We also get our fair share of powerful gales.

After one of these storms hit, I always wonder if the shed is going to be on its side or maybe in the neighbor’s side yard. I say this because I’ve been blown over before carrying a piece of plywood on a windy day.

Have you ever thought about the best way to secure a deck to a concrete pier? What about securing a large barn to a foundation? Tall barns present a huge face to wind and can blow over in a windstorm.

Vertical Hold-Down Anchors

There are all sorts of metal connectors you can use to ensure things you build don’t blow away. I happen to prefer vertical hold-down anchors that are bolted to a substantial concrete pier with a 5/8-inch diameter anchor bolt. Long galvanized lag bolts pass through the metal anchor and are tightened securely to the wood post leg.

It’s really important to use approved galvanized bolts that are rated for direct contact to treated lumber if you’re using these bolts outdoors. When these bolts get wet and the metal is in contact with treated lumber that contains copper as a preservative, a chemical brew is created that can corrode steel and iron that’s not protected. You studied this in high school chemistry class when galvanic reactions were discussed.

Roofing Nails are Not Structural Fasteners

I see mistakes made all the time when I view photographs sent to me by homeowners like you. One big one is using roofing nails to attach joist hangers on decks or inside a home. Roofing nails are not structural fasteners. They work well to secure shingles to roofs or tar paper to wall and roof sheathing but that’s about the extent of their usefulness.

It’s far better to use approved galvanized small structural screws to attach joist hangers to beams and ledger boards. A drill/driver can be used to drive these rapidly. If you’re going to use nails on the joist hangers, be sure to use approved heavy-duty structural nails that have the proper coating to prevent corrosion. You don’t want the nails to rust years from now and have the joist fail.

Structural Screws

Three-inch-long coated screws are easy to find at home centers and hardware stores. These are excellent fasteners to attach two pieces of wood that you never want to come apart. Over time, some nails can lose their holding power as lumber shrinks. A screw that’s not overdriven will hold the two pieces of wood together for many decades.

3 inch long timber screw

This is a structural timber screw. Note the bugle-shaped head. It also sports special knerels above the threads that drill a pilot hole for the screw shaft that doesn't have threads. Copyright 2023 Tim Carter

Large-diameter timber screws with large bugle-shaped heads are now mainstream. These can be used much like the lag bolts of old. Some have very aggressive coarse threads and are perfect for securing larger dimensional lumber together.

Lag Bolts

Lag bolts are heavy-duty screws. The usually have a hex head. I feel they're inferior because it's easy to overdrive them. When this happens, they lose a considerable amount of holding power.

lag bolt

This is a standard lag bolt. You'd use a flat washer up against the hex head. These come in a wide variety of diameters and lengths. In a marine environment outdoors, use stainless steel ones! Copyright 2023 Tim Carter

Through Bolts are Best

Through bolts are, in my opinion, the gold standard. A through bolt is different from a lag bolt or large timber screw. The through bolt requires that you drill a hole completely through the two pieces of lumber you want to secure to one another. Lag bolts only require a small-diameter pilot hole. Some timber screws require no pilot hole.

through bolt with washer and nut

This is an example of a through bolt. They come in a wide variety of diameters and lengths. You must use a washer at the nut end! Copyright 2023 Tim Carter

This method of connecting two things together is so good it's what's been used for well over 100 years. Ships, bridges, structural-steel building skeletons are all held together with through bolts. Years ago they were called rivets. Rivets were used to connect massive plates together for the hulls of ships like the Titanic and Lusitania. But for decades now actual high-strength steel bolts and nuts have been used to connect steel beams together.

The hole diameter should match the diameter of the bolt shaft. This requires you to hammer the bolt through the lumber. Once the bolt passes through the pieces of wood, you slide a flat washer over the threads then rotate a nut onto the threads. A wrench or socket on a ratchet is used to tighten the nut and pull the pieces of wood together.

This makes for a stronger connection than you’d achieve using a lag bolt. Lag bolts can be over-tightened by an inexperienced person. When this happens, they lose a significant amount of holding power. For a through bolt to fail, the entire bolt, washer, nut, or bolt head has to be pulled through the lumber. It’s either that or the bolt has to shear off. Through bolts offer great peace of mind and many structural engineers specify them.

Structural Engineer Inspection

I once had to use 1-inch-diameter through bolts to secure rafter ties at the bottom of rafters on a steep 17/12 pitch roof. The architect had specified these. Little did I know that he had arranged for an inspection by a local structural engineer once I had framed the roof.

One day the engineer showed up at the job site unannounced. I knew him and we were friends. He said, “Tim, do you mind if I borrow two of your adjustable wrenches?” I obliged and he proceeded to back off the nuts on a few random connections. He was testing to see if I had taken a shortcut by drilling a larger hole through the lumber. Trust me, it’s no easy chore to install long 1-inch bolts through a 1-inch hole in southern yellow-pine 2x12s!

I had drilled 1-inch holes and after inspecting about four bolts, he gave me an A+ grade on my framing. Make sure you do the same as I did each time you install through bolts. Don’t be tempted to take a shortcut. If you want to talk to me about structural problems or any other conundrum you face, just go to: https://go.askthebuilder.com/coaching

Column 1536