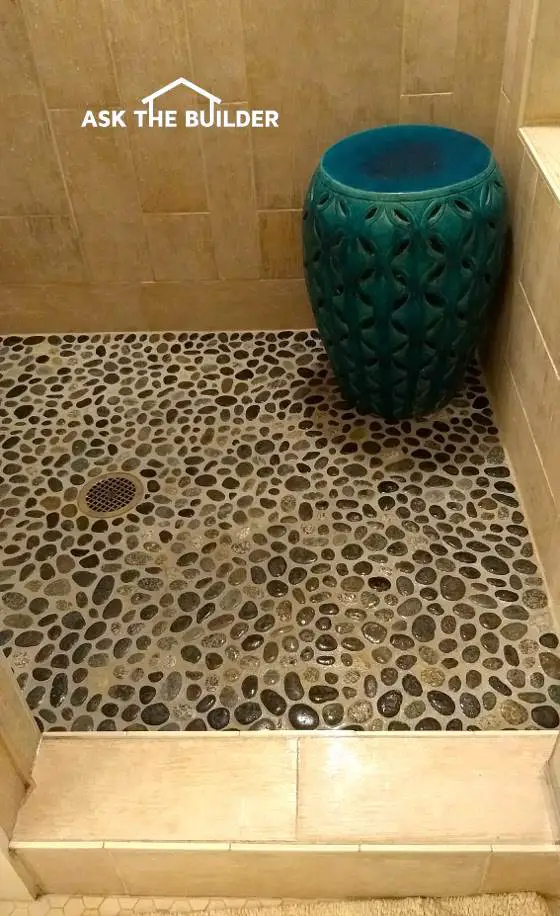
Pebble Shower Floor
Pebble Shower Floor TIPS
- Rounded pebbles massage better than flat ones
- Pebbles come in sheets for easy installation
- WATCH installation video below
- Set pebble sheets in thinset for permanent bond
- CLICK HERE to Get Tim's FREE & FUNNY Newsletter
DEAR TIM: I stayed at a rental home that had a pebble shower floor. The pebbles were both beautiful and rounded. I loved how they massaged my feet as I showered. I now want these pebbles in my own home. How hard is it to install a pebble shower floor? Are there different types and colors? Is it hard to install the grout between the pebbles? It must be hard to install the pebbles one at a time. Nancy McK., Bangor, ME
DEAR NANCY: I love pebble shower floors! My college degree is geology and whenever I can incorporate stone into my building projects I do it. At the present time I’ve been looking for small granite pebbles myself to use in a planned man-cave bathroom.
Related Links:
Ceramic Tile Installation Tips
Four step-by-step How To Install Sanded Grout videos
Pebble Shower Floor Adds Magic
The pebble shower floor material is available in quite a few shapes, colors, and textures. In addition you can purchase the pebbles either flat or slightly rounded.
The first thing to remember when considering this natural material is it can be used on just about any surface including shower walls, a kitchen counter backsplash and even as a countertop. By all means use flat smooth pebbles for countertops.
Free & Fast BIDS
CLICK HERE to get FREE & FAST BIDS from local tile setters who can install pebble tile.
Easy To Install
It’s not hard at all to install a pebble shower floor. For one thing, the pebbles come on sheets so you don’t have to install each pebble one at a time. Perhaps the best feature is each sheet interlocks with the one next to it but in such a way that the pattern appears random.

Here’s a magnificent pebble shower floor. The pebbles come in many different shapes, sizes and colors. (C) Copyright 2017 Tim Carter
It’s important to realize you use all the same tools and techniques installing the thin stone pebbles as you would install normal flat ceramic tile. Shower floor installations require a waterproof membrane or pan to channel each drop of water into the plumbing drain.
Pebble Shower Floor Installation Video
Watch this video to see how one tile setter puts a pebble shower floor in using thinset.
For this reason I prefer to install the pebbles on a concrete mud base just as the master tile setters of old did it. The cement mud is a mixture of coarse and medium sand and Portland cement. It resembles a stiff bricklayer’s mortar as you install it on the waterproof membrane.
Slope Pebbles To The Drain
Keep in mind the cement mud must have a gentle slope towards the shower floor drain so all water in the shower runs into the drain and doesn’t puddle. The installation of a cement mud floor requires considerable skill. By the same token it’s possible for a rookie to get it right if you just take your time.
I use thinset mortar to bond the pebble sheets to the cement mud floor. The thinset is waterproof and it contains Portland cement which helps create a permanent bond.
Cut Pebbles With a Diamond Wet Saw
Another key point is cutting the pebbles. Master tile setters years ago used nippers to make precise cuts to mosaic tile that resemble the pebbles. Nippers are a tool that pinch tile or the pebbles taking small bites of material. Cuts made with nippers take lots of time.
A diamond wet saw is the modern way to cut the pebbles. It won’t make sense for you to buy one for just one job. Try to rent one of these saws from a tool rental business near you.
CLICK HERE to get FREE & FAST BIDS from local tile setters who can install pebble tile.
You can minimize your rental cost by dry setting the pebbles in the shower floor without the thinset. Make all your cuts at once and don’t worry about setting the pebbles in wet thinset. Professional tile setters may have a helper feeding them cut pebbles so the pieces are set in wet thinset that has not skinned over.
You don’t need that pressure as a rookie. Make all your cuts in a few hours and then return the saw to keep your cost to a minimum. Once you get back home, mix up the thinset and install all the pieces at once with no delay.
Spread Thinset With Correct Trowel
Use the correct notched trowel to spread the thinset. The pebble manufacturer should have in the written instructions which sized trowel to use. A 1/4 by 1/4-inch square-notched trowel is the most common one to use.
You’ll use sanded grout to fill in the gaps between the pebbles. Sanded grout is a blend of Portland cement and fine silica sand. As a result, it’s extremely durable. The silica sand wears like iron.
Rounded pebbles look more interesting and will massage your feet, but it will require more grout than if you had used flat or sawn pebbles. Grout is not expensive, so if you like the rounded look and feel, then don’t worry about how much grout is required.
To summarize, before you select your pebbles, take lots of time to look at the wide variety of colors, shapes and textures. Some colors are striking and when coupled with a complimentary wall tile, you’ll have a shower worthy of a cover shot for one of the leading home magazines!
CLICK HERE to get FREE & FAST BIDS from local tile setters who can install pebble tile.
Column 1219