Pre Hung Interior Doors

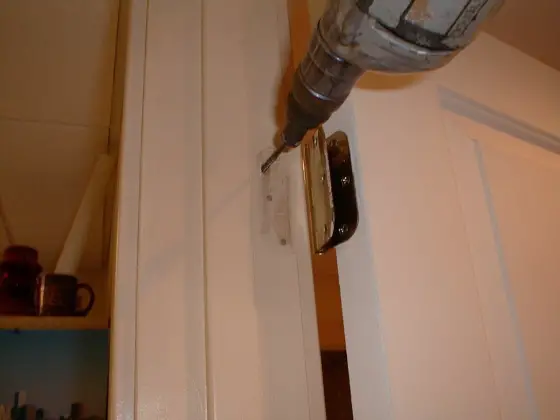
Prehung Doors | Here is a trick worth its weight in gold. Drive a 3-inch long screw behind the upper hinge through the door jamb and into the rough frame.
Prehung Interior Doors
DEAR TIM: I want to save some money on an upcoming project. It seems to me that I could successfully hang interior pre-hung doors if I had some guidance. Surely it can't be that hard to do. Of course I want the doors to operate smoothly from now on. What must I do to get trouble free door operation? Scott J., Tiffin, OH
DEAR SCOTT: Hanging interior prehung doors can be somewhat challenging. Don't underestimate the complexity of the job by any means. Fortunately it requires a few simple tools and a minimum of materials. Gather up a two and a four foot level, a hammer, a nail set, a screw-gun, a small square, a bundle of wood shims, a pound of eight penny finish nails and several three inch long drywall screws.
Prehung interior doors have much of the work done for you when you receive them. But there is still some work to do to get a perfect fit. Typically the manufacturer will leave some extra length on each of the side jambs. This is done on purpose so you can adjust for a floor that is out of level across the width of the door opening. This is the first thing to check for.
You do this with a two foot level. If the floor is out of level across the opening, this means that one of the jamb legs - the one on the high side of the opening - will need to be shortened. If you fail to make this adjustment in length, one of the jamb legs will end up floating in the air as you begin to secure the jambs to the rough opening.
The door slab itself is almost always perfectly square. The trick is to adjust and support the jamb in the rough opening so that the spacing between the jambs and the door is consistent all the way around the door. You start the job on the hinge jamb.
Use the four foot level to check the hinge side rough opening to see if it is plumb. If it is not, don't worry too much. If it is out of plumb, try to measure how much and where it is out of plumb. You will need to know this so that you can insert the proper amount of shims between the jamb and the rough opening as you start to hang the door.
(Editor's Note: Read about Don's issue with his door opening not being square.)
Position the door and the jamb in the rough opening and use one or two eight penny nails to temporarily tack the hinge jamb into place. Use the level and necessary shims to get the hinge jamb as plumb as possible. Be sure that the door jambs are flush with the finished wall surfaces on both sides of the wall. Ideally you would like to see the jamb project beyond the finished wall surface by about 1/32nd of an inch.
Slide shims as necessary between the jamb and the rough frame at each hinge location. Tack the door in place with additional nails and close the door. Stand on a ladder and check the top of the door to see if the spacing between the door and jamb is equal across the entire width. It should be a 1/8 inch gap or so. You should have a similar gap on the hinge side. If the top gap is not consistent, you need to readjust the length of one of the side jambs.
Once the gap on the hinge jamb and top is the same, you work on the latch or door knob jamb. Simply slide shims between the jamb and the rough opening until the gap is consistent and the door operates smoothly. If you are satisfied, nail the jamb in place at the shim locations. The space between the shims should not exceed 24 inches if possible.
The key to years of trouble free service is to screw the hinge jamb to the rough opening. Without screws, repeated operations can cause the door to sag slightly. I prefer to hide the screws behind the hinges. All you have to do is remove the screws from one hinge at a time on the door jamb. Gently pry the hinge out of the jamb and install a long drywall screw through the jamb into the solid wood of the rough opening. It is an old carpenter's trick I learned long ago.
Column 375
One Response to Pre Hung Interior Doors