Resurface a Cracked Concrete Driveway

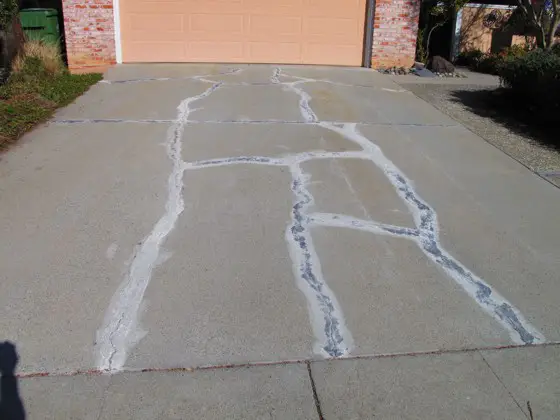
This cracked concrete driveway can be made to look like new with not too much effort. Photo Credit: Julie C., San Jose, CA
DEAR TIM: I have an older driveway that was installed forty-two years ago. It's still in pretty good shape other than some cracks. These have been patched and are unsightly. I was wondering if I could get an even appearance to the entire surface by applying a thin layer of colored thinset grout over the driveway. Do you think this would hold up to vehicular traffic? If so, how would you apply it to get a nice appearance? If not what other ideas do you have? Julie C., San Jose, CA
DEAR JULIE: I've got great news for you. Soon your driveway is going to look simply stunning. You can transform it's look using colored thinset if you choose, but I'd recommend a slightly different material that will give you the durability you're looking for.
Perhaps the best news of all is that this is a DIY project if you can muster up the help of three friends for just about half a day. Are you sitting down? The total cost of the project should be less than $500.00, and that includes the pizza and beverages you'll serve your work crew!
Your photo showing the existing cracks and discoloration was very helpful. For your new driveway to look superb for many years, you're going to have to do some extra work repairing the cracks. I suggest that you grind them out, use a pressure washer to remove as much debris as possible trying to open up the cracks the full depth of the slab.
Once you have achieved this, you need to use any number of concrete epoxy crack repair products to bond the broken slabs together. If you choose to skip this step, the cracks will telegraph through the new overlay you're going to apply.
It may take you one or two days to repair the cracks using epoxy, but it's worth it. The epoxy you choose to use will tell you how wide, how clean, and how deep the epoxy must penetrate to get a lasting repair.
When you're ready to resurface the driveway, I would highly recommend you apply a layer of cement stucco to the driveway. You can get by with a layer as thin as one-quarter inch in your case. This stucco is very similar to the thinset grout you were thinking of using, but it differs in that the sand particles are much larger.
Thinset usually contains a fine silica sand. To withstand vehicular traffic, you need larger sand particles found in coarse or medium sand. Traditional sand usually contains small rock particles that are different colors, and this will actually work to your benefit since you want a colored surface.
You'll use just sand and pure Portland cement to make the stucco, I'd recommend you blend one part Portland cement to three parts sand. To achieve the color you want, you just add dry shake pigments that are made for brick mortar or stamped concrete applications. You can purchase all these ingredients at a traditional building supply store that sells materials to bricklayers and stone masons.
I highly recommend that you make up a test batch of this stucco and pour it on a plastic sheet in your garage. You want to see what color it is after it cures in 30 to 45 days. The last thing you want to do is go to all this work and not be happy with the color.
To get the new stucco to bond permanently to the existing concrete you need to do what some old master masons taught me decades ago. They would apply a thin coat of cement paint to the existing driveway just before pouring the stucco. You make cement paint by mixing pure Portland cement with water to the consistency of regular paint.
Just before applying the cement paint, you need to spritz the existing driveway with water. Don't get the driveway too wet, just damp. Roll on the cement paint on the existing driveway just before you pour on the stucco mix. Don't allow the cement paint to dry. It's best to work on overcast cooler days. Sunny, windy days are the absolute worst conditions to do this job.
Use a magnesium float to finish the stucco. You can also apply a broom finish if you want a linear pattern. To achieve a great broom finish, you'll have to practice to discover the magic time when the stucco is ready to be stroked. Do it too early and you end up with a mess. Wait too long and the stucco gets too hard. If this happens, the broom bristles won't make a great impression.
I suggest you partake in some on-the-job training to hone your skills. In your photo, I see a small sidewalk between your drive and front door. Apply this same stucco first to this sidewalk, one small section at a time until you have a great feel for how long it takes for the stucco to hard enough to apply a finish.
The key to getting even color in the batches you mix is very controlled measuring of all ingredients. It's also very important that you add the same amount of water each time as you make each batch. Too much or too little water will affect the finished color of the batches.
Column 990
7 Responses to Resurface a Cracked Concrete Driveway