Tile Backsplash
DEAR TIM: I think a tile backsplash would be a great way to make my bathroom look better. Do you have to buy special backsplash tile? I'm open to any backsplash tile ideas including a glass tile backsplash. If you were installing a ceramic tile backsplash, how would you do it, and what are the pitfalls you would avoid? Do I need any special tools or skills to complete this job? Amber C., Newark, OH
DEAR AMBER: Tile backsplashes in bathrooms or kitchens are a great idea. I like them for all sorts of reasons. First, they are almost entirely waterproof. Furthermore, because tiles come in all sorts of textures, colors, patterns, etc. the tile backsplash can become a dramatic accent focal point. This is especially true when the countertop is natural stone like granite or marble or a man-made stone composite.
Special tile is not required for this job, but you may want to consider it. Regular flat tile that is common in many bathrooms will work, but you have to make sure you purchase a tile with a finished edge, or one that comes with special trim tile. Because ceramic tile is often one-quarter-inch thick, and sometimes thicker, the transition from tile to the wall surface must be made with trim tile or tiles that have a finished edge on at least one side of the tile. These special tile are frequently referred to as bullnose tiles. They have a soft rounded edge that is the same color as the tile.

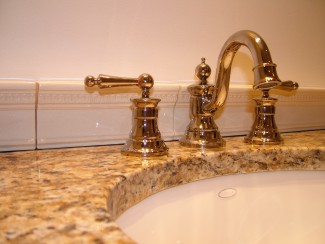
This tile backsplash was made with ornate cornice tiles, but installed in less than an hour. PHOTO CREDIT: Tim Carter
For a drop-dead gorgeous look, visit a specialty tile store that sells only tile and tile products. There you will probably discover special cornice tiles that resemble woodwork trim. The profile of the tile is nearly identical to woodwork where one edge of the tile is thicker. These tiles are often rectangles and sometimes come with special profiled outside corners in case you have an outside corner as part of your backsplash.
Before you choose the tile for your backsplash, slow down and think about the look you want to have for years. Ceramic tile, in my opinion, is not a short-term decorating product. Tile is often expensive, and requires a significant amount of work to install. If you purchase a high-quality tile, it can last for 50 or even 100 years. For this reason, you may want to pick a ceramic tile that will age gracefully. Some modern tile styles are transitional in my opinion. They may become dated in as few as 10 or 20 years.
There are all sorts of different installation tips depending upon what type of tile you select and the type of countertop it rests on. Recently I installed a stunning decorative tile backsplash on a granite top. Before I started, I caulked the joint where the granite met the wall. After the caulk was dry, I then sealed the granite well, especially the small area where the tile would overlap the granite.
You want a small one-sixteenth-inch space between the bottom of the tile and the countertop. This gap should be caulked with a caulk that matches the color of the grout. You can frequently find these specialty caulks at the stores that sell only ceramic tile. Some caulks are made to exactly match specific tile grout colors.
I prefer to grout the backsplash tile first. If any grout gets into the gap between the tile and countertop, remove it immediately with a toothpick. If you wait until the grout hardens, removing it is risky. One slip with the tool and you could scratch the tile or the countertop.
Most tile backsplashes can be installed with a minimum of tools. Regular tile can be scored and cut with a tile snapper. Fancy tiles must be cut with a wet diamond-blade saw. Miter joints for inside corners are best cut with this same saw. These special saws can be rented if a friend doesn't own one you can borrow.
As for skill, installing tile requires attention to detail and precise measuring ability. Tile grout joints for backsplashes vary from 1/16th inch up to and including 1/4 inch. When a cut tile is too short, the resulting fatter grout line is more visible than a lighthouse beacon on a clear night. Take your time both measuring, marking tile and cutting.
If the tile backsplash is for a vanity that is freestanding and neither side of the countertop touches a side wall, make sure the tile is centered on the countertop. There are two ways to center a tile backsplash. Once you mark the exact centerline of the countertop, lay the end of one tile on the centerline mark and place other tiles next to it with the proper spacing for the grout lines as you work just one direction towards the edge.
If the last piece of tile needs to be cut and it is less than one-half-inch wide, then adjust where the first tile starts. Instead of placing the end of the tile on the centerline, place the center the first tile directly over the centerline of the countertop. This will allow you to have a much larger piece of tile when you get to the edge of the countertop.
Column 679
3 Responses to Tile Backsplash